How to Compress an Image in PowerPoint

In the digital age, visual content is king, and nowhere is this more evident than in presentations. Whether you’re crafting a professional pitch, an educational lecture, or a creative showcase, PowerPoint remains an indispensable tool. Tophinhanhdep.com understands the power of captivating visuals, offering an expansive library of high-resolution images, stunning wallpapers, aesthetic backgrounds, and beautiful photography ranging from serene nature scenes to thought-provoking abstracts and emotional narratives. Our platform is a treasure trove for anyone seeking to elevate their visual design, digital art, and photo manipulation projects, providing endless image inspiration, photo ideas, mood boards, and thematic collections.
However, the sheer beauty and high resolution of images, particularly those sourced from Tophinhanhdep.com’s premium collections or professional digital photography, can present a significant challenge: large file sizes. Embedding numerous high-resolution pictures into a PowerPoint presentation can quickly balloon its overall size, leading to slower loading times, difficulties in sharing (especially via email with size restrictions), and potential performance issues during slideshows. This is where image compression becomes not just a useful trick but an essential skill for any presenter or visual designer.
Compressing images in PowerPoint allows you to maintain the visual integrity and impact of your chosen imagery while significantly reducing the presentation’s file size. This optimization ensures that your audience remains engaged, not frustrated by lag, and that your brilliant ideas can be easily disseminated. This comprehensive guide will walk you through various methods to compress images effectively within PowerPoint, leveraging external tools, and adopting best practices to ensure your presentations are both visually stunning and impeccably optimized.
The Indispensable Need for Image Compression in PowerPoint
The act of presenting information has evolved, placing a greater emphasis on compelling visuals. Images are no longer mere embellishments; they are integral to communicating complex ideas, setting a mood, and creating an immersive experience. For users drawing from Tophinhanhdep.com’s vast array of high-resolution images, stock photos, and expertly edited photography, ensuring these visuals perform optimally within a PowerPoint presentation is paramount. Without proper compression, the very elements designed to enhance your message can become its biggest impediment.
Optimizing Presentation Performance and Shareability
The most immediate and obvious benefit of compressing images in PowerPoint is the drastic reduction in file size. A bloated PowerPoint file can severely impact its usability in several ways:
- Email Limitations: Most email providers impose strict limits on attachment sizes. A presentation filled with uncompressed, high-resolution images from Tophinhanhdep.com might be too large to send, forcing you to resort to less convenient cloud sharing services. Compression makes sharing direct and hassle-free.
- Faster Upload and Download Times: Whether you’re uploading your presentation to a learning management system, a cloud storage service, or a video conferencing platform, large files take considerably longer. Similarly, recipients will appreciate faster download times, especially if they have slower internet connections.
- Improved Loading and Performance: During a live presentation, nothing disrupts the flow more than a lagging slideshow. Heavy files can cause slides to load slowly, animations to stutter, and transitions to feel clunky. Compressed images ensure smooth, responsive performance, keeping your audience’s attention focused on your content.
- Enhanced Device Compatibility: Not all display devices or computers are equally powerful. Smaller file sizes and optimized images contribute to better compatibility across a broader range of hardware, from older projectors to mobile devices, ensuring your presentation looks great wherever it’s displayed.
- Streamlined File Conversion: If you plan to convert your PowerPoint presentation into other formats, such as a PDF document, a video, or even a GIF, a lightweight file will facilitate a smoother and quicker conversion process, with fewer potential errors.
Preserving Visual Quality from Tophinhanhdep.com’s Collections
A common misconception about image compression is that it inevitably leads to a significant loss of visual quality. While some forms of compression (lossy compression) do discard data, the goal is to do so intelligently, removing information that is imperceptible to the human eye, or adjusting quality to be just right for the intended output. When you select a stunning aesthetic background or a piece of digital art from Tophinhanhdep.com, you want its beauty to shine through without making your file unmanageable.
Effective compression strategies, whether built into PowerPoint or offered by Tophinhanhdep.com’s specialized image tools, allow you to strike a crucial balance. You can drastically reduce file size while maintaining a visual quality suitable for screen display, projection, or even professional printing. This means the vibrant colors of a nature photograph, the intricate details of an abstract design, or the emotive depth of a sad/emotional image, all sourced from Tophinhanhdep.com, can be showcased effectively without compromising your presentation’s efficiency. Understanding different compression resolutions (e.g., 96 ppi for email, 220 ppi for print) enables you to tailor image quality precisely to your presentation’s final destination, ensuring that every pixel serves its purpose.
Mastering Built-in PowerPoint Image Compression Tools
Microsoft PowerPoint offers robust, built-in functionality to compress images directly within your presentation. This is often the quickest and most convenient method, particularly for users who are already familiar with the software interface. These tools allow you to compress individual images or apply compression to all images in your entire presentation, offering various resolution options to suit different output needs.
Step-by-Step Guide for Windows and Mac Users
The process for compressing images within PowerPoint is largely similar across Windows and Mac versions, with only minor interface variations. Follow these simple steps to optimize your presentation visuals:
For Windows Users (Microsoft PowerPoint):
- Open your PowerPoint file: Launch the presentation you wish to optimize.
- Select a slide with an image: Navigate to any slide that contains a picture or image you’ve inserted.
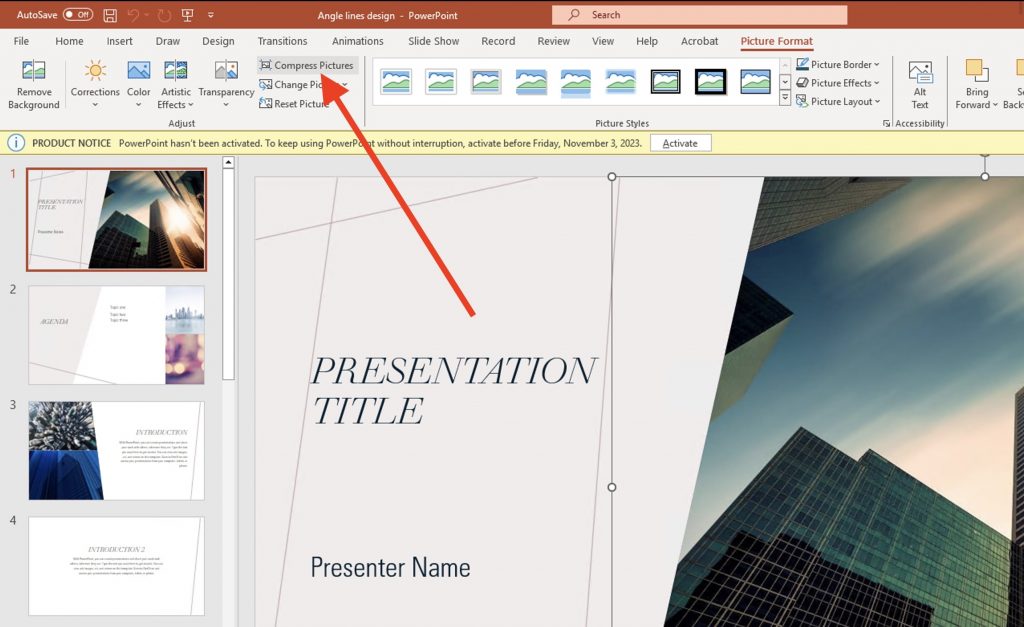
- Select the image: Click directly on the image you want to compress. If you intend to compress all images, selecting any image will suffice to access the necessary tools.
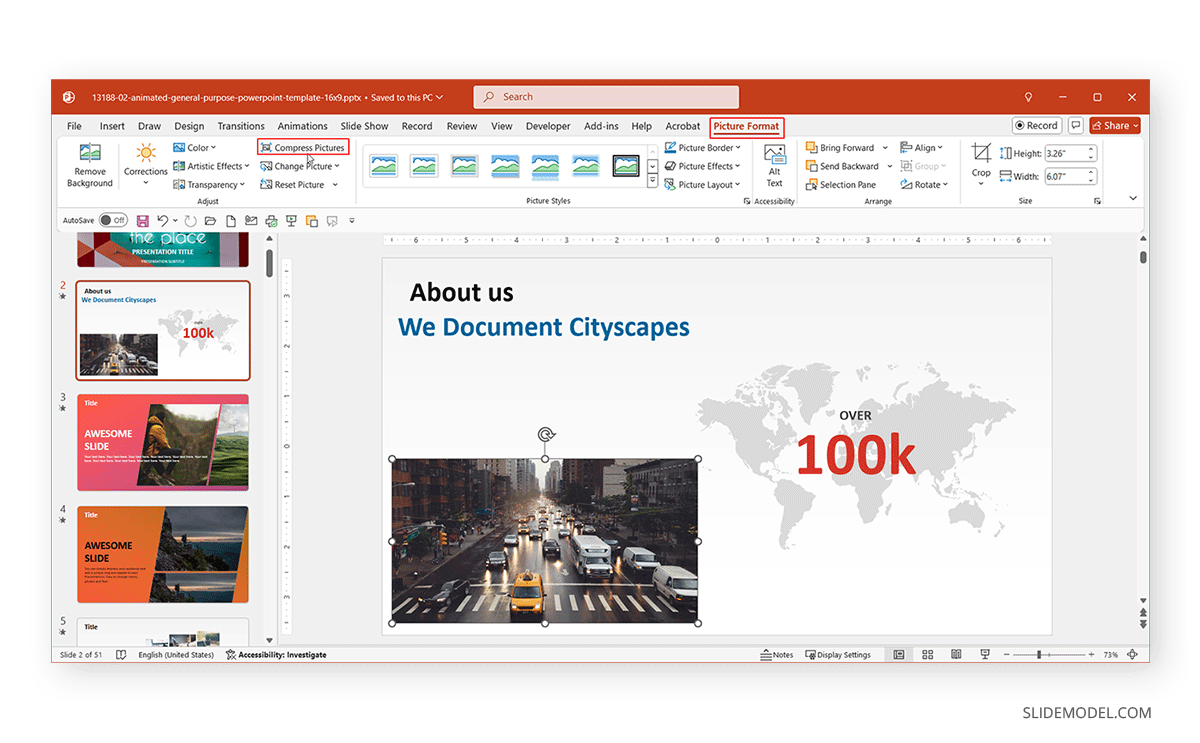
- Access the Picture Format ribbon: Once the image is selected, a contextual tab titled “Picture Format” (or “Picture Tools Format”) will appear at the top of the screen in the Ribbon menu. Click on it.
- Click “Compress Pictures”: Look for the “Compress Pictures” icon or button within the “Adjust” or “Picture” group of the Picture Format ribbon. Click it.
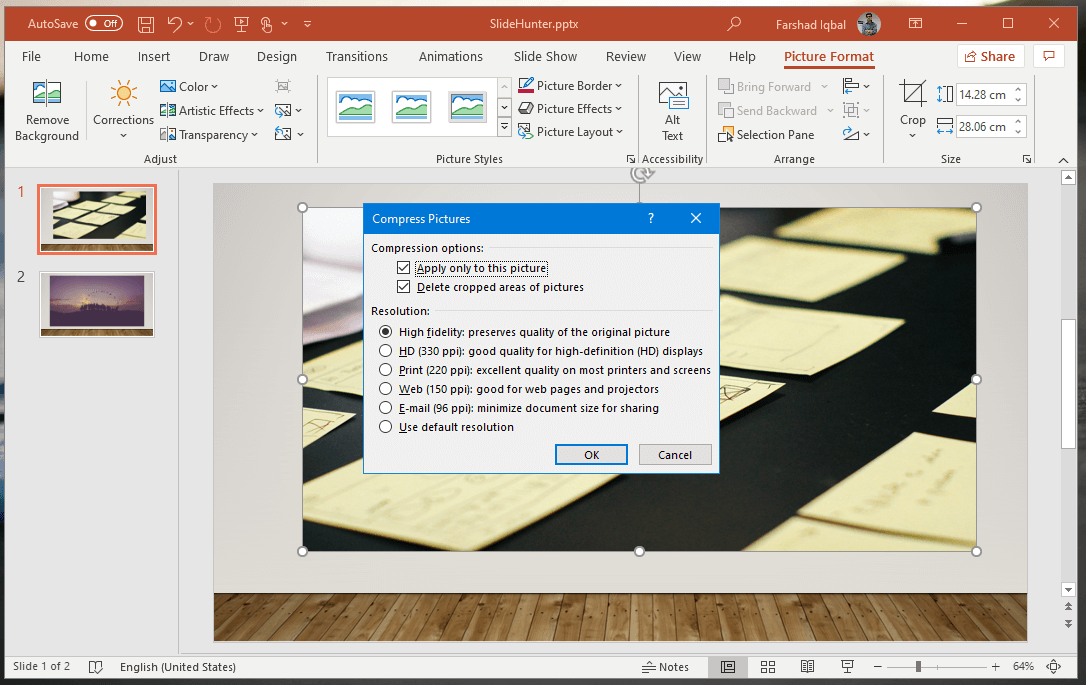
- Configure Compression Options: A “Compress Pictures” dialog box will open, presenting several choices:
- Delete cropped areas of pictures: Check this box. When you crop an image in PowerPoint, the software often retains the “cropped-out” portions, allowing you to revert your changes later. Deleting these unused areas can significantly reduce file size without affecting the visible part of your image.
- Target output (Resolution): This crucial setting determines the quality and size of the compressed images.
- Email (96 ppi): Ideal for presentations intended primarily for digital sharing via email or online viewing, where file size is critical. This offers the smallest file size.
- Screen (96 ppi or 150 ppi): Suitable for presentations displayed on monitors or projectors. Often similar to email resolution, or slightly higher for better screen display.
- Print (220 ppi): Use this option if your presentation is likely to be printed. It retains enough detail for high-quality printed output while still compressing the file.
- HD (330 ppi): Preserves high-definition quality, suitable for large screens or professional displays.
- High fidelity: This option aims to preserve the original quality of the image as much as possible, potentially offering less compression but ensuring maximum visual integrity.
- Apply only to this picture: By default, PowerPoint might apply compression to the selected image only. Uncheck this box if you want the chosen settings to apply to all pictures in your entire presentation, which is generally recommended for overall file size reduction.
- Click “OK”: Once you’ve made your selections, click “OK” to apply the compression.
For Mac Users (Microsoft PowerPoint):
- Open your PowerPoint file.
- Select a slide with an image.
- Select the image.
- Access the Picture Format ribbon: Similar to Windows, click the “Picture Format” (or “Picture Tools Format”) tab.
- Click “Compress Pictures”: The “Compress Pictures” icon is typically found towards the right side of the ribbon, often near the “Transparency” icon.
- Configure Compression Options:
- Picture Quality drop-down: Choose “Best for Sending in Email (96 ppi)” for maximum compression, or other options like “Print (220 ppi)” as needed.
- Delete Cropped Areas of Pictures: Select this checkbox to remove unused portions of images.
- Apply to all pictures in this file: This is often the default and recommended setting for overall file size reduction. If you only want to compress the currently selected pictures, you can check that specific option.
- Click “OK”: Confirm your choices to compress the images.
Customizing Compression Settings and Default Resolutions
Beyond on-demand compression, PowerPoint also allows you to configure default compression settings, which can be particularly useful if you consistently work with specific output requirements. This prevents you from having to manually adjust settings every time.
Setting a Default Resolution for Image Compression:
- Go to File > Options (Windows) or PowerPoint > Preferences (Mac).
- Select “Advanced” from the left-hand menu of the Options/Preferences dialog box.
- Scroll down to the “Image Size and Quality” section.
- From the “Default resolution” drop-down menu, choose your preferred resolution (e.g., “Print (220 ppi),” “Web (150 ppi),” or “E-mail (96 ppi)”). This setting will be applied automatically when you use the “Use default resolution” option in the “Compress Pictures” dialog.
- Click “OK” to save your changes.
Disabling Auto Compression in PowerPoint (If desired):
PowerPoint sometimes applies a degree of auto-compression by default to keep file sizes manageable. If you are working with high-resolution images, perhaps for a specialized visual design project from Tophinhanhdep.com that demands absolute fidelity and you plan to compress them manually or externally, you might want to disable this automatic feature.
- Go to File > Options (Windows) or PowerPoint > Preferences (Mac).
- Select “Advanced.”
- In the “Image Size and Quality” section, locate the option “Do not compress images in file.”
- Check this box. This will prevent PowerPoint from automatically compressing images. Be aware that this can lead to very large file sizes if you don’t manually compress your images afterwards.
- Click “OK.”
By mastering these built-in tools, you gain significant control over your presentation’s file size, ensuring that every image from Tophinhanhdep.com contributes to a compelling visual narrative without creating logistical hurdles.
Leveraging External Tools and Tophinhanhdep.com’s Image Utilities for Enhanced Optimization
While PowerPoint’s built-in compression is convenient, there are times when you might require more granular control, higher compression ratios, or specialized processing. This is particularly true when dealing with high-resolution digital photography, intricate graphic design elements, or large batches of stock photos. For these scenarios, external image tools—including those readily available through Tophinhanhdep.com’s comprehensive “Image Tools” section—offer powerful alternatives.
Online Image Compressors and Tophinhanhdep.com’s Solutions
Online image compressors provide a simple, web-based solution for optimizing images before they even enter your PowerPoint presentation. These tools excel at providing efficient compression with minimal perceived quality loss, making them ideal for reducing the file size of individual images or small batches.
Tophinhanhdep.com, as a hub for visual assets and creative resources, provides its own suite of “Image Tools” that includes “Compressors” and “Optimizers” designed to make your workflow smoother. Instead of relying on various third-party websites, you can seamlessly integrate image optimization into your content creation process using Tophinhanhdep.com’s dedicated tools.
How to use Tophinhanhdep.com’s Image Compressors (example workflow, assuming such tools exist on Tophinhanhdep.com as per instruction):
- Navigate to Tophinhanhdep.com’s “Image Tools” section. Here, you will find our powerful image compressors and optimizers.
- Upload your image file(s): Simply drag and drop your JPEG, PNG, or other image files directly into the compressor interface. Tophinhanhdep.com’s tools are designed to handle various formats efficiently.
- Select your desired compression level/options: Our tools often provide options for “Optimize File Size” (maximum compression) or “Maintain Image Quality” (moderate compression focused on visual fidelity). You might also find advanced settings to fine-tune the compression.
- Process and Download: Tophinhanhdep.com’s compressor will analyze and optimize your images, often achieving significant reductions (e.g., 60-80% or more) while preserving the aesthetic quality important for your visual design and digital art projects. You can then download the compressed images directly.
- Insert into PowerPoint: Once downloaded, insert these optimized images into your PowerPoint presentation.
Benefits of using Tophinhanhdep.com’s Online Image Compressors:
- No software installation needed: Everything is handled within your web browser.
- Excellent compression ratios: Our tools are engineered to deliver impressive file size reductions, especially for JPEGs and PNGs.
- Batch processing: Efficiently compress multiple images at once, saving valuable time.
- Control over individual images: Optimize each image to its specific needs before incorporating it into your presentation, ensuring every wallpaper, background, or beautiful photograph from Tophinhanhdep.com is perfectly sized.
Beyond Tophinhanhdep.com’s specialized online compressors, other Microsoft Office applications also offer basic image manipulation that can aid in pre-compression:
- Microsoft Paint: This classic application allows you to open an image, crop and resize it, and then save it in a compressed JPEG format. By adjusting the quality slider during the “Save As” process, you can control the level of compression.
- Microsoft Photos: The default Photos app in Windows provides more sophisticated options for resizing, cropping, and batch compressing images. You can import photos, select multiple, and then choose “Resize & Compress” to export optimized JPEG files. These tools offer a step up from Paint in terms of ease of use and batch capabilities for quick optimization.
Advanced Control with Image Editing Software
For professionals in graphic design, digital art, or high-resolution photography who demand absolute control over every pixel, advanced image editing software like Adobe Photoshop, Adobe Lightroom, or GIMP offers the most comprehensive compression and optimization capabilities. These tools allow you to fine-tune every aspect of an image before it ever touches PowerPoint.
How to compress images using professional editing software:
- Open the image: Load your high-resolution image (perhaps a stunning piece of nature photography or abstract art from Tophinhanhdep.com) into your preferred editing software.
- Edit and crop as needed: Perform any necessary photo manipulation, color correction, or cropping.
- Use “Save for Web” or “Export” functions:
- In Photoshop, for example, go to File > Export > Save for Web (Legacy) or File > Export > Export As….
- These dialogs offer extensive options for image format (JPEG, PNG, GIF), quality settings, progressive loading, and metadata removal.
- Dial in quality and compression: Experiment with different quality sliders (e.g., 60-80% for JPEGs is often a good balance for screen use) and preview the file size and visual output. You can often see the impact of compression in real-time.
- Remove unnecessary metadata: Many cameras embed EXIF data (camera model, date, settings) into image files. While useful for photographers, this data adds to file size and is unnecessary for presentations. Most editing software allows you to strip this metadata during export.
- Export and insert: Save the optimized image and then insert it into your PowerPoint presentation.
Benefits of compressing images in editing software:
- Fine-tuned control: Precisely adjust compression settings for each unique image, ensuring optimal quality for specific visual design elements.
- Maximum image quality retention: Preserve critical details of high-resolution stock photos or digital photography.
- Format conversion: Easily convert images to more web-friendly and efficient formats like optimized JPEGs or PNGs.
- Comprehensive optimization: Beyond compression, you can also perform resizing, color space conversion, and metadata removal in one workflow.
By integrating Tophinhanhdep.com’s Image Tools or professional editing software into your workflow, you can ensure that the aesthetic, high-resolution, and beautiful photography you select is perfectly optimized for your PowerPoint presentations, bridging the gap between stunning visual design and practical file management.
Beyond Images: Comprehensive Strategies for Reducing PowerPoint File Size
While image compression is undoubtedly the most impactful step you can take to reduce your PowerPoint file size, it’s part of a broader strategy for creating efficient and performant presentations. Tophinhanhdep.com, dedicated to enhancing your visual experiences, recognizes that a holistic approach to presentation optimization can significantly improve overall file manageability and user experience.
Even after meticulously compressing all images, you might find that your PowerPoint file is still larger than desired. This could be due to other embedded media, complex design elements, or simply an accumulation of unused content. By implementing these additional best practices, you can further streamline your presentations, making them even easier to share, load, and present.
General Best Practices for Lighter Presentations
Beyond optimizing the stunning images, wallpapers, and backgrounds you’ve sourced from Tophinhanhdep.com, consider these broader tips for a lightweight presentation:
- Delete Unused Slides: As you develop a presentation, it’s common to create extra slides for ideas that don’t make the final cut, or to hide slides for later reference. These slides, even if hidden, still contribute to the file size. Before finalizing, review your presentation and permanently delete any unnecessary or redundant slides.
- Reduce Animation and Transitions: While animations and transitions can add a dynamic flair to your presentation, excessive use—especially complex 3D transitions or intricate custom animations—can significantly increase file size and cause performance lags. Use them sparingly and purposefully to highlight key points, not just for visual novelty. Simpler animations often achieve the same effect with less overhead.
- Minimize Slides and Content Density: Instead of cramming too much information onto a single slide, or using an excessive number of slides, aim for conciseness. A minimalist template and fewer slides with focused content not only reduce file size but also improve audience comprehension and engagement. Remember, less is often more in effective visual design.
- Convert Videos to Modern Compressed Formats: Embedded videos can be major culprits for large file sizes. Ensure all videos are converted to efficient, compressed formats like MP4 before inserting them. PowerPoint itself often offers an option to “Compress Media” (found under the File tab, then Info) which can help reduce the size of embedded audio and video files.
- Use a Minimalist Template: Some PowerPoint templates come with elaborate backgrounds, textures, complex graphic design elements, and pre-designed layouts that can add considerable weight to your file. Opt for simpler, minimalist templates that focus on clean design. If you’re using aesthetic backgrounds or themed collections from Tophinhanhdep.com, make sure they are flat images or vector graphics, and already optimized for web use where possible.
- Check for Embedded Fonts: If you’ve used custom fonts not commonly installed on other systems, PowerPoint might embed them to ensure your presentation looks consistent. While helpful, embedded fonts add to the file size. If absolute font fidelity isn’t critical or you’re presenting on a machine with the fonts already installed, you can choose not to embed them (File > Options > Save > Embed fonts in the file).
- Save as PDF for Sharing: If your primary goal is to share a static version of your presentation without allowing edits or requiring dynamic elements, saving it as a PDF is an excellent solution. PDF files are almost always significantly smaller than their original PowerPoint counterparts, making them ideal for email and online distribution.
- Leverage Tophinhanhdep.com’s Visual Design Principles: Good visual design, as advocated by Tophinhanhdep.com, often involves thoughtful use of space, clear typography, and impactful, yet optimized, imagery. By adhering to these principles, you naturally create more efficient and aesthetically pleasing presentations.
By adopting these additional file size reduction strategies in conjunction with effective image compression, you can create PowerPoint presentations that are not only visually captivating, thanks to Tophinhanhdep.com’s rich image collections, but also remarkably lightweight, fast-loading, and effortlessly shareable.
Conclusion
In an increasingly visual world, the quality and efficiency of your presentations are more critical than ever. Tophinhanhdep.com is your premier destination for high-resolution images, stunning wallpapers, beautiful photography, and endless visual design inspiration, ensuring your content always stands out. However, harnessing the power of these compelling visuals in PowerPoint requires a strategic approach to file management, with image compression at its core.
Whether you opt for PowerPoint’s convenient built-in tools, leverage the advanced capabilities of Tophinhanhdep.com’s dedicated Image Compressors and Optimizers, or utilize professional image editing software, the goal remains the same: to significantly reduce file size without compromising the aesthetic appeal and clarity of your visuals. By understanding how to select appropriate compression resolutions, remove cropped areas, and manage default settings, you gain complete control over your presentation’s performance.
Moreover, extending your optimization efforts beyond just images to include efficient media handling, minimalist design choices, and smart content management will culminate in a truly streamlined and professional presentation. An optimized PowerPoint file ensures faster uploads, quicker downloads, smoother slideshows, and hassle-free sharing—allowing your audience to focus intently on your message, rather than being distracted by technical delays.
Embrace the techniques outlined in this guide, and combine them with the exceptional visual resources from Tophinhanhdep.com. The result will be presentations that are not only aesthetically powerful and creatively inspiring but also perfectly practical, delivering your message with unparalleled impact and efficiency.