How to Compress an Image on Mac: Your Ultimate Guide to Optimizing Visuals with Tophinhanhdep.com

In today’s visually-driven world, images are everywhere. From stunning wallpapers and backgrounds that personalize our devices to high-resolution photography capturing life’s most beautiful moments, visuals play a central role. However, as camera technology advances and screen resolutions soar, the photos and screenshots we capture often come with a significant downside: massive file sizes. These hefty files can quickly consume valuable storage on your Mac, iCloud, or external SSDs, and dramatically slow down sharing via messages, email, or social media. They can also impede website performance for digital photography and graphic design projects, impacting user experience and SEO.
At Tophinhanhdep.com, we understand the critical balance between image quality and file size. Our platform is dedicated to providing comprehensive resources for everything visual, from abstract art and nature photography inspiration to advanced image tools and visual design insights. This guide is specifically crafted to help Mac users efficiently compress images, ensuring your stunning visuals remain vibrant while becoming more manageable for storage, sharing, and web optimization. We’ll explore various free and easy-to-use methods, both built into macOS and through expert-recommended tools found right here on Tophinhanhdep.com, allowing you to save space without compromising the aesthetic appeal of your images.
Understanding Image Compression: Why and How it Works
Image compression is the process of reducing the file size of an image while trying to retain as much visual quality as possible. This is a crucial skill for anyone working with digital media, from casual users sharing family photos to professional photographers and graphic designers managing extensive portfolios. The goal is to make images lighter without sacrificing their impact, whether they are high-resolution stock photos or creative ideas for your next mood board.
Key Factors Influencing Image File Size
The size of an image file isn’t arbitrary; it’s determined by several technical characteristics. Understanding these factors is the first step toward effective compression, allowing you to make informed decisions about how to optimize your visuals.
- Image Dimensions (Resolution): This refers to the width and height of an image in pixels. A 1920 x 1080 pixel image, for instance, will inherently have a larger file size than a 720 x 480 pixel image, simply because it contains more individual pixels. More pixels mean more data to store. For digital photography, where detail is paramount, larger dimensions are common, but often need scaling for web use.
- Image Format: The file format plays a significant role in how image data is stored and compressed.
- JPEG/JPG: This format uses lossy compression, meaning it discards some image data permanently during compression. It’s excellent for photographs with continuous tones and variations in color, offering a good balance between file size and perceived quality. It’s widely supported and ideal for web images and sharing.
- PNG: This format uses lossless compression, preserving all original image data. It’s preferred for images with sharp edges, text, or transparent backgrounds (like logos or screenshots with text), as it avoids artifacts that can appear with JPEG compression. However, PNG files are typically much larger than JPEGs for photographic content.
- HEIC/HEIF: Apple’s High-Efficiency Image File (HEIC) format offers superior compression to JPEG, often halving the file size while maintaining similar or better quality. It’s increasingly common on iPhones and Macs, but its compatibility isn’t as universal as JPEG or PNG yet.
- JPEG-2000: An improved version of JPEG, supporting both lossy and lossless compression. It can offer better quality at similar file sizes to JPEG but has limited compatibility across browsers and applications.
- WebP: A modern format from Google that offers excellent lossy and lossless compression for web images, often resulting in smaller file sizes than JPEG and PNG for comparable quality. While gaining traction, it’s not yet universally adopted.
- Image Content and Color Depth: The complexity of an image also affects its size. An image with many intricate details, a wide range of colors, or subtle gradients will generally be larger than an image with large areas of solid, uniform color. Color depth (the number of bits used to represent the color of a single pixel) also contributes; higher color depth means more information per pixel.
- Camera Type and Settings: Images captured by high-megapixel cameras (e.g., modern iPhone main cameras) will naturally have larger file sizes than those from lower-resolution cameras (e.g., front-facing cameras or webcams) due to the sheer amount of data they record. Using flash can also sometimes increase file size by introducing more light information.
- Screen Resolution (for Screenshots): When taking screenshots on a Retina display Mac, the higher pixel density and resulting image dimensions lead to significantly larger screenshot files compared to non-Retina displays.
The Quality vs. Size Conundrum
Compressing images inherently involves a trade-off. Lossy compression (like JPEG) achieves greater file size reduction by permanently discarding some image data. While this often results in imperceptible changes to the naked eye for most users, pushing the compression too far can lead to visible artifacts and a noticeable degradation in quality. Lossless compression (like PNG) reduces file size by identifying and eliminating redundant data without discarding any original information. This preserves image quality perfectly but usually results in less dramatic file size reductions compared to lossy methods.
Finding the optimal balance is crucial. For web content, smaller files are preferred for faster loading times and improved user experience, while for archiving high-resolution photography or digital art, quality preservation is key. Tophinhanhdep.com encourages users to experiment with different compression levels and formats to find what works best for their specific needs, whether it’s optimizing beautiful photography for online galleries or creating aesthetic backgrounds without heavy file loads. Additionally, removing metadata (EXIF data) can offer minor file size reductions without any quality loss, a technique often highlighted in Tophinhanhdep.com’s guides on image optimization.
Native macOS Tools for Image Compression
One of the most convenient aspects of managing visuals on a Mac is the suite of powerful, free tools built directly into the operating system. These tools allow for efficient image compression without the need for additional software, making them perfect for everyday tasks and quick optimizations. Tophinhanhdep.com frequently guides users through these native options, ensuring everyone can master their digital assets.
Mastering Preview for Single and Batch Compression
The Preview app, often underestimated, is a versatile image editor and PDF viewer that comes pre-installed on every Mac. It’s an invaluable tool for reducing image file sizes, whether you’re working with a single image or a collection of high-resolution stock photos.
Compressing a Single Image in Preview:
- Open the Image: Double-click your image file, or right-click and choose “Open With” > “Preview.”
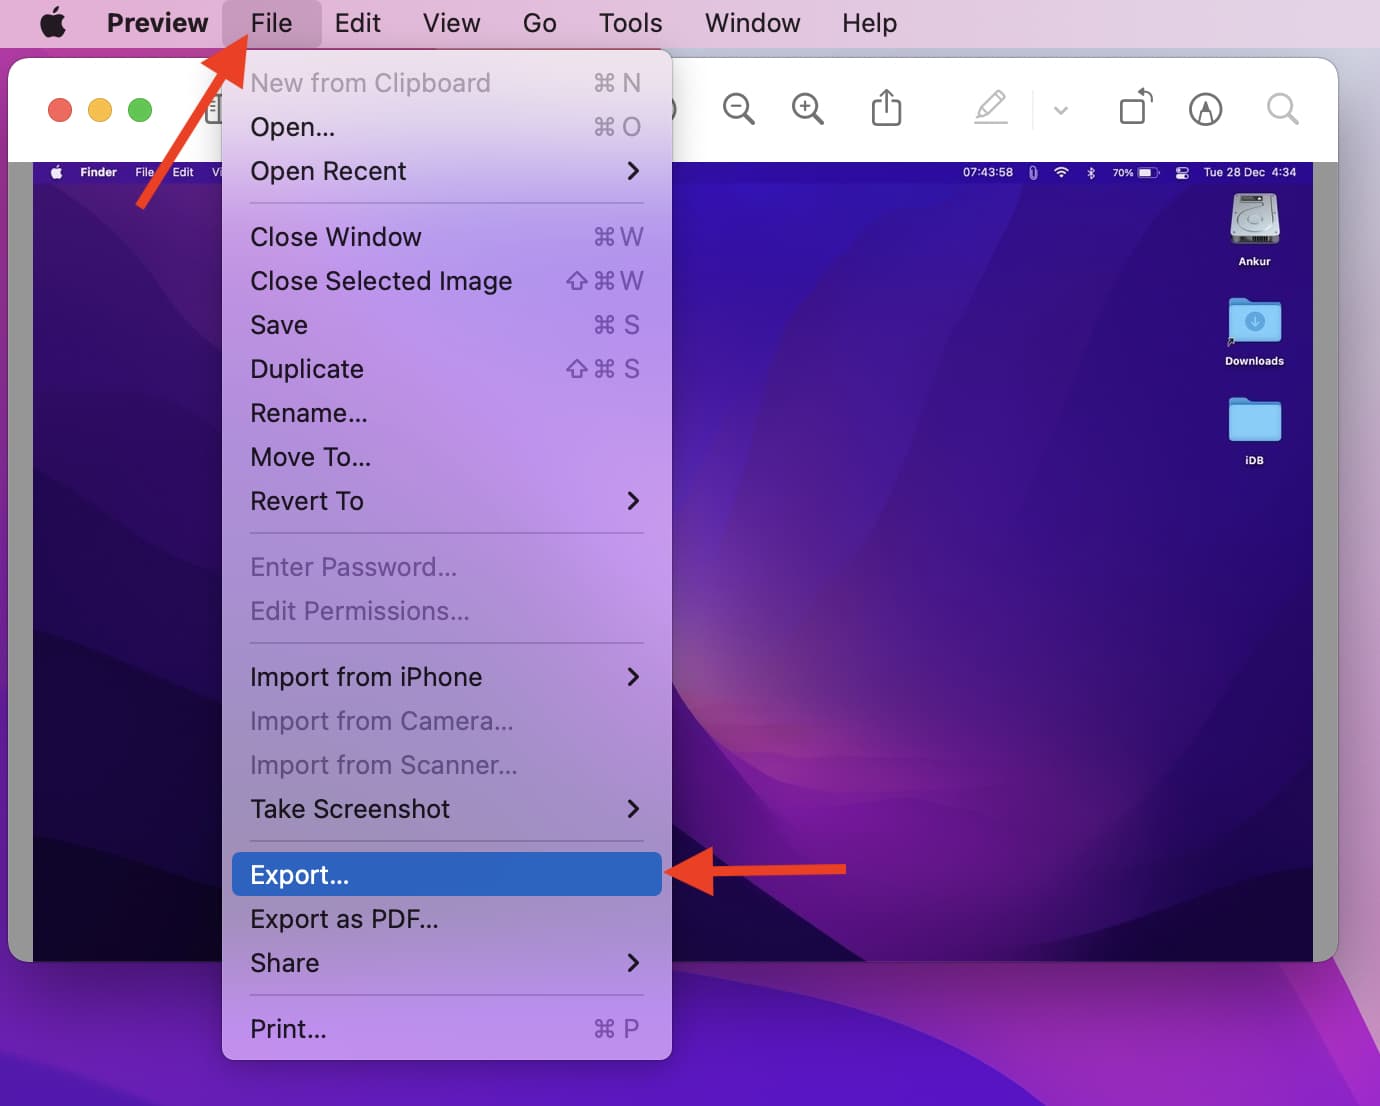
- Access Export Options: From the top menu bar, click “File” > “Export.”
- Choose Format and Quality:
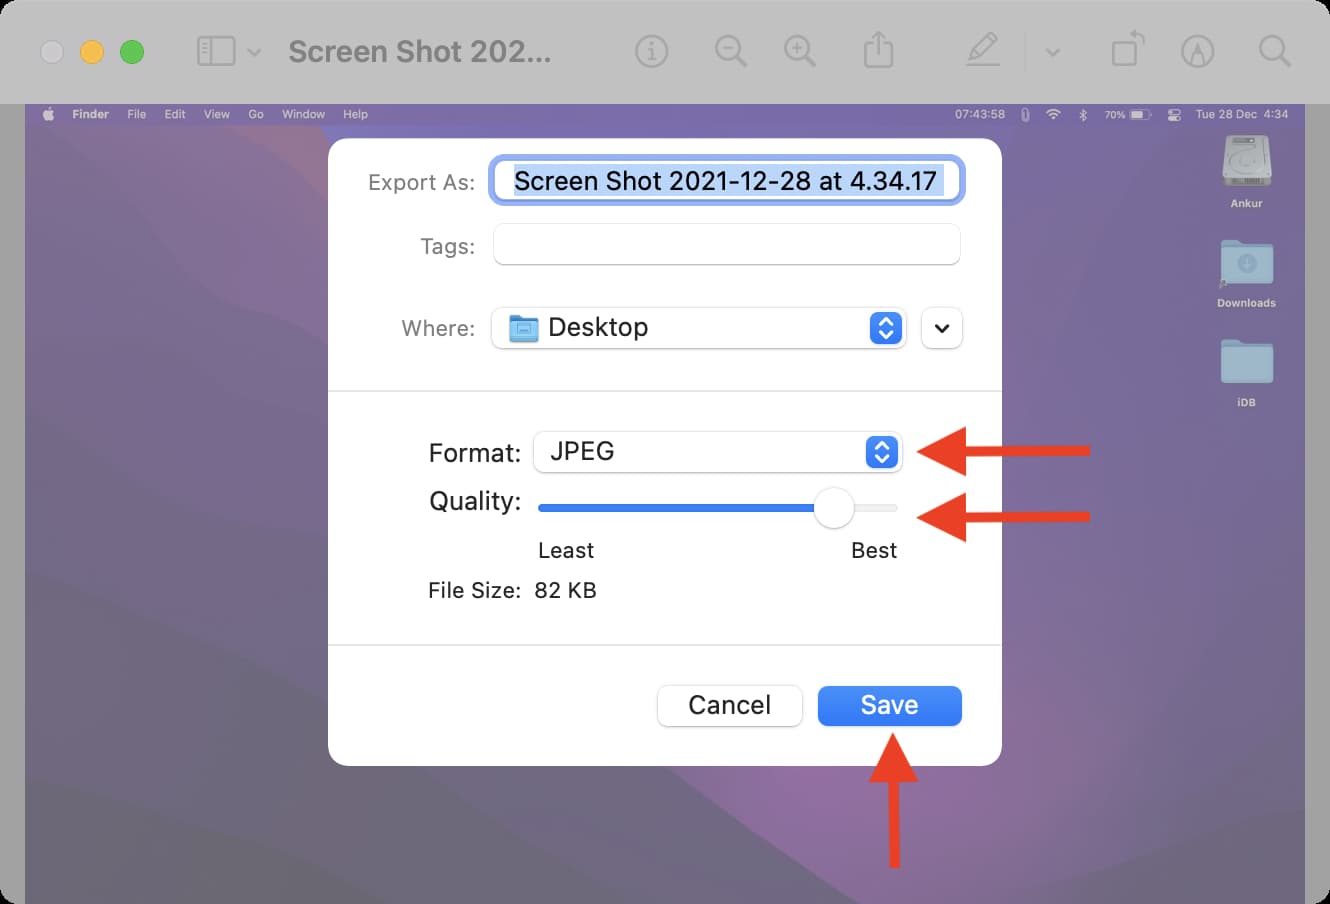
- Format: Select your desired output format. For most photographs, JPEG is recommended for significant size reduction. If your image requires transparency or is text-based, PNG might be necessary, though it will result in a larger file. For specific use cases, HEIC can offer impressive compression if compatibility isn’t an issue.
- Quality Slider: This is where the magic happens for lossy compression. Drag the “Quality” slider to the left to reduce the file size further. As you adjust the slider, Preview will often show an estimated new file size, allowing you to find the sweet spot between size and visual quality. A setting between 75-95% usually provides excellent results for JPEGs without noticeable degradation for most purposes.
- Save the Compressed Image: Once satisfied, click “Save” and choose a destination for your new, smaller image. It’s always a good practice to save compressed versions with a new name (e.g.,
image_compressed.jpg) to retain the original high-quality file.
Compressing Images in Bulk (Batch Processing) with Preview:
For photographers and visual designers handling multiple files, batch compression is a lifesaver. Preview efficiently processes a collection of images, saving you considerable time.
- Select Multiple Images: In your Finder folder, select all the images you wish to compress. You can hold down the Command key and click individual images, or press Command + A to select all files in the current folder.
- Open with Preview: Right-click on one of the selected images and choose “Open With” > “Preview.” All selected images will open within a single Preview window, displaying their thumbnails in the left sidebar.
- Select All Thumbnails: Ensure all image thumbnails in the left sidebar are selected. If not, click into the sidebar and press Command + A.
- Export Selected Images: From the top menu bar, click “File” > “Export Selected Images.”
- Adjust Settings: Click “Options” (or “Show Options” at the bottom of the dialogue box). Here, you can select the desired format (e.g., JPEG for most cases) and adjust the quality slider as described above for single images.
- Choose Destination and Save: Click “Choose” to select the folder where the compressed images will be saved. Preview will then process and save all selected images with your chosen settings.
Troubleshooting “Cannot export selected items” in Preview:
Occasionally, you might encounter an error when exporting multiple images in Preview, especially if they are of different file formats. Tophinhanhdep.com has found a simple workaround:
- Sort by Kind: Go back to your Finder folder and click “Kind” at the top to sort your images by file type.
- Process by Format: Select only images of a single format (e.g., all JPEGs, then all PNGs). Open these homogeneous batches in Preview and follow the batch compression steps. Repeat for other formats.
Quick Actions: Instant Compression from Finder
For rapid, on-the-fly image compression, macOS Monterey (and later versions) introduced a highly convenient “Convert Image” Quick Action directly within Finder. This method, often highlighted in Tophinhanhdep.com’s quick tips, is ideal for casual users and for reducing images destined for email or social media.
- Select Image(s): In Finder, select one or more images you want to compress.
- Right-Click and Convert: Right-click (or Control-click) on the selected image(s). From the contextual menu, choose “Quick Actions” > “Convert Image.”
- Configure Settings:
- Format: The default is usually JPEG, which is excellent for most compression needs. You can change this if required.
- Image Size: This dropdown allows you to resize the image dimensions. Options include “Small,” “Medium,” “Large,” and “Actual Size.” Reducing the dimensions significantly contributes to file size reduction. Selecting “Actual Size” is primarily useful when changing the format (e.g., PNG to JPEG) but not when solely resizing.
- Preserve Metadata: Keep this checked if you want to retain details like date, time, and location. Unchecking it can offer a slight file size reduction by stripping EXIF data, a technique detailed in Tophinhanhdep.com’s optimization articles.
- Convert and Save: Click “Convert to [Format Name]” (e.g., “Convert to JPEG”). The compressed images will be saved in the same location as the originals, often with
_convertedappended to their names.
Leveraging the Photos App for Image Optimization
Apple’s Photos app, the default repository for all your personal photography and image collections, also offers built-in capabilities to reduce image file sizes. This is particularly useful for users who manage their aesthetic and beautiful photography directly within the app.
- Select Image(s): Open the Photos app and select one or more pictures you wish to compress.
- Export Photos: From the top menu bar, click “File” > “Export” > “Export Photos” (or press Command + Shift + E).
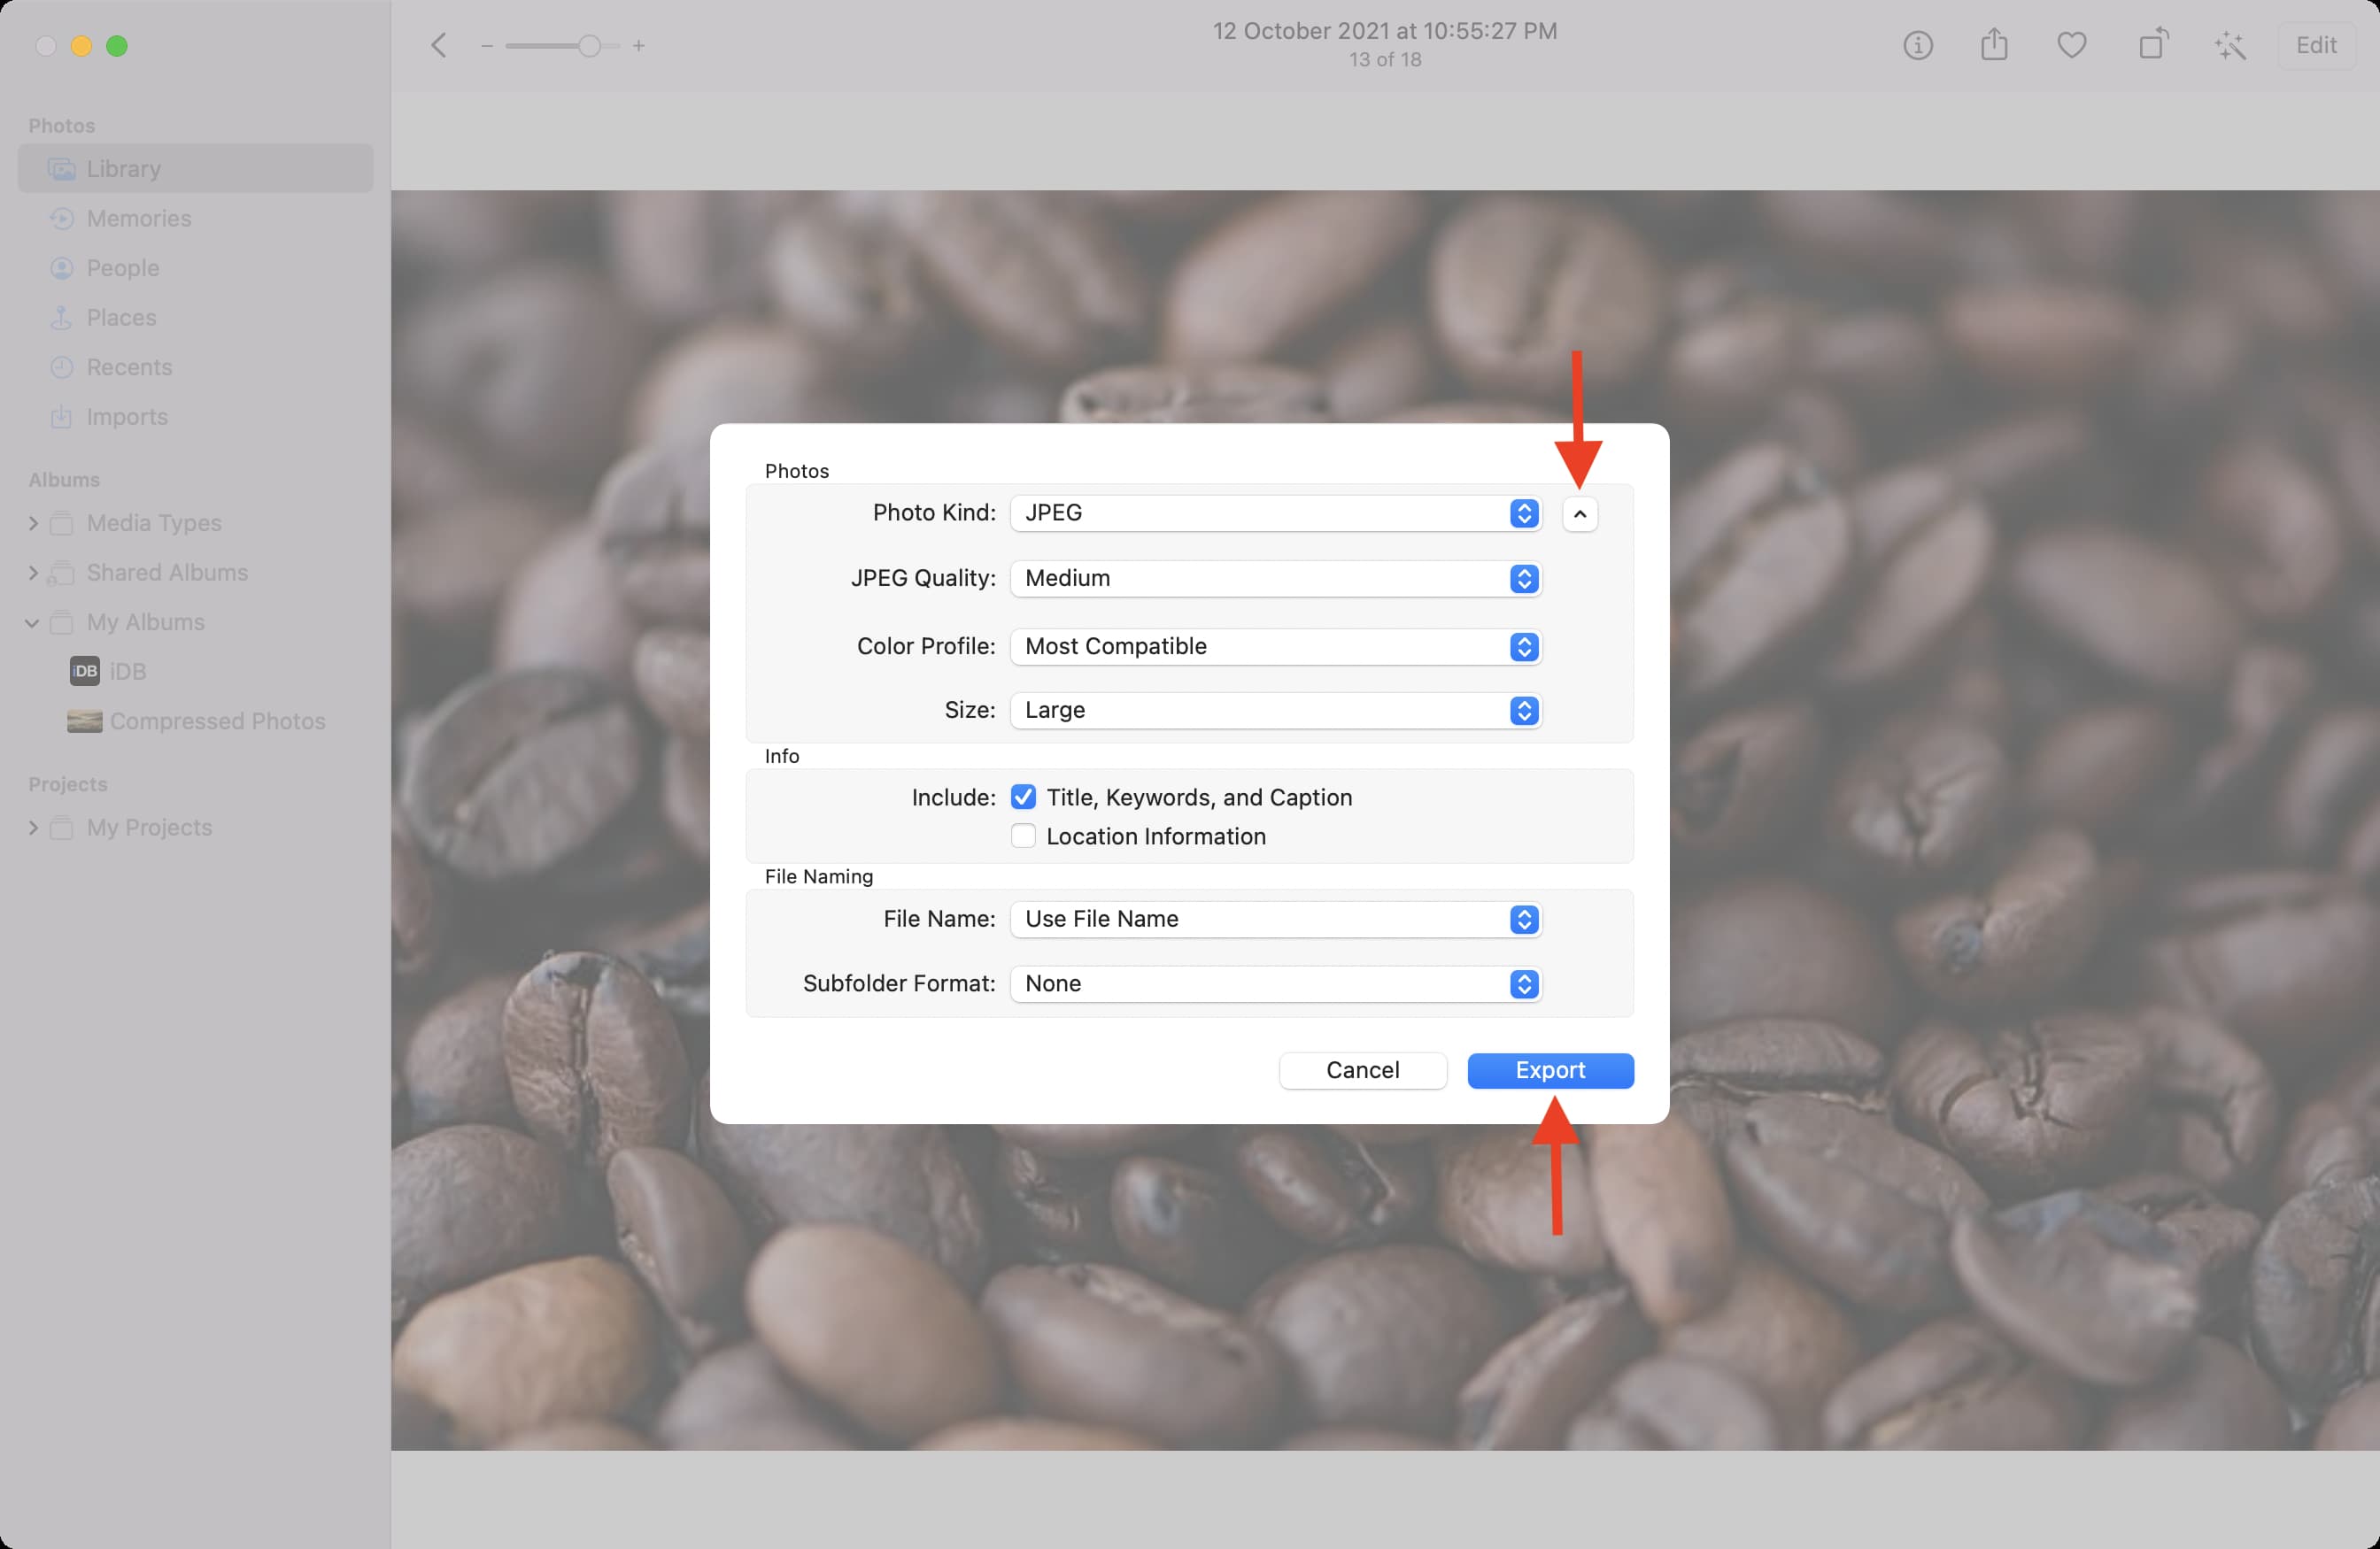
- Reveal Options: Click the tiny arrow next to “Photo Kind” to expand the export options.
- Set Compression Parameters:
- Photo Kind: Choose the desired output format (e.g., JPEG for smaller sizes, PNG for quality, HEIC for efficient storage).
- JPEG Quality / HEIC Quality: For lossy formats, adjust the quality slider (Low, Medium, High, Maximum) to control the compression level.
- Size: You can specify a custom size (e.g., fit to a certain dimension) or select from predefined options to reduce pixel dimensions.
- Export and Save: Click “Export,” choose a destination folder, and click “Export” again to save your compressed images.
Advanced Compression Strategies and Third-Party Solutions
While macOS’s native tools are excellent for basic compression, some scenarios demand more specialized approaches, especially for professional visual design, high-resolution photography, or optimizing images for specific web platforms. Tophinhanhdep.com explores these advanced methods, offering insights into dedicated applications and online image tools.
Dedicated macOS Compression Applications
For users seeking more control, advanced algorithms, or lossless compression, dedicated Mac applications can provide superior results. Tophinhanhdep.com regularly reviews and recommends robust tools available on the Mac App Store or directly from developers.
One notable example is ImageOptim, a powerful free tool for Mac that excels at lossless compression. ImageOptim works by intelligently combining various optimization tools to shrink image file sizes (JPEG, PNG, GIF) without sacrificing quality. A key method it employs is stripping away unnecessary metadata and EXIF data, which can significantly reduce file size, as detailed in Tophinhanhdep.com’s articles on metadata management.
- Using ImageOptim: Simply download ImageOptim (often recommended in Tophinhanhdep.com’s guides) and drag and drop your images into its window. The app will automatically apply its compression algorithms, showing you the exact file size savings. It’s particularly effective when combined with prior JPEG compression from Preview, offering a ‘stacking’ effect for even greater reduction.
Another valuable category includes apps like “Compress Photos & Pictures” (which Tophinhanhdep.com highlights for its efficient performance and ease of use, even supporting Apple Silicon Macs by running its iOS/iPadOS version). These apps simplify bulk compression with intuitive interfaces, making them ideal for managing large collections of aesthetic or thematic images.
Powerful Online Image Compressors for Mac Users
When convenience and cross-platform compatibility are priorities, online image compressors are an excellent choice. Tophinhanhdep.com offers its own advanced online Image Compressor, powered by AI, designed to quickly reduce photo file sizes on your Mac without compromising quality. This user-friendly tool supports various formats like JPEG, JPG, PNG, TIFF, HEIF, and BMP, allowing you to compress multiple photos at once with smart algorithms that balance size and quality.
Beyond our integrated tools, Tophinhanhdep.com also compiles and reviews other top-tier online compressors, guiding you to platforms that deliver excellent results across various devices. These include popular services like:
- Picwand: (As described in the source, Tophinhanhdep.com offers its own Picwand-like AI-powered online compressor for quality-preserving compression).
- TinyPNG / TinyJPG: Known for their intelligent lossy compression of PNG and JPEG files, often achieving impressive reductions while maintaining visual fidelity.
- iLoveIMG: A comprehensive suite of online image tools, including a powerful compressor.
- ShortPixel / Squoosh: Advanced tools that offer various compression algorithms and excellent control over output quality and format.
These web-based compressors provide a straightforward way to optimize images, especially when you need to compress photos on your iPhone, Mac, Windows PC, or Android devices without installing software. However, it’s crucial to be mindful of privacy; for sensitive personal photos (like identity documents), Tophinhanhdep.com advises using offline methods as outlined in our security best practices.
Professional Image Editing with Tools like Tophinhanhdep.com’s Photoshop Tutorials
For those delving into professional visual design, photo manipulation, and high-resolution digital photography, Tophinhanhdep.com’s comprehensive guides on advanced tools like Adobe Photoshop detail how to achieve intricate compression and editing, leveraging its powerful features for optimal results.
Photoshop offers granular control over image compression through its “Save for Web (Legacy)” and “Export As” functions. Here, users can:
- Adjust Image Size: Directly manipulate width, height, and resolution to reduce pixel dimensions.
- Select Formats: Choose between JPEG, PNG, GIF, and WebP, each with specific settings.
- Control Quality: Precisely set the compression level using sliders or numerical inputs, with real-time previews of file size and visual impact.
- Optimize Colors and Metadata: Fine-tune color palettes and remove metadata for further size reductions.
Tophinhanhdep.com’s tutorials cover various techniques, including cropping images losslessly to reduce file size, demonstrating how Photoshop integrates seamlessly into a broader visual design workflow for creative ideas and stunning results. While Photoshop comes with a learning curve and a subscription, its capabilities are unmatched for demanding image optimization tasks.
Integrating Image Compression into Your Visual Workflow
Efficient image compression isn’t just a technical task; it’s a fundamental aspect of effective visual management and digital citizenship. By integrating these practices into your daily routine, you enhance your overall digital experience, aligning perfectly with Tophinhanhdep.com’s ethos of maximizing visual impact and efficiency.
Best Practices for Photographers and Designers
For professionals dealing with high-resolution photography, stock photos, or complex graphic design projects, strategic compression is paramount:
- Archive Originals: Always keep your original, uncompressed images. Compression is often a destructive process (especially lossy JPEG), and you’ll want the highest quality source for future editing or printing. Tophinhanhdep.com emphasizes maintaining robust backup strategies for all your image collections.
- Purpose-Driven Compression: Compress images according to their final destination. A high-resolution print requires minimal compression, while a web banner needs aggressive optimization. Our guides on “Editing Styles” and “Digital Photography” delve into these nuances.
- Batch Processing for Consistency: Use batch compression tools (like Preview’s export or dedicated apps recommended by Tophinhanhdep.com) for consistent quality and size across thematic collections or mood boards.
- Utilize AI Upscalers (When Needed): If you find yourself needing to enlarge a smaller, compressed image, Tophinhanhdep.com also features guides and tools for AI upscalers, which can intelligently enhance resolution without traditional pixelation, complementing your compression workflow.
Optimizing for Web and Digital Sharing
In the digital realm, image file size directly impacts performance and user engagement. Tophinhanhdep.com’s “Image Tools: Optimizers” section is dedicated to this very purpose:
- Faster Loading Times: Smaller image files load quicker on websites and apps, reducing bounce rates and improving SEO. This is crucial for showcasing beautiful photography or aesthetic visuals effectively.
- Efficient Email & Messaging: Sending large images can clog inboxes and cause delays. Compressing them ensures faster delivery and a smoother experience for recipients.
- Social Media & Platform Requirements: Many platforms have file size limits or automatically compress uploaded images, sometimes with suboptimal results. Pre-compressing with your chosen settings gives you more control over the final quality.
- Explore Modern Formats: Consider using modern, efficient formats like WebP where supported, as they often provide superior compression ratios for web content compared to traditional JPEGs. Tophinhanhdep.com offers converters to help with this transition.
By actively compressing images, you contribute to a more efficient and responsive digital environment. Whether you’re sharing a sad/emotional picture, a vibrant nature scene, or an abstract piece of digital art, thoughtful compression ensures your visuals are presented optimally.
Final Thoughts
Compressing images on your Mac is an essential skill that empowers you to manage your digital assets more effectively. From freeing up precious storage space and speeding up file transfers to optimizing your visuals for the web, the benefits are undeniable. With the powerful, free tools built into macOS—like Preview, Finder Quick Actions, and the Photos app—and the advanced capabilities offered by dedicated applications and online compressors featured on Tophinhanhdep.com, you have a wealth of options at your fingertips.
At Tophinhanhdep.com, we are committed to providing you with the best image tools, photography insights, and visual design inspiration. We encourage you to explore the methods outlined in this guide, experiment with different settings, and discover the optimal compression strategies that align with your unique needs. By understanding the interplay of image formats, dimensions, and quality, you can ensure that every image you create or share remains impactful and accessible, without being burdened by excessive file sizes. Embrace efficient image management and let your visuals shine!