How to Master Image Compression on Mac: Your Essential Guide to Optimized Visuals with Tophinhanhdep.com

In today’s visually-driven world, high-resolution images are everywhere. From stunning wallpapers and aesthetic backgrounds to breathtaking nature photography and intricate digital art, our Macs are constantly handling larger and larger image files. While this means unparalleled visual quality, it also comes with a significant drawback: massive file sizes. These bulky images quickly consume precious storage space on your Mac, iCloud, or external SSDs, and slow down sharing via messages, email, or cloud services. This is where image compression becomes an indispensable skill for every Mac user, especially those passionate about photography and visual design like the community at Tophinhanhdep.com.
Compressing an image on your Mac means reducing its file size, making it lighter and more manageable. While compression inherently involves some reduction in picture quality, in most scenarios, the difference is negligible and far outweighed by the benefits of smaller files. For artists, photographers, and visual enthusiasts who frequently work with high-resolution imagery, optimizing file sizes is key to efficient workflow, faster sharing, and maintaining extensive image collections without storage headaches. This comprehensive guide, brought to you by Tophinhanhdep.com, will walk you through various free and easy methods to compress images directly on your Mac, ensuring your visual assets are always perfectly optimized.
Understanding Image Compression: Why It Matters for Your Mac and Visual Content
Before diving into the “how-to,” it’s crucial to understand why image compression is so vital and what factors influence an image’s file size. For anyone curating aesthetic backgrounds, showcasing high-resolution photography, or engaging in detailed photo manipulation, optimizing your images is a fundamental step.
The Core Factors Influencing Image File Size
The size of an image file isn’t arbitrary; it’s determined by several key elements:
- Image Dimensions: Simply put, more pixels mean a larger file. A wallpaper-worthy 1920 x 1080 pixel image will naturally be larger than a small 720 x 480 pixel thumbnail. When dealing with images for digital art or high-resolution stock photos, dimensions are often the primary driver of file size.
- Image Format: Different file formats handle image data in unique ways. For most photographs and graphical content, JPEG/JPG is generally preferred due to its efficient lossy compression, resulting in significantly smaller files than PNG. However, for images with transparency, sharp lines, or text (like screenshots for tutorials or abstract designs with clear edges), PNG is superior because it uses lossless compression, preserving every detail, albeit at a larger file size. HEIC, a newer format primarily used by Apple devices, offers excellent compression efficiency with impressive quality, making it ideal for storing large collections of digital photography.
- Image Content and Color Depth: The complexity and color variation within an image also play a role. An image with vast areas of uniform color or high contrast (e.g., a minimalistic abstract background) might compress more efficiently than a vibrant, highly detailed nature photograph with a wide spectrum of colors.
- Camera Type and Resolution: Images captured with high-megapixel professional cameras or modern smartphone cameras will inherently have larger file sizes than those from a basic webcam. This is particularly relevant for photographers contributing to “beautiful photography” collections or creating “stock photos.”
- Screen Resolution for Screenshots: Taking screenshots on a Retina display Mac, with its higher pixel density, results in much larger image dimensions and file sizes compared to older, non-Retina displays. This directly impacts the storage footprint of your “visual design” documentation.
The Balance Between Quality and Size: A Tophinhanhdep.com Perspective
Image compression inherently involves a trade-off between file size and perceived quality. Lossy compression, common in JPEG, achieves smaller files by discarding some image data that is deemed less critical to visual perception. Lossless compression, used in PNG, reduces file size without any loss of data, but the reduction is typically less dramatic.
For most users and applications, a slight reduction in quality (often imperceptible to the human eye) is an acceptable compromise for the significant benefits of smaller files. Whether you’re uploading high-resolution images to a “mood board,” sharing “thematic collections,” or optimizing “digital photography” for web display, finding the right balance ensures your visuals remain stunning while performing optimally. Tophinhanhdep.com champions both visual excellence and practical efficiency, making smart compression a key component of effective image management.
Native macOS Tools for Effortless Image Compression
Your Mac comes equipped with powerful, free tools that can handle most of your image compression needs without requiring any extra software. These built-in utilities are perfect for everyday tasks, from preparing images for email to optimizing wallpapers for your desktop.
Streamlining with Finder’s Quick Actions
For Mac users running macOS Monterey or later, Finder’s Quick Actions provide an incredibly convenient way to compress one or multiple images with just a few clicks. This method is ideal for quick adjustments to “aesthetic backgrounds” or a batch of “stock photos.”
- Select Your Images: Navigate to your images in Finder. You can select a single image or hold down the
Commandkey to select multiple images simultaneously. - Access Quick Actions: Right-click (or Control-click) on your selected image(s). From the contextual menu, choose
Quick Actions > Convert Image. - Configure Conversion Settings: A small window will appear with several options:
- Format: For significant file size reduction,
JPEGis usually the best choice, especially if your original images are PNGs or uncompressed TIFFs. If your image primarily consists of text or requires transparency, you might stick with PNG or consider HEIC for its efficiency. - Preserve Metadata: By default, this option is checked, meaning details like capture date, time, camera settings, and location (EXIF data) will be retained. If you’re sharing images publicly or don’t need this information, unchecking it can sometimes offer a tiny additional file size saving, though its primary impact is privacy. For “beautiful photography” where origin matters, keep it checked.
- Image Size: This crucial dropdown allows you to reduce the physical dimensions of your image. Options include
Small,Medium,Large, orActual Size. Reducing dimensions (e.g., from 4000x2800px to 2000x1400px) can dramatically decrease file size. Note that choosingActual Sizeprimarily offers savings when changing the format (e.g., converting a large PNG to a JPEG).
- Format: For significant file size reduction,
- Execute Conversion: Once satisfied with your settings, click
Convert to [Selected Format](e.g., “Convert to JPEG”). The compressed images will be saved in the same location as the originals, typically with a new filename suffix to distinguish them (e.g.,image-small.jpeg).
Tip from Tophinhanhdep.com: To easily see the impact of your compression, sort your Finder folder by “Size” to compare the original and compressed files side-by-side.
Mastering Image Compression in Preview App
Preview, the default image and PDF viewer on macOS, is a remarkably versatile tool for single or batch image compression. It offers more granular control over quality and format, making it suitable for optimizing “high-resolution” images or preparing “digital art” for various platforms.
Compressing a Single Image:
- Open in Preview: Double-click the image you want to compress, and it should open automatically in Preview.
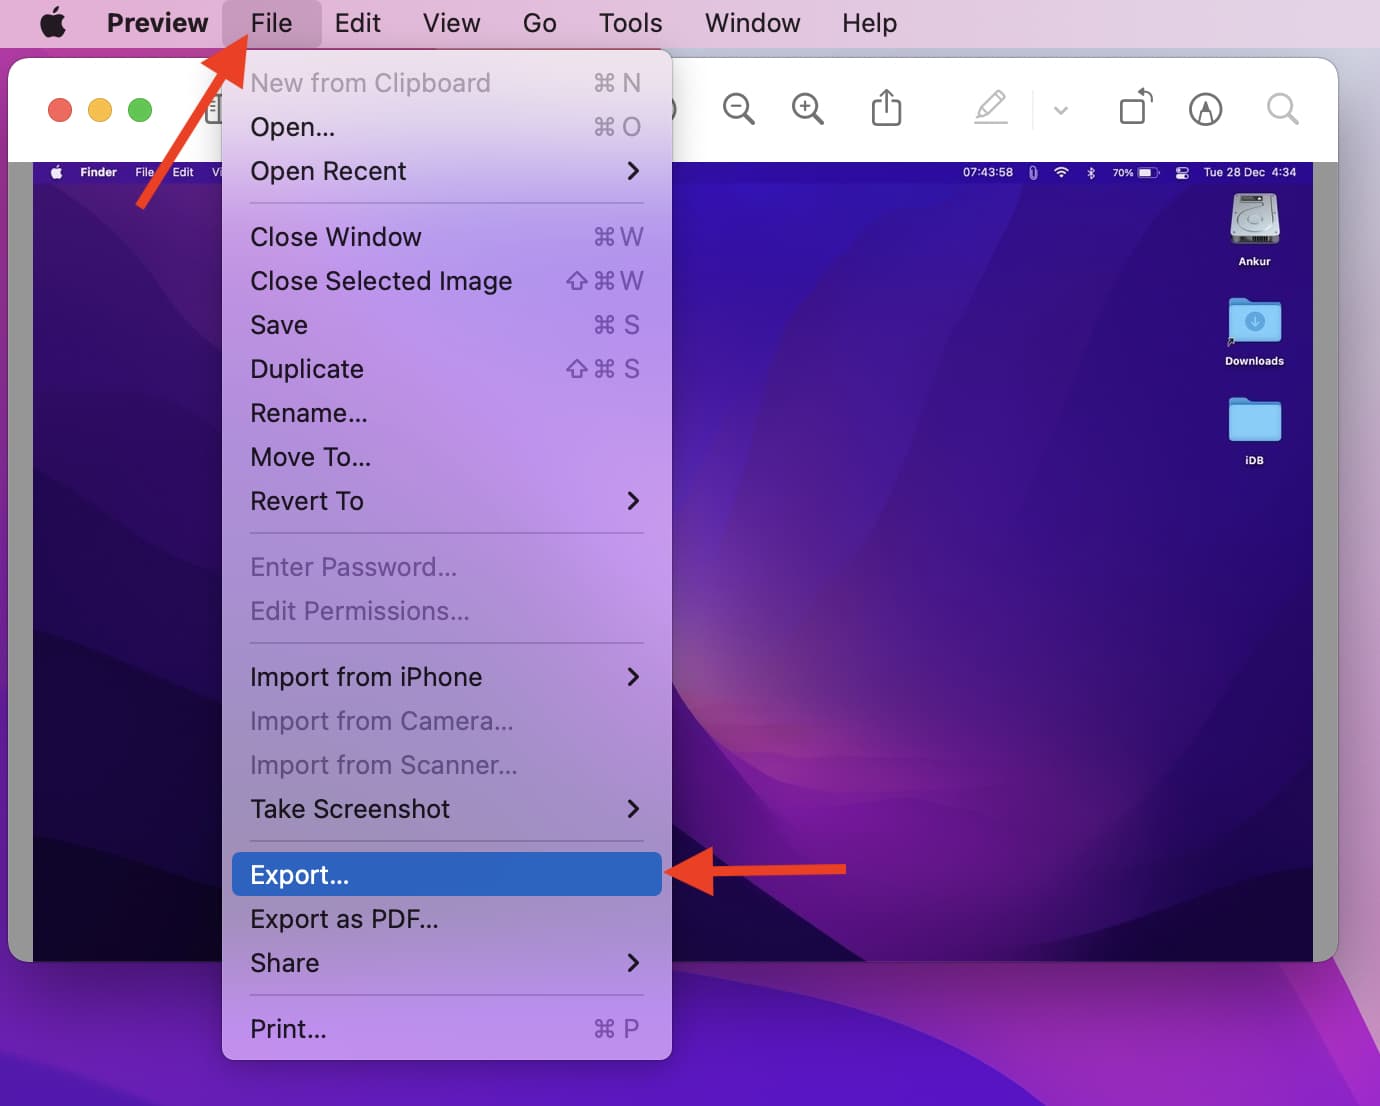
- Export the Image: From the top menu bar, click
File > Export. - Adjust Format and Quality:
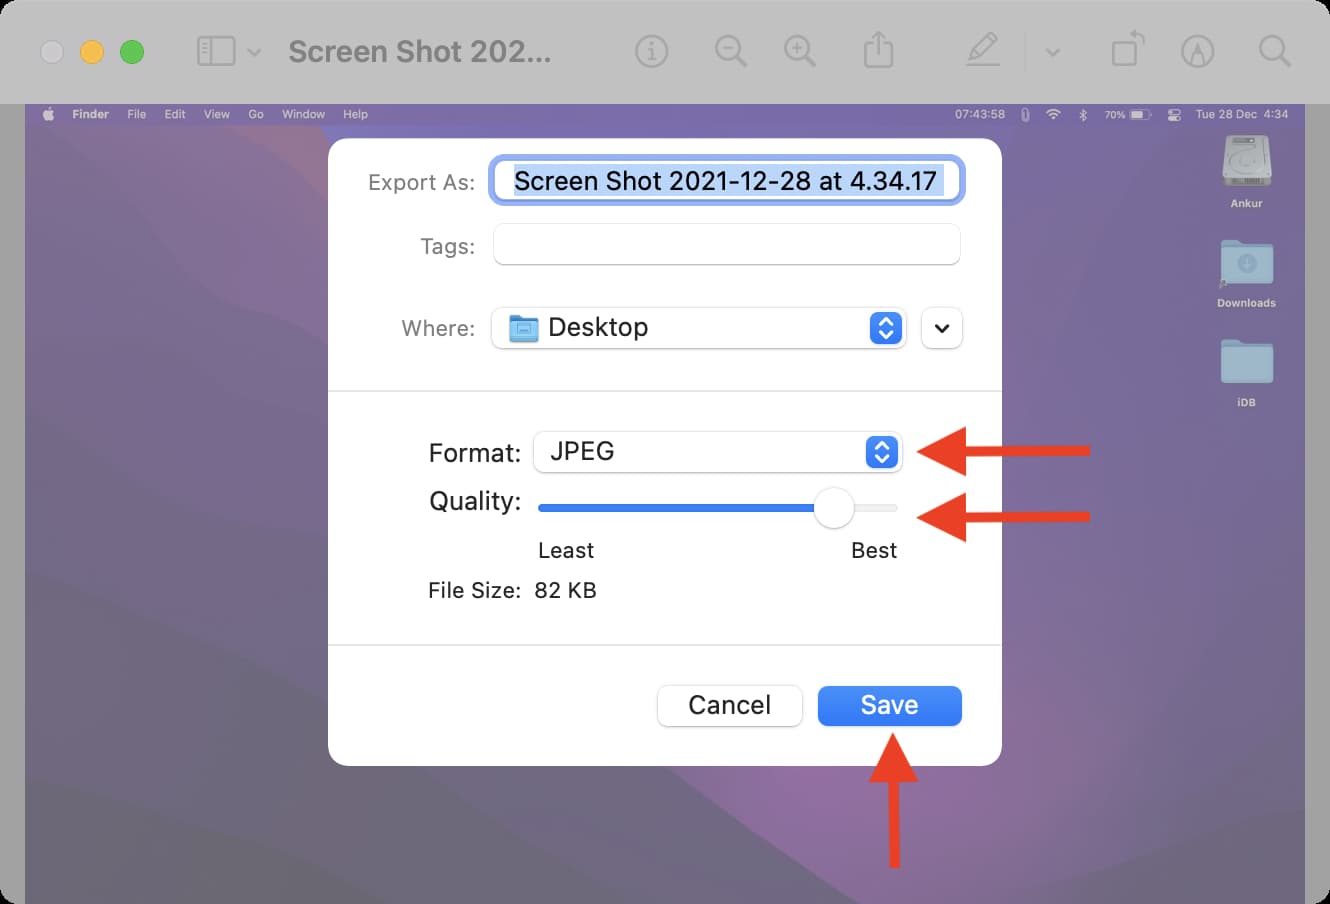
- Format: Choose your desired output format.
JPEGis excellent for general photo compression.HEICoffers superior compression for Apple devices, but ensure compatibility if sharing widely. For “abstract” or “sad/emotional” images where specific color palettes need to be preserved without artifacts, experiment with PNG or JPEG-2000 if compatibility is not an issue. - Quality Slider: This is where you fine-tune the compression level. Dragging the slider to the left will aggressively reduce the file size, but at the cost of more noticeable quality degradation. Moving it to the right prioritizes quality, resulting in a larger file. Preview provides a real-time estimate of the new file size as you adjust the slider, helping you find the perfect balance for your “visual design” needs.
- Format: Choose your desired output format.
- Save Your Changes: Once you’re happy with the estimated file size and quality, click
Save.
Tophinhanhdep.com Pro Tip: If you find the compressed image quality unsatisfactory, go back to the original, follow these steps again, and be less aggressive with the quality slider.
Compressing Images in Bulk/Batch:
Preview also excels at processing multiple images simultaneously, a huge time-saver for managing “image collections” or optimizing numerous “stock photos.”
- Select and Open in Preview: Select all the images you want to compress in Finder (Command + Click for multiple, Command + A for all). Right-click and choose
Open With > Preview. - Select All Thumbnails: In the Preview app’s left sidebar, ensure all image thumbnails are selected (if not, click one and press
Command + A). - Export Selected Images: Go to
File > Export Selected Images. - Set Options: In the dialog box, click
Show OptionsorOptionsat the bottom. - Adjust Format and Quality: Similar to single image compression, set your preferred format (e.g.,
JPEG) and adjust the quality slider. - Choose Destination and Save: Click
Chooseto select where you want to save the compressed batch.
Troubleshooting “Cannot export selected items”: This error often occurs if you’ve selected images of different formats (e.g., JPEG and PNG) for batch export. To fix this, click “OK,” then hold the Command key and unselect images of differing formats from the left sidebar. Alternatively, return to Finder, sort your images by “Kind,” and then select and open only pictures of a single format (e.g., all JPEGs) in Preview for batch processing. This ensures consistent output for your “thematic collections.”
Optimizing Your Photo Library with the Photos App
For those who manage their “beautiful photography” and personal “image collections” primarily within Apple’s Photos app, it offers a direct way to export and compress images.
- Select Photos: Open the Photos app and select one or more pictures you wish to compress.
- Initiate Export: Press
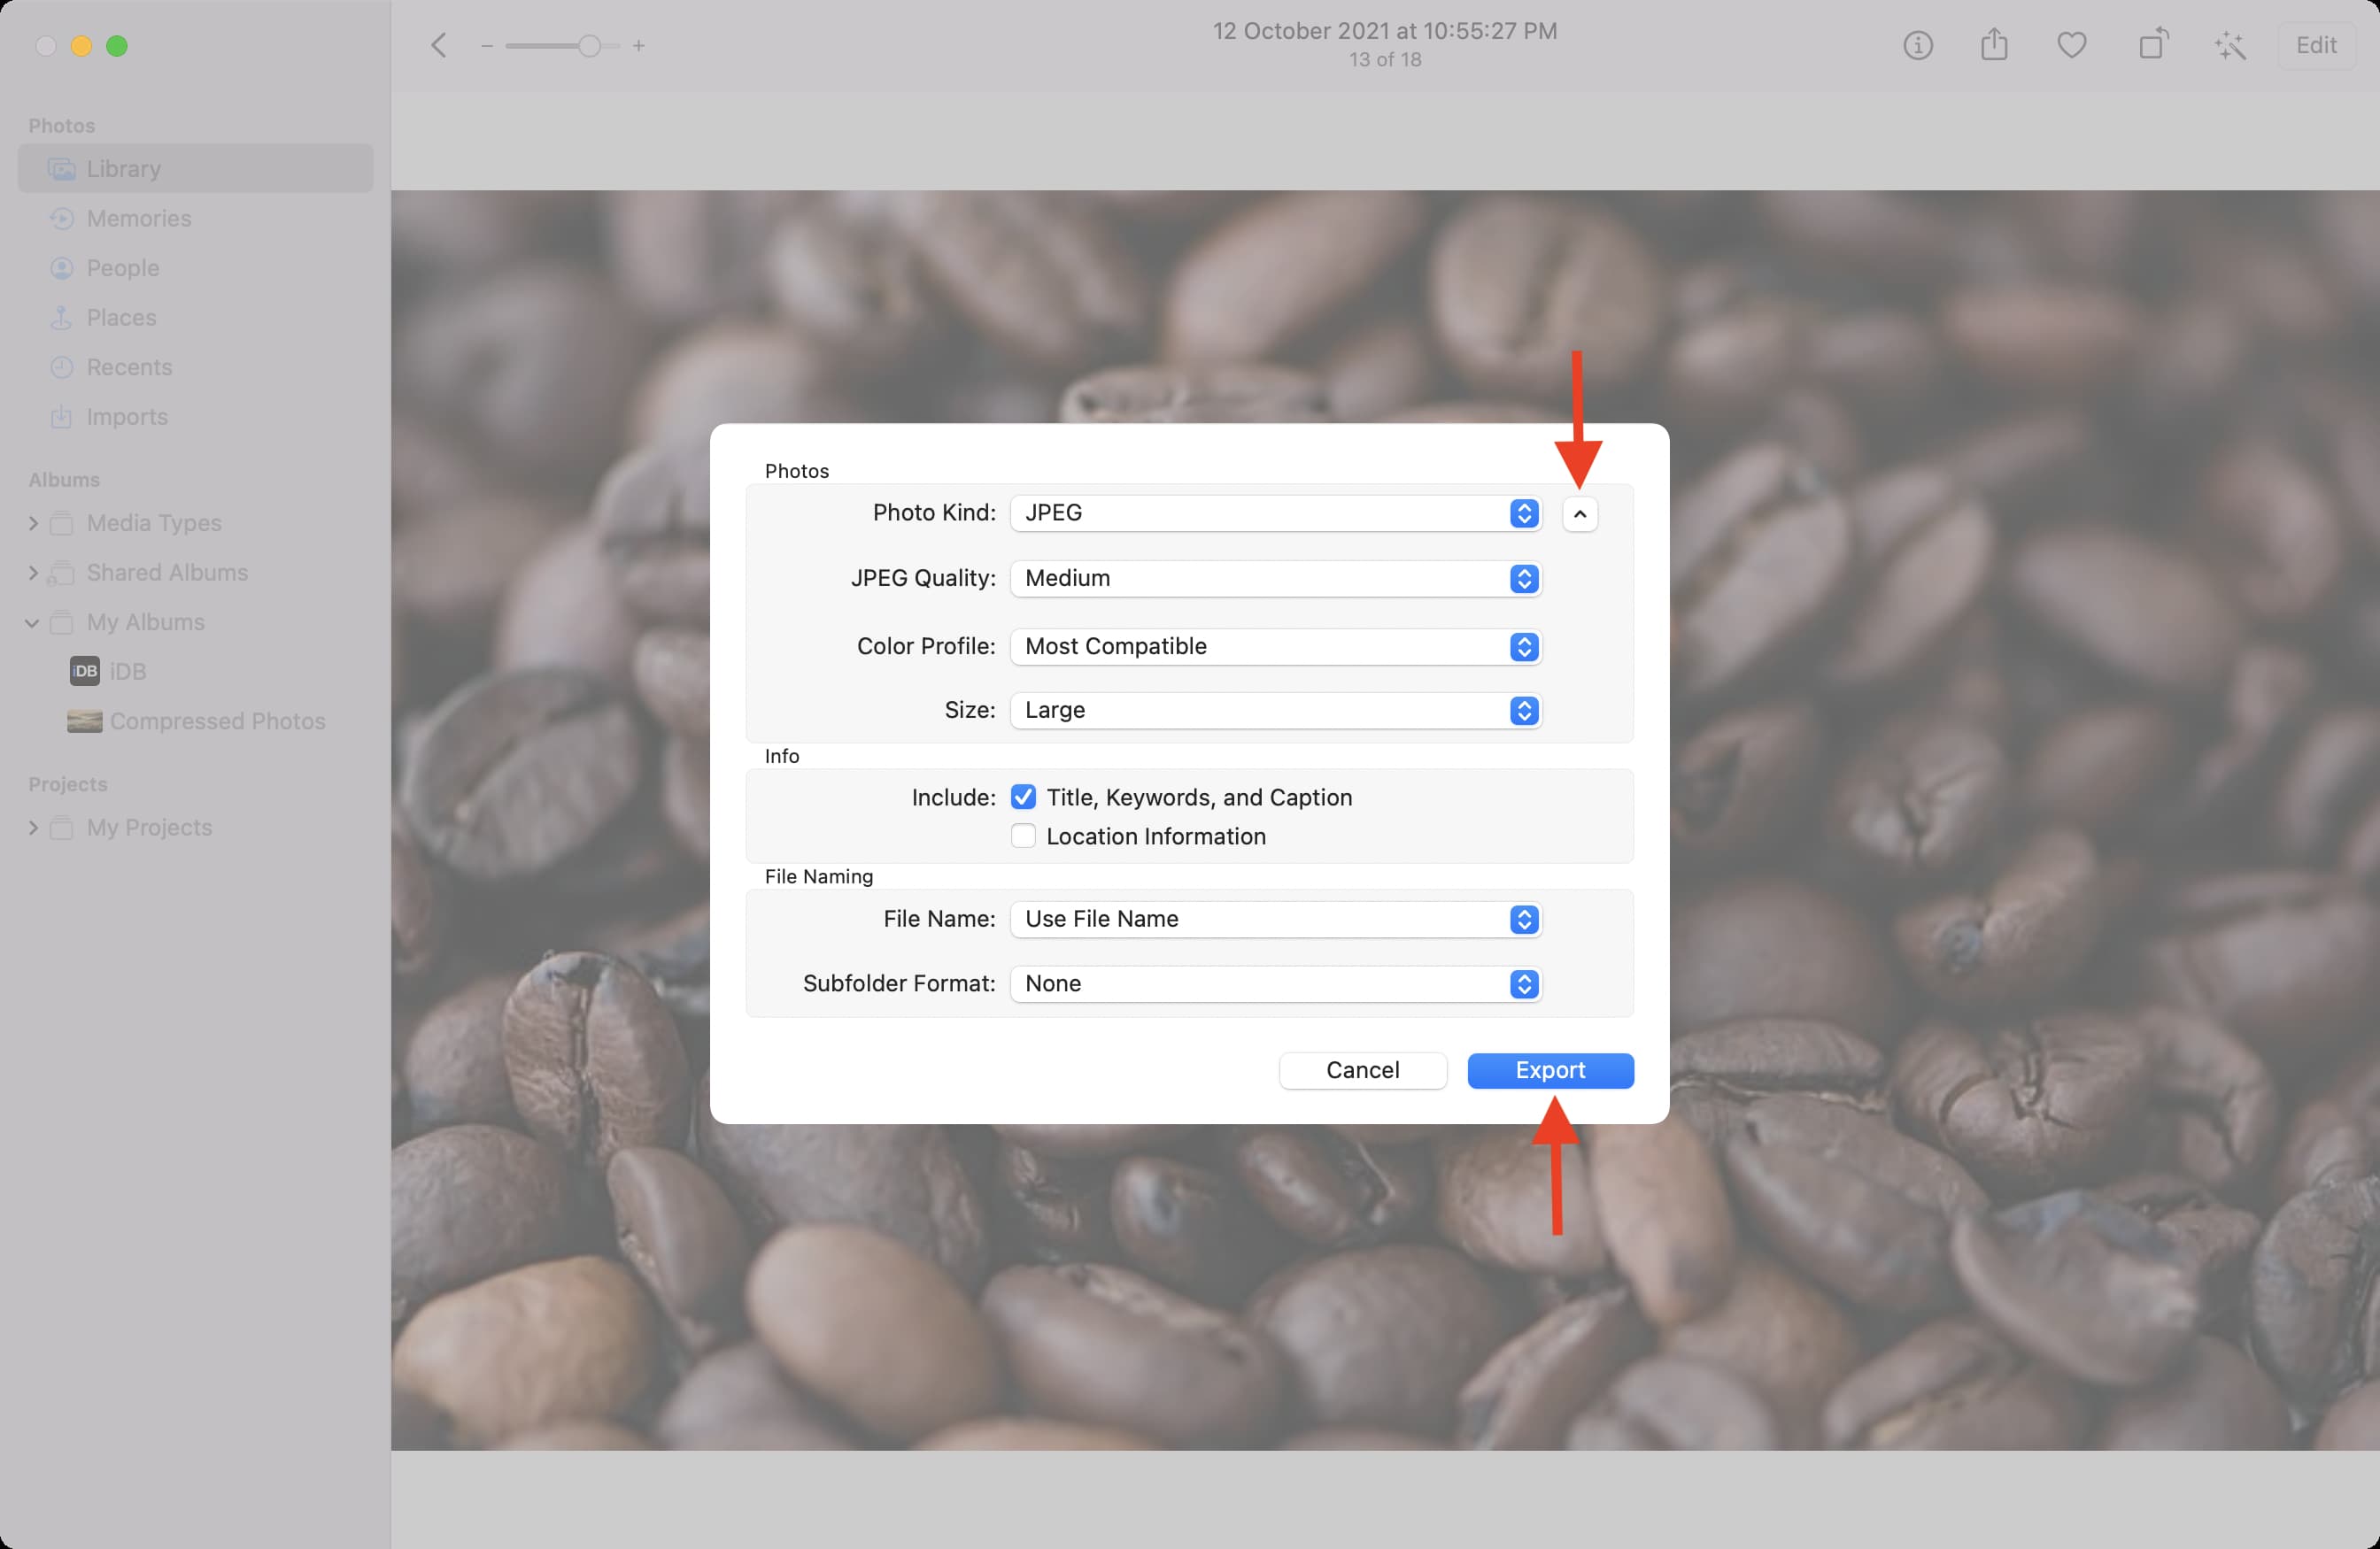
Command + Shift + E, or go to the top menu bar and clickFile > Export > Export Photos. - Configure Export Settings: Click the small arrow next to
Photo Kindto reveal more options. Here, you can define:- Photo Kind: Choose the format (e.g.,
JPEG,HEIC). - Quality: Adjust the compression quality using a slider or preset options.
- Size: Similar to Preview, you can often specify maximum dimensions.
- Photo Kind: Choose the format (e.g.,
- Export and Save: Click
Export, select a destination folder, and clickExportagain to save your newly compressed images.
This method is highly integrated into the Apple ecosystem, making it seamless for users who rely on Photos for managing their visual assets, including “wallpapers” and “backgrounds.”
Advanced Compression Techniques and Third-Party Solutions
While macOS built-in tools are incredibly capable, specialized compression apps and online services can offer even greater flexibility, efficiency, and sometimes, superior results, especially for “digital photography” and professional “visual design” projects.
Leveraging Dedicated Compression Applications
The Mac App Store, as well as various independent developers, offer a plethora of dedicated image compression applications. These tools often feature advanced algorithms, batch processing capabilities, and more control over the compression process, catering to specific needs for “image tools” and “optimizers.”
One highly recommended example, which we at Tophinhanhdep.com often reference, is ImageOptim. This free utility is renowned for its lossless compression, meaning it can significantly reduce file sizes without any perceptible loss in visual quality. It achieves this by stripping out unnecessary metadata (like EXIF data – valuable for photographers but unnecessary for web images) and applying various optimization algorithms to image files.
How to use a typical dedicated compression app like ImageOptim:
- Download and Install: Obtain the app (e.g., ImageOptim from its developer’s website).
- Drag and Drop: Open the application. Simply drag and drop the image(s) you wish to compress into its window.
- Automated Compression: The app will automatically process the images, informing you of the exact file size savings achieved.
Tophinhanhdep.com Insights: Dedicated apps like ImageOptim work exceptionally well when combined with other compression methods. For example, you can first use Preview to convert a high-resolution PNG to a JPEG and reduce its quality slightly, then run the resulting JPEG through ImageOptim for further lossless optimization. This “stacking” approach can dramatically reduce an 8MB image to a mere few hundred kilobytes, perfect for “high-resolution” images needing drastic reduction without visible degradation.
Other apps might offer features like AI-powered upscaling (which Tophinhanhdep.com also explores in its “Image Tools” section), format conversion, or specific compression profiles for different output needs (e.g., web, print, mobile).
The Power of Online Image Compressors, including Tophinhanhdep.com’s Tools
For quick, hassle-free compression without installing any software, online image compressors are an excellent choice. They are universally accessible from any browser on your Mac and often support a wide range of formats. Many Tophinhanhdep.com users find these tools invaluable for optimizing “stock photos” or preparing “mood board” images on the fly.
A simple web search for “compress images online” will yield numerous options. For example, Tophinhanhdep.com provides its own powerful and intuitive Online Image Compressor as part of its comprehensive suite of “Image Tools.”
Using Tophinhanhdep.com’s Online Image Compressor (or similar platforms):
- Access the Tool: Visit Tophinhanhdep.com and navigate to the “Image Tools” section, then select the “Compress Images” feature.
- Upload Your Files: Drag and drop your image files directly into the designated upload area. Our compressor supports various formats like JPEG, PNG, GIF, and more.
- Specify Compression Settings: You’ll typically have options to:
- Desired File Size: Enter a target size in MB or KB.
- Quality/Size Balance: Choose presets like “Better Quality” (lower compression) or “Smaller Size” (higher compression) to suit your needs.
- Compress and Download: Click the “Compress” button. Once processed, you can download the optimized images directly to your Mac’s Downloads folder or, in some cases, save them to cloud storage services.
Important Consideration from Tophinhanhdep.com: While highly convenient, always exercise caution when uploading images with personal or sensitive information to online services. For highly private “personal photos” or confidential “digital art,” stick to offline methods like Preview or dedicated desktop apps. However, for general “wallpapers,” “abstract” designs, or “nature photography” intended for public consumption, online tools are perfectly safe and efficient. Tophinhanhdep.com prioritizes user security and data privacy in all its online tools.
Best Practices for Managing Your Visual Assets on Mac
Optimizing images is more than just a one-time task; it’s an ongoing process that enhances your overall digital experience, especially for anyone deeply involved in “photography,” “visual design,” or creating “image collections.”
Strategic Format Selection for Diverse Content
The choice of image format is fundamental to effective compression and maintaining visual integrity.
- JPEG for Photos and Complex Graphics: For vibrant “nature photography,” “beautiful photography,” or general graphical content without transparency, JPEG is almost always the best choice due to its excellent lossy compression. It provides a good balance between file size and quality, making it ideal for sharing or uploading to websites.
- PNG for Transparency and Sharp Details: When you need transparency (e.g., for “digital art” overlays or logos) or exceptionally crisp lines and text (e.g., screenshots, graphic design elements), PNG is the go-to format. Although files are larger, the lossless compression ensures pixel-perfect clarity.
- HEIC for Apple Ecosystem: If your images will primarily live within the Apple ecosystem and don’t require widespread cross-platform compatibility, HEIC offers superior compression efficiency compared to JPEG at similar quality levels, making it excellent for conserving space in your “image collections.”
- WebP for Web Optimization: While not natively supported by all macOS tools for creating the format, WebP is an increasingly popular format for web images, offering even better compression than JPEG and PNG with support for transparency and animation. For web-focused “visual design” and “graphic design” work, converting to WebP via online tools (like Tophinhanhdep.com’s converters) or third-party apps is a forward-thinking practice.
Resizing vs. Compressing: Knowing When and How to Apply Each
It’s crucial to distinguish between resizing and compressing, as both contribute to reducing file size but achieve it differently:
- Resizing (Changing Dimensions): This means altering the actual width and height of an image in pixels. A 4000x3000px image will have a much larger file size than a 1000x750px image, even if both are JPEGs with the same compression quality. Resizing is most effective when the image is simply too large for its intended use (e.g., a print-quality photo being used as a small web thumbnail or an email attachment). For “aesthetic wallpapers” or “backgrounds” for specific screen resolutions, resizing is often the first and most impactful step.
- Compressing (Optimizing File Data): This involves reducing the amount of data within the image file itself, either lossily (discarding some visual information) or losslessly (optimizing encoding without losing information). This is what the “quality slider” in Preview or the algorithms in ImageOptim do.
For maximum file size reduction, it’s often best to combine both: first, resize the image to the appropriate dimensions for its final destination, and then apply compression to further optimize its file size. This dual approach ensures your “high-resolution photography” is not only visually striking but also incredibly efficient.
Maintaining Image Quality for Professional and Personal Use
The goal of compression is not to simply make files as small as possible, but to make them small enough while preserving acceptable quality.
- Understand Your Audience and Platform: A “beautiful photography” piece intended for a large print will require minimal or no compression, retaining maximum detail. The same image, destined for a social media post or a “mood board” on Tophinhanhdep.com, can withstand more aggressive compression without its impact being diminished.
- Preview and Compare: Always take a moment to preview your compressed images and compare them to the originals. Zoom in to check for artifacts, blurriness, or color shifts. If the quality loss is noticeable and detracts from the “aesthetic” or “emotional” impact of your image, adjust your settings.
- Keep Originals: As a rule of thumb, always keep a copy of your original, uncompressed, high-resolution images. This ensures you always have the master file to revert to if a compressed version doesn’t meet future needs or if you require a different compression level. This is particularly important for professional “stock photos” or “digital art” archives.
By mastering these techniques and leveraging the right tools, including Tophinhanhdep.com’s dedicated “Image Tools” and resources for “Visual Design” and “Photography,” you can efficiently manage your visual assets on your Mac, ensuring they are perfectly optimized for any purpose without compromising on the stunning quality that defines your creative work. Embrace smart compression and transform the way you interact with your digital images.