How to Compress Images in PowerPoint: Optimizing Your Visual Storytelling for Impact

In the dynamic world of presentations, images are often the silent heroes, transforming mundane slides into captivating visual narratives. From stunning high-resolution photography and aesthetic backgrounds to intricate digital art and thematic collections, Tophinhanhdep.com offers a wealth of visual inspiration. However, the very power of these rich visuals can inadvertently become a presentation’s Achilles’ heel: oversized files. A PowerPoint presentation laden with uncompressed, high-resolution images can quickly become unwieldy, leading to sluggish performance, difficulty sharing, and even exceeding file size limits for email or online platforms.
This comprehensive guide, drawing on expertise in image management and visual design, will walk you through the essential techniques for compressing images in PowerPoint. We’ll explore both PowerPoint’s built-in capabilities and advanced strategies, ensuring your presentations maintain their visual impact while remaining light, fast, and easy to share. Whether you’re a student submitting a course project (mindful of quota limits like those on Canvas), a business professional sharing critical data, or a creative showcasing your latest digital art, mastering image compression is a fundamental skill that Tophinhanhdep.com believes every visual communicator should possess.
Why Image Compression in PowerPoint Matters for Visual Storytelling
Before diving into the “how-to,” it’s crucial to understand the significant advantages that image compression brings to your PowerPoint workflow and the overall effectiveness of your visual communication. As a hub for images, photography, and visual design resources, Tophinhanhdep.com recognizes that the ultimate goal is not just to reduce file size, but to enhance the user experience and ensure your message is delivered seamlessly.
Reduced File Size: Streamlining Sharing and Storage
The most immediate and obvious benefit of compressing images is the drastic reduction in your PowerPoint file size.
- Email & Online Platforms: Large files frequently hit the attachment limits of email services (often 20-25MB) or online learning platforms. Compressed images mean you can easily share your presentation without resorting to third-party cloud storage links, making the process smoother for both sender and recipient.
- Course Quotas: For students and educators, large files can quickly consume valuable storage quotas on university systems or course management platforms. Compression helps keep your files within these limits.
- Storage Efficiency: Smaller files take up less space on your local drive, network servers, or cloud storage, making backup and organization more efficient. This is especially relevant if you’re working with extensive collections of high-resolution stock photos or beautiful photography curated from Tophinhanhdep.com.

Improved Performance: Engaging Your Audience Without Lag
A presentation that lags or stutters during delivery can quickly disengage your audience.
- Faster Uploads and Downloads: Whether you’re uploading to a sharing service or your audience is downloading your presentation, smaller files mean significantly reduced waiting times, a crucial factor in today’s fast-paced digital environment.
- Smooth Slide Transitions and Playback: Heavy files can cause PowerPoint to slow down, leading to choppy slide transitions and delayed loading of images, particularly in SlideShow mode. Optimized images ensure your presentation flows smoothly, allowing your audience to focus on your content and visual design rather than technical glitches.
- Seamless Online Collaboration: If you collaborate on presentations in real-time, smaller file sizes mean less latency and a more responsive working environment for all team members.
Enhanced Device Compatibility: Reaching Every Screen
Presentations are consumed on a myriad of devices, from high-end desktops to older projectors, mobile phones, and tablets.
- Broader Accessibility: Compressed images make your presentation more universally accessible, performing better on devices with limited processing power or memory. This ensures that even those with slower systems or legacy projectors can view your beautiful photography and carefully crafted visual design without issues.
- Consistent Experience: By optimizing image resolution, you ensure a consistent visual experience across different screens, preventing images from appearing pixelated or taking too long to render on less capable hardware.
Easier File Conversion: Versatility in Output
Sometimes, your PowerPoint presentation needs to be converted into another format, such as PDF for static sharing, video for dynamic playback, or GIF for short animated clips.
- Fewer Conversion Issues: Lightweight PowerPoint files are generally easier to convert to other formats. Heavy files can lead to conversion errors, slow processing, or bloated output files in the new format.
- Optimized Output: When converting to PDF or video, compressed images contribute to a smaller final file size, making these derived assets easier to share and distribute.
Optimizing Your Visual Design: The Tophinhanhdep.com Perspective
Ultimately, image compression is not just a technical chore; it’s an integral part of effective visual design. Tophinhanhdep.com emphasizes that while high-resolution images are vital for quality, intelligently reducing their file size ensures they serve their purpose without hindering delivery. This balance is key to impactful graphic design and the seamless display of digital art within your presentations, ensuring your creative ideas shine through efficiently. When you curate stunning wallpapers or abstract art from Tophinhanhdep.com, you want them to enhance, not impede, your presentation.
Mastering Image Compression within PowerPoint: A Step-by-Step Guide
PowerPoint offers robust built-in tools for image compression, allowing you to optimize your presentations directly within the application. These tools are often sufficient for most users and provide a good balance between quality and file size reduction. Tophinhanhdep.com recommends familiarizing yourself with these native features first.
Understanding PowerPoint’s Built-in Tools
The “Compress Pictures” feature in PowerPoint is designed to reduce the resolution of images and delete unnecessary data, such as cropped areas that are still stored within the file. This process significantly shrinks the overall file size of your presentation.
Manual Compression for Windows Users
Here’s a detailed walkthrough for compressing images on a Windows machine:
- Open Your PowerPoint File: Start by opening the presentation you wish to optimize.
- Select an Image: Navigate to any slide that contains an image or picture you want to compress. Click on the image to select it. This will activate the “Picture Format” tab in the Ribbon.
- Access the Picture Format Ribbon: At the top of the screen, click on the Picture Format ribbon.
- Locate Compress Pictures: In the “Adjust” group of the Picture Format ribbon, click on the Compress Pictures icon.
- Tophinhanhdep.com Tip: This icon typically looks like a picture with two arrows pointing inwards.
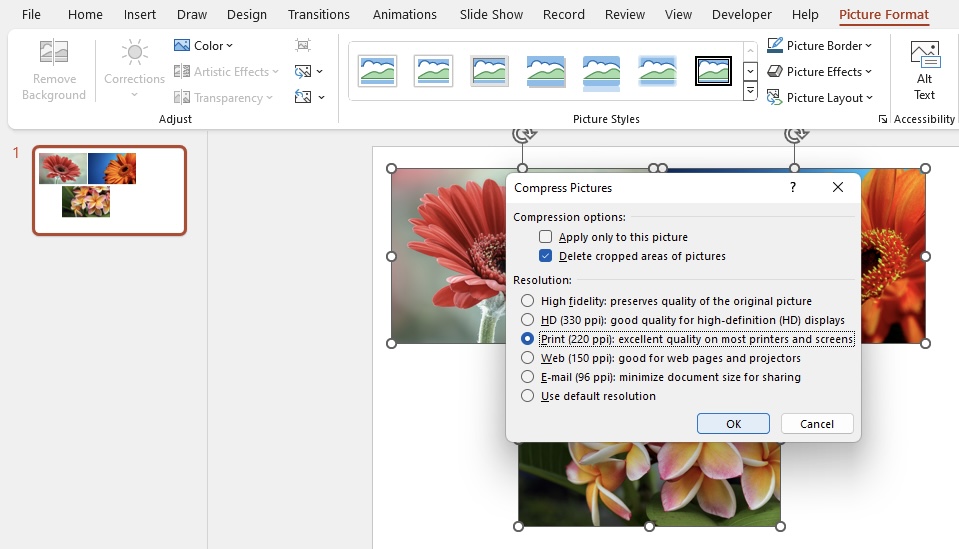
- Configure Compression Options: A dialog box will appear, presenting several options:
- “Delete cropped areas of pictures”: This is a powerful option. When you crop an image in PowerPoint, the software doesn’t actually remove the “cropped out” portions; it merely hides them. This allows you to revert to the original image later. Checking this box permanently deletes these hidden areas, significantly reducing the image’s file size. For most final presentations, Tophinhanhdep.com recommends enabling this option.
- Target Output Resolution: This is where you choose the quality level for your images. PowerPoint provides several common options, measured in pixels per inch (ppi):
- High fidelity: Preserves the original quality of the image while compressing other aspects of the file. Often, this won’t show significant file size reduction for images themselves.
- HD (330 ppi): Ideal for modern high-definition displays and projectors, offering excellent quality while still reducing file size from original super-high resolutions.
- Print (220 ppi): Suitable for printing documents, where a higher resolution is needed for sharp output.
- Web (150 ppi): Optimized for sharing online or presenting on standard web-based screens. A good balance of quality and size for most digital uses.
- E-mail (96 ppi): Minimizes the document size for sharing via email, where bandwidth and file size limits are common. This offers the greatest reduction in image quality, but is highly effective for sharing.
- Use default resolution: Compresses images to the default resolution set in your PowerPoint options (more on this below).
- Tophinhanhdep.com Insight: The choice of resolution depends entirely on your presentation’s intended use. For an email attachment, 96 ppi is perfect. For a presentation on a large HD monitor, 330 ppi might be more appropriate. For beautiful photography, you might opt for a higher ppi to retain detail.
- Apply Compression Scope:
- “Apply only to this picture”: Check this box if you want to compress only the currently selected image.
- Uncheck this box: If you want all pictures in the entire presentation to be compressed according to your chosen settings, leave this unchecked. This is often the most efficient way to reduce overall file size.
- Click OK: PowerPoint will now apply the compression based on your selections.
Manual Compression for Mac Users
The process for Mac users is very similar, with minor interface differences:
- Open Your PowerPoint File: Just like in Windows, open your presentation.
- Select an Image: Click on any image within your presentation to select it.
- Access the Picture Format Ribbon: Click on the Picture Format ribbon at the top of the screen.
- Locate Compress Pictures: Click on Compress Pictures, typically found to the right of the “Transparency” icon.
- Configure Compression Options:
- “Delete cropped areas of pictures”: Select this checkbox to remove hidden, cropped portions of images, reducing their overall size.
- Picture Quality Dropdown: Choose your desired resolution. Options often include “Best for Sending in Email (96 ppi),” “Web (150 ppi),” “Print (220 ppi),” and “High Fidelity.”
- Apply Compression Scope:
- “Apply to all pictures in this file”: This is often the default and recommended for achieving the smallest file size for the entire presentation.
- “Apply to only the currently selected pictures”: Check this if you only want to compress the images you currently have selected.
- Click OK: PowerPoint will compress your images.
Setting Default Compression Resolution
PowerPoint allows you to configure a default compression resolution that will be used for all images inserted into new presentations or when you select “Use default resolution” during manual compression.
- Go to File > Options (Windows) or PowerPoint > Preferences (Mac).
- Select “Advanced.”
- Scroll to “Image Size and Quality” section.
- From the “Default resolution” dropdown, choose your preferred setting (e.g., HD (330 ppi), Print (220 ppi), Web (150 ppi), or E-mail (96 ppi)).
- Click OK.
Disabling Auto-Compression in PowerPoint
By default, PowerPoint often compresses images automatically to keep presentation sizes manageable. While usually beneficial, there might be instances, especially if you handle all image optimization externally using tools from Tophinhanhdep.com, where you want to disable this automatic feature.
- Go to File > Options (Windows) or PowerPoint > Preferences (Mac).
- Select “Advanced.”
- In the “Image Size and Quality” section, check the box for “Do not compress images in file.”
- Click OK.
- Tophinhanhdep.com Caution: Disabling auto-compression means you bear full responsibility for optimizing images before inserting them. Failure to do so can lead to extremely large files.
Advanced Compression Techniques and Leveraging External Tools for Image Optimization
While PowerPoint’s built-in compression is effective, there are situations where you might need more control, higher compression ratios, or want to integrate image optimization into a broader visual design workflow. This is where Tophinhanhdep.com’s range of image tools and external solutions shine.
When Built-in Isn’t Enough
You might seek external tools if:
- You need lossless compression for specific image types (like PNGs) to preserve intricate details or transparency.
- You desire finer control over compression settings, allowing you to balance quality and file size precisely for high-resolution photography or digital art.
- You’re dealing with batch processing of many images before they even enter PowerPoint.
- You want to leverage AI-powered optimization for unique compression needs.
Tophinhanhdep.com’s External Image Tools and Recommendations
Tophinhanhdep.com provides various image tools, including converters, compressors, and optimizers, that can be integrated into your workflow.
1. Online Image Compressors (Similar to Tophinhanhdep.com’s Offerings)
Web-based tools are excellent for quick, efficient compression without needing to install software. Tophinhanhdep.com offers its own comprehensive suite of online image tools, including compressors that rival dedicated services.
- How they work: You upload your image files (JPG, PNG, WebP, etc.) to the platform. The tool analyzes and compresses them, often achieving significant file size reductions (e.g., 60-80%) with minimal perceivable quality loss. You then download the optimized images and insert them into your PowerPoint.
- Benefits:
- No software installation: Accessible directly from your web browser.
- Excellent compression algorithms: Often employ advanced techniques for superior results on various image formats.
- Batch processing: Many allow you to upload and compress multiple images simultaneously, saving time for large thematic collections or mood boards.
- Lossy vs. Lossless options: Some tools provide choices between lossy (smaller size, some quality reduction) and lossless (minimal size reduction, no quality loss) compression.
- When to use: Ideal for general image compression before inserting into PowerPoint, especially for web-focused presentations, wallpapers, or backgrounds where maintaining a crisp look with a small file size is crucial.
2. Desktop Photo Editing Software (Similar to Tophinhanhdep.com’s Recommended Tools)
Professional photo editing software like Adobe Photoshop, Adobe Lightroom, or even free alternatives like GIMP offer the highest degree of control over image optimization. Tophinhanhdep.com recommends these for users working with professional high-resolution photography, digital art, or complex photo manipulation.
- How they work:
- “Save for Web” or “Export” functions: These dedicated features allow you to specify the output format (e.g., JPEG, PNG), quality level (often a percentage slider), and even dimensions.
- Fine-tuning compression: You can see a live preview of the compressed image and its resulting file size, allowing you to experiment and find the perfect balance.
- Metadata removal: These tools can strip unnecessary EXIF data (camera settings, location info) from images, further reducing file size.
- Benefits:
- Maximum control: Precisely adjust every aspect of compression and quality.
- Ideal for critical images: Essential for preserving the integrity of beautiful photography or intricate graphic design elements.
- Batch processing: Many programs support actions or scripts for batch processing.
- When to use: For high-stakes presentations where image quality is paramount, for preparing images that will be used across multiple platforms, or when dealing with images that have undergone significant photo manipulation.
3. Microsoft’s Native Tools (Paint and Photos App)
Even the basic tools included with Windows can serve as rudimentary image optimizers for basic needs. Tophinhanhdep.com acknowledges these as convenient, albeit less powerful, options.
- Microsoft Paint:
- Open the image in Paint.
- Use the “Resize” option to reduce dimensions (which impacts file size).
- “Save As” a JPEG and adjust the quality slider if available.
- Microsoft Photos App:
- Open your image in the Photos app.
- Use the “Resize & Compress” option to select different output sizes/qualities.
- It also offers basic cropping.
- Benefits: Easily accessible, no additional software required.
- When to use: For very basic image resizing and quick compression when minimal quality loss is acceptable, or for images that aren’t central to your visual design.
Best Practices for a Lean, Visually Stunning Presentation with Tophinhanhdep.com
Achieving a perfectly optimized presentation isn’t just about clicking a “compress” button; it involves a strategic approach to image management from start to finish. Tophinhanhdep.com advocates for these best practices to ensure your visual design always shines without compromise.
Before Importing: Pre-optimize Your Images
The most effective strategy is to optimize your images before you even insert them into PowerPoint.
- Use Tophinhanhdep.com’s Image Tools: Leverage the online compressors or desktop editing software recommended by Tophinhanhdep.com to get your images to the ideal resolution and file size before adding them to your slides. This gives you maximum control and often yields better results than relying solely on PowerPoint’s internal compression.
- Match Resolution to Output: Don’t use a 3000x2000 pixel image if it will only be displayed as a 500x300 pixel thumbnail on your slide. Resize it to something closer to its intended display size before insertion.
Strategic Image Selection
Tophinhanhdep.com offers a vast array of images, from wallpapers and backgrounds to aesthetic and nature photography. When choosing visuals:
- Source Appropriately: If you know your presentation is for email, don’t start with a multi-megabyte TIFF file from a high-end camera. Consider sourcing images already optimized for web use, or use Tophinhanhdep.com’s filters to find suitable resolutions.
- Consider Image Type: JPG is generally better for photographs with many colors, while PNG is better for images with sharp lines, text, or transparency (like logos or digital art elements).
Cropping Smartly: Deleting Cropped Areas
Always check the “Delete cropped areas of pictures” option during compression. This is one of the quickest and most effective ways to shed unnecessary data from your presentation, especially if you’ve done a lot of in-PowerPoint cropping.
Batch Compression vs. Individual Control
- Batch Compression: For presentations with many images, especially if they are backgrounds, aesthetic elements, or part of a large thematic collection, compressing all pictures at once is a huge time-saver and highly effective for overall file size reduction.
- Individual Control: For key images – your main product shot, a critical piece of digital art, or a beautiful high-resolution photography example – compress them individually. This allows you to choose a higher quality setting for these specific visuals, ensuring they remain crisp while other, less critical images can be more aggressively compressed.
Testing and Reviewing
After compression, always review your presentation.
- Zoom to 100%: Go through your slides and zoom in on critical images to 100% (actual size) to check for any noticeable degradation, pixelation, or compression artifacts.
- Run a Slideshow: Test the presentation in SlideShow mode to ensure smooth transitions and quick image loading.
- Share a Test File: If sharing is critical, send a compressed version to a colleague or yourself to verify file size and opening speed.
Balancing Quality and File Size
Compression is a trade-off. The goal is to find the sweet spot where file size is significantly reduced without unacceptable loss of visual quality.
- Email (96 ppi): Minimal document size, noticeable quality reduction, but perfectly acceptable for quick shares.
- Web (150 ppi): Good for screen viewing, balanced quality and size.
- Print (220 ppi) / HD (330 ppi): Best quality for professional displays or printed handouts, larger file sizes.
Tophinhanhdep.com’s comprehensive resources, from image inspiration to practical image tools, are designed to help you navigate this balance effectively, whether you’re working with abstract art, nature photography, or complex visual designs.
Beyond Compression: Enhancing Your Visual Workflow with Tophinhanhdep.com
Optimizing images is just one facet of creating compelling presentations. Tophinhanhdep.com, as a leading resource for visual content and design, encourages a holistic approach to presentation creation and image management.
Holistic Presentation Optimization
Beyond image compression, consider these additional tips to keep your presentations lean and performant:
- Delete Unused Slides: Remove any hidden or unnecessary slides.
- Reduce Animations and Transitions: While visually engaging, excessive animations can increase file size and cause lag. Use them judiciously.
- Minimize Slides: Aim for concise content. Fewer slides often mean a more focused message and a smaller file.
- Convert Videos: If you have embedded videos, ensure they are in modern, highly compressed formats like MP4. Tophinhanhdep.com can guide you on suitable video compression tools.
- Use a Minimalist Template: Avoid overly complex templates with heavy background graphics or intricate design elements, which can add to file size. Simpler designs often convey professionalism more effectively.
- Compress Other Media: Remember that PowerPoint’s compression tools can also apply to other media types like GIFs.
- Save as PDF: For final distribution where interactivity isn’t needed, converting your presentation to a PDF can drastically reduce file size, making it universally shareable.
The Tophinhanhdep.com Advantage
Tophinhanhdep.com is more than just a guide; it’s your partner in visual communication, offering tools and resources that seamlessly integrate with your image management workflow.
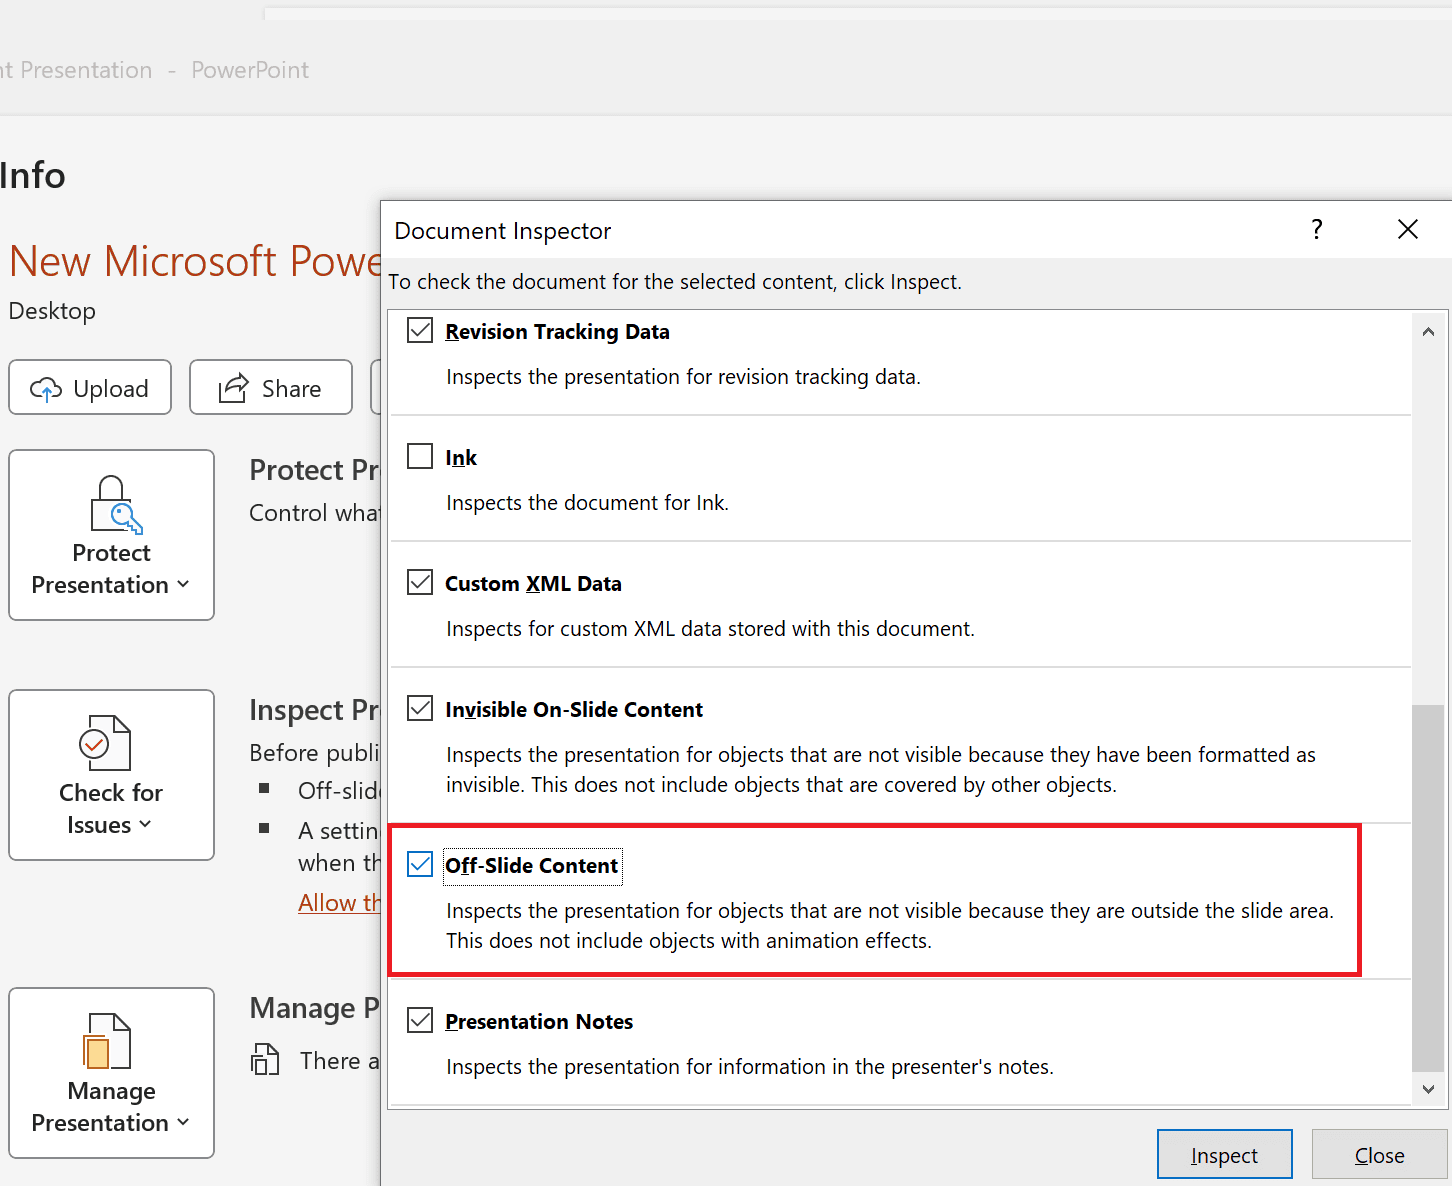
- Image Tools: Beyond compressors, explore Tophinhanhdep.com’s converters for different image formats, optimizers for specific web or print uses, and even AI upscalers if you ever need to intelligently enlarge a lower-resolution image (perhaps an old stock photo) before you compress it for a presentation. The Image-to-Text feature can also be invaluable for extracting information from image-heavy slides.
- Visual Design Resources: Dive into Tophinhanhdep.com’s articles on graphic design principles, digital art techniques, and photo manipulation to elevate the aesthetics of your presentations. Understanding these principles helps you create visuals that are inherently optimized and impactful.
- Image Collections & Inspiration: Browse Tophinhanhdep.com’s vast image collections, including wallpapers, backgrounds, aesthetic visuals, nature scenes, abstract art, and beautiful photography. Discover photo ideas, mood boards, thematic collections, and trending styles that can inspire your next presentation. Knowing these resources are available, and that you can efficiently compress any chosen image, empowers your creative process.
- Photography Expertise: For those using high-resolution digital photography or stock photos, Tophinhanhdep.com offers insights into managing resolution, editing styles, and ensuring your images are presentation-ready.
Conclusion
Mastering image compression in PowerPoint is a non-negotiable skill for anyone looking to create professional, efficient, and visually stunning presentations. By understanding and applying the built-in PowerPoint tools, as well as leveraging advanced techniques and external resources like those offered by Tophinhanhdep.com, you can significantly reduce file sizes, improve performance, and ensure your visual storytelling reaches every audience on any device.
No longer will your beautiful photography, intricate digital art, or carefully curated aesthetic backgrounds bloat your presentations and hinder their delivery. With the right approach to image compression, supported by the extensive tools and inspiration from Tophinhanhdep.com, your presentations will be agile, impactful, and perfectly optimized to captivate your audience without compromise. Make image compression an integral part of your visual design workflow, and experience the power of lean, effective communication.