How to Compress Images on Mac: A Comprehensive Guide to Optimizing Your Visuals

In an era dominated by high-resolution displays and sophisticated camera technology, the digital images we capture and create are more stunning than ever. From breathtaking nature photography and abstract art for wallpapers to high-resolution stock photos and meticulously crafted graphic designs, visuals are central to our digital lives. However, this pursuit of visual excellence often comes at a cost: increasingly large file sizes. Whether you’re an avid photographer, a graphic designer, a digital artist, or simply someone who frequently handles images on your Mac, managing these large files is a common challenge.
Large image files consume valuable storage space on your MacBook’s SSD, iCloud, and other storage solutions. They also significantly slow down sharing via email, messages, or cloud services, and can impact website loading times. The good news is that image compression offers a powerful solution, allowing you to reduce file sizes without noticeable quality degradation in most scenarios. At Tophinhanhdep.com, we understand the importance of efficient image management, complementing our vast collections of wallpapers, backgrounds, and inspirational photography with robust tools for optimization. This guide will walk you through various free and easy methods to compress images on your Mac, ensuring your visuals remain beautiful and manageable.
Understanding the Factors Behind Image File Size
Before diving into compression techniques, it’s beneficial to understand what makes an image file large. Several factors contribute to an image’s overall file size:
- Image Dimensions (Resolution): This refers to the width and height of an image in pixels (e.g., 1920x1080, 4000x2800). Naturally, an image with more pixels contains more data, resulting in a larger file size. High-resolution photography, especially for aesthetic and nature wallpapers, often starts with very large dimensions.
- Image Format: Different image formats use different compression algorithms.
- JPEG/JPG: This format uses “lossy” compression, meaning some data is discarded during compression to achieve smaller file sizes. It’s ideal for photographs and complex images with many colors and gradients, offering a good balance between quality and file size.
- PNG: This format uses “lossless” compression, preserving all original image data, making it suitable for images with sharp lines, text, or transparent backgrounds (like screenshots or digital art elements). However, PNG files are typically larger than JPEGs for photographic content.
- HEIC: Apple’s High-Efficiency Image Container (HEIC) format offers superior compression efficiency compared to JPEG, especially for photos taken with newer iPhones, resulting in significantly smaller files with comparable or better quality. However, its compatibility might be less universal than JPEG.
- Image Content and Color Depth: Images with complex patterns, a wide range of colors, and high color depth tend to be larger than simpler images with fewer colors or large areas of uniform color.
- Camera Type and Settings: Images captured by high-megapixel primary cameras (e.g., on an iPhone Pro or professional digital photography equipment) will naturally have larger file sizes than those from a front camera or webcam. Using flash can also subtly increase file size.
- Screen Resolution: Screenshots taken on Retina displays have higher pixel dimensions, leading to larger file sizes compared to non-Retina displays.
By understanding these factors, you can make informed decisions about which compression method is best suited for your specific image and desired outcome, whether you’re optimizing a beautiful landscape photograph or a graphic design element.
Leveraging Built-in macOS Tools for Effortless Compression
Your Mac comes equipped with powerful, free tools that allow you to compress images directly, saving you from needing third-party software for many common tasks. These tools are integrated into the macOS experience, making the process seamless.
Preview: Your Mac’s Versatile Image Compressor and Editor
Preview is not just for viewing images; it’s a surprisingly robust image editor and compressor. It offers fine-grained control over file size reduction for single or multiple images.
Compressing a Single Image with Preview:
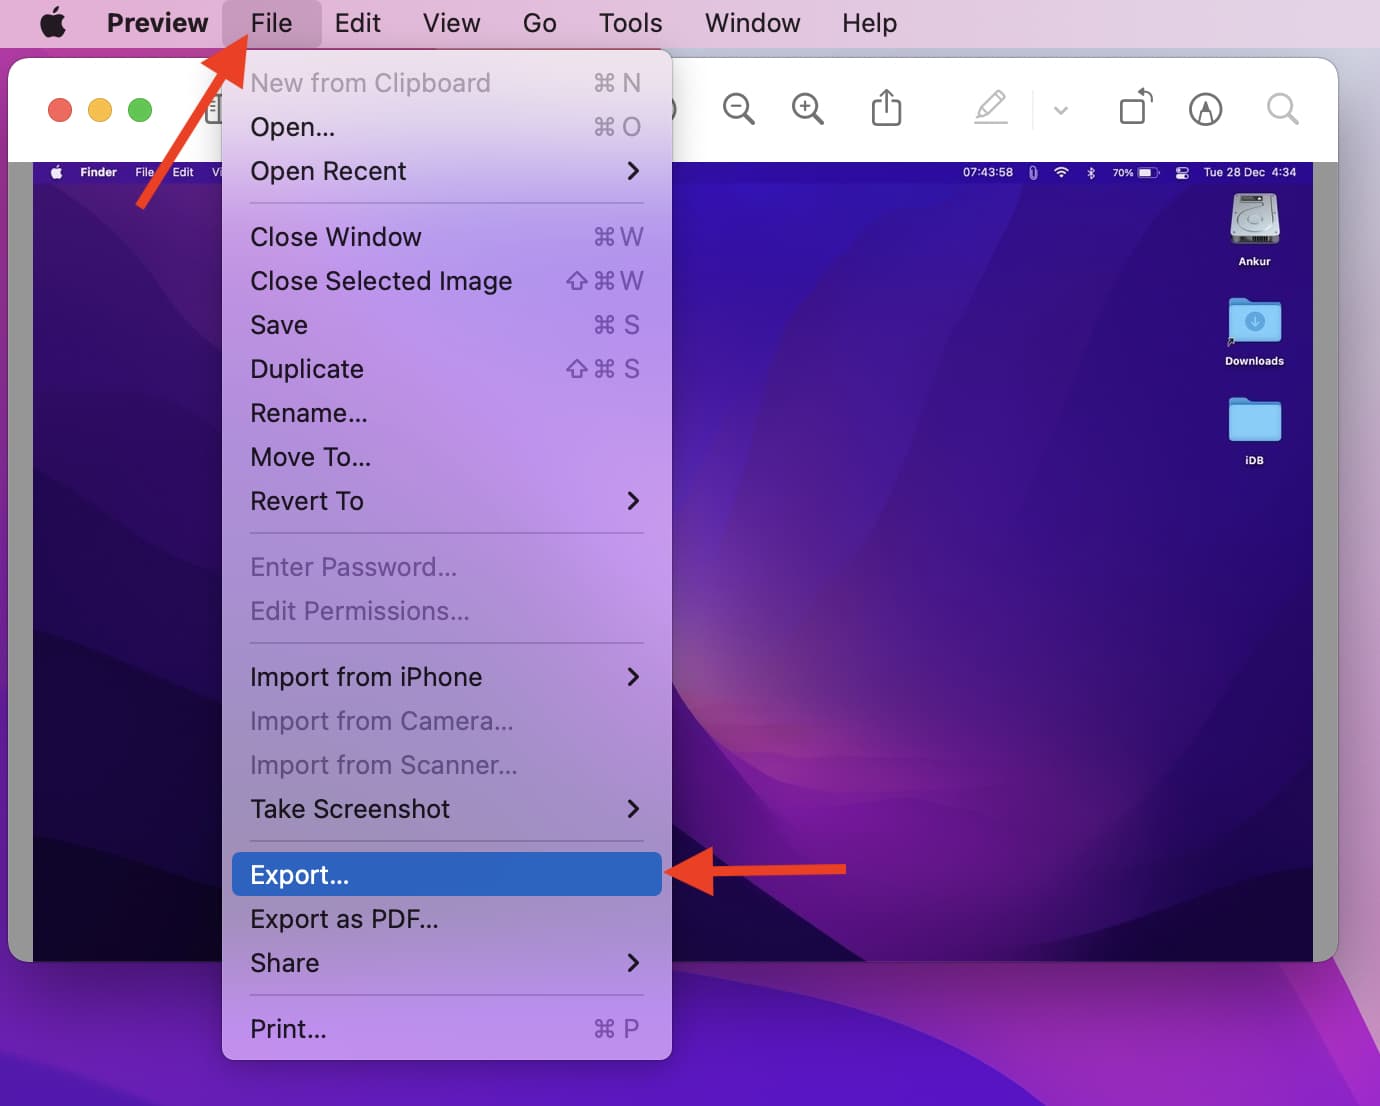
- Open the Image: Double-click the image file to open it in the Preview app.
- Access Export Options: From the top menu bar, click
File > Export. - Choose Format and Adjust Quality:
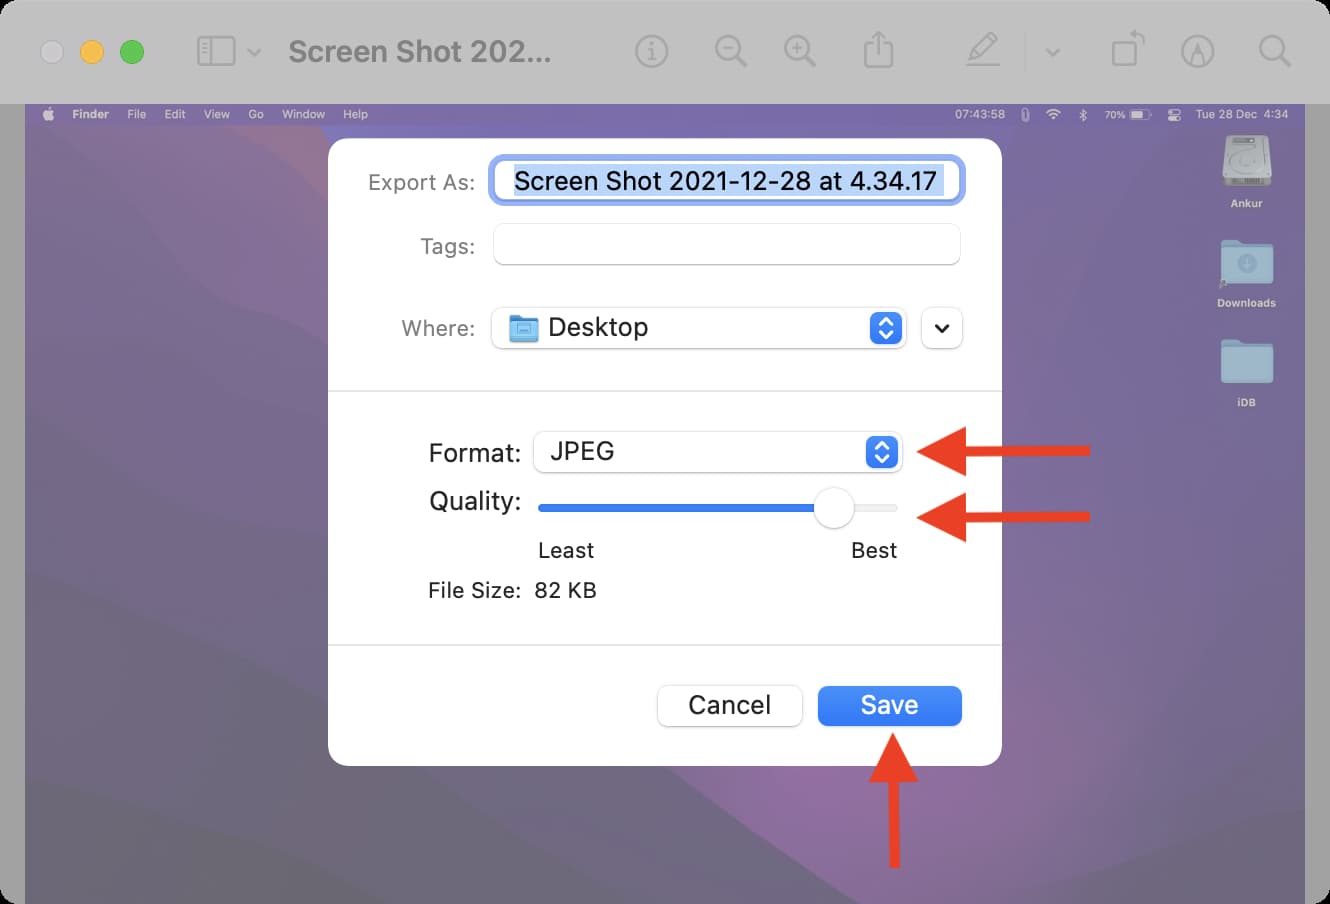
- Format: Select your desired output format.
JPEGis generally recommended for photos due to its excellent size-to-quality ratio.HEICcan offer even greater savings if compatibility isn’t an issue. - Quality Slider: This is where the magic happens. Drag the “Quality” slider to the left to reduce the file size. As you adjust it, you’ll see the estimated file size update, allowing you to find the optimal balance. For most users, a quality setting between 75% and 95% offers significant savings with imperceptible quality loss.
- Format: Select your desired output format.
- Save the Compressed Image: Once satisfied, click
Save, choose a destination, and give your new file a name.
Batch Compressing Images with Preview:
If you have multiple images – perhaps a collection of beautiful photography or a series of visual design assets – Preview can handle them in a batch:
- Select Images: In a Finder folder, select all the images you wish to compress by holding the
Commandkey and clicking each one, or pressCommand + Ato select all. - Open with Preview: Right-click (or Control-click) any selected image and choose
Open With > Preview. - Export Selected Images: In the Preview app, ensure all image thumbnails are selected in the left sidebar (if not, press
Command + A). Then, from the top menu bar, clickFile > Export Selected Images. - Set Options and Export:
- Click
Show OptionsorOptionsat the bottom of the dialog box. - Choose your
Formatand adjust theQualityslider as you would for a single image. - Finally, click
Chooseto select a save location and compress all selected images.
- Click
- Troubleshooting “Cannot export selected items” in Preview: This error often occurs when trying to batch export images of different formats (e.g., JPEG and PNG) simultaneously. To resolve this:
- Click
Okon the error message. - Hold the
Commandkey and unselect images of different formats from the left sidebar. Try exporting again. - Alternatively, return to the Finder folder, click
Kindto sort your images by format, and then select and open only the pictures of a single format (e.g., all JPEGs) in Preview for compression.
- Click
Finder Quick Actions: Rapid Image Conversion and Resizing
For quick, on-the-fly compression, macOS Monterey and later versions offer “Quick Actions” directly in Finder. This is particularly useful for reducing the size of wallpapers or backgrounds you’ve just downloaded from Tophinhanhdep.com.
- Select Images: Select one or more images in Finder.
- Access Quick Actions: Right-click (or Control-click) the selected image(s) and choose
Quick Actions > Convert Image. - Configure Conversion:
- Format:
JPEGis typically the default and a good choice for general image compression. - Image Size: This crucial dropdown menu allows you to reduce image dimensions. Choose
Small,Medium, orLarge. SelectingActual Sizewill only provide significant savings if you’re changing the format (e.g., PNG to JPEG), not if you’re staying with the same format. - Preserve metadata: Uncheck this if you want to remove embedded photo details like date, time, and location, which can offer minor additional file size savings.
- Format:
- Convert and Save: Click
Convert to [Format Name]to save the compressed version(s) in the same location as the original.
Photos App: Compressing Your Photo Library
If your images are already organized within the macOS Photos app – perhaps a collection of beautiful photography or thematic collections – you can compress them during export.
- Select Photos: Open the Photos app and select one or more pictures you wish to compress.
- Export Photos: Press
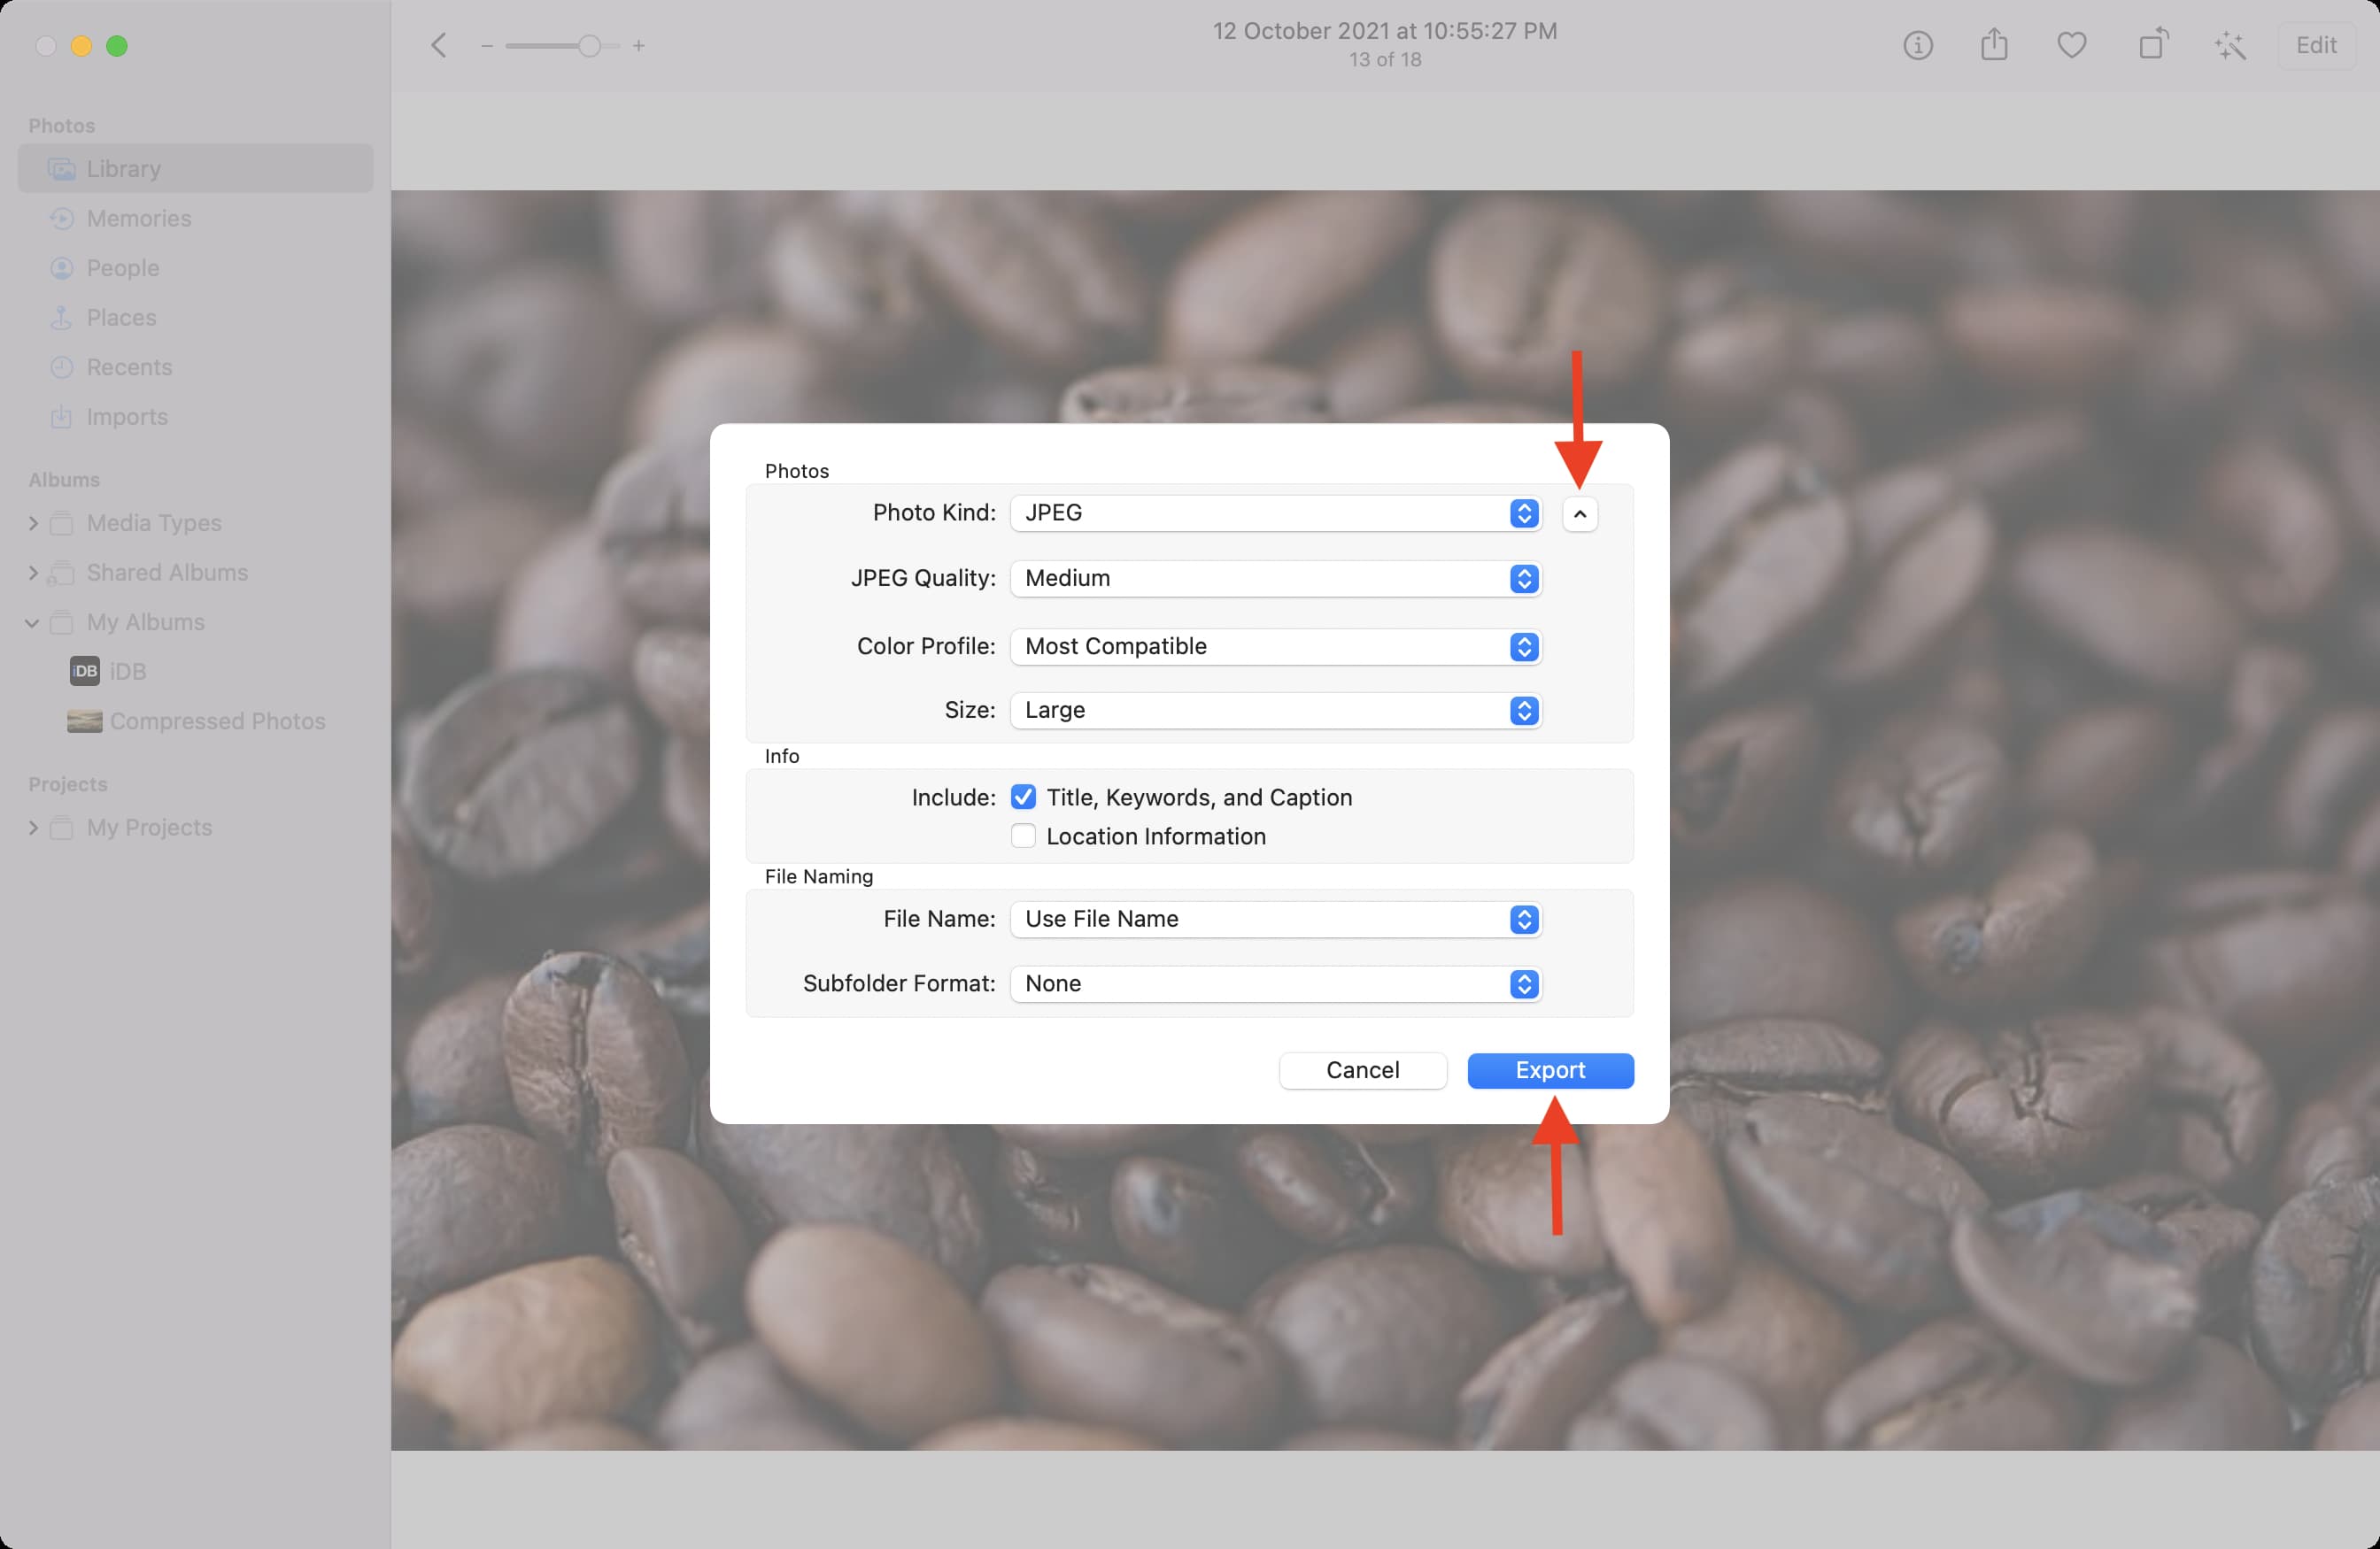
Command + Shift + E, or go toFile > Export > Export Photos. - Adjust Export Settings:
- Click the tiny arrow next to
Photo Kindto reveal more options. - Set the
Photo Kind(e.g., JPEG, HEIC),Quality, andSizeaccording to your compression needs.
- Click the tiny arrow next to
- Export: Click
Export, choose a destination, and confirm.
Strategic Approaches to Maximizing Compression Efficiency
Beyond simply using the tools, adopting a strategic mindset about image format and dimensions can dramatically improve your compression results.
Optimizing by Changing Image Format
As highlighted earlier, the choice of image format significantly impacts file size. For photographic content, converting PNGs to JPEGs can yield astounding reductions—sometimes up to 98%—with minimal visual difference. This is especially relevant for screenshots that aren’t primarily text-based. For text-heavy screenshots or images requiring transparency, PNG is still preferable. Tophinhanhdep.com often provides diverse image formats, and understanding when to convert is a key skill.
Resizing Images to Reduce Dimensions
A fundamental truth of digital images is that more pixels mean a larger file. If your image dimensions are unnecessarily large for its intended use (e.g., a 4000x2800 pixel image for a web thumbnail of 800x600 pixels), resizing it is one of the most effective compression strategies. This directly reduces the amount of data stored.
You can observe an image’s dimensions by selecting it in Finder and pressing Command + I. Both Preview and Finder’s Quick Actions allow you to reduce image dimensions, whether by selecting preset sizes or by manually inputting new pixel values. For instance, resizing a 6000x4000px image to 1080x720px can drastically cut its file size, making it perfect for online sharing or blog posts without the need for high-resolution stock photos.
Advanced & Third-Party Image Compression Solutions
While built-in macOS tools are excellent for most users, certain scenarios or a desire for specialized compression might lead you to explore dedicated applications or online services. Tophinhanhdep.com, with its focus on visual design and image tools, recommends several advanced options.
Dedicated Mac Compression Applications
The Mac App Store offers a variety of applications specifically designed for image compression. Searching for “compress images” will reveal many options. For users with Apple Silicon Macs, some iPhone/iPad apps, like “Compress Photos & Pictures,” can even be installed and run directly on your computer, offering a familiar interface for mobile-optimized compression.
One highly regarded lossless compression tool for Mac is ImageOptim. Lossless compression means it reduces file size without discarding any visual information, maintaining the exact image quality. ImageOptim achieves this by:
- Stripping Metadata: It removes unnecessary EXIF data (camera settings, date, location) and other extraneous information embedded in the file.
- Applying Advanced Algorithms: It re-encodes image data using optimized lossless compression algorithms.
How to Use ImageOptim:
- Download: Obtain ImageOptim (available for free from its developer).
- Drag and Drop: Open ImageOptim and simply drag and drop your image files into its window.
- Automatic Compression: The app will automatically process the images, informing you of the exact file size savings achieved.
ImageOptim works quickly and effectively across various formats (JPEG, PNG, GIF, WebP). For the absolute best compression results, a common workflow is to first use Preview to convert an image to JPEG and reduce its quality slightly (lossy compression), then run that JPEG through ImageOptim for further lossless optimization. This “stacked” approach can lead to astonishing file size reductions, often shrinking an 8MB photo to less than 500KB without any noticeable visual difference for the average viewer. This is crucial for optimizing images for web use or for creating compact thematic collections.
Tophinhanhdep.com’s Online Image Tools
For quick, batch compression without installing software, online image tools are incredibly convenient. Tophinhanhdep.com provides a suite of online “Image Tools” including Converters, Compressors, and Optimizers. These web-based platforms allow you to upload images directly and perform compression tasks.
Benefits of Tophinhanhdep.com’s Online Compressors:
- Platform Agnostic: Accessible from any device with a web browser, including Mac, Windows, or mobile.
- Batch Processing: Efficiently compress multiple photos in one go.
- Customizable Settings: Often allow you to specify desired file size (MB or KB), choose between “Better Quality” or “Smaller Size” presets, and select output formats (e.g., Compress JPEG, Compress PNG, Compress GIF).
- No Installation Required: Ideal for occasional use or when you’re on a different computer.
How to Use Tophinhanhdep.com’s Online Compressors:
- Navigate: Go to Tophinhanhdep.com and locate the “Image Tools” section, then select “Compress Images.”
- Upload: Drag and drop your image files into the designated area.
- Adjust Settings: Choose your desired compression level or target file size.
- Compress & Download: Initiate the compression and then download your optimized images. They can typically be saved to your Mac’s Downloads folder or directly to cloud storage services.
A Note on Privacy: When using any online service, you are uploading your images to external servers. For highly personal or sensitive photos (like identity documents or private images), it is always advisable to use offline, built-in Mac tools or dedicated desktop applications to maintain privacy. Tophinhanhdep.com prioritizes user data security, but understanding the nature of online services is important.
Optimizing Images for Visual Design and Creative Projects
Image compression isn’t just about saving space; it’s a critical component of effective visual design, photography workflows, and digital content creation. Tophinhanhdep.com champions not just beautiful visuals but also their practical application.
Enhancing Web Performance and User Experience
For web developers, bloggers, or anyone publishing content online (including stunning aesthetic wallpapers or high-resolution stock photos), compressed images are non-negotiable. Faster loading times improve SEO, reduce bounce rates, and provide a smoother user experience. Compressing graphic design elements and digital art before uploading ensures your creative ideas are presented efficiently.
Managing High-Resolution Photography and Thematic Collections
Photographers often work with very large RAW or high-quality JPEG files. Compressing these for portfolio websites, client proofs, or social media is standard practice. Tophinhanhdep.com’s “Image Inspiration & Collections” features highlight how optimized images can still maintain their impact, allowing for vast thematic collections without overwhelming storage. Whether it’s nature, abstract, or beautiful photography, the ability to store and share these efficiently is invaluable.
The Role of AI in Image Optimization
It’s also worth noting the evolution of image tools. While compression reduces file size, sometimes too aggressively, AI Upscalers (like those offered by Tophinhanhdep.com) can intelligently enhance or restore image quality and resolution. This creates a powerful workflow: compress images for storage and speed, and then use an AI Upscaler if a higher-quality version is needed for a specific display or print application later on, ensuring your visual assets remain versatile.
Conclusion
Mastering image compression on your Mac is an essential skill for anyone dealing with digital visuals. Whether you’re optimizing stunning wallpapers, preparing high-resolution photography for online galleries, or managing visual design assets, the ability to reduce file sizes efficiently is invaluable. Your Mac offers a suite of free, built-in tools like Preview, Finder Quick Actions, and the Photos app that handle most compression needs with ease. For more advanced or lossless optimization, dedicated applications like ImageOptim provide powerful solutions. And for ultimate convenience and batch processing, Tophinhanhdep.com’s online image tools offer robust features accessible from anywhere.
By understanding the factors influencing file size and applying these diverse compression techniques, you can effectively manage your digital assets, save storage space, accelerate sharing, and enhance the overall performance of your creative projects. Explore Tophinhanhdep.com not only for inspiring images and beautiful photography but also for the practical “Image Tools” that empower you to optimize your visual world.