Mastering Image Compression: A Comprehensive Guide for Tophinhanhdep.com Users

In the vibrant world of digital imagery, where every pixel contributes to the overall aesthetic, the sheer size of high-resolution images can often present a challenge. Whether you’re a professional photographer capturing stunning high-resolution shots, a graphic designer crafting intricate digital art, or simply an enthusiast collecting beautiful wallpapers and backgrounds, managing large image files is an essential skill. Large files consume valuable storage space, slow down websites, and can be cumbersome to share via email or cloud services.
At Tophinhanhdep.com, we understand the importance of visual excellence and efficient digital asset management. Our platform is dedicated to providing inspiration and tools for everything from aesthetic nature shots to abstract art and trending visual designs. This comprehensive guide will delve into the art and science of image compression, empowering you to optimize your visual content without sacrificing its impact. We’ll explore various methods – from built-in system tools to advanced software and online compressors – all tailored to help you maintain a seamless workflow, preserve your creative vision, and make the most of Tophinhanhdep.com’s resources.

1. Understanding Image Compression: Why and How it Works
Image compression is the process of reducing the file size of an image. This might sound counterintuitive for those passionate about high-resolution photography and digital art, but it’s a critical technique for modern digital workflows.
1.1 The Imperative for Image Compression
Why should Tophinhanhdep.com users care about compressing images? The reasons are numerous and directly impact your ability to store, share, and showcase your visual assets effectively:

- Storage Efficiency: Your vast collections of wallpapers, backgrounds, aesthetic shots, and beautiful photography can quickly fill up hard drives and cloud storage. Compression frees up significant space, allowing you to store more of your treasured images. For high-resolution stock photos and thematic collections, this is invaluable.
- Faster Sharing: Sending multiple high-resolution images as email attachments can be frustrating due to file size limits. Compressed images are quicker and easier to send, ensuring your photo ideas and mood boards reach collaborators without delay.
- Improved Website Performance: For photographers showcasing their digital photography portfolios or designers presenting their creative ideas, website load speed is paramount. Heavily optimized images ensure faster loading times, enhance user experience, and even boost search engine rankings for Tophinhanhdep.com users’ online presence.
- Efficient Workflow: In graphic design and photo manipulation, working with smaller files can lead to smoother software performance and quicker project completion, especially when dealing with complex multi-layered digital art.
1.2 The Inevitable Trade-off: Quality vs. Size
It’s crucial to understand that image compression, particularly for photographs, almost always involves a trade-off: reduced file size often means a slight, or sometimes significant, reduction in image quality. As a general rule, there is no way to compress a photo while retaining its exact original quality. The goal is to find the optimal balance where the file size is drastically reduced, but the perceived quality remains acceptable for its intended use.
1.3 Lossless vs. Lossy Compression
To achieve this balance, it’s helpful to distinguish between two primary types of compression:
- Lossless Compression: This method reduces file size without discarding any data. When the image is decompressed, it is an exact replica of the original. Formats like PNG and GIF often utilize lossless compression. This is ideal for graphic design elements, logos, screenshots, or digital art with sharp edges and transparent backgrounds, where pixel-perfect accuracy is vital. For Tophinhanhdep.com users focusing on precise visual design, lossless is preferred.
- Lossy Compression: This method permanently removes some redundant or less perceptible image data during compression. Once the data is removed, it cannot be recovered. JPEG is the most common lossy format, predominantly used for photographs. While it results in much smaller file sizes than lossless methods, it’s crucial to apply it carefully. The human eye is often less sensitive to minor detail loss in complex photographic images, making lossy compression highly effective for beautiful photography and high-resolution images, especially when destined for web or email.
Understanding these fundamentals sets the stage for choosing the right compression technique for your specific visual assets.
2. Built-in Compression Tools for Everyday Image Management
Before diving into specialized software, it’s worth noting that most operating systems offer straightforward, built-in methods for file compression. While these typically create archives (like ZIP files) that contain images rather than directly compressing the images themselves with fine-tuned quality settings, they are incredibly useful for grouping and shrinking collections of files for storage or easy transfer.
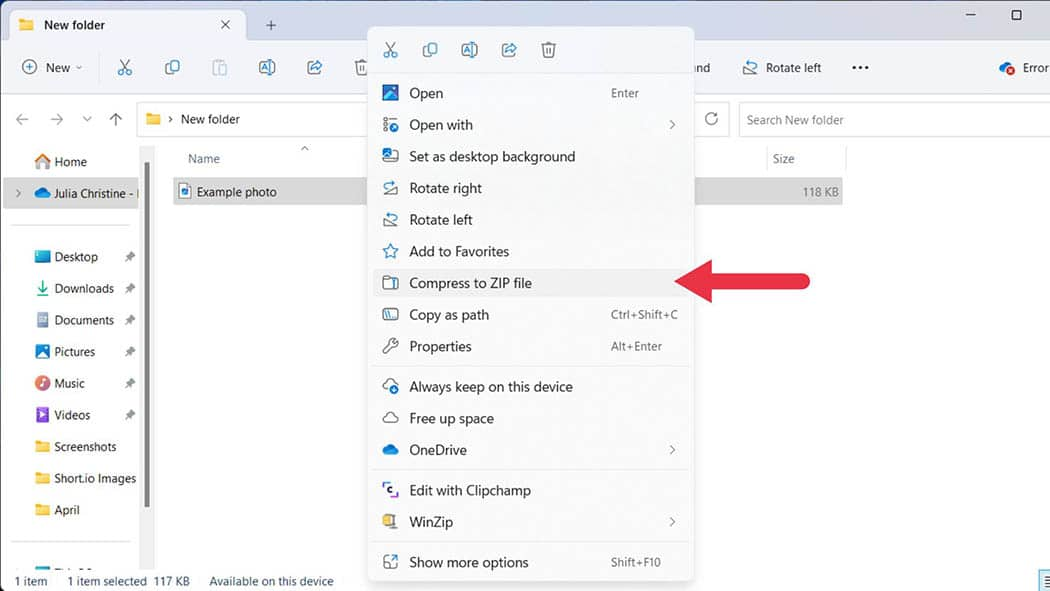
2.1 Compressing Files and Folders on Windows
Windows’ native File Explorer provides a quick way to compress one or more files and folders into a ZIP archive. This is particularly handy for organizing a thematic collection of images or a batch of photo ideas before sharing.
Step-by-Step Instructions:
- Locate Your Files: Open File Explorer and navigate to the folder containing the images or other files you wish to compress.
- Select Files/Folders: Select the individual images or the entire folder. If compressing multiple non-contiguous files, hold down the
Ctrlkey while clicking each file. - Right-Click: Right-click on any of the selected files or the folder.
- Send To: From the context menu that appears, hover your mouse over “Send to”.
- Choose Compressed (zipped) Folder: Select “Compressed (zipped) folder” from the sub-menu.
- Rename (Optional): A new ZIP folder will be created in the same location as your original files, often with a highlighted name. You can rename it for better organization (e.g., “Nature_Photography_Compressed”).
- Ready to Use: Your compressed
.zipfile is now ready for storage, attachment to an email, or upload.
Uncompressing (Extracting) Files on Windows:
- Find the ZIP File: Locate the compressed
.zipfile. - Right-Click: Right-click on the
.zipfile. - Extract All: Select “Extract all…” from the context menu. This will open the “Windows Extraction Wizard.”
- Follow the Wizard: Choose a destination folder for the extracted files and click “Extract.” Ensure the “Show extracted files when complete” checkbox is ticked if you want to immediately view the contents.
2.2 Compressing Files and Folders on Mac
macOS offers an equally simple method to compress files and folders using Finder, creating standard ZIP archives.
Step-by-Step Instructions:
- Open Finder: Click the Finder icon (the blue smiley face) in your Dock.
- Locate Your Files: Navigate to the images or folders you want to compress.
- Select Files/Folders: Select the desired items. To select multiple files, hold down the
Commandkey while clicking. - Right-Click (or Control-Click): Right-click (or
Control+click) on your selection. - Compress: Choose “Compress [item name]” or “Compress [number] Items” from the context menu.
- Result: A new
.ziparchive will appear in the same directory, bearing the same name as the original item (or “Archive.zip” for multiple items).
Uncompressing (Extracting) Files on Mac:
- Double-Click: Simply double-click the
.zipfile. macOS’s built-in Archive Utility will automatically extract the contents to a new folder in the same location.
2.3 Compressing Images within Microsoft Office Applications
Tophinhanhdep.com users might frequently embed beautiful photography or digital art into documents, presentations, or spreadsheets. Microsoft Office applications (desktop versions, not web-based) have their own compression features to manage the file size of embedded images.
Step-by-Step Instructions (Windows & macOS):
- Open Your Document: Open the Office file (e.g., Word, PowerPoint, Excel) containing the images.
- Select Image(s): Click on the picture(s) you wish to compress. To select multiple, hold
Ctrl(Windows) orCommand(Mac) while clicking. - Access Picture Tools: Once an image is selected, the “Picture Tools” tab (or “Picture Format” tab on Mac) will appear in the ribbon. Click on it.
- Compress Pictures: In the “Adjust” group (Windows) or “Format” tab (Mac), locate and click the “Compress Pictures” button. (On smaller screens, you might only see an icon without a label).
- Choose Compression Options:
- Apply only to this picture: Tick this box if you only want to compress the currently selected image(s). Unticking it will apply changes to all images in the document.
- Resolution: Select the desired resolution based on where the document will be used:
- Print (220 ppi): High quality for printing.
- Web (150 ppi): Good for displaying on web pages.
- E-mail (96 ppi): Smallest size for sharing via email.
- Click OK: The images will be compressed within your document.
Additional Office Features for Image Management:
- Change Default Picture Resolution: You can set a default picture resolution for current or future documents via
File > Options > Advanced > Image Size and Quality. - Discard Editing Data: Office applications store data about all the edits you make to a picture. Selecting
File > Options > Advanced > Image Size and Quality > Discard editing datacan further reduce file size, though it means you can’t easily undo previous picture edits without re-inserting the original image.
These built-in methods are excellent for general file management and specific document optimization. However, for precise control over image quality and format, specialized tools are necessary.
3. Advanced Image Compression with Dedicated Tools and Platforms
For photographers, graphic designers, and anyone creating or curating visual content, Tophinhanhdep.com offers access to and insights into more sophisticated compression tools. These tools provide granular control over quality, format, and other settings, crucial for preserving the integrity of your digital photography and creative ideas while significantly reducing file sizes.
3.1 Online Image Compressors: Quick and Convenient
Online image compressors are a fantastic solution for fast, accessible image optimization without needing to install any software. Tophinhanhdep.com users can leverage various online platforms, including Tophinhanhdep.com’s own suite of image tools, to quickly process images.
Example Workflow (similar to online tools available through Tophinhanhdep.com):
- Access the Compressor: Navigate to an online image compressor, such as one integrated into Tophinhanhdep.com’s “Image Tools” section.
- Upload Your Files: Click the “UPLOAD FILES” button. You can typically select multiple image formats like JPEG, PNG, GIF, WebP, and HEIC, often up to 20 files at once.
- Select an Image: Once uploaded, thumbnails of your images will appear. Click on an individual image’s thumbnail to fine-tune its settings.
- Adjust Compression Quality: A “Quality” slider will usually be available, allowing you to visually compare the uncompressed version with the compressed output. Drag the slider to the left for higher compression (smaller file size) or to the right for higher quality (larger file size). This visual feedback is invaluable for aesthetic images or beautiful photography.
- Apply Settings: Click “APPLY” to commit your chosen compression level to that image. You can repeat this process for other images or let the tool apply its default intelligent compression.
- Download Compressed Files: Once satisfied, click “DOWNLOAD ALL.” The tool will often package all compressed images into a single ZIP folder for easy download.
- Extract: Remember to extract the contents of the downloaded ZIP folder to access your individually compressed images.
Advantages of Online Compressors:
- Accessibility: Use from any device with an internet connection.
- No Installation: Avoids software downloads and updates.
- Visual Feedback: Many offer live previews to help you balance quality and size for your photo ideas and mood boards.
- Multi-format Support: Handles various file types, including new formats like HEIC, which Tophinhanhdep.com converts and optimizes for broader compatibility.
Considerations: Be mindful of file size limits for uploads and any privacy concerns for highly sensitive images.
3.2 Desktop Image Compression for Windows: The Photos App
For Windows users, the built-in “Photos” app provides a simple way to resize and compress individual images, making it suitable for casual photo sharing or preparing images for personal use.
Step-by-Step Instructions:
- Locate Your Photo: Open File Explorer and find the image file you want to compress.
- Open in Photos: Double-click the photo to open it in the Photos app. If Photos isn’t the default, right-click, select “Open with,” and choose “Photos.”
- Access Resize Option: Click the “⋯” (More options) icon in the top-right corner of the Photos window.
- Select “Resize”: From the drop-down menu, click “Resize.” (If “Resize” isn’t available, the photo cannot be significantly compressed further by this app.)
- Choose a Size: A pop-up window will offer preset sizes (e.g., S for “Small,” M for “Medium,” L for “Large”), usually indicating target dimensions and file size. Select an option smaller than the current size.
- Name and Save: In the “Save As” window, enter a new “File name” (e.g., “OriginalName_Compressed”). Crucially, avoid replacing the original. Select your desired “Save location.”
- Click “Save”: Your compressed photo will be saved to the specified location.
3.3 Desktop Image Compression for Mac: The Preview App
Mac users can utilize the versatile “Preview” app to perform basic image compression and resizing. This is a quick way to optimize aesthetic or nature images before sharing.
Step-by-Step Instructions:
- Locate Your Photo: Find the image file in Finder.
- Open in Preview: Select the photo, then go to
Filein the menu bar, selectOpen With, and choosePreview. - Access Export Options: In Preview, click
Filein the menu bar again, then selectExport…. - Configure Export Settings:
- Name: Enter a new name for the compressed image in the “Name” field.
- Where: Use the “Where” drop-down menu to choose a save location.
- Format: Ensure “JPEG” is selected from the “Format” drop-down. JPEG is generally best for photographic compression.
- Quality Slider: Drag the “Quality” slider to the left to reduce the image quality (and file size). You’ll see an estimated file size update as you adjust.
- Click “Save”: The compressed copy of your image will be saved.
3.4 Utilizing Professional Image Editors for Fine-tuned Compression
For Tophinhanhdep.com users involved in serious digital photography, editing styles, and photo manipulation, professional image editors like Adobe Photoshop or GIMP (a powerful free alternative) offer the most comprehensive control over compression.
General Workflow (Applies to most professional editors):
- Open Image: Launch your chosen image editor and open the image you want to compress. This is where you might bring your high-resolution images or stock photos.
- Access Export/Save Options: Go to
Filein the menu bar. Depending on the software, you’ll choose:Save As(for simple format changes)Export AsorSave for Web(for optimized web images).
- Choose Output Format: Select the appropriate format for your needs:
- JPEG: Ideal for photographs (beautiful photography, nature, abstract). Offers a quality slider where you can specify the compression level from 0-100. Lower numbers mean higher compression and smaller files.
- PNG: Best for digital art, graphic design elements, or images with transparent backgrounds and sharp lines. Offers lossless compression, but usually results in larger files for complex photos.
- GIF: Suitable for simple animations or images with very few colors.
- Adjust Quality/Compression Settings: A dialog box will appear allowing you to fine-tune settings specific to your chosen format. For JPEGs, adjust the “Quality” slider. For PNGs, you might choose compression levels or specify bit depth.
- Preview and Save: Many editors offer a preview function so you can see the impact of compression on quality before saving. Once satisfied, click “Save” or “Export.”
Key Advantages of Professional Editors:
- Maximum Control: Precise control over quality, resolution, and format for specific editing styles.
- Batch Processing: Advanced scripting or actions allow you to compress entire folders of images (e.g., a large collection of wallpapers) with consistent settings.
- Integration: Seamlessly integrates compression into your existing photo editing and visual design workflow.
Important Note: Always save your compressed image as a new file (e.g., image_web.jpg or image_small.png) to ensure you retain your original, uncompressed, high-resolution source image.
4. Optimizing Images for Web and Digital Projects with Tophinhanhdep.com
For Tophinhanhdep.com users, image optimization is not just about saving space; it’s about enhancing the impact and accessibility of your visual content online. Whether you’re uploading stunning abstract images to a portfolio, sharing aesthetic backgrounds on social media, or building a website featuring your digital photography, optimized images are paramount.
4.1 The Critical Role of Optimized Images for Online Success
- Website Speed: Heavy, uncompressed images are the leading cause of slow website load times. This impacts user experience, leading to higher bounce rates and frustrating visitors eager to see your beautiful photography. Fast-loading sites also rank better in search engines.
- Bandwidth Conservation: Optimized images consume less bandwidth, which is beneficial for both your hosting costs and for users with slower internet connections or limited data plans.
- SEO Benefits: Search engines favor faster websites and properly optimized images (with appropriate file names, alt text, and dimensions) for better indexing and visibility, helping your image inspiration and thematic collections reach a wider audience.
- Responsive Design: Smaller, properly scaled images adapt better to different screen sizes and devices, ensuring your digital art and creative ideas look great on desktops, tablets, and phones.
4.2 Tophinhanhdep.com’s Role in Image Optimization
Tophinhanhdep.com is your hub for achieving peak image performance. Our platform integrates or recommends tools that serve as powerful Compressors, Optimizers, and Converters. We help you prepare your images to look their best and perform efficiently across all digital mediums.
Expert Advice for Web Optimization:
A crucial tip from industry experts, echoing best practices in photography and visual design, is to always size your images to the exact dimensions the website or platform is looking for before compressing and uploading.
“Before you compress and upload a photo to a website, be sure you size it to the exact dimensions the website is looking for. Otherwise, the image might be stretched or cropped, diminishing the quality of your aesthetic or high-resolution images.”
This seemingly small step prevents unnecessary stretching or cropping by the website’s content management system, ensuring your creative ideas are presented exactly as intended. Tophinhanhdep.com provides guidance on ideal dimensions for trending styles and various platforms, helping you maintain visual integrity.
Leveraging Tophinhanhdep.com’s Image Tools:
Beyond basic compression, Tophinhanhdep.com also points to more advanced functionalities that assist in comprehensive image optimization:
- AI Upscalers: Sometimes you have a smaller image that needs to be scaled up for a high-resolution display before compression. Tophinhanhdep.com’s recommended AI upscalers can intelligently enhance image resolution without significant quality loss, allowing you to then compress the larger, higher-quality image more effectively for its final destination.
- Converters: For formats like HEIC (common on iPhones) that aren’t universally supported, Tophinhanhdep.com’s converters allow you to easily change them to more compatible formats like JPG or PNG, ensuring your photos are viewable everywhere.
By strategically compressing and optimizing your images, you’re not just saving space; you’re enhancing the entire visual experience for your audience and ensuring your digital assets truly shine.
5. Best Practices and Troubleshooting for Image Compression
Mastering image compression involves more than just knowing how to use the tools; it requires strategic thinking and an understanding of best practices to avoid common pitfalls. For Tophinhanhdep.com users, these tips will help you manage your image collections, from beautiful photography to digital art, effectively and safely.
5.1 General Best Practices
- Always Keep Originals: This is arguably the most critical rule. Always store uncompressed, high-resolution versions of your digital photography, stock photos, and digital art on a separate hard drive, external storage, or a reliable cloud backup. Compressed files are for distribution, web use, or temporary storage, not for permanent archival. Lossy compression is irreversible.
- Batch Processing for Collections: If you’re compressing a large number of images, such as an entire folder of wallpapers, backgrounds, or a thematic collection, utilize tools that support batch processing. This saves immense time compared to compressing each image individually. Many online compressors and professional desktop editors offer this feature.
- Descriptive Naming Conventions: When saving compressed versions, use descriptive names to easily distinguish them from your originals. For example,
landscape_original.jpgbecomeslandscape_web.jpgorlandscape_email.jpg. This prevents accidental overwriting of your high-resolution files. - Test Compression Settings: Don’t assume one setting fits all. Experiment with different quality levels (e.g., JPEG quality 60, 70, 80) to find the optimal balance between file size and visual quality for your specific images and their intended use. A nature photo might tolerate more compression than a detailed abstract piece.
- Consider the Destination:
- Emails: Aim for the smallest acceptable file size (e.g., 96 ppi, medium JPEG quality) to ensure fast sending and downloading.
- Websites/Online Galleries: Strive for a balance between visual quality and fast loading times. Often, JPEG quality 70-80 is a good starting point for photographs.
- Printing: For print, use the highest quality possible, ideally the original uncompressed file or minimal lossless compression, to avoid pixelation and ensure sharp output.
5.2 Uncompressing (Extracting) Files
Since many image compression workflows involve packaging multiple images into a ZIP archive, knowing how to extract them is essential.
- Windows: Right-click the
.zipfolder, select “Extract all…”, and follow the wizard. - Mac: Simply double-click the
.zipfile, and its contents will be extracted to a new folder. - Other Archive Formats: For less common archive formats like
.7zor.rar(sometimes used for very large image bundles), you might need third-party software like PeaZip or 7-Zip (available on Tophinhanhdep.com’s recommended “Image Tools” section) to extract the contents.
5.3 Important Warnings and Considerations
- Irreversible Quality Loss: Reiterate that lossy compression is permanent. Once pixels are removed, they cannot be recovered. This means if you over-compress a beautiful photography piece, that detail is gone forever in that specific file.
- Over-compression Artifacts: Pushing compression too far will result in noticeable artifacts, pixelation, and color degradation. This can make your aesthetic images or digital art appear unprofessional and cheap. Always preview the compressed output.
- Avoid System File Compression: Never attempt to compress operating system files or program files using general file compression methods (like Windows’ NTFS compression). These files are crucial for your computer’s stability, and altering them can lead to system errors or instability. Focus only on your user files, especially your images and visual assets.
- NTFS Compression vs. Image-Specific Compression: While Windows offers file system compression via NTFS, it’s generally not as efficient or image-quality-conscious as dedicated image compression tools. For visual content, stick to specialized image compressors for the best results.
- Compatibility for Sharing: When sharing compressed images, especially in a ZIP archive, consider the recipient’s ability to open the file. ZIP is universal. Other archive formats like
.7zor.rarrequire specific software on the recipient’s end, so it’s best to confirm their capabilities if using non-standard formats.
Conclusion
Image compression is more than just a technical chore; it’s a vital skill for anyone navigating the visually rich digital landscape, especially for Tophinhanhdep.com users passionate about their images. By understanding the principles of compression and leveraging the right tools – from built-in operating system features to online compressors and professional editing software – you can effectively manage your vast collections of wallpapers, backgrounds, and high-resolution photography.
Tophinhanhdep.com is your go-to resource for discovering image inspiration, exploring trending styles, and accessing the image tools necessary to optimize your visual content. By mastering these compression techniques, you’ll ensure your digital photography, graphic design, and creative ideas are not only stunning but also efficiently stored, swiftly shared, and beautifully displayed across every platform. Embrace smart image management and let your visual stories unfold seamlessly.