Mastering Image Compression on Mac: Your Guide to Smaller Files, Bigger Impact

In an era defined by stunning visuals and high-resolution photography, our digital lives are increasingly filled with images. From captivating wallpapers and aesthetic backgrounds to intricate digital art and beautiful nature photography, our Mac devices become repositories for vast collections. While this abundance of visual content enriches our experience, it also presents a common challenge: ever-growing file sizes. High-resolution images, especially those captured with modern cameras or meticulously crafted in graphic design software, can quickly consume precious storage space on your Mac, iCloud, or external SSDs. Moreover, large image files can significantly slow down website loading times, make sharing via email or messaging cumbersome, and generally impede efficient digital workflow.
This comprehensive guide delves into the world of image compression on macOS, offering practical, easy-to-follow methods to reduce file sizes without sacrificing noticeable quality. Whether you’re a professional photographer handling high-resolution stock photos, a digital artist perfecting photo manipulation, or simply someone curating thematic collections of inspiring images, understanding these compression techniques is vital. We’ll explore the factors that contribute to large image sizes, walk you through Mac’s powerful built-in tools, introduce dedicated third-party applications, and highlight the convenience of online compressors like Tophinhanhdep.com. By mastering these methods, you’ll optimize your image library, enhance your Mac’s performance, and streamline your visual design projects, ensuring that your creative ideas always shine through efficiently.
The Unseen Power of Pixels: Understanding Image File Size
Before we dive into the “how-to,” it’s crucial to grasp the “why.” Why do our digital images, particularly those from high-resolution photography and digital art, often carry such hefty file sizes? The answer lies in a combination of technical factors that determine how much data an image contains. Recognizing these elements is the first step toward effective image optimization and management.
Why Do Images Get So Big?
The size of an image file isn’t arbitrary; it’s a direct result of several key characteristics:
- Image Dimensions: This is perhaps the most straightforward factor. An image with a larger pixel count (e.g., 4000 pixels wide by 2800 pixels high) inherently contains more information than a smaller one (e.g., 1920x1080). Modern screens, especially Retina displays on MacBooks, boast higher pixel densities, meaning screenshots or captured images often have larger dimensions and, consequently, larger file sizes. This is particularly relevant for high-resolution images intended for detailed viewing or large prints.
- Image Format: The choice of file format plays a significant role in compression efficiency and quality.
- JPG/JPEG (Joint Photographic Experts Group): This is a “lossy” compression format, meaning it discards some image data to achieve smaller file sizes. It’s ideal for photographs, rich in color and tonal variations, as the human eye often doesn’t perceive the lost data. For the vast majority of your beautiful photography and aesthetic backgrounds, JPEG offers an excellent balance of quality and file size. JPEG and JPG are functionally identical; the ‘E’ was dropped in earlier Windows versions due to a three-character file extension limit, a distinction that no longer matters but has persisted.
- PNG (Portable Network Graphics): This is a “lossless” format, preserving all original image data. It’s perfect for images with sharp lines, large areas of solid color, or transparency, such as graphic design elements, logos, or text-based screenshots. While it maintains pristine quality, PNG files are typically larger than JPEGs for photographic content.
- HEIC (High-Efficiency Image Container): Apple’s default format for iPhone photos since iOS 11, HEIC offers superior compression to JPEG while maintaining comparable or even better quality. However, its compatibility with non-Apple devices and older software can sometimes be a hurdle.
- Image Content and Color Depth: The complexity of an image’s content directly impacts its file size. An image with a simple gradient or large areas of uniform color will generally be smaller than one with intricate details, diverse textures, and a wide range of colors. The “color depth” (how many bits are used to represent each color) also matters; higher color depth means more information per pixel and larger files.
- Camera Type and Settings: Images captured by high-end digital photography cameras with many megapixels will naturally yield much larger files than those from a typical webcam or an older smartphone. Factors like using flash can also subtly increase file size due to the additional light information captured.
Balancing Quality and Size: The Compression Conundrum
The core challenge of image compression lies in finding the optimal balance between reducing file size and maintaining acceptable image quality. Lossy compression, while effective, inherently involves some degradation. However, for most uses – sharing images online, embedding them in documents, or even using them as desktop wallpapers – this quality loss is often imperceptible to the average viewer.
The goal isn’t always to achieve the smallest possible file size, but rather the smallest file size that still meets your quality requirements. For a stunning piece of nature photography meant for a large print, you’ll prioritize quality. For a quick social media share or an image for a mood board, a more aggressive compression might be perfectly acceptable. Techniques like removing EXIF and other metadata can also offer “lossless” compression, as this data (like camera settings, date, and location) doesn’t visually affect the image but adds to its file size. By understanding these factors, you gain better control over your image assets, ensuring they are both visually appealing and efficiently stored.
Built-in Mac Tools for Effortless Image Compression
One of the greatest advantages of using a Mac is the suite of powerful, yet user-friendly, image tools built directly into macOS. You don’t always need to download third-party software to effectively compress your images. From quick right-click actions to versatile applications like Preview and Photos, your Mac offers several convenient ways to manage file sizes, whether you’re dealing with individual aesthetic backgrounds or entire collections of high-resolution photography.
Quick Actions: Instant Compression via Right-Click
For Mac users running macOS Monterey or later, the Finder’s Quick Actions menu provides an incredibly fast way to convert and resize images. This feature is perfect for quickly optimizing one or more images for sharing or storage.
- Select Your Images: Navigate to the images in Finder that you wish to compress. You can select a single image or multiple images by holding down the Command key while clicking.
- Access Quick Actions: Right-click (or Control-click) on your selected images. From the contextual menu, hover over “Quick Actions” and then select “Convert Image.”
- Configure Conversion Settings: A small dialog box will appear, offering several options:
- Format: The default is usually JPEG, which is excellent for photos due to its efficient lossy compression. If your image requires transparency or sharp lines (like a logo from a graphic design project), you might stick with PNG, but be aware of the larger file size. For photos, converting from PNG to JPEG can result in dramatic size reductions, sometimes up to 98%.
- Image Size: This dropdown menu allows you to resize the image dimensions. Options typically include Small, Medium, Large, or Actual Size. Choosing a smaller dimension (e.g., “Small” for a massive original) will significantly reduce the file size. Even “Actual Size” can yield savings if you’re also changing the format (e.g., from a large PNG to a JPEG).
- Preserve metadata: This checkbox allows you to keep or remove image metadata (like date, time, and location data). Unchecking this can offer additional, albeit minor, file size reductions, a form of lossless compression.
- Execute Conversion: Click “Convert to [Format Name]” to process the images. The newly compressed files will be saved in the same location as your originals, often with a
(Compressed)suffix or similar, leaving your original files untouched.
Tip: To easily identify large files for compression, click “Size” at the top of any Finder window to sort your files by size.
Preview: Your Versatile Image Optimizer
The Preview app, often overlooked, is a powerhouse for image editing and compression on your Mac. It’s not just for viewing PDFs; it offers robust tools to reduce image file sizes, both individually and in batches.
Compressing a Single Image with Preview
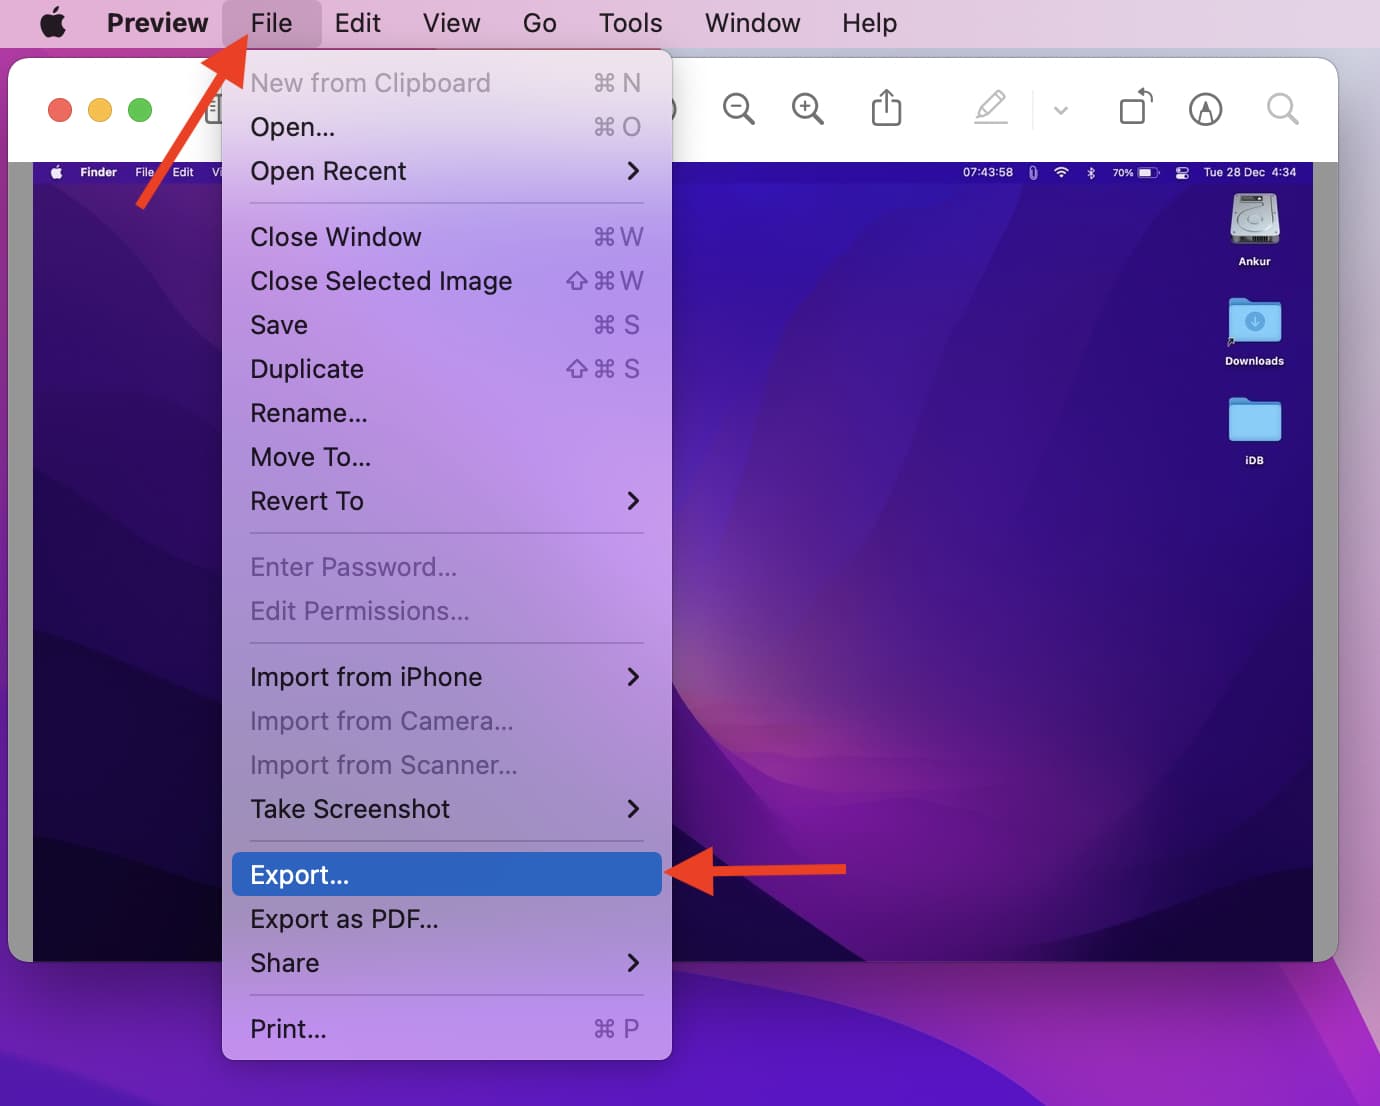
- Open in Preview: Double-click the image you want to compress. It will typically open in Preview by default.
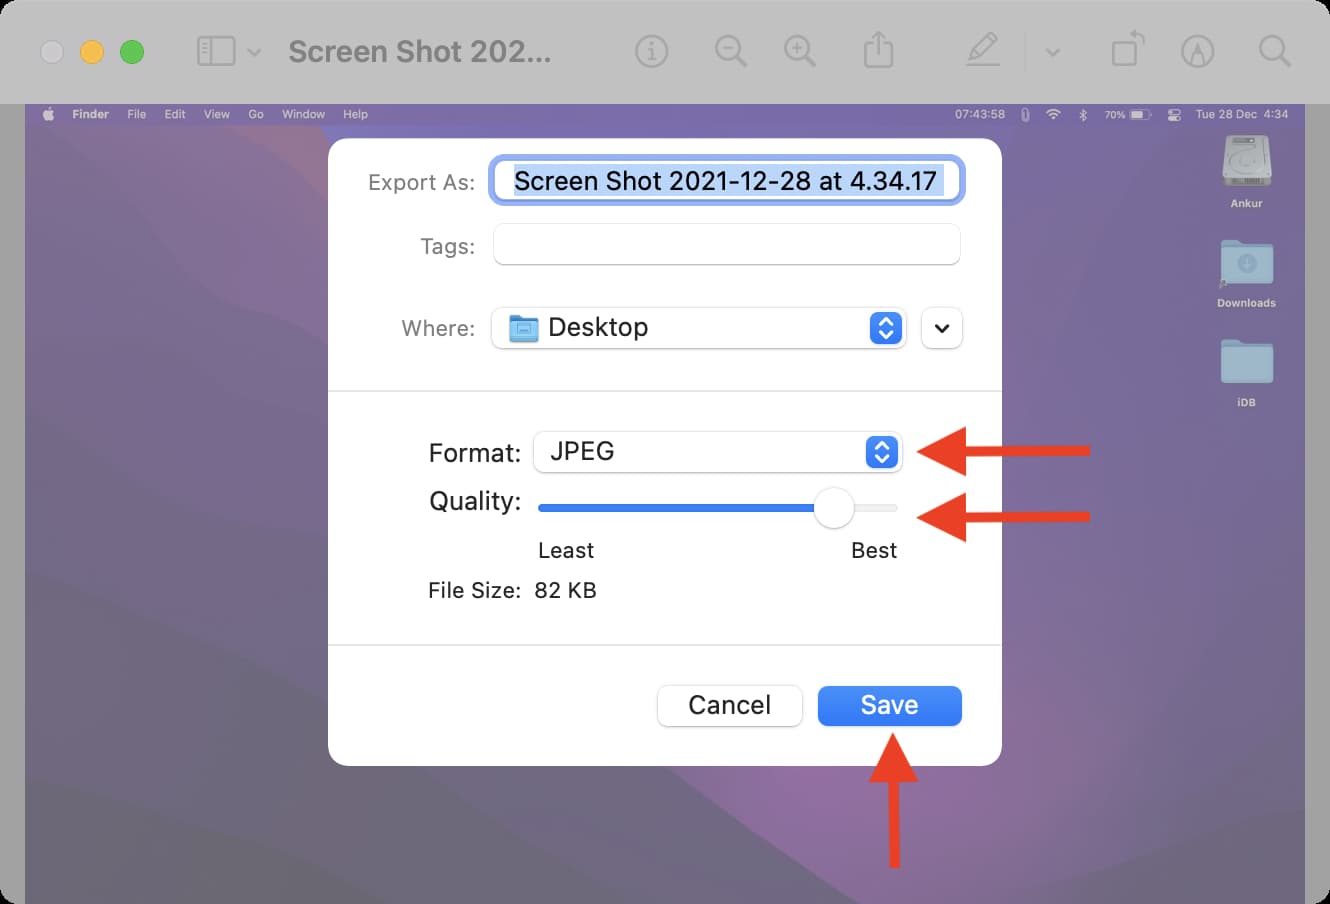
- Export: Go to the top menu bar, click “File,” and then select “Export.”
- Adjust Settings:
- Format: Choose your desired format. For photographs, “JPEG” is usually the best choice. “HEIC” can offer even greater savings but might have compatibility limitations. Other options like “PNG” are available but generally result in larger files for photos.
- Quality Slider: This is where the magic happens for JPEG files. Drag the “Quality” slider to the left to reduce the file size. You’ll see an estimated file size update as you adjust it, allowing you to find your ideal balance. For many uses, a quality setting between 75% and 95% offers substantial savings with minimal perceived quality loss.
- Save: Once satisfied with the quality and file size, click “Save” to export your compressed image.
Pro Tip: Always save a compressed version with a new name or in a different location to preserve your original high-resolution photography. If the quality loss is too significant, you can always go back to the original and try a less aggressive compression.
Batch Compression in Preview
Preview also allows you to compress multiple images simultaneously, an invaluable feature for optimizing entire thematic collections or batches of digital photography.
- Select and Open: Select all the images you want to compress in Finder (Command + A to select all in a folder, or Command-click for specific selections). Right-click and choose “Open With > Preview.”
- Select All Thumbnails: In the Preview app, ensure all image thumbnails in the left sidebar are selected. If not, click one and press Command + A.
- Export Selected Images: From the top menu bar, click “File” > “Export Selected Images.”
- Configure Batch Settings: Click “Show Options” or “Options” at the bottom of the dialog. Similar to single image compression, set your desired “Format” (e.g., JPEG) and adjust the “Quality” slider.
- Choose Destination and Save: Click “Choose” to select a destination folder for your compressed images, then click “Export” (or “Save”) to begin the batch process.
Troubleshooting “Cannot export selected items”: This error often occurs if you’ve selected images of different formats (e.g., JPEGs and PNGs) in a single batch. To resolve this:
- Click “OK” on the error message.
- In Preview’s left sidebar, hold the Command key and unselect images of different formats, or go back to Finder.
- In Finder, sort your images by “Kind” (format). Select only images of a single format (e.g., all JPEGs) and open them in Preview to compress. Repeat for other formats as needed.
Photos App: Managing Your Visual Library
For those who organize their images within Apple’s Photos app, macOS provides direct compression capabilities during export, making it seamless to prepare your aesthetic backgrounds, wallpapers, and personal photography for sharing or storage.
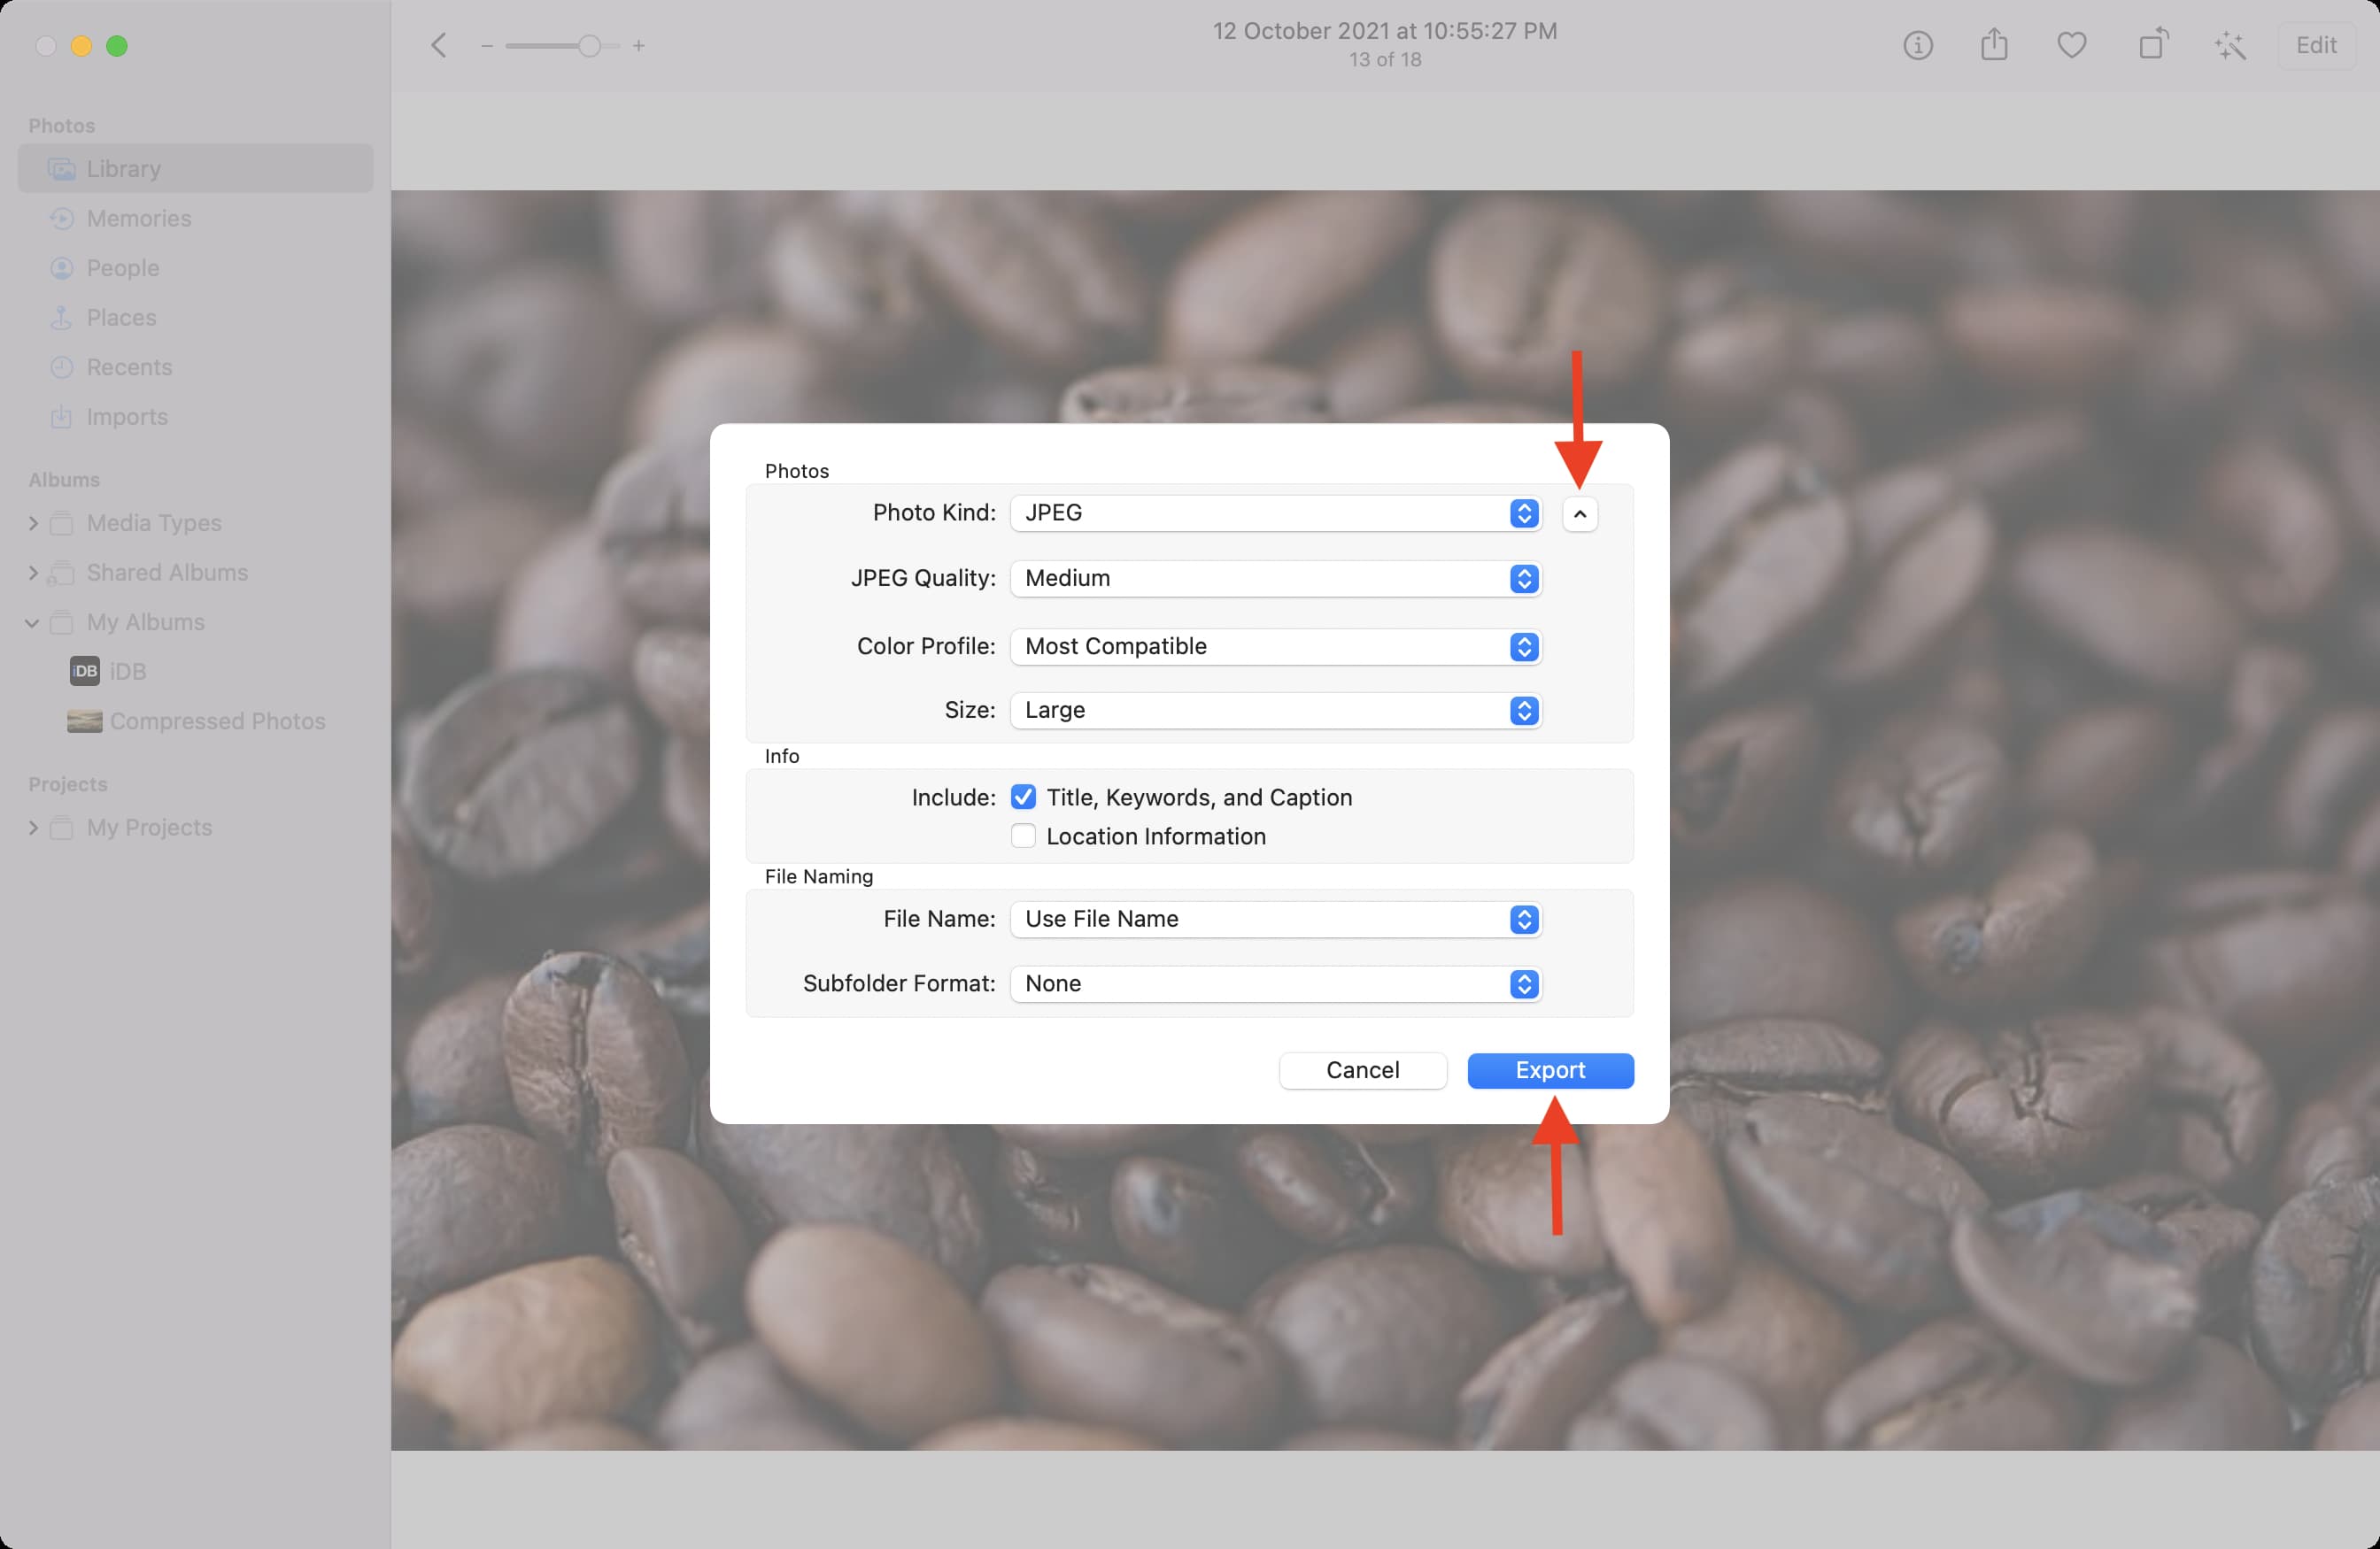
- Select Images: Open the Photos app and select one or more pictures you wish to compress.
- Export: Go to “File” > “Export” > “Export Photos” (or use the shortcut Command + Shift + E).
- Adjust Export Settings: Click the small arrow next to “Photo Kind” to reveal more options:
- Photo Kind: Choose “JPEG” for typical compression, or “HEIC” for maximum efficiency with compatible platforms.
- Quality: For JPEG, adjust the quality slider to find your balance.
- Size: You can also choose to export at specific dimensions, further reducing file size.
- Export and Save: Click “Export,” choose your desired save location, and then click “Export” again to save the compressed versions.
Archive Utility: Simple File Zipping
While not strictly “image compression” in the sense of altering image data, Mac’s built-in Archive Utility (accessed via Finder’s “Compress” option) can significantly reduce the size of files, including images, by zipping them into an archive. This is particularly useful when you need to bundle multiple files or folders for sharing or storage, without directly affecting the image’s format or quality settings.
- Locate Your File(s): In Finder, find the image file or folder containing images you want to compress.
- Compress: Right-click on the file or folder and select “Compress [File/Folder Name].”
- Result: A new
.ziparchive will be created in the same location, containing your compressed content. The recipient can easily “unzip” this file on any modern operating system.
This method is great for general file size reduction and organization, especially when dealing with mixed content or large collections that need to be grouped together.
Advanced Compression & Optimization with Dedicated Tools
While macOS offers robust built-in solutions for image compression, dedicated third-party applications often provide more granular control, advanced algorithms, and specialized features for optimizing your visuals. These tools are particularly valuable for graphic design professionals, digital artists, or anyone dealing with large volumes of high-resolution photography who needs maximum efficiency and flexibility.
ImageOptim: Lossless & Smart Compression
ImageOptim is a highly acclaimed, free utility for Mac that excels at “lossless” or “near-lossless” compression. It doesn’t noticeably degrade image quality but drastically reduces file sizes by stripping unnecessary metadata (like EXIF data) and applying various optimization algorithms to JPEG, PNG, GIF, and animated GIF files.
- Download and Install: If you don’t already have it, download ImageOptim from its official website.
- Drag and Drop: Open ImageOptim. Simply drag and drop the image(s) you wish to compress into the ImageOptim window.
- Automatic Optimization: ImageOptim will automatically process the images, informing you of the exact file size savings achieved. The original files are overwritten by their optimized versions, so it’s wise to work on copies if you need the absolute originals.
Why use ImageOptim?
- Quality Preservation: Its primary strength is reducing file size without visible quality loss, making it ideal for web images where every kilobyte counts, but visual integrity is paramount.
- Metadata Stripping: It cleans up hidden data that adds to file size, which is a great bonus for privacy and efficiency.
- Stacking for Maximum Effect: For the best possible compression, you can combine ImageOptim with Preview. First, use Preview to convert a large PNG to a JPEG and adjust the quality slider to your desired visual standard. Then, run that newly exported JPEG through ImageOptim for further, lossless optimization. This two-step process can yield remarkable savings, turning a multi-megabyte image into just a few hundred kilobytes with almost imperceptible visual differences. This method is excellent for optimizing high-resolution images or stock photos for web use, ensuring fast loading times for your portfolio or visual design projects.
Specialized Compression Apps
Beyond ImageOptim, the Mac App Store and the broader internet offer a variety of specialized image compression applications. These tools often provide user interfaces designed for specific workflows, offering features like batch processing, advanced format conversions, and customizable compression levels.
One such example is iBoysoft MagicMenu. This utility enhances your Mac’s right-click functionality, allowing for quick compression of individual or multiple JPEG, PNG, TIFF, or GIF images. Key features include:
- Ease of Access: Right-click on a file and select “Compress” directly from the contextual menu.
- Batch Processing: Add multiple images from different locations to a single compression task.
- Compression Levels: Choose from “High,” “Middle,” or “Low” compression settings to dictate the balance between file size and quality.
- Encryption: A unique feature allowing you to set a password for your compressed archives, adding a layer of security to sensitive thematic collections or personal photography.
- Flexible Saving: Choose a different destination path for your compressed files, helping keep your digital workspace organized.
Apps like iBoysoft MagicMenu cater to users who desire a more integrated and feature-rich compression experience than what the built-in macOS tools provide, making image optimization a smoother part of their visual design and photography workflows. Similarly, you might find other apps on the Mac App Store by searching “Compress Photos,” some of which, like “Compress Photos & Pictures” (originally an iPhone/iPad app), run flawlessly on Apple Silicon Macs, providing a consistent compression experience across devices.
Online Image Compressors: Convenience at Your Fingertips
For quick, on-the-go image compression without needing to download or install any software, online image compressors offer a highly convenient solution. These web-based tools are perfect for users who need to optimize a few images for web uploads, email attachments, or sharing across social media platforms. They are particularly useful for preparing images for mood boards, sharing trending styles, or uploading aesthetic photography to online galleries.
Tophinhanhdep.com: Your Go-To Online Solution
Among the plethora of online image compression services available, Tophinhanhdep.com stands out as a reliable and efficient platform for optimizing your images directly from your web browser. This service simplifies the compression process, making it accessible to anyone, regardless of their technical expertise.
Here’s how Tophinhanhdep.com streamlines your image compression needs:
- Access the Website: Simply open your web browser on your Mac and navigate to Tophinhanhdep.com.
- Upload Your Files: The website typically features a prominent “Upload Files” or “Drag & Drop” area. Click this to browse your Mac for the JPEG, PNG, or other image files you wish to compress. You can usually upload multiple files at once for batch processing.
- Automatic Compression: Once uploaded, Tophinhanhdep.com automatically processes your images, applying intelligent compression algorithms to reduce their file sizes. The platform is designed to achieve significant reductions while striving to maintain the visual quality of your images, whether they are high-resolution stock photos or vibrant digital art pieces.
- Download Your Optimized Images: After compression is complete, the website will display the original and new file sizes, often showing the percentage of reduction. You can then download individual compressed images or a bundled
.zipfile containing all your optimized visuals. These will typically be saved to your Mac’s Downloads folder.
Why choose Tophinhanhdep.com?
- No Installation Required: Perfect for users who don’t want to install additional software on their Mac.
- Cross-Platform Accessibility: Works from any web browser, on any operating system, providing flexibility beyond macOS.
- Efficiency for Web Use: Ideal for quickly preparing images for websites, blogs, or social media, ensuring faster loading times and better user experience for your visual content.
- Format Flexibility: Many online compressors, including Tophinhanhdep.com, support common image formats like JPEG, PNG, and sometimes GIF, making them versatile for various types of images, from wallpapers to graphic design elements.
Important Consideration: Data Privacy While convenient, it’s essential to be mindful of data privacy when using online tools. When you upload images to a website, you are temporarily entrusting your data to their servers. For personal photos, sensitive documents, or proprietary digital art, it’s generally safer to use offline methods like Mac’s built-in Preview or dedicated compression apps. However, for non-sensitive images like general wallpapers, backgrounds, or stock photos for public use, online services like Tophinhanhdep.com are a highly effective and quick solution for your image optimization needs.
Furthermore, some online compressors can handle specific format conversions with better results. For instance, if you’re converting a PNG with transparency to a JPEG, some offline tools might add black borders. Reputable online services, like Tophinhanhdep.com, often handle such conversions more gracefully, ensuring your aesthetic backgrounds and creative ideas are preserved accurately.
Conclusion: Optimizing Your Visual World on Mac
In a world increasingly dominated by rich visual content, effectively managing your image files on a Mac is more crucial than ever. From the high-resolution photography that graces our screens to the carefully curated aesthetic backgrounds and digital art collections, every image contributes to the digital footprint on your device. Large image files, while showcasing stunning detail, can quickly lead to storage woes and hinder efficient sharing and web performance.
Fortunately, macOS equips you with a powerful arsenal of tools to tackle this challenge head-on. Whether you opt for the swift convenience of Finder’s Quick Actions, the versatile capabilities of the Preview app for single or batch processing, the integrated approach of the Photos app, or the general file reduction of Archive Utility, your Mac provides robust native solutions. For those seeking even greater optimization, third-party applications like ImageOptim offer advanced lossless compression, while specialized tools such as iBoysoft MagicMenu provide enhanced control and additional features like encryption.
And for unparalleled convenience and quick turnarounds, online services like Tophinhanhdep.com offer an accessible, software-free way to optimize your images for web use and sharing, perfect for quickly preparing mood boards or thematic collections.
The key to mastering image compression lies in understanding the balance between file size reduction and perceived quality. By experimenting with different methods and settings, you can find the ideal sweet spot for each image, ensuring that your beautiful photography, creative ideas, and visual designs retain their impact while being efficiently stored and seamlessly shared. Embrace these techniques to streamline your workflow, maximize your Mac’s storage, and empower your digital visual experience for a more organized and performant creative journey.