Mastering Image Compression in PowerPoint: A Comprehensive Guide for Stunning Yet Streamlined Presentations

In the dynamic world of digital communication, PowerPoint presentations remain a cornerstone for conveying information, ideas, and stories. From corporate pitches to academic lectures, these visual aids empower us to engage audiences with compelling content. However, the pursuit of stunning visuals often leads to an unforeseen challenge: excessively large file sizes. High-resolution images, vibrant backgrounds, and intricate visual designs, while aesthetically pleasing, can bloat a PowerPoint file, making it slow to load, difficult to share, and cumbersome to store, especially when dealing with platform-specific quotas like those found in learning management systems.
At Tophinhanhdep.com, we understand the delicate balance between visual impact and practical efficiency. Our platform is dedicated to providing an array of resources, from breathtaking wallpapers and aesthetic backgrounds to advanced image tools like converters, compressors, and AI upscalers. This guide will delve into the essential techniques for compressing images within PowerPoint, ensuring your presentations maintain their visual brilliance without compromising on performance or portability. We’ll explore PowerPoint’s built-in capabilities, as well as external strategies that align with our broader focus on high-resolution photography, digital art, and effective visual design.
The Critical Role of Image Optimization in Digital Presentations
The modern era of digital photography and graphic design has blessed us with the ability to capture and create images of incredible detail and clarity. High-resolution photos, often in the range of several megapixels, are commonplace, delivering exceptional sharpness and richness whether they are professional stock photos, personal beautiful photography, or abstract digital art pieces. These images are indispensable for crafting impactful presentations, serving as captivating wallpapers, informative backgrounds, or evocative visual elements that convey sad/emotional or nature-inspired themes.
However, the very quality that makes these images so appealing is also their Achilles’ heel when it comes to presentation file size. A single unoptimized, high-resolution photograph can weigh several megabytes. Multiply that by dozens of slides, and you quickly find yourself with a PowerPoint file that is hundreds of megabytes large, or even gigabytes. This can lead to a cascade of problems:
- Slow Loading Times: Large files take longer to open and navigate, disrupting the flow of your presentation.
- Difficulty in Sharing: Email servers often have strict attachment size limits, making large presentations impossible to send. Cloud storage and collaboration platforms can also struggle with hefty files, consuming valuable bandwidth and storage space.
- Performance Issues: A bloated file can cause PowerPoint to lag, crash, or consume excessive system resources, especially on older computers or when running alongside other applications.
- Platform Quotas: Learning management systems (LMS) like Canvas impose quotas on course content. A single large PowerPoint file can quickly eat into this allocation, limiting the space available for other valuable resources.
- Printing Challenges: While not always the primary concern, unoptimized images can still lead to larger print files and slower printing processes.
Understanding these challenges underscores why image optimization is not merely an optional step but a fundamental aspect of effective digital presentation creation. By judiciously compressing your images, you ensure that your audience experiences your visual content as intended – vibrant and clear – without any of the technical headaches that can detract from your message. This practice is crucial for anyone working with digital photography, whether it’s for professional graphic design, digital art, or simply compiling image inspiration for a mood board.
Navigating PowerPoint’s Built-in Compression Tools
Microsoft PowerPoint offers a range of integrated tools designed to help users manage and compress the images embedded within their presentations. These tools provide a convenient way to reduce file size without needing external software for basic optimization. Familiarizing yourself with these options is the first step towards creating streamlined and shareable presentations.
Manual Compression for Individual Images (Windows & Mac)
For precise control over specific images or to address isolated instances of large image files, manual compression is an excellent approach. The steps are largely similar for both Windows and Mac versions of Microsoft PowerPoint, with slight interface variations.
Steps to Compress Images: Windows - Microsoft PowerPoint
- Open your PowerPoint file.
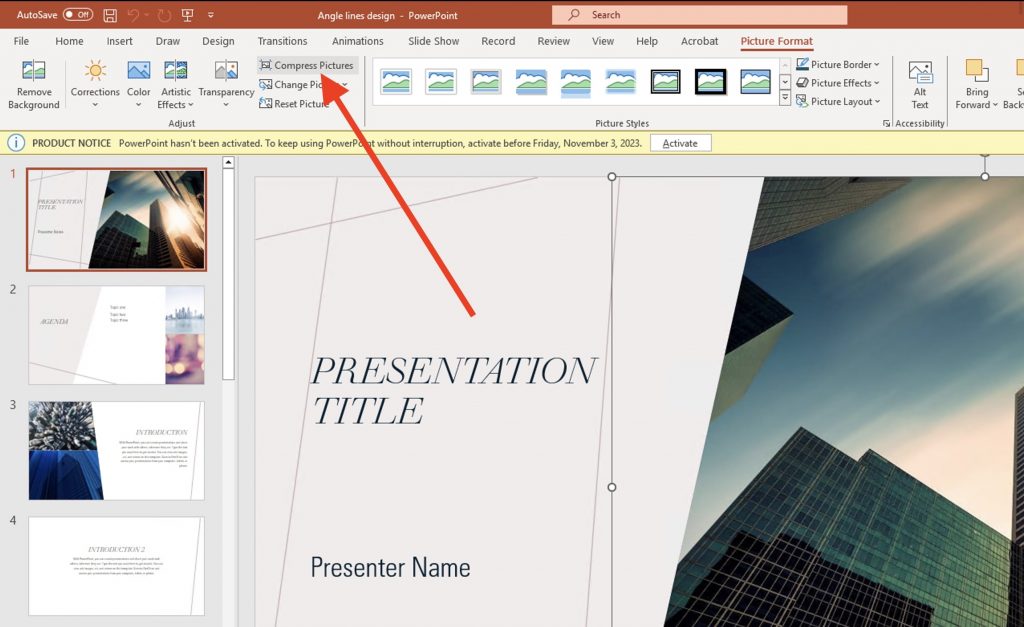
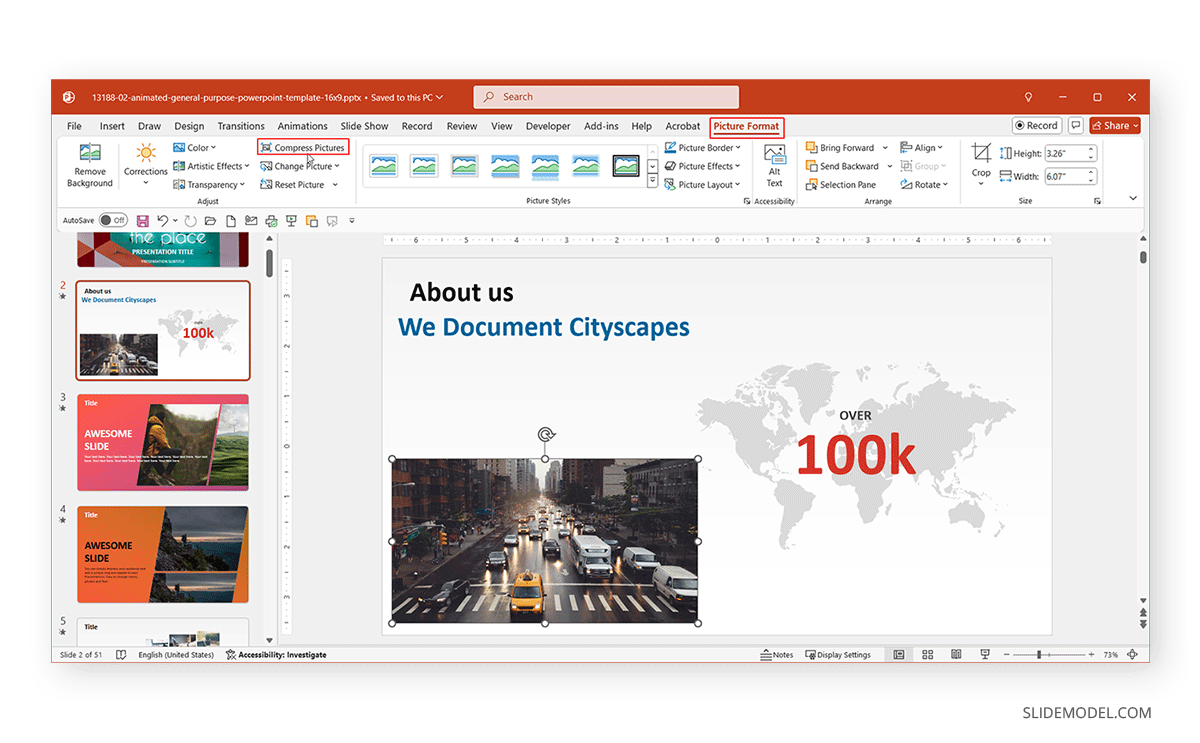
- Select a slide that contains an image or picture. Click directly on the image you wish to compress.
- Once selected, the Picture Format ribbon (or Picture Tools Format tab in some versions) will appear at the top of the screen. Click on it.
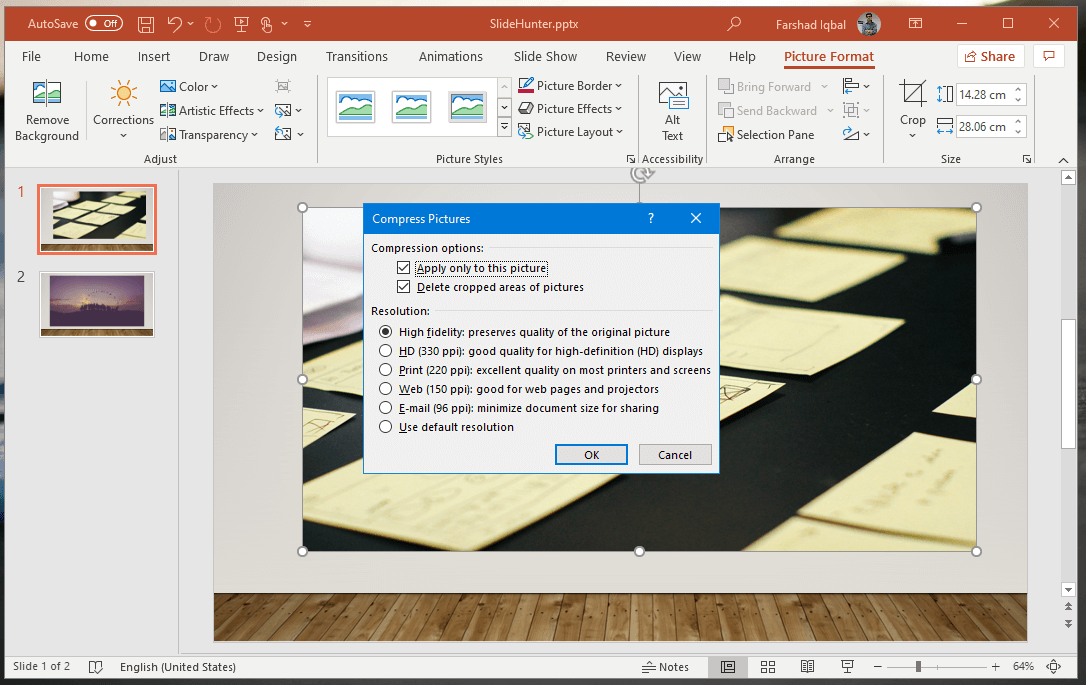
- In the “Adjust” group, locate and click “Compress Pictures.”
- A dialog box will appear with compression options. To further reduce the size, select the checkbox next to “Delete cropped areas of pictures.” This removes any hidden parts of the image that were cropped out but still remain in the file data.
- Under “Target Output,” choose a suitable resolution. For general sharing and minimizing document size, especially for email, select “Email (96 ppi).” This is a low-resolution setting that is usually sufficient for screen viewing.
- By default, PowerPoint might apply compression to all pictures. If you only want to compress the currently selected picture, make sure the option “Apply only to this picture” is checked. If you intend to compress all pictures in the entire presentation, ensure this box is unchecked.
- Click OK to apply the compression.
Steps to Compress Images: Mac - Microsoft PowerPoint
- Open your PowerPoint file.
- Select a slide that contains an image or picture. Click directly on the image you wish to compress.
- The Picture Format ribbon will appear at the top of the screen. Click on it.
- Click “Compress Pictures” (often located to the right of the Transparency icon in the Adjust group).
- In the compression dialog, click the Picture Quality drop down and choose “Best for Sending in Email (96 ppi)” for maximum file size reduction, or another appropriate resolution.
- Select the checkbox next to “Delete Cropped Areas of Pictures” to remove unnecessary image data.
- The option “Apply to all pictures in this file” is often default and recommended for a smaller overall file. If you only want to compress the currently selected image, check the option to “Apply to only the currently selected pictures.”
- Click OK.
When choosing resolution options, PowerPoint typically provides several choices:
- High fidelity: Preserves the original image quality, typically for professional printing or large displays where no compromise on quality is acceptable. This option might not reduce file size significantly.
- HD (330 ppi): A very high resolution, ideal for high-definition displays and projectors, offering excellent quality.
- Print (220 ppi): Optimized for printed documents, balancing quality and file size.
- Web (150 ppi): Best for web pages and standard projectors, offering a good balance for online viewing.
- E-mail (96 ppi): Minimizes document size for sharing, particularly via email, where file size is critical. This results in the smallest file size but also the lowest quality.
- Use default resolution: Applies the resolution set in PowerPoint’s global options, which we’ll discuss next.
The selection depends on your presentation’s ultimate purpose. For on-screen viewing and sharing, lower PPI (pixels per inch) settings like 96 ppi or 150 ppi are generally sufficient, whereas for high-quality printing or large displays, 220 ppi or 330 ppi would be more appropriate.
Setting Default Compression and Disabling Auto-Compression
PowerPoint is designed to be user-friendly, and part of that involves automatically compressing images by default to help keep file sizes manageable. However, users can also take control by setting a preferred default resolution or even disabling auto-compression entirely, depending on their workflow and quality requirements.
To Select a Default Resolution for Image Compression:
- Go to File > Options (on Mac, PowerPoint > Preferences).
- In the PowerPoint Options dialog box, select “Advanced.”
- Scroll down to the “Image Size and Quality” section.
- Here, you’ll find the “Default Resolution” dropdown. You can set it to High Fidelity, HD (330 ppi), Print (220 ppi), Web (150 ppi), or E-mail (96 ppi).
- Choose the resolution that best suits your typical presentation needs. For instance, if you frequently share presentations via email, setting the default to 96 ppi will ensure consistency.
- Click OK.
This setting will apply to all new images inserted into the presentation from that point forward, or globally for all presentations depending on how PowerPoint’s options are configured (often “all new presentations”).
To Disable Auto-Compression in PowerPoint:
Sometimes, you might want to maintain the absolute original quality of your images, perhaps if you’re a professional photographer showcasing high-resolution digital photography or a graphic designer presenting intricate digital art where every pixel counts. In such cases, you can disable PowerPoint’s automatic compression:
- Go to File > Options (on Mac, PowerPoint > Preferences).
- Select “Advanced.”
- In the “Image Size and Quality” section, check the box next to “Do not compress images in file.”
- Click OK.
Be aware that disabling auto-compression will likely result in significantly larger file sizes, so this option should be used cautiously and only when absolute image fidelity is paramount, and the consequences of a larger file are understood and accepted.
Batch Compression via “Save As”
For a quick, universal approach to reducing your presentation’s file size, PowerPoint offers a batch compression option accessible through the “Save As” function. This method compresses all images within your presentation simultaneously.
- Open your PowerPoint file.
- Click on the File tab at the top of the ribbon.
- Select “Save As.”
- Choose a location to save your file (e.g., “Browse” to your desired folder).
- At the bottom of the “Save As” window, you’ll see a “Tools” dropdown menu next to the “Save” button. Click it.
- From the dropdown, select “Compress Pictures.”
- A dialog box will appear. Here, you can choose the approximate size or resolution for your compressed file (e.g., “Print,” “Web,” “Email”).
- Click the OK button.
- Finally, click “Save” to save your presentation with the newly compressed images. It’s often recommended to save this as a new file to preserve your original, uncompressed version.
This “Save As” method provides a broad-stroke compression that can dramatically reduce the overall file size with just a few clicks. It’s particularly useful when you have a presentation ready for distribution and need to quickly shrink its footprint.
Beyond PowerPoint: External Tools for Advanced Image Optimization
While PowerPoint’s built-in compression features are convenient, they sometimes offer limited control or may not achieve the desired level of optimization, especially for truly high-resolution images or complex visual designs. This is where external image tools and pre-processing techniques, often found at platforms like Tophinhanhdep.com, become invaluable. Leveraging these “Image Tools” – including converters, compressors, optimizers, and even AI upscalers – can provide a more powerful and nuanced approach to managing your visual content before it even enters your PowerPoint presentation.
Leveraging Online Image Compressors (e.g., Tophinhanhdep.com’s Compressor)
Online image compressors offer a user-friendly and efficient way to reduce image file sizes without requiring any software installation. They are particularly effective for optimizing JPEGs and PNGs, which are common formats for aesthetic images, wallpapers, and digital photography.
Tophinhanhdep.com offers advanced image compression capabilities designed to significantly reduce file sizes while maintaining optimal image quality. Here’s how such tools typically work:
- Upload Your Image: Simply drag and drop your image file (or select it from your device) onto the online compressor interface.
- Automatic Analysis and Compression: The tool analyzes the image and applies sophisticated compression algorithms. Many advanced compressors, like those on Tophinhanhdep.com, can achieve substantial reductions (e.g., 60-80% or even up to 90%) without noticeable visual degradation.
- Download Compressed Image: Once compressed, you can download the optimized image and then insert it into your PowerPoint presentation.
Benefits of Using Online Image Compressors:
- No Software Needed: Access and use these tools directly from your web browser, making them ideal for users who don’t have dedicated editing software.
- Excellent Compression Ratios: Often provide superior compression compared to basic built-in tools, especially for JPEGs and PNGs, making them perfect for optimizing backgrounds, aesthetic photos, and nature images.
- Control Over Individual Images: Allows you to optimize each image separately, giving you fine-grained control over the quality-to-size ratio for critical visuals.
- Completely Automated Process: Simple and straightforward, requiring minimal technical expertise.
- Batch Processing (on some platforms): Certain online tools, including those found on Tophinhanhdep.com, may offer options to compress multiple images at once, further streamlining the workflow for thematic collections or mood boards.
By pre-compressing images using Tophinhanhdep.com’s compressor before inserting them into PowerPoint, you can achieve a baseline of optimization that significantly reduces your presentation’s overall file size, often surpassing what PowerPoint’s internal tools can do alone.
Pre-processing Images with Photo Editing Software
For those who demand ultimate control over their image quality and file size, using professional photo editing software like Adobe Photoshop, GIMP, or other similar tools is the gold standard. This approach falls under the “Photography (Editing Styles)” and “Visual Design (Graphic Design, Digital Art, Photo Manipulation)” categories, allowing for meticulous optimization before images are even considered for a presentation.
When exporting images from such software, you can fine-tune compression settings to achieve the smallest possible file size while preserving acceptable visual quality:
- Open the Image: Load your high-resolution image into your preferred editing software.
- Perform Edits and Cropping: Make any necessary adjustments, color corrections, or cropping. Cropping effectively removes unused pixel data, which is a form of pre-compression.
- “Save for Web” (or equivalent): In Photoshop, for example, navigate to File > Export > Save for Web (Legacy) or File > Export As…. Other programs will have similar export dialogs.
- Choose Format and Quality:
- Select JPEG for photographs and images with continuous tones. JPEG is highly efficient for these types of images.
- Select PNG-8 or PNG-24 for images with transparency or sharp lines (like logos or abstract graphics). PNG-8 (256 colors) is often smaller than PNG-24 (full color) if your image doesn’t require millions of colors.
- Adjust the quality slider (for JPEG) or color palette (for PNG-8). Experiment with different settings to find the sweet spot where the file size is minimized without noticeable degradation in quality.
- Preview and Export: Most “Save for Web” interfaces allow you to preview the image at different quality settings and see the estimated file size. Once satisfied, export the optimized image.
Benefits of Compressing Images in Editing Software:
- Fine-Tune Compression: Offers the most granular control over compression algorithms and quality settings for each specific image, whether it’s a beautiful landscape or a detailed abstract design.
- Maximum Quality Retention: Allows you to maintain the highest possible image quality while still achieving significant file size reductions.
- Change Format: You can convert images to web-friendly and efficient formats (like progressive JPEGs) that load faster.
- Remove Metadata: Often allows for the removal of EXIF data (camera information, GPS location, etc.), which can subtly inflate file size and is usually unnecessary for a presentation.
- Advanced Image Manipulation: Before compression, you can perform photo manipulation, apply creative ideas, or adjust editing styles to ensure your image is perfect.
This method is ideal for those preparing high-resolution stock photos or digital art for presentations, ensuring the visual integrity that aligns with the “high resolution” and “beautiful photography” categories.
Utilizing Other Microsoft Office Tools
While PowerPoint is the main application for presentations, other Microsoft Office tools can also be leveraged for preliminary image optimization before embedding them. These tools, though simpler than dedicated photo editors, offer convenient ways to resize and compress images.
-
Microsoft Paint: The classic Paint application, available on Windows, provides basic image editing capabilities that can be used for compression:
- Open the image in Paint.
- Use the “Crop” and “Resize” tools as needed to reduce the image dimensions and remove unnecessary areas.
- Go to File > Save As > JPEG picture. In the “Save As” dialog, you can often adjust a quality slider (if available for your Paint version) to control the compression level.
- Save the optimized image.
-
Microsoft Photos: This free app, built into Windows, is a more modern image management and editing tool:
- Import your photos into the Photos app.
- Select the images you want to compress.
- Look for options like “Resize” or “Compress.” The app often provides presets for different uses (e.g., “Best for email,” “Best for documents”).
- Export the optimized JPEG files. The Photos app can also handle batch processing, making it useful for managing collections of images.
The primary benefit of utilizing these ancillary Microsoft tools is that they allow you to achieve a greater degree of compression than PowerPoint might offer directly, especially for batch resizing and format conversion. By optimizing images externally, even with these basic tools, you reduce the initial file size before inserting them into your PowerPoint, contributing to a much smaller overall presentation footprint. These methods are simple yet effective for preparing various image types, from abstract backgrounds to aesthetic wallpapers.
Holistic Presentation Optimization: More Than Just Images
While image compression is paramount, achieving a truly lightweight and efficient PowerPoint presentation involves a broader strategy of optimization. Tophinhanhdep.com, with its focus on visual design, graphic design, and creative ideas, recognizes that presentation excellence extends beyond individual image files. It encompasses the entire structure and content of your presentation. By addressing other media types and streamlining the design elements, you can further enhance performance and reduce file size.
Compressing Video and Media Files
Just like high-resolution images, embedded video and audio files can be significant contributors to a PowerPoint’s file size. Modern digital photography often includes short video clips, and graphic design projects may incorporate animated elements. Thankfully, PowerPoint also offers tools to compress these media elements.
To compress video files in your presentation:
- Click on the “File” tab.
- Under the “Info” section, you’ll see a “Media Size and Performance” pane. This pane is only visible if there’s an embedded video file in your presentation.
- Click “Compress Media.”
- PowerPoint will offer options to adjust the quality of the videos, such as “Presentation Quality,” “Internet Quality,” or “Low Quality.” These options correspond to different levels of compression and required storage space.
- Choose the appropriate quality level based on your needs. For presentations primarily viewed on screens or shared online, “Internet Quality” or even “Low Quality” might suffice, drastically reducing the file size.
Important Consideration: Be aware that compressing videos can sometimes lead to a loss of fidelity in audio tracks or the removal of embedded subtitles. Always check your presentation thoroughly after compression to ensure all media elements function as expected and meet your quality requirements. Making a backup copy before compression is highly recommended.
Cleaning Up Slide Masters and Unused Content
Beyond media files, the internal structure of your PowerPoint presentation can also contribute to unnecessary file bloat. This often happens in larger projects, collaborative efforts, or when copying slides from various sources.
-
Slide Master Bloat: If you’ve ever copied slides from other presentations, you might have inadvertently brought along their associated slide masters. These unused master layouts can add significant hidden data to your file.
- Go to the “View” tab.
- In the “Master Views” group, select “Slide Master.”
- On the left side of the screen, you’ll see all active and inactive slide masters and their corresponding layouts.
- Identify and delete any master layouts that you don’t need or aren’t actively using in your presentation. Simply select the unwanted master or layout and press the “DEL” key on your keyboard.
- Close the Slide Master view when finished.
-
Removing Unused Slides and Hidden Content: Regularly review your presentation to delete any slides that are no longer relevant, hidden slides that you’ve decided not to use, or objects that might be off-slide. Even seemingly empty slides can contain hidden elements.
By cleaning up your slide master and pruning unnecessary content, you ensure that your presentation’s underlying structure is as lean and efficient as its visible content. This practice aligns with effective visual design principles that prioritize clarity and efficiency.
Design Best Practices for Smaller File Sizes
Good visual design is not just about aesthetics; it’s also about efficiency. Adopting certain design practices can inherently lead to smaller file sizes, complementing your compression efforts. Tophinhanhdep.com, with its array of image inspiration and creative ideas, advocates for designs that are both impactful and optimized.
- Reduce Animation and Transitions: While visually engaging, excessive animations and complex transitions can increase file size and sometimes even strain system resources during playback. Use them judiciously and with purpose.
- Minimize Slides, Maximize Impact: Instead of using many slides with minimal content, aim for fewer, more concise slides that convey information clearly and powerfully. This not only reduces file size but also improves audience engagement.
- Convert Videos to Efficient Formats: Ensure any embedded videos are in modern, highly compressed formats like MP4. Avoid older, less efficient formats if possible.
- Use Minimalist Templates: Avoid overly elaborate or image-heavy template backgrounds and design elements if they’re not critical to your message. Simpler templates inherently have a smaller footprint.
- Save as PDF for Final Sharing: If the presentation is for viewing only and no further editing or interactivity is required, saving it as a PDF can drastically reduce the file size, making it incredibly easy to share. PDF converters are also part of the “Image Tools” ecosystem that Tophinhanhdep.com supports.
By integrating these holistic optimization strategies, you move beyond just compressing images to creating a truly optimized, high-performing presentation. This comprehensive approach ensures that your content, whether it’s breathtaking nature photography, aesthetic backgrounds, or abstract art, is presented effectively and efficiently.
Conclusion
In the realm of digital presentations, the ability to effectively manage and compress images is a fundamental skill. High-resolution images, while undeniably enhancing the visual appeal of your PowerPoint slides, can easily transform a sleek presentation into a cumbersome behemoth, hindering sharing, slowing performance, and consuming valuable storage.
This guide, inspired by the comprehensive image resources available at Tophinhanhdep.com, has provided you with a robust toolkit for tackling this challenge. We’ve explored PowerPoint’s versatile built-in compression features, offering step-by-step instructions for both Windows and Mac users to manually compress individual images, set default compression resolutions, disable auto-compression, and perform batch optimization via the “Save As” function.
Beyond PowerPoint’s native capabilities, we highlighted the power of external optimization. Tools like Tophinhanhdep.com’s online image compressors offer advanced algorithms to achieve significant file size reductions without compromising the visual integrity of your high-resolution photography, aesthetic backgrounds, or digital art. Professional photo editing software provides unparalleled control, allowing for meticulous pre-processing and format optimization. Even other simple Microsoft Office applications can play a role in preparing your images for a lean presentation.
Finally, we broadened our scope to encompass holistic presentation optimization, recognizing that truly streamlined files involve more than just image compression. Strategies such as compressing video media, cleaning up slide masters, and adopting minimalist visual design principles all contribute to a lightweight, high-performance presentation.
By applying these techniques, you ensure that your presentations not only captivate your audience with stunning visuals—be it wallpapers, beautiful photography, or creative graphic design—but also load quickly, share effortlessly, and run smoothly. At Tophinhanhdep.com, we are committed to providing the tools and inspiration needed to make your visual content shine, efficiently and effectively. Master image compression, and empower your presentations to deliver maximum impact with minimum fuss.