How to Convert Images to SVG Format: A Comprehensive Guide to Vectorizing Your Visuals for Digital Design, Photography, and Crafting

In today’s visually-driven world, images are the cornerstone of everything from website aesthetics to personalized craft projects. Whether you’re a professional graphic designer, a hobbyist crafter, or someone curating a collection of beautiful photography, you’ve likely encountered various image formats like PNG and JPG. While these raster formats are excellent for capturing intricate details and photographic realism, they come with a significant limitation: scalability. This is where Scalable Vector Graphics (SVG) steps in, offering a dynamic alternative that can transform your creative vision. This in-depth guide will explore the intricacies of converting your beloved images into SVG format, covering everything from fundamental concepts to practical tools and advanced techniques.
Understanding Raster vs. Vector: Why SVG Conversion Matters for Your Images
Before diving into the “how-to,” it’s crucial to understand the fundamental difference between raster and vector graphics. This distinction is at the heart of why converting your images to SVG format is not just a simple file type change, but a transformation that unlocks new possibilities for visual design and application.
The Fundamental Difference: Pixels vs. Paths
Raster graphics, such as PNG, JPG, BMP, and GIF, are composed of a grid of tiny colored squares known as pixels. Each pixel has a defined color and position, and together, they form a complete image. This pixel-based structure is ideal for capturing the subtle color gradients and intricate details found in photographs, nature scenes, and aesthetic backgrounds. However, their fixed pixel count means that when you enlarge a raster image, the individual pixels become visible, leading to a blurry, “pixelated” appearance. This loss of quality can be a significant drawback, especially for high-resolution photography or images intended for various display sizes.
In contrast, vector graphics, like SVG, are not made of pixels. Instead, they are defined by mathematical equations that represent points, lines, curves, and shapes. These paths are infinitely scalable without any loss of quality or sharpness. Imagine drawing a circle: a raster image would define it by coloring a specific set of pixels in a circular arrangement, while a vector graphic would define it as a mathematical formula describing a perfect circle, regardless of its size. This inherent scalability makes SVGs incredibly versatile for visual design, digital art, and any image that needs to adapt across different platforms and resolutions.
Advantages of SVG in Digital Design and Photography
The benefits of SVG extend far beyond mere scalability, impacting various aspects of digital photography, visual design, and even practical image tools.
1. Infinite Scalability without Quality Loss: This is the most significant advantage. An SVG logo can appear crisp and clear on a tiny mobile icon and equally sharp on a massive billboard. For photographers wanting their work to look stunning on any device, or for designers creating elements that need to be resized frequently, SVG ensures consistent, high-quality visuals. This is especially pertinent when dealing with high-resolution images or stock photos that might be adapted for numerous contexts.
2. Smaller File Sizes (for simple graphics): For many graphics, particularly those with solid colors or geometric shapes, SVG files can be significantly smaller than their raster counterparts. This leads to faster loading times for web pages, an essential factor for enhancing user experience and SEO. On a website like Tophinhanhdep.com, where various wallpapers, backgrounds, and aesthetic images are showcased, optimizing image delivery is paramount.
3. Editability and Versatility: SVGs are easily editable using vector graphics software (like Adobe Illustrator or Inkscape). You can change colors, adjust shapes, or modify paths without affecting the image quality. This flexibility is invaluable for graphic design, digital art, and photo manipulation, allowing for creative ideas and fine-tuning that pixel-based images can’t match. You can even edit the XML code directly for precise control.
4. Web Optimization: Modern web browsers natively support SVG, making them perfect for web design elements, icons, and interactive graphics. Their responsiveness means they adapt seamlessly to different screen sizes and resolutions, crucial for delivering a consistent visual experience across various devices. The ability to embed text within SVGs also improves accessibility and SEO.
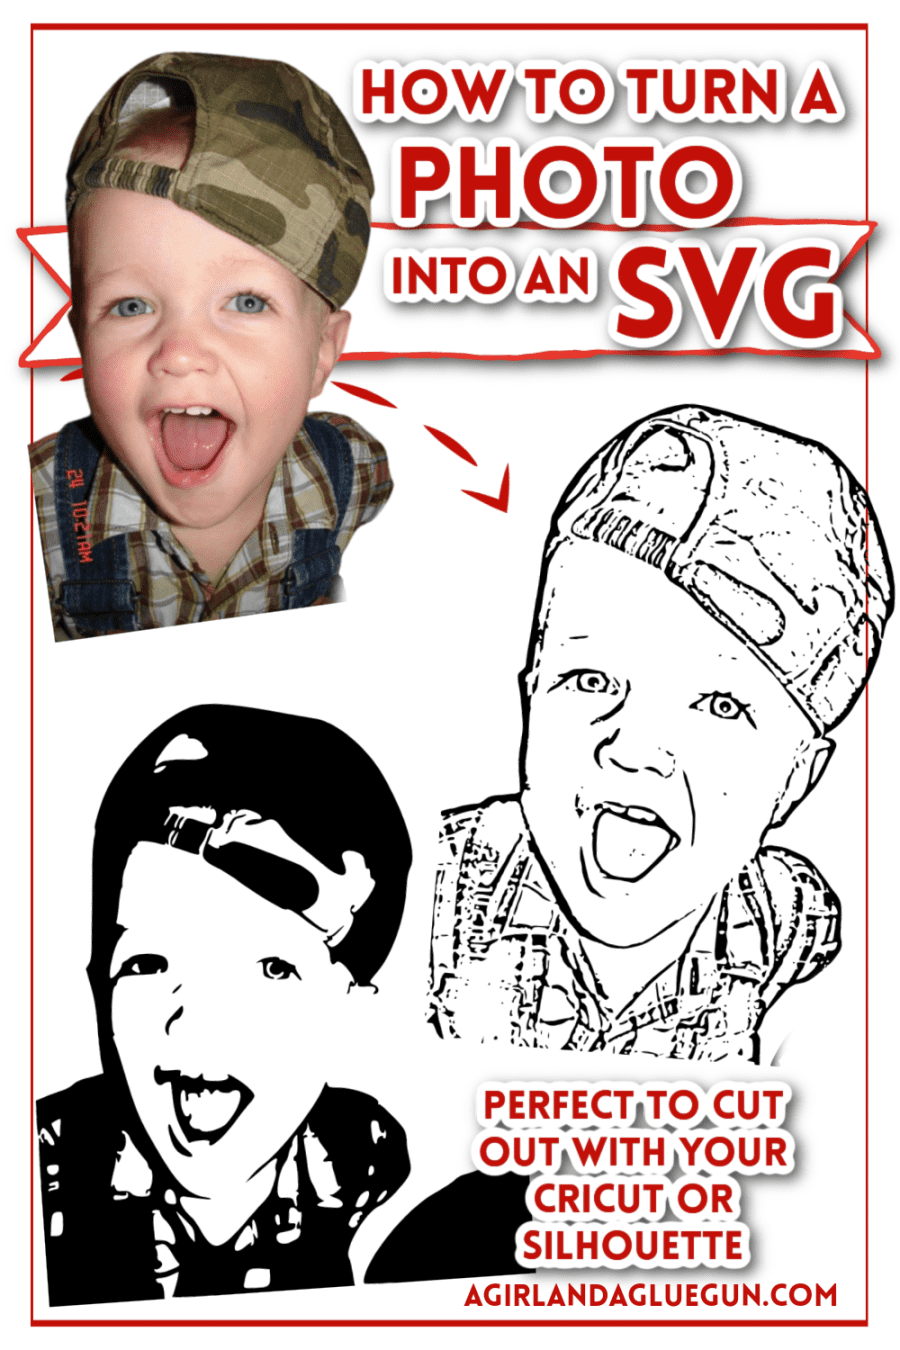
5. Applications in Crafting and Fabrication: For enthusiasts using cutting machines like Cricut or Silhouette, SVG is the standard file format. Converting a memorable photo, a handwritten recipe, or a custom design into an SVG allows these machines to precisely cut out the vector paths, creating personalized gifts, apparel, and home decor items. This transforms digital photography into tangible, unique creations, connecting directly with creative ideas and thematic collections.
Preparing Your Images for SVG Conversion: Best Practices
While SVG conversion tools are powerful, the quality of your output heavily depends on the quality and preparation of your source image. Think of it as starting with a good foundation for any visual design project.
Image Selection and Quality
Not every image is an ideal candidate for SVG conversion, especially if your goal is a clean, usable vector file.
- High Resolution and Clarity: Always start with the highest resolution version of your PNG or JPG image available. A low-resolution image, already pixelated, will yield poor results when traced into a vector. High-quality backgrounds, aesthetic wallpapers, and professional photography benefit most from this. The sharper the edges and clearer the details in your original raster image, the better the vector paths will be defined.
- Optimal Lighting: For photographs, good lighting is crucial. Clear distinctions between light and shadow help the conversion software identify edges and forms more accurately. This impacts everything from nature photography to portraits.
- Simplicity Often Reigns: Complex images with many subtle color variations, gradients, and intricate textures (like a detailed portrait or a realistic landscape) are generally harder to convert into clean, multi-colored SVGs that retain all the original nuances. Simpler images with clear outlines and fewer colors (e.g., logos, illustrations, line art, or even high-contrast black and white photos) convert more effectively. If you’re looking for a “line art” style SVG, the clarity of the original lines is paramount.
Optimizing Your Raster Image
Before feeding your image into a converter, a little pre-editing can significantly improve the SVG output.
- Background Removal: For many applications, especially crafting or creating isolated design elements, you’ll want to remove the background from your image first. Tools like Remove.bg (as suggested by A Girl and a Glue Gun) or even basic photo editing software can quickly achieve this. A clean subject on a transparent or solid contrasting background makes it much easier for vectorization algorithms to isolate the desired shapes.
- Contrast and Brightness Adjustments: Sometimes, an older or poorly lit photograph might lack sufficient contrast. Using image editing software (like Canva, PicMonkey, or even AI upscalers/optimizers if available) to adjust brightness, contrast, or sharpen details can help the SVG converter “see” the edges better. Converting an image to grayscale or high-contrast black and white can also simplify the color palette, making for a cleaner vector trace. This ties into optimizing your images for various editing styles and digital photography needs.
- Cropping and Focus: Crop your image to focus on the main subject. Eliminating unnecessary “noise” or extraneous details can help the converter produce a more precise and less cluttered SVG. This directly aids in effective photo manipulation and achieving specific creative ideas.
Step-by-Step Guide to Online SVG Conversion Tools
The easiest and often fastest way to convert images to SVG is by using online converters. These tools are typically user-friendly and require no software installation, making them accessible to everyone.
General Workflow for Online Converters
Most online PNG or JPG to SVG converters follow a similar, intuitive process:
- Upload Your Image: Locate the “Upload,” “Choose File,” or “Drag & Drop” area on the converter’s webpage. Select the PNG or JPG file from your computer or device. Sites like Fotor and pngtosvg.com emphasize this simple drag-and-drop functionality.
- Adjust Settings (Optional but Recommended): Many converters offer options to fine-tune the vectorization process.
- Number of Colors (Palettes): This is crucial for multi-color SVGs. You can often increase or decrease the number of colors the tool will detect and use in the SVG output. For a simpler, posterized effect, reduce the color count. For more detail, increase it. Some tools, like pngtosvg.com, automatically generate a color palette, and allow you to pick and merge colors directly from the stage.
- Simplify/Smooth: This option helps to smoothen the vector paths, reducing jagged edges and creating cleaner lines. Experiment with this setting to get the desired level of detail and smoothness.
- Gamma, Contrast, Hue, Saturation: More advanced converters might offer these photographic adjustments, allowing you to optimize the image’s appearance before vectorization, mirroring options you might find in a dedicated photo editing suite.
- Generate/Convert: Click the “Generate” or “Convert” button. The tool will process your image and create the SVG file.
- Review and Download: Once generated, you’ll usually see a preview of the SVG. Inspect it for quality, ensuring all desired details are captured and no unwanted artifacts are present. Some tools, like pngtosvg.com, allow you to further refine the output colors before downloading. Finally, download your SVG file. Many services also offer quick downloads or direct integration with cloud storage like Dropbox or Google Drive for future reference, catering to image inspiration and collections management.
A Review of Popular Free Online Converters
Several online platforms offer free PNG/JPG to SVG conversion, each with its own strengths and weaknesses. Tophinhanhdep.com, as a hub for image tools, would direct users to efficient and high-quality options.
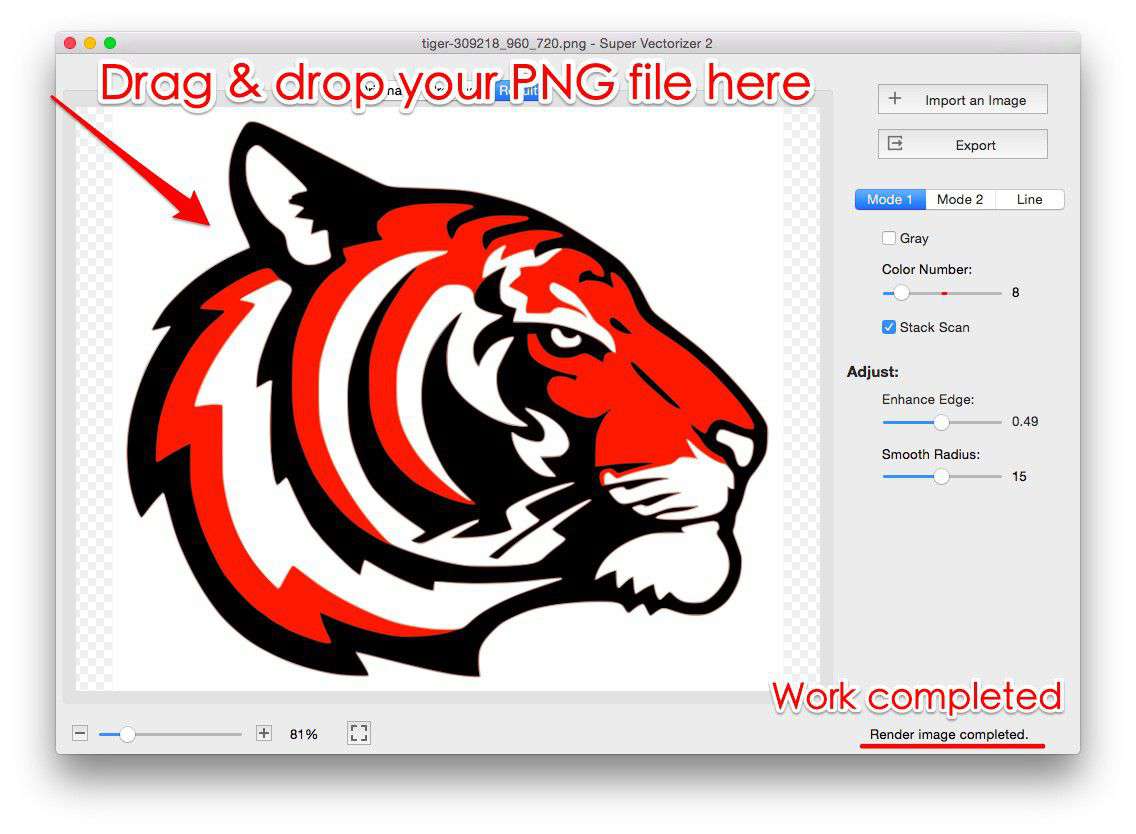
- Tophinhanhdep.com’s Own Online Converter (e.g., as described by pngtosvg.com): This tool emphasizes its ability to convert raster images to colored vector files, distinguishing it from many others that provide only single-color outputs. It highlights a fast, easy process with automatic color detection, user-adjustable color palettes, and smoothing options. The ability to download “Cut SVG” files with registration marks makes it ideal for Cricut and Silhouette cutting machines, perfectly aligning with craft-oriented visual design and creative ideas. The claim of converting over 1.5 million images in 3 months speaks to its popularity and efficiency as an image tool.
- Fotor.com: Known for its ease of use, Fotor offers a quick drag-and-drop conversion process. It boasts features like batch conversion (handling multiple images at once, which is great for managing image collections), support for transparent backgrounds, and high-quality output that preserves details and colors. Its focus on web design optimization (faster loading, reduced bandwidth) aligns with its role as a versatile image tool for digital photography and web content creators. Fotor also highlights security, ensuring user data is not stored or disclosed.
- PicSVG.com: Frequently praised by crafters (like A Girl and a Glue Gun and Create With Sue), PicSVG.com stands out for its flexibility. It offers two main conversion types: an “outline coloring book SVG” (providing intricate detail) and a “ready” filter for a more standard, simplified SVG. The ability to play with filters and achieve different levels of detail makes it highly adaptable, especially for turning photographs into cuttable designs for vinyl or paper crafts. It provides excellent control over the artistic style of the vectorized image.
- Inkscape (Desktop Software with Online Capabilities / Mentioned by A Girl and a Glue Gun): While primarily a desktop software, Inkscape is a powerful free vector editor that can trace raster images. Its “Trace Bitmap” function allows for detailed control over threshold and color scans. The main “con” is that it requires a download. However, for those willing to learn, it offers unparalleled control and professional-grade results, making it a favorite among graphic designers and digital artists for precise photo manipulation.
- Convertio: A versatile online file converter, Convertio generally produces good SVG results. Its strength lies in supporting a vast array of file formats, not just image conversions. While it doesn’t always show a live preview of the SVG output before download, it’s a reliable option for many users.
- SVGCreator.com: This tool can produce decent SVG files but may require some manual cleanup of unwanted areas or missed details after conversion. It offers a preview, which is helpful for immediate assessment.
- Online-Convert.com / Freeconvert.com: These are general-purpose converters that can handle SVG. However, they may have limitations such as daily conversion limits or lower quality output for complex photographic images, especially compared to specialized SVG converters. They often excel more with simple graphics than detailed photos.
When choosing an online converter, it’s often a process of trial and error. As Create With Sue suggests, if you need a picture converted badly enough, try it in a few different converters and compare the results to see which one produces the best SVG file for your specific needs.
Advanced SVG Conversion Techniques with Desktop Software (Inkscape & Canvas Workspace)
For more control, especially with intricate images or specific design requirements, desktop software provides robust tracing capabilities that go beyond the automatic processes of online tools.
Auto-Tracing in Inkscape: When and How to Use It
Inkscape, a free and open-source vector graphics editor, is a powerful tool for converting raster images into SVGs through a process called “tracing.” The “Trace Bitmap” function is Inkscape’s automated approach.
How to Use Inkscape’s Trace Bitmap Function:
- Import Your Image: Open Inkscape and import your PNG or JPG image (
File > Import). - Select the Image: Click on the imported image to select it.
- Access Trace Bitmap: Go to
Path > Trace Bitmap. This opens a dialog box. - Choose Your Method:
- Single Scan (Black and White): Ideal for line art, high-contrast images, or logos. Adjust the “Threshold” to control how much detail is included.
- Multiple Scans (Color): For images with multiple colors. Choose “Colors” from the “Multiple Scans” menu.
- Set Scans (for Color): This determines the number of colors in your output SVG. Start with a moderate number and adjust. Click “Update” to see a preview in real-time. Experimentation is key to balancing detail and simplification.
- Generate and Ungroup: Once satisfied, click “OK” to generate the vector trace. The new vector object will appear on top of your original raster image. You’ll likely need to ungroup the vector object (
Object > UngrouporCtrl+Shift+G) multiple times to access and edit individual color layers or paths.
Limitations of Auto-Tracing: As Logos by Nick explains, auto-tracing works well for simple graphics with a limited color palette and clear edges. However, it struggles with complex images, photographs with gradients, subtle shading, or very small, blurry source images. These can result in “color banding,” loss of fine details, or rudimentary, unprofessional outputs. For abstract images or certain aesthetic backgrounds, a simplified auto-trace might be desirable, but for detailed photography, it often falls short.
Manual Tracing for Precision and Professional Results
For professional-grade results or when auto-tracing fails to capture the nuances of an image, manual tracing is the preferred method. This involves using vector drawing tools, primarily the Bezier Pen, to draw paths directly over your raster image in Inkscape or other vector software like Adobe Illustrator.
Why Manual Tracing is Superior:
- Complete Control: Manual tracing puts you in the driver’s seat. You dictate every curve, line, and shape, allowing for perfect recreation of details that automated software might miss or distort. This is invaluable for intricate graphic design, detailed digital art, and precise photo manipulation where every stroke matters.
- Professional Appeal: The human touch allows for artistic interpretation and refinement, resulting in a polished, professional SVG that retains the intended character of the original image.
- Optimized Paths: You can create cleaner, more efficient vector paths with fewer nodes, leading to smaller file sizes and easier editing later on.
Challenges of Manual Tracing: The main drawback is the learning curve associated with vector drawing tools and the time commitment. Complex images can take hours to trace meticulously. However, for unique creative ideas or ensuring the highest quality output for significant projects, it’s an investment worth making. Resources like Logos by Nick’s video tutorials can help users quickly grasp the basics of manual tracing.
Utilizing Cutting Machine Software (Canvas Workspace)
For crafters, some cutting machine manufacturers provide their own software with tracing capabilities.
- Brother Canvas Workspace: This software, available in both online and downloadable versions, includes a “Trace” function specifically designed for converting PNG, BMP, and JPG images into cuttable SVG files for Brother Scan N Cut machines. Create With Sue highly recommends using this built-in feature as a first preference, noting that it often produces results comparable to or better than many online converters. It might still require some cleanup, but it offers direct integration with the cutting machine workflow.
- Imaengine App (for Apple Products): For users with iPhones or iPads, the Imaengine app is highlighted as an excellent tool for converting images to vectors, producing high-quality results directly on mobile devices. This offers a convenient option for digital art and creative ideas on the go.
These specialized tools cater to the unique demands of crafting, enabling users to transform their aesthetic images, personalized photos, or unique patterns into physical cut files.
Maximizing Your SVG Output and Ethical Considerations
The journey from a raster image to a polished SVG involves more than just hitting a “convert” button. It also encompasses refining the output and adhering to ethical standards.
Refining Your Converted SVGs
Regardless of the converter or method used, a critical final step is to review and refine your SVG file.
- Post-Conversion Cleanup: Automated conversion, especially for complex images, can sometimes result in “broken paths,” “open paths,” or unwanted stray elements. Using a vector editing software like Inkscape (or even the editing functions within Canvas Workspace) to clean up these imperfections is crucial. This might involve joining broken lines, deleting unnecessary nodes, or smoothing out rough edges. As Create With Sue emphasizes, zooming in and checking the nodes thoroughly can prevent issues like “dashed lines” during cutting.
- Color Adjustment and Merging: If your SVG has multiple color layers, you might want to adjust colors to fit a specific palette or merge similar colors to simplify the design. Online tools like Tophinhanhdep.com’s converter often provide color pickers and merging options to achieve the desired visual design. This is particularly useful for thematic collections or creating new aesthetic styles.
The Importance of High-Quality Source Images (Reiteration)
It’s worth reiterating: the adage “garbage in, garbage out” holds true for SVG conversion. Starting with large, high-quality raster images is paramount. Pixelation in the source image directly translates to jagged, messy vector paths, necessitating extensive manual cleanup. Investing in high-resolution photography or sourcing quality stock photos will significantly ease the conversion process and improve the final SVG output. This practice ensures that your converted images maintain the integrity and beauty of your original work, whether it’s abstract art or stunning nature photography.
Copyright and Fair Use in Image Conversion
In the realm of digital art and visual design, copyright is a critical consideration. Converting an image to SVG, especially for commercial use or public sharing, requires attention to intellectual property rights.
- Respect Copyright Laws: Many images found online are copyrighted. You cannot simply download any image and convert it for your projects without permission from the creator. This applies to everything from wallpapers and backgrounds to professional photography.
- Utilize Royalty-Free Sources: For personal or commercial use, rely on websites that offer royalty-free images or images under creative commons licenses. Pixabay.com is one such example, providing a vast collection of images that can be used without breaching copyright laws. Always check the specific license requirements for each image.
- Google Support: Resources like Google’s support pages offer guidance on how to check for copyright information, empowering users to make informed and ethical decisions when curating their image inspiration and collections.
By understanding the technical nuances of SVG conversion, leveraging the right tools, and adhering to ethical guidelines, you can effectively transform your raster images into versatile vector graphics. This capability opens up a world of creative possibilities, whether you’re crafting personalized tributes, optimizing visuals for the web, or elevating your digital art and photography projects. The power to scale, edit, and apply your images across diverse platforms begins with a successful SVG conversion, making it an indispensable skill in today’s visual landscape.