How to Convert Image to Vector in Illustrator: A Comprehensive Guide for Tophinhanhdep.com Users

At Tophinhanhdep.com, we understand the power of visual content. From breathtaking wallpapers and evocative backgrounds to stunning nature photography and intricate abstract art, images form the core of our digital experience. For creators, designers, and enthusiasts alike, mastering the tools that transform these images into versatile assets is paramount. One such indispensable skill is converting raster images into vector graphics, particularly within the industry-standard software, Adobe Illustrator.
Raster images, composed of pixels, are perfect for capturing the nuanced details of a beautiful photograph or the subtle gradients of an aesthetic background. However, they struggle with scalability, becoming pixelated when enlarged. Vector graphics, on the other hand, are built from mathematical paths, points, and curves, allowing them to be scaled infinitely without any loss of quality. This distinction is crucial for everything from designing a crisp logo to crafting an elegant graphic for print or web, ensuring your visual design maintains its integrity across all applications.
This comprehensive guide from Tophinhanhdep.com will walk you through the process of transforming your favorite photos and illustrations into adaptable vector art using Adobe Illustrator’s powerful Image Trace feature. Whether you’re aiming to create striking visual design elements, prepare high-resolution stock photos for diverse uses, or simply explore new creative ideas with your existing image collections, this tutorial will equip you with the knowledge to unlock the full potential of your visuals. Dive in and discover how this essential image tool can elevate your digital art and photo manipulation projects.
Understanding Raster vs. Vector Graphics: Why the Conversion Matters for Tophinhanhdep.com Users
Before we delve into the “how-to,” it’s vital to grasp the fundamental differences between raster and vector graphics and why this conversion is so important for the diverse needs of Tophinhanhdep.com’s community.
Raster Graphics (Pixel-Based): These are the images we encounter most frequently: JPEGs, PNGs, GIFs, and TIFFs. They are essentially a grid of tiny colored squares called pixels. Think of a digital photograph you capture with your camera – it’s a raster image. The strength of raster images lies in their ability to display complex color gradients and intricate detail, making them ideal for high-resolution photography, detailed wallpapers, and realistic backgrounds. However, their pixel-based nature means they are resolution-dependent. If you try to enlarge a raster image beyond its original resolution, the individual pixels become visible, leading to a blurry, “pixelated” appearance. This limitation can be a significant hurdle for graphic designers and digital artists who need flexibility in their work. For instance, a beautiful nature photograph might look stunning as a desktop background, but if you want to extract an element from it for a logo that needs to be printed on a billboard, the pixelation would render it unusable.
Vector Graphics (Path-Based): In contrast, vector graphics are not made of pixels. Instead, they are defined by mathematical equations that describe points, lines, curves, and polygons. These geometric primitives form shapes, which are then filled with colors or gradients. Software like Adobe Illustrator uses these equations to render the image. The incredible advantage of vector graphics is their scalability. Since the image is defined mathematically, it can be resized to any dimension – from a tiny icon to a massive billboard – without any loss of quality or introduction of pixelation. The lines remain sharp, and the colors stay true. This makes vectors indispensable for logos, illustrations, typefaces, graphic design elements, and technical drawings. For those working with visual design, creating marketing materials, or developing digital art that needs to adapt across various platforms, vectors offer unparalleled flexibility.
Why the Conversion Matters for Tophinhanhdep.com Users: For our community, which appreciates everything from abstract art to beautiful photography and needs powerful image tools, converting images to vectors opens up a world of possibilities:

- Scalability for Visual Design: Imagine you’ve found an aesthetic image or a unique abstract pattern on Tophinhanhdep.com. By converting it to a vector, you can use it as a tiny icon on a website, stretch it across a large banner, or incorporate it into a print design without worrying about quality degradation. This is crucial for graphic design and digital art projects.
- Editing Flexibility: Vector graphics are fully editable. You can change colors, adjust shapes, modify paths, and separate elements easily. This allows for deep photo manipulation and creative ideas, letting you transform a static image into a dynamic design asset.
- Professional Output: For projects requiring high-quality printing, such as posters, brochures, or merchandise, vector files are the industry standard. They ensure crisp lines and vibrant colors every time, essential for professional stock photos and digital photography used in commercial contexts.
- Creating Custom Elements: Perhaps you love a specific detail from a nature image or a unique element from a sad/emotional picture that you want to re-purpose. Vectorizing allows you to extract and refine these elements, turning them into reusable assets for your mood boards, thematic collections, or personalized wallpapers and backgrounds.
- Beyond Simple Conversion: It’s not just about converting; it’s about transforming. Vectorization can give a photographic image a stylized, illustrative quality, opening new avenues for artistic expression and trending styles in digital art.
By understanding these distinctions, you’ll appreciate why the Image Trace feature in Illustrator is not just an image converter, but a powerful bridge between different visual formats, empowering you to create, adapt, and innovate.
Preparing Your Image for Vectorization: Best Practices for Quality Output
The success of your vector conversion often hinges on the quality and type of the original raster image. While Adobe Illustrator’s Image Trace is a remarkable tool, it performs best when fed a suitable starting image. This preparatory phase is where your eye for detail and understanding of different image categories, which you’ve honed through exploring Tophinhanhdep.com’s extensive collections, truly come into play.
Choosing the Right Source Image: From Beautiful Photography to Abstract Concepts
Not all images are created equal when it comes to vectorization. The ideal candidate depends heavily on your desired outcome.
- For Line Art and Logos: Images with clear, well-defined lines and distinct shapes are perfect. Think of a simple sketch, a clean black-and-white drawing, or a logo with solid colors. These will yield very clean and accurate vector paths. If you have a hand-drawn illustration or a custom design you want to digitize, scanning it and then vectorizing it is an excellent approach. This method is particularly useful for creating graphic design elements that require sharp edges and scalable forms.
- For Stylized Photography and Digital Art: If you’re looking to transform a beautiful photograph—be it a vibrant nature scene, an aesthetic portrait, or a poignant sad/emotional moment—into a stylized illustration, then photos with strong contrasts and relatively simple details can work wonderfully. You won’t get a photorealistic vector, but rather an artistic interpretation with a reduced color palette or simplified shapes. This approach is fantastic for creating unique digital art pieces or stylized backgrounds that maintain an artistic flair without the heavy file size of a raster image. Tophinhanhdep.com’s high-resolution photography can be an excellent starting point for such creative transformations.
- For Abstract and Geometric Patterns: Images featuring abstract designs, geometric patterns, or bold color blocks are also excellent candidates for vectorization. The clean lines and distinct areas of color translate very well into editable vector shapes, making them ideal for creating scalable backgrounds, thematic collections, or elements for mood boards.
- Images to be cautious with: Highly detailed photographs with subtle gradients, intricate textures, or very soft edges can be challenging. While Illustrator can attempt to trace them, the resulting vector might be excessively complex (with thousands of paths and anchor points), making it difficult to edit, or it might lose the delicate nuances of the original. In such cases, a more artistic, less literal interpretation might be the best path, or perhaps considering AI upscalers as an alternative image tool if pure resolution enhancement is the goal without vector conversion.
Optimizing Raster Images Before Tracing: A Step Towards Perfect Vectors
Even with a well-chosen image, a little pre-processing can significantly improve the quality of your vector conversion and make your post-conversion editing much easier. Think of these steps as fine-tuning your image with Tophinhanhdep.com’s philosophy of high-quality visuals in mind.
- High Resolution is Key: Always start with the highest resolution version of your image possible. More pixels mean more detail for Illustrator’s Image Trace algorithm to interpret accurately. This is why Tophinhanhdep.com emphasizes high-resolution photography and stock photos – they provide a superior foundation for any creative process, including vectorization.
- Crop and Clean Up: Remove any unnecessary elements or backgrounds from your image before tracing. A cluttered image will result in a more complex and potentially messy vector. Use a photo editing tool to crop out irrelevant areas and clean up any dust, scratches, or unwanted noise. This simplifies the tracing process and focuses Illustrator on the essential parts of your image.
- Adjust Contrast and Brightness: Enhancing the contrast can help define edges more clearly, which is crucial for Illustrator to differentiate between shapes and colors. Increase the brightness if the image is too dark, or reduce it if it’s overexposed. These adjustments, akin to basic editing styles, help Illustrator “see” the image more effectively.
- Desaturate or Convert to Grayscale (Optional): For purely black-and-white line art, converting your image to grayscale (or desaturating it completely) before tracing can yield cleaner results, especially if the original image had subtle color variations that might confuse the tracing algorithm.
- Consider Manual Tracing for Unique Styles: For truly bespoke line art, like a unique “sketched art” effect, you might even consider a traditional method: print your photo in black and white, lay a plain sheet over it (or use a light box/window), trace the outlines with a marker, then scan your sketch. This gives you ultimate control over the lines you want to vectorize, offering a distinct creative idea and personal touch.
By carefully selecting and preparing your images, you set yourself up for success, ensuring that the vector graphics you create in Illustrator are as refined and versatile as the inspiring visuals you find on Tophinhanhdep.com.
Step-by-Step Guide: Converting Images to Vectors in Adobe Illustrator
Now that we understand the ‘why’ and the ‘what’ of image preparation, let’s dive into the practical ‘how-to’ using Adobe Illustrator. This process leverages Illustrator’s powerful Image Trace feature, transforming your pixel-based image into editable, scalable vector artwork.
Setting Up Your Workspace: Initiating the Vectorization Process
The journey begins by getting your image into Illustrator and ready for the tracing magic.
Step 1: Open a New Document in Adobe Illustrator
Launch Adobe Illustrator. Go to File > New (or Cmd/Ctrl + N). For this tutorial, you can specify a standard size like 470px width and 350px height, or any dimensions suitable for your project. Give your document a name and save it early.
Step 2: Place Your Raster Image onto the Artboard
With your new document open, you need to bring your raster image into the Illustrator environment. Go to File > Place... (or Shift + Cmd/Ctrl + P). Navigate to the location of your prepared image file (e.g., a high-resolution photo, a scanned sketch, or an abstract background from Tophinhanhdep.com). Click Place, then click on your artboard to place the image.
Step 3: Resize Your Image (If Necessary)
If your image is too large or too small for your artboard, you can easily adjust its size. With the image selected (use the Selection Tool - shortcut V), you’ll see a bounding box around it. Use the Free Transform Tool (shortcut E) or simply drag the corner handles of the bounding box while holding Shift (to maintain proportions) to resize the image. Position it centrally on your artboard.
Harnessing the Power of Image Trace: Unlocking Vector Potential
The core of the conversion process lies within the Image Trace panel. This is where you instruct Illustrator on how to interpret your raster image and generate vector paths.
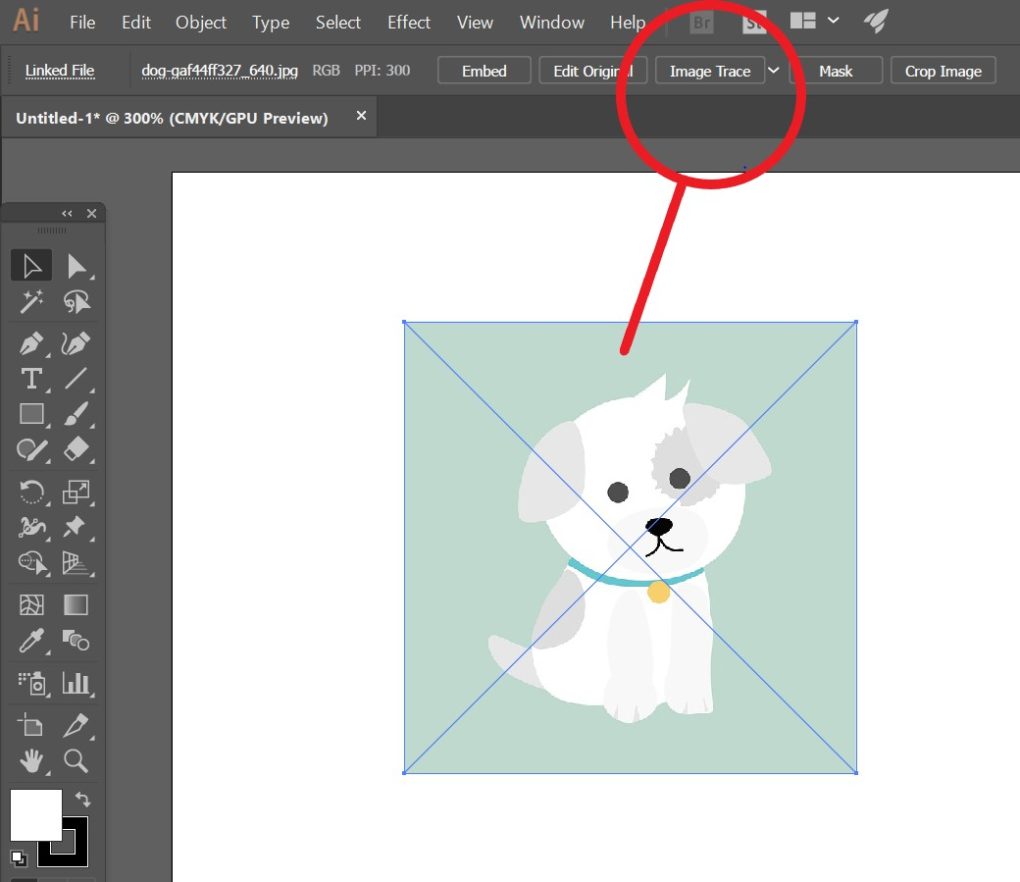
Step 4: Open the Image Trace Panel
With your placed image still selected, open the Image Trace panel. You can do this in one of two ways:
- Go to
Window > Image Trace. - If your Control panel is visible at the top of your workspace, you might see an “Image Trace” button or a small icon that looks like a small square with an arrow when the image is selected. Clicking this will automatically apply a default trace and often open the panel. It’s generally best to open the full panel via
Windowfor more control.
Step 5: Explore Image Trace Presets
Once the Image Trace panel is open, you’ll notice a Preset dropdown menu at the top. This menu offers a variety of pre-configured settings tailored for different types of images and desired outcomes. Experimenting with these presets is crucial, as the best choice depends on your specific image and artistic vision.
Some common presets include:
- High Fidelity Photo / Low Fidelity Photo: Ideal for converting photographs into complex vector art with varying levels of detail and color. “Low Fidelity” will yield fewer colors and simpler shapes, giving a more illustrative feel to your beautiful photography.
- 3 Colors / 6 Colors / 16 Colors: Good for images with a limited color palette, or when you want to simplify a colorful image into a poster-like vector. Excellent for abstract art or graphic design elements.
- Grayscale / Black and White Logo: Perfect for converting black and white images, scanned sketches, or logos with clear distinctions into crisp vector line art. This is often the go-to for precise conversions.
- Line Art / Sketched Art: Designed to capture the essence of drawings and sketches, simplifying them into clean vector lines. This is fantastic for digitizing your creative ideas that started on paper.
Select your image on the artboard and then choose a preset from the dropdown. Illustrator will immediately apply the trace, and you’ll see a preview of the vectorized result. Don’t worry if it’s not perfect yet – this is just the beginning of refinement.
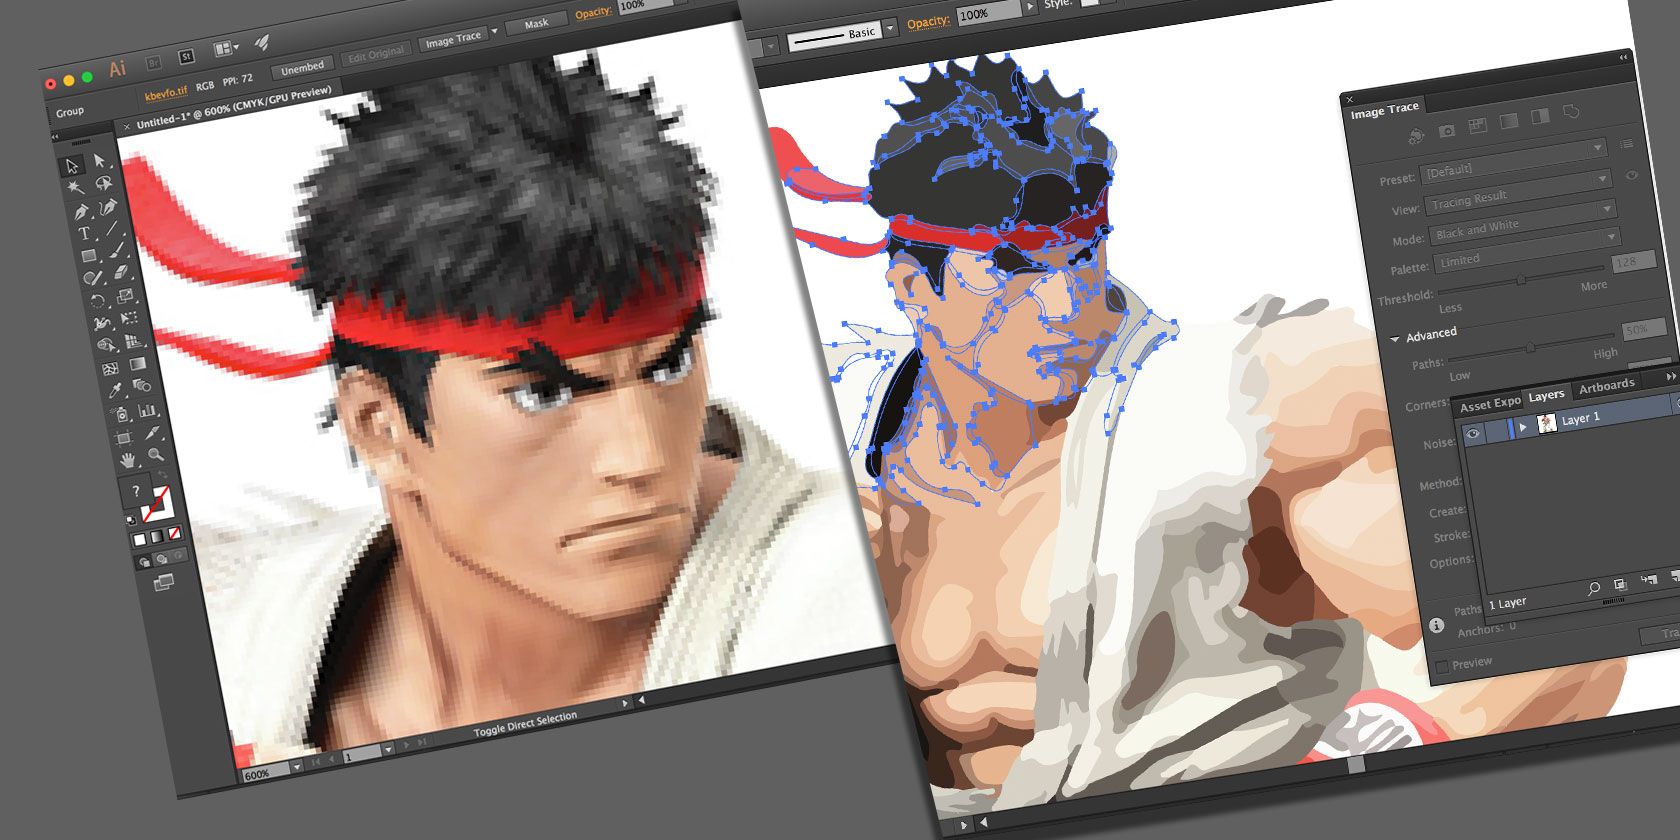
Step 6: Fine-tuning with Advanced Options
Below the presets, you’ll find Mode (Color, Grayscale, Black and White) and a Palette option for color modes. For more granular control, click the Advanced dropdown in the Image Trace panel. This reveals several crucial sliders and checkboxes that allow you to customize the tracing process:
- Threshold (for Black and White mode): This slider controls how light or dark pixels are interpreted as black or white. Increasing the threshold makes more pixels black, resulting in a bolder, darker trace. Decreasing it makes more pixels white, resulting in a lighter trace. This is incredibly useful for adjusting the density of lines in line art or sketched art.
- Paths: Controls the accuracy of the trace. Higher values create more intricate paths, capturing more detail but potentially leading to a very complex vector. Lower values simplify the paths, creating a smoother, more generalized look.
- Corners: Determines how sharp or rounded the corners of your vector shapes will be. Higher values result in sharper, more angular corners, while lower values produce softer, more rounded ones.
- Noise: Filters out small, unwanted details or “noise” from the original image. Increasing this value ignores smaller elements, simplifying the overall vector. Keep this value low if you want to retain fine details, especially for detailed photography.
- Method: Choose between
Abutting(creates cut-out paths) orOverlapping(creates stacked paths). - Snap Curves to Lines: Tries to convert curved segments into straight lines where appropriate.
- Ignore White: This is a very useful checkbox, especially for line art or logos. When checked, Illustrator will ignore any white areas in the original image, making them transparent in the resulting vector. This is invaluable when you want only the colored or black elements of your trace to be visible, leaving a transparent background for easy integration into other graphic design projects.
- Preview: Ensure the
Previewcheckbox is selected so you can see your adjustments in real-time as you move the sliders.
Experiment with these settings. For example, if you’re tracing a photograph to create a “low fidelity” artistic effect, you might adjust the Paths and Colors to find the perfect balance between detail and stylization. If you’re vectorizing a line drawing, focus on Threshold, Paths, and Noise to achieve clean, crisp lines.
Refining and Expanding Your Vector Graphic: The Final Touches
Once you’re satisfied with the preview of your trace, there’s one final, critical step to convert it into editable vector paths.
Step 7: Expand the Image Trace After achieving your desired trace, the image is still a “live” trace object, meaning it’s a dynamic preview of the vector. To convert it into actual, editable vector paths, you need to “Expand” it.
- With the traced image still selected, click the
Expandbutton in the Control panel at the top of the screen (it appears after you apply an Image Trace preset). - Alternatively, go to
Object > Image Trace > Expand.
Once expanded, your image will transform from a raster preview into a collection of vector paths, anchor points, and shapes. You’ll see the individual paths when you zoom in or select it with the Direct Selection Tool (shortcut A).
Step 8: Ungroup and Edit Your Vector Object After expanding, the entire vectorized image is typically grouped together. To edit individual components or change colors, you’ll need to ungroup it.
- Right-click on the expanded vector object and choose
Ungroup(orObject > Ungroup). You might need to ungroup multiple times if there are nested groups. - Now, you can use the
Direct Selection Tool(A) to select individual anchor points and paths, or theSelection Tool(V) to select whole shapes. You can change fill colors, stroke colors, delete unwanted elements, or move parts of your vector around. This level of photo manipulation and creative editing is where vector graphics truly shine. For instance, you could change the color palette of an abstract background to perfectly match a brand’s aesthetic or refine the lines of a character from your digital art collection.
Step 9: Compare and Save Your Masterpiece You now have a fully editable vector graphic! It’s often insightful to compare your final vector image with the original raster image (you can keep the original on a separate layer or artboard). This comparison highlights the successful transformation and the new possibilities for scalability and editing.
You can save your new vector graphic as an Adobe Illustrator file (.ai), an Encapsulated PostScript file (.eps), or a Scalable Vector Graphics file (.svg) for web use. These formats ensure your artwork remains scalable and editable for any future project.
Remember, if at any point you want to discard the trace and return to the original raster image, you can select the traced object and go to Object > Image Trace > Release.
Beyond Conversion: Leveraging Vector Graphics in Your Visual Design Journey with Tophinhanhdep.com
Converting an image to a vector in Illustrator is not just a technical step; it’s a gateway to limitless creative possibilities. For users of Tophinhanhdep.com, a hub for stunning images and visual design inspiration, mastering this skill means you can transcend the limitations of raster and infuse your projects with unparalleled versatility and professional polish.
Think about the vast collections available on Tophinhanhdep.com – from tranquil nature wallpapers to profound sad/emotional photography, from vibrant aesthetic backgrounds to cutting-edge abstract art. Each of these can serve as a potent starting point for your vector conversion journey, leading to unique outcomes that align with trending styles and your personal artistic vision.
Here’s how leveraging vector graphics can elevate your visual design journey:
-
Crafting Distinctive Graphic Design Elements:
- Logos and Branding: Vectorized designs are the backbone of effective branding. Transform a sketch or a simple graphic from Tophinhanhdep.com into a scalable logo that looks crisp on a business card, a website, or a billboard. This ensures brand consistency across all mediums.
- Illustrations for Print and Web: Turn a detailed photograph into a stylized vector illustration perfect for editorial content, web graphics, or children’s books. The ability to easily change colors and modify shapes allows for endless iterations and thematic collections that resonate with your audience.
- Custom Icons and Infographics: Vectorize simple objects or symbols from your image inspiration to create custom icon sets or compelling infographic elements. These scalable assets enhance clarity and professionalism in your visual communication.
-
Expanding Your Digital Art and Photo Manipulation Skills:
- Artistic Filters and Effects: Vectorization can serve as a powerful artistic filter, transforming a realistic photo into a painterly, comic-book, or graphic novel style. Experiment with different Image Trace presets on beautiful photography to achieve unique digital art aesthetics.
- Layering and Compositing: Combine vectorized elements from various sources – perhaps a stylized tree from a nature image, an abstract shape, and a hand-drawn text element – to create complex and dynamic compositions for your backgrounds or digital artwork.
- Creating Unique Textures and Patterns: Vectorize intricate details from aesthetic images or repeating patterns to generate seamless vector textures and patterns that can be used as fills, backgrounds, or design accents in your projects.
-
Generating Inspiration and Collections:
- Mood Boards with Scalable Elements: Use vectorized snippets from various images to build dynamic mood boards. These scalable elements can be resized and recolored effortlessly, making it easier to refine your photo ideas and explore new creative ideas without pixelation.
- Thematic Collections for Any Purpose: Create consistent thematic collections by vectorizing elements from related images. Whether you’re curating elements for a series of sad/emotional graphics or a collection of vibrant abstract designs, vectors ensure uniformity and quality.
- Custom Wallpapers and Backgrounds: Design personalized wallpapers and backgrounds by vectorizing complex elements or transforming simple shapes. These bespoke creations will remain sharp and vibrant on any screen size, from a phone to a large monitor.
-
Integration with Other Image Tools:
- The vector files you create can seamlessly integrate with other image tools. While Illustrator is ideal for creation, these vector assets can be exported and used in other software, complementing your work with AI upscalers, image compressors, or even image-to-text tools for generating descriptions of your new art.
By embracing vector conversion, you’re not just performing a technical operation; you’re unlocking new dimensions for your creative expression. It empowers you to take the stunning images and photo inspiration you find on Tophinhanhdep.com and transform them into versatile, professional-grade assets that can adapt to any project, scale to any size, and truly bring your visual design ideas to life.
In conclusion, the ability to convert images to vectors in Adobe Illustrator is a foundational skill for anyone serious about digital art, graphic design, or professional image manipulation. It bridges the gap between the rich detail of raster images and the infinite scalability of vector graphics, offering a versatile tool for creators.
From transforming a beautiful nature photo into a stylized illustration to digitizing a hand-drawn sketch for a clean logo, the Image Trace feature in Illustrator, combined with careful preparation and thoughtful refinement, empowers you to unleash incredible creative potential. As you’ve learned, whether you’re working with high-resolution photography, abstract art, or developing unique aesthetic backgrounds, this process provides the flexibility needed to adapt your visuals for any purpose, from a tiny icon to a massive print.
Tophinhanhdep.com is dedicated to providing you with not only inspiring image collections – from evocative wallpapers and mood boards to trending styles and creative ideas – but also the essential image tools and tutorials to bring your visions to life. We encourage you to experiment with the techniques outlined in this guide. Take your favorite images, dive into Illustrator, and discover the transformative power of vectorization. The world of scalable, editable, and infinitely adaptable visual design awaits. Explore, create, and elevate your artistry with Tophinhanhdep.com.