How to Convert JPG to Vector Image: The Ultimate Guide for Flawless Scaling

In the vibrant world of digital imagery, where visuals dominate everything from personal social media to professional branding, understanding image formats is paramount. You’ve likely encountered JPGs countless times – the ubiquitous format for photographs, web banners, and everyday graphics. While incredibly versatile for capturing intricate detail and color gradients, JPGs, being raster images, come with a fundamental limitation: they pixelate when scaled up. This inherent drawback often leads designers and content creators to a crucial task: converting JPGs to vector images.
At Tophinhanhdep.com, we understand the critical need for images that maintain pristine quality at any size. Our comprehensive suite of image tools, including advanced converters, compressors, optimizers, and AI upscalers, is designed to empower you with unparalleled control over your visual assets. This guide delves into the art and science of transforming a pixel-based JPG into a mathematically defined vector graphic, ensuring your visuals are always sharp, scalable, and ready for any application. Whether you’re working on a sprawling billboard, a crisp company logo, or a detailed digital illustration, mastering vector conversion is an indispensable skill in your visual design arsenal.
The Indispensable Need for Vector Graphics: Why Convert Your JPGs?
The digital landscape thrives on visual appeal, and the quality of your images directly reflects on your brand or message. While a beautiful high-resolution JPG might look stunning on a monitor, its inherent pixel-based structure presents significant challenges when it comes to scalability. This is where the power of vector graphics truly shines, offering a solution to the dreaded “pixelation problem.”
Consider the typical lifecycle of an image: it might start as a photograph for a blog post (Images: Beautiful Photography), then be adapted for a social media campaign (Images: Aesthetic), before eventually needing to be printed on a large banner or etched into merchandise. A JPG, perfect for the initial web use, would dramatically degrade in quality when enlarged for print, appearing blurry and unprofessional. This is precisely why converting your JPGs to vector format is not just a technical step, but a strategic design decision with far-reaching benefits.
Raster Images: The Pixelated Truth
At their core, raster images, like JPGs (and PNGs, GIFs, etc.), are composed of a grid of tiny colored squares known as pixels. Each pixel holds specific color information, and together, they form a complete image. The quality of a raster image is directly tied to its resolution – the number of pixels per inch (PPI) or dots per inch (DPI). A high-resolution image has many pixels, allowing for intricate detail.
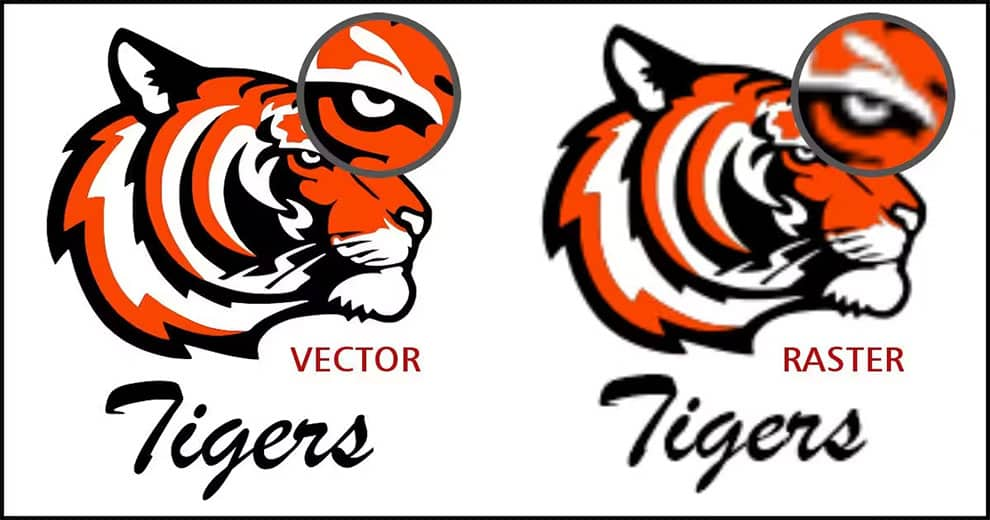
However, this pixel-based foundation is also their Achilles’ heel. When you enlarge a raster image beyond its original resolution, the software has to “guess” and add more pixels (interpolation). This often results in a loss of sharpness, a jagged appearance, and the dreaded visible pixel squares – an effect commonly known as pixelation. This makes raster formats unsuitable for designs that require frequent resizing, such as logos, illustrations, and typography. While Tophinhanhdep.com offers advanced AI Upscalers to enhance raster image resolution, a native vector format provides true, lossless scalability.
Vector Graphics: The Scalable Solution
In stark contrast, vector graphics are not built from pixels. Instead, they are composed of mathematical paths, defined by points, lines, curves, and shapes. These paths contain information about their color, thickness, and position. Because these images are defined by mathematical equations rather than fixed pixel grids, they are infinitely scalable.
This means you can enlarge a vector image from the size of a postage stamp to a colossal billboard without any loss of quality or introduction of pixelation. The mathematical definitions simply recalculate, rendering crisp lines and smooth curves at any dimension. This characteristic makes vector formats (such as SVG, AI, EPS, CDR) ideal for:
- Logos and Branding: A logo must look perfect on a business card, a website, and a skyscraper. Vector ensures consistent brand identity.
- Illustrations and Digital Art: Complex digital artworks or simple icons benefit from precise, scalable lines.
- Typography: Fonts are inherently vector-based, ensuring text remains sharp at any size.
- Print Projects: From brochures to vehicle wraps, vector guarantees professional-grade output.
- Web Design: Scalable Vector Graphics (SVGs) are lightweight, responsive, and provide crystal-clear visuals for web icons and illustrations, integrating seamlessly into modern visual design practices.
By converting your JPGs to vector format using Tophinhanhdep.com’s robust tools, you unlock a realm of creative freedom and professional adaptability, ensuring your visuals always represent your best work.
Methods for Converting JPG to Vector with Tophinhanhdep.com
Tophinhanhdep.com provides a suite of powerful tools designed to cater to various vectorization needs, from quick online conversions to detailed, professional-grade desktop transformations. We generalize the best practices from leading software to offer you a comprehensive approach.
Method 1: Using Tophinhanhdep.com’s Advanced Desktop Application
For projects demanding precision, intricate detail, and extensive control, Tophinhanhdep.com’s advanced desktop application offers a robust environment for converting JPGs to vector images. This method is ideal for complex logos, illustrations, or any image where fine-tuning the trace is critical.
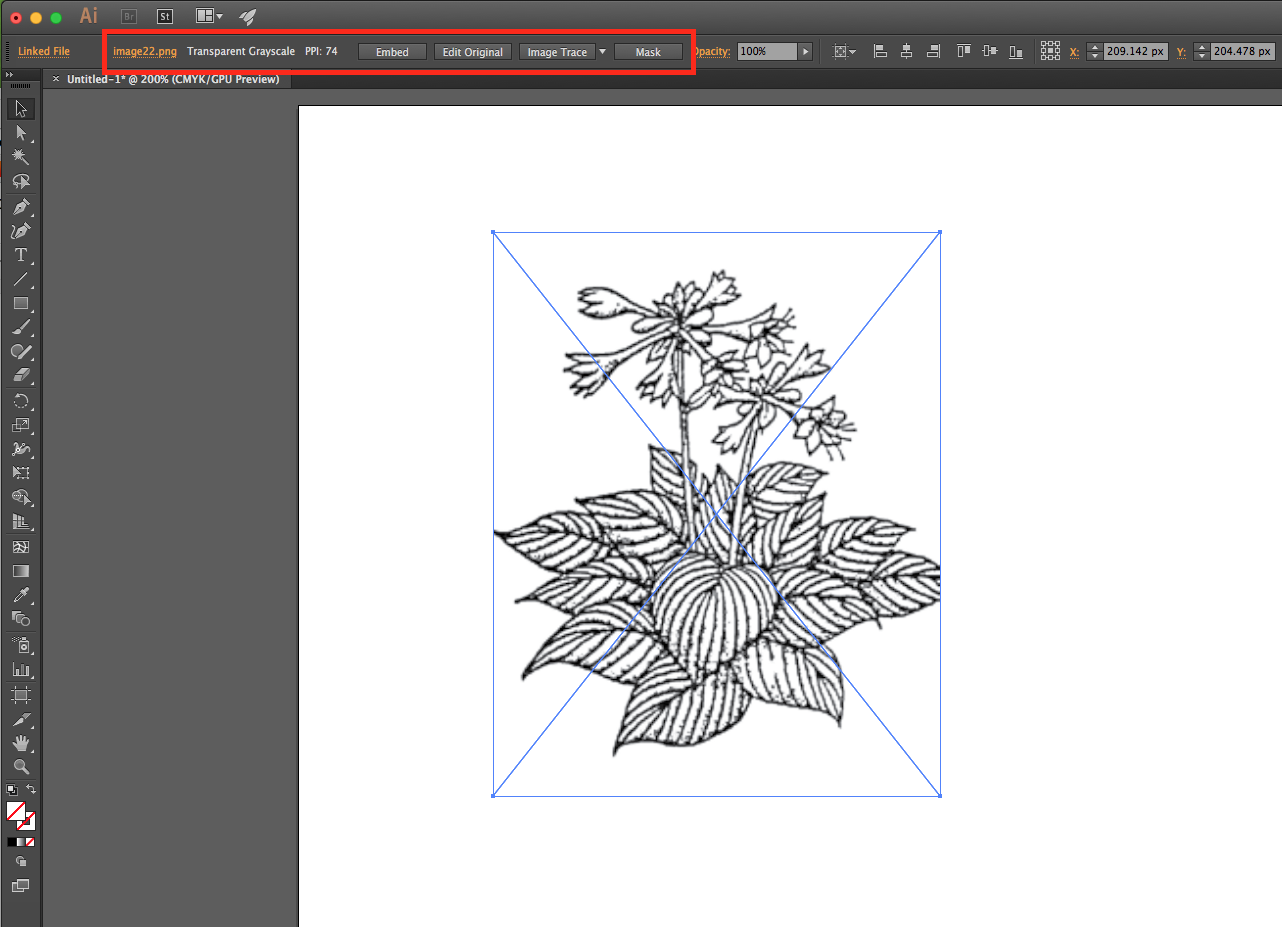
1. Importing Your Raster Image
Begin by opening Tophinhanhdep.com’s desktop software and creating a new document. Then, import your JPG image. Our software supports direct import, making it easy to bring your raster image into the workspace. A useful tip: hitting the spacebar (or equivalent hotkey) after selecting the import option will often center your image on the canvas.
2. Automatic Tracing with Tophinhanhdep.com’s Power-Trace Equivalent
Once your JPG is imported and selected, navigate to the “Image Tools” or “Trace Bitmap” section. Here, you’ll find Tophinhanhdep.com’s intelligent Power-Trace equivalent feature. This tool is designed to automatically detect and convert pixel-based information into vector paths. You’ll typically have several tracing options:
- Quick Trace: Utilizes predefined or last-used settings for a fast conversion.
- Outline Trace: Best for images with clear, distinct shapes and solid colors, like logos or simple graphics.
- Centerline Trace: Suited for more technical illustrations or line drawings where the central path of a line is most important.
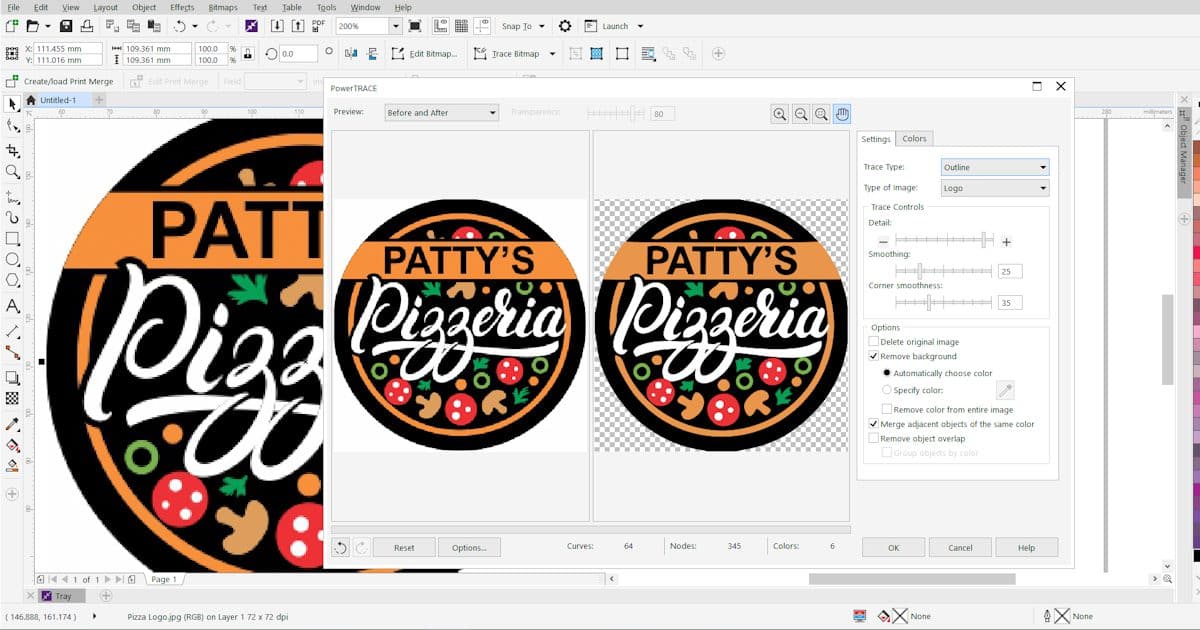
For most logos and general images, “Outline Trace” followed by “Logo” (or a similar category) is a good starting point. The software will then display a preview, showing your original JPG alongside the preliminary vector trace.
3. Refining Trace Settings: Detail, Smoothing, Corner Smoothness
The true power of Tophinhanhdep.com’s desktop application lies in its ability to fine-tune the vectorization process. In the settings panel of the Power-Trace feature, you’ll encounter sliders and options to control various aspects of the trace:
- Detail: This slider controls how much detail from the original JPG is captured in the vector output. Dragging it to the right increases detail, which is crucial for intricate designs, but can also introduce noise or excessive nodes.
- Smoothing: Adjusts the smoothness of the vector lines. Increasing this can round out jagged edges, making the output cleaner for some images, especially those with curves.
- Corner Smoothness: Specifically targets the sharpness of corners. This is particularly useful for text or geometric shapes, helping to maintain crisp angles.
Experiment with these sliders while observing the real-time preview to achieve the desired balance between fidelity and clean vector paths.
4. Background Removal and Color Management
Many JPGs come with unwanted backgrounds. Tophinhanhdep.com’s tracing tools offer robust background removal options:
- Automatic Removal: Often, the tool can automatically detect and remove a solid-colored background.
- Specify Color: For more control, you can use an eyedropper tool to manually select specific background colors to remove. Holding
Shiftwhile clicking allows you to select multiple background areas. Be cautious with options like “Remove color from entire image” as it might remove that color from within your desired foreground elements too. - Merge Adjacent Objects of the Same Color: This helps simplify the vector output by combining contiguous areas of the same color, reducing file complexity.
- Remove Object Overlap: Essential for creating clean, cut-through shapes, preventing redundant overlapping elements. Grouping objects by color often requires this setting to be active.
5. Post-Conversion Adjustments and Manual Enhancements
After the initial trace, Tophinhanhdep.com allows for further manual refinement. If a circle isn’t perfectly round or a line is slightly off, you can use the Shape tool to edit individual nodes and paths. For instance, to perfect a circular logo element:
- Ungroup the traced object to access individual components.
- Use drawing tools (e.g.,
Ellipsetool) to create perfect geometric shapes. - Align and combine these perfect shapes with your traced elements, deleting imperfect sections.
- Group all refined vector elements back together for easy manipulation.
This combination of intelligent tracing and manual control ensures a truly professional vector output.
Method 2: Leveraging Tophinhanhdep.com’s Online Vector Conversion Tools
For quick conversions, less complex images, or when you need a vector image on the go, Tophinhanhdep.com offers efficient online vector conversion tools. These tools typically utilize algorithms similar to desktop software but provide a streamlined, browser-based experience.
1. Quick and Easy Online Conversion
Access Tophinhanhdep.com’s online converter through your web browser. Simply upload your JPG or PNG image. The tool will process your image and generate an initial vector preview, often using default settings.
2. Adjusting Filters and Vectorization Options
While simpler than the desktop application, our online tools still provide options for refinement:
- Brightness, Contrast, and Threshold: Apply these filters to enhance the edges and differentiate colors in your raster image before vectorization, which can significantly improve the trace quality.
- Vectorize Layer options (e.g., Contour, Posterized): These settings control how colors and shapes are interpreted. “Contour” might be good for silhouettes, while “Posterized” can reduce colors to create a multi-color vector with a graphic art style.
- Number of Colors: Reduce the color palette for simpler vector output, combining similar hues.
- Background Removal: Similar to the desktop version, you can usually specify a color to make transparent.
After adjusting settings, you can often preview the changes in real-time. Once satisfied, download your vector file in formats like SVG.
3. Batch Processing and Workflow Efficiency
For users dealing with multiple images, Tophinhanhdep.com’s online tools often support batch processing, allowing you to convert several JPGs simultaneously. This aligns perfectly with our broader “Image Tools” category, which includes optimizers and compressors, helping you manage entire collections efficiently. Our online converters are a vital component of a fast-paced workflow, especially when integrating vector assets into larger visual design projects.
Method 3: Simplified Silhouette Conversion with Tophinhanhdep.com’s Basic Features
Sometimes, all you need is a single-color vector silhouette. Tophinhanhdep.com’s basic image editing features, often found within our broader “Image Tools” or integrated into simpler online converters, can achieve this quickly.
1. Creating Single-Color Vector Silhouettes
This method focuses on transforming an image into a monochrome outline or solid shape.
- Threshold Adjustment: Within Tophinhanhdep.com’s image editing interface, apply a “Threshold” adjustment to your JPG. This converts your image to pure black and white, making it easier for the vectorizer to identify the main outline. Adjust the threshold level to get the cleanest silhouette.
- Automated Outline Trace: Once the image is monochromatic, use a basic “Outline Trace” function. Since there’s only one dominant color, the tool will primarily focus on creating the outer contour.
- Fill with Solid Color: After tracing, the resulting vector can be filled with any solid color, effectively creating a vector silhouette.
2. Exporting for Specific Uses
These single-color vector images are perfect for icons, simple logos, stencils, or as a base for more complex illustrations. Export them as SVG for web use or other vector formats for print. This simplified approach is highly efficient for specific graphic design tasks, especially when generating visual elements for “Thematic Collections” or “Mood Boards.”
By offering these diverse methods, Tophinhanhdep.com ensures that whether you’re a professional graphic designer, a hobbyist, or simply someone needing a quick conversion, you have the right tool for the job.
Step-by-Step Guide: Converting a JPG Logo Using Tophinhanhdep.com’s Desktop Software
To illustrate the process clearly, let’s walk through converting a sample JPG logo into a scalable vector image using Tophinhanhdep.com’s advanced desktop application, emphasizing clarity and precision at each stage. This detailed guide integrates techniques that professional visual designers apply daily.
1. Preparing Your Raster Image
Before initiating the vectorization process, ensure your JPG is as clean as possible. A higher quality, clearer original JPG with good contrast and well-defined edges will always yield better vectorization results. For instance, if you have a low-resolution image (e.g., 72 dpi) and want it to be perfect for large prints, this conversion is essential.
Action: Open Tophinhanhdep.com’s desktop application. Create a new document with default settings. Go to File > Import (or Ctrl+I on Windows, ⌘+I on Mac) and select your target JPG image. A bonus tip: press Enter or the Spacebar to place the image centrally on your canvas.
2. Initiating the Vectorization Process
With your JPG imported, the next step is to activate Tophinhanhdep.com’s vector tracing capabilities.
Action: Ensure your imported logo is selected using the Pick tool. You can access the vectorization feature in a couple of ways:
- Navigate to
Bitmaps(orImages)> Outline Trace > Logo. - Alternatively, with the
Picktool active, look for theTrace Bitmap(orConvert to Vector) button on the interactive toolbar, click its dropdown arrow, and chooseOutline Trace > Logo.
Upon activation, a new window will appear, typically showing your original JPG on the left and a preliminary vector trace result on the right. This side-by-side comparison is vital for real-time adjustments.
3. Fine-Tuning Trace Settings for Optimal Results
This is the most critical phase where you control the quality and fidelity of your vector output. The goal is to make the traced image as close to the original as possible while being comprised of smooth, clean vector paths.
Detail, Smoothing, and Corner Smoothness
These three sliders are your primary controls for refining the trace:
- Detail: Drag the
Detailslider to the right. As you increase it, more fine points and curves from your original JPG will be captured. For intricate logos, a higher detail setting is usually necessary, but be mindful not to overdo it, as it can introduce unnecessary nodes and complexity. - Smoothing: Adjust the
Smoothingslider to control the fluidity of your lines. IncreasingSmoothingcan help eliminate minor imperfections and give curves a more organic flow. For a logo with flowing lines, a higher value might be appropriate. - Corner Smoothness: This slider is particularly effective for images containing text or sharp geometric elements. By adjusting
Corner Smoothness, you can ensure that angles remain crisp and text characters retain their intended sharpness, preventing a ‘melted’ or rounded look. For example, setting it around32can significantly clean up text edges.
Background Removal Techniques
Most JPGs come with a background you’ll want to remove to create a transparent, versatile vector image.
- Remove Background: Check this box in the settings. The preview will show a grey and white checkerboard pattern, indicating transparency.
- Specify Color: If the background isn’t automatically removed, or if you need to remove specific colors, enable
Specify Color. Use theEyedroppertool, then hold downShiftand click on each area of the background you want to make transparent. This allows for precise control. - Caution with “Remove color from entire image”: Be careful with options like “Remove color from entire image” or “Merge adjacent objects of the same color.” While they can simplify, they might unintentionally remove or merge colors from within your primary logo elements (e.g., white letters in a pizza logo if the background is also white). Experimentation is key to understanding their effect.
- Merge and Grouping: Use
Merge adjacent objects of the same colorto consolidate similar color regions, andRemove object overlapto ensure clean, distinct vector shapes. For advanced organization, activateGroup objects by color(often requiresRemove object overlapto be on).
4. Managing Colors and Output Modes
Color management is vital for maintaining brand consistency, especially for print projects.
Action: Switch to the Colors tab within the tracing window.
- Color List: You’ll see a list of colors identified in your image. Diagonal lines in the preview indicate the selected color.
- Merging Colors: If the trace identifies multiple shades of a single color (e.g., two shades of white), select both (holding
Ctrl) and clickMerge. This simplifies the color palette. - Editing Colors: If a merged color isn’t quite right (e.g., an off-white instead of pure white), select it and click the
Editbutton. In theSelect Colordialog box, adjust the color values (RGB, Hex, CMYK) to achieve the exact shade you need. - Color Mode: For specific output requirements, use the
Color Modedropdown. For print, selectCMYK; for web,RGB. You can also choosePantone® spot colorsif your brand requires them. - Number of Colors: You can also manually reduce the
Number of Colorshere, which will force the software to consolidate colors and simplify the overall vector output.
Once your colors are perfected, click OK to apply the trace and close the Power-Trace window.
5. Post-Conversion Refinements and Verification
Back in the main Tophinhanhdep.com interface, your new vector image will be placed directly over your original JPG.
Inspecting Vector Lines (Wireframe View)
Action: Use the Pick tool to drag the vector trace aside for a side-by-side comparison with the original JPG. To truly see the vector structure, go to View > Wireframe. This mode displays only the mathematical paths and nodes, confirming that your image is now vector-based. The original JPG will remain pixelated, while your new vector will show crisp lines. Return to View > Enhanced to see the full color image.
Manual Adjustments and Shape Correction
Sometimes, even with the best automatic tracing, minor imperfections remain. For example, a perfect circle might appear slightly wobbly.
Action:
- Select the original JPG and press
Delete. - Select your vector trace and press
Pto center it on the page. PressF4to zoom in. - Ungroup your logo (
Ctrl+UorUngroupicon on the toolbar). - If a shape like a circle needs perfection, use Tophinhanhdep.com’s drawing tools. For a wobbly circle:
- Hold
Shiftand double-click theRectangletool to create a bounding box. - Activate the
Shapetool, holdShift, and drag a corner node inward to create a perfect circle from the rectangle. - Send this perfect circle to the back (
To back of layericon). - Deselect the logo. Select and
Deleteany imperfect, curved sections from the original trace (e.g., the black curved sections of a pizza logo). - Select your newly created perfect black circle and fill it with the correct color from the color palette.
- Hold
- Finally, use the
Picktool to drag a selection box around all individual pieces of your refined logo and click theGroup Objecticon (Ctrl+G) to consolidate them.
Scaling and Exporting Your Vector Image
Action:
- To verify transparency, double-click the
Rectangletool to create a page-sized rectangle, then fill it with a contrasting color. You’ll see if any background elements remain. - Select your grouped vector logo. In the
Object Sizesettings (usually at the top toolbar), enter your desired dimensions (e.g., 36 inches for a sign). Crucially, ensure theLockicon isclosedto maintain the aspect ratio.
Your vector image is now ready to be scaled to any size for print, web, or any other application without losing quality. This ensures your “High Resolution” photography, when combined with vector logos, always looks sharp.
Applications and Creative Possibilities of Vector Images
The conversion of a JPG to a vector image, powered by Tophinhanhdep.com’s robust tools, isn’t merely a technical step; it unlocks a universe of creative and practical applications across various design disciplines. Vector graphics are the backbone of professional visual communication, offering flexibility and quality that raster images cannot match.
Branding & Logos: The Foundation of Identity
At the forefront of vector applications is branding. Every company, big or small, needs a logo that is instantly recognizable and perfectly rendered across all mediums. A logo designed or converted to vector format ensures:
- Consistency: Whether displayed on a tiny app icon or a monumental billboard, the logo maintains its exact proportions, colors, and sharp edges.
- Versatility: It can be used for digital platforms, print materials, merchandise, vehicle wraps, and even embroidered onto uniforms, all from a single source file.
- Professionalism: A crisp, clean logo elevates a brand’s image, reflecting attention to detail and quality.
This is directly relevant to our “Visual Design: Graphic Design, Creative Ideas” topic, as vector logos are central to all graphic design endeavors.
Print Media: Impeccable Quality, Any Size
For any print project, vector images are indispensable. Imagine creating “Wallpapers” or “Backgrounds” for a large-format poster. If these were raster images, they would quickly pixelate.
- Large-Format Printing: Banners, billboards, trade show displays, and vehicle graphics require images that can be scaled to immense sizes without degradation. Vector conversion ensures these prints are sharp and professional.
- Merchandise: T-shirts, mugs, pens, and other promotional items often use vector artwork for screen printing, engraving, or embroidery, where crisp lines are paramount.
- Brochures and Flyers: Even smaller print items benefit from vector elements like logos and illustrations, which appear sharper than their raster counterparts, especially when examined closely.
Tophinhanhdep.com’s conversion tools ensure that your “High Resolution” photographs, when accompanied by vector elements, are prepared for any printing challenge.
Web Design: Responsive, Lightweight, and Crystal Clear
The modern web demands responsiveness and efficiency. Scalable Vector Graphics (SVGs), a popular vector format, are perfectly suited for this environment:
- Responsive Design: SVGs scale flawlessly across devices with varying screen sizes and resolutions, from smartphones to 4K monitors, ensuring your website looks perfect everywhere.
- Performance: Often, SVGs are smaller in file size than equivalent raster images, leading to faster loading times for web pages.
- Icons and UI Elements: Vector icons and user interface components are always sharp, regardless of zooming or screen density.
- Interactive Graphics: SVGs can be animated and manipulated with CSS and JavaScript, opening up dynamic possibilities for web “Digital Art.”
Our “Image Tools” like compressors and optimizers, when combined with vector output, ensure web-ready assets that are both high-quality and efficient.
Digital Art & Illustrations: Precision and Flexibility
Artists and illustrators greatly benefit from vector graphics. Creating “Digital Art” or “Abstract” images in vector format offers:
- Precision: Fine details, intricate lines, and smooth curves can be drawn and manipulated with absolute mathematical accuracy.
- Editability: Each element is an independent object, making it easy to adjust colors, shapes, and positions without affecting other parts of the artwork.
- Layering: Vector software allows for complex layering, essential for “Photo Manipulation” and detailed compositions.
This provides incredible flexibility for artists looking to produce works that can be used across print, web, and animation.
Enhancing Visual Design Projects: Creative Ideas and Mood Boards
Vector graphics play a significant role in fostering creativity and driving design projects forward. When curating “Image Inspiration & Collections,” vector elements often stand out for their adaptability.
- Creative Ideas: Designers can quickly iterate on concepts, resizing and recoloring vector elements to fit various “Mood Boards” and design explorations.
- Mock-ups and Prototypes: Vector assets are easily integrated into mock-ups for websites, apps, or physical products, allowing clients to visualize the final outcome accurately.
- Thematic Collections: Creating cohesive sets of icons, illustrations, or design elements is simpler with vector, as all pieces can be uniformly scaled and styled.
- Trending Styles: Many modern “Trending Styles” in graphic design lean heavily on clean, scalable vector illustrations and geometric patterns.
By providing the capability to convert and manage these essential visual assets, Tophinhanhdep.com empowers designers to bring their “Creative Ideas” to life with unparalleled quality.
Conclusion: Elevate Your Visuals with Tophinhanhdep.com’s Vector Conversion
The ability to convert JPG to vector image is more than just a technical trick; it’s a gateway to limitless creative possibilities and professional quality. In an age where visuals are paramount, relying on pixel-based images for scalable applications is a compromise that can undermine your brand, your message, and your artistic vision.
Tophinhanhdep.com stands as your comprehensive partner in navigating the complex world of digital imagery. Our specialized “Image Tools” are meticulously designed to ensure your photos, logos, and illustrations are always presented in their best light. From our advanced desktop application offering granular control over the vectorization process to our efficient online converters for quick transformations, we provide the means to achieve pixel-perfect (or rather, path-perfect) results.
Whether you’re developing high-resolution “Backgrounds” and “Wallpapers,” curating “Beautiful Photography,” optimizing “Stock Photos,” or engaging in intricate “Graphic Design” and “Digital Art,” understanding and utilizing vector conversion is a fundamental step towards excellence. Beyond conversion, Tophinhanhdep.com offers “Compressors” to reduce file sizes, “Optimizers” to streamline performance, and cutting-edge “AI Upscalers” to breathe new life into existing raster images.
Embrace the power of vector graphics today. Explore Tophinhanhdep.com’s array of “Image Tools” and transform your low-resolution JPGs into endlessly scalable masterpieces. Let your visuals speak volumes, always sharp, always clear, and always ready for any challenge your creative journey presents.