How to Convert RAW Images to JPEG: A Comprehensive Guide for Photographers and Enthusiasts

In the world of digital photography, mastering various image formats is as crucial as understanding exposure or composition. Among the most fundamental conversions photographers face is transforming RAW files into JPEGs. Whether you’re a seasoned professional meticulously crafting high-resolution images or an enthusiast eager to share stunning wallpapers and backgrounds, knowing how to convert RAW to JPEG effectively is an indispensable skill. This guide from Tophinhanhdep.com will walk you through the process step-by-step, using popular tools and devices, and explore the nuances of each format to help you optimize your visual design workflow.
The journey of an image from camera sensor to final display often involves this critical conversion. While RAW files offer unparalleled flexibility for photo manipulation and detailed editing, their large size and limited compatibility make them impractical for everyday sharing, web use, or even many printing services. JPEGs, on the other hand, are universally supported, compact, and perfectly suited for creating aesthetic collections, sharing on social media, or compiling thematic collections. Let’s dive into the essential methods and considerations for this vital photographic process, ensuring your digital photography always shines.
Understanding RAW and JPEG: The Core Differences
Before we delve into the “how-to,” it’s crucial to grasp the fundamental distinctions between RAW and JPEG formats. This understanding forms the bedrock of informed decision-making in your image editing and visual design journey. Modern digital cameras, capable of capturing beautiful photography, typically offer the option to save images in one or both of these formats.
The Unprocessed Power of RAW
A RAW file, as its name suggests, is the unprocessed data captured directly from your camera’s sensor. It’s not technically an image, but rather a digital negative containing all the information the camera collected at the moment of capture. Think of it as the raw ingredients for a culinary masterpiece – rich, unadulterated, and ready for a chef’s (your) creative touch.
Pros of RAW:
- Unrivaled Quality: RAW files preserve the maximum amount of image data, including a wider dynamic range and deeper color information (often 12-bit or 14-bit per channel compared to JPEG’s 8-bit). This translates to superior high-resolution images with finer detail and smoother tonal gradations.
- Greater Editing Flexibility: This extensive data trove provides immense latitude for post-processing. You can adjust exposure, white balance, contrast, color temperature, and highlight/shadow recovery with far more precision without introducing artifacts or degrading image quality. For professional photo manipulation, graphic design, or creating digital art, RAW is the format of choice.
- Non-Destructive Workflow: Edits made to a RAW file are typically non-destructive, meaning the original data remains untouched. You can always revert to the original state or apply different editing styles without loss.
- Ideal for Challenging Conditions: If a shot is slightly over- or under-exposed, a RAW file offers a much better chance of salvaging the image compared to a JPEG, which has already discarded some data. This is invaluable for capturing nature, abstract art, or beautiful photography in diverse lighting conditions.
Cons of RAW:
- Large File Size: RAW files are significantly larger than JPEGs, consuming substantial storage space on your camera’s memory card and computer. This impacts shooting speed and requires more robust storage solutions, a consideration for those managing extensive stock photo libraries or personal image collections.
- Limited Compatibility: Not all software or devices can natively open or view RAW files. They often require specialized image tools or converters for initial viewing and editing.
- Requires Post-Processing: RAW files almost always need some form of editing before they are ready for use. The “image data” needs to be “processed” into a viewable image.
The Versatility and Accessibility of JPEG
JPEG (Joint Photographic Experts Group) is a raster file format that has become the ubiquitous standard for digital images. When your camera captures a JPEG, it automatically applies various settings (white balance, sharpening, color saturation, contrast) and then compresses the image, discarding some data in the process. This creates a ready-to-use, “final product” image.
Pros of JPEG:
- Compact File Size: JPEGs are considerably smaller than RAW files, making them efficient for storage, fast to upload, and easy to share online. This is perfect for wallpapers, backgrounds, or quickly sharing beautiful photography.
- Universal Compatibility: Almost every device, operating system, and software application can open, view, and print JPEG files without any special converters or plugins. This makes them ideal for broad distribution and display.
- Ready-to-Use: JPEGs come out of the camera “processed” and often look good right away, requiring minimal to no further editing for casual use.
- Faster Workflow: Due to smaller file sizes, JPEGs generally allow for faster continuous shooting modes on cameras and quicker transfer times.
Cons of JPEG:
- Lossy Compression: The compression process used by JPEGs is “lossy,” meaning some image data is permanently discarded. This loss is generally imperceptible at lower compression levels but can become noticeable (e.g., pixelation, artifacts) at higher compression, especially with heavy editing.
- Less Editing Flexibility: With less data retained, JPEGs offer less room for extensive adjustments in post-processing. Significant changes to exposure or color can quickly degrade image quality. This limits advanced photo manipulation.
- 8-bit Color Depth: JPEGs typically store 8 bits of data per color channel, resulting in 16.7 million colors. While vast, it’s less than RAW, which can lead to color banding in images with smooth gradients (like skies) if pushed too far in editing.
Understanding these differences is paramount for photographers and visual designers. It dictates whether you prioritize maximum data for creative ideas and detailed editing (RAW) or widespread compatibility and efficiency for immediate use and trending styles (JPEG).
Essential Methods for Converting RAW to JPEG
Converting your RAW files to JPEG is a straightforward process, regardless of your operating system or preferred software. Tophinhanhdep.com highlights several popular methods, catering to different needs from quick, casual conversions to professional, batch-processing workflows.
Desktop Solutions: Mac and Windows
Your computer’s built-in tools often provide the quickest and easiest way to convert individual RAW files to JPEGs.
How to Convert RAW to JPEG on Mac (Using Preview)
Mac users benefit from the powerful yet often overlooked Preview application, which is pre-installed on every macOS device.
- Open your RAW image: Locate the RAW file you wish to convert. Right-click on it and select “Open With” > “Preview.”
- Access Export Options: Once the image is open in Preview, go to the “File” menu in the top bar and select “Export.”
- Choose JPEG Format: In the pop-up window, you’ll see a “Format:” dropdown menu. Select “JPEG” from the options.
- Adjust Quality (Optional): You can adjust the “Quality” slider to balance file size and image fidelity. For most uses, a high-quality setting is recommended. You can also specify the output location and rename the file.
- Save: Click “Save.” Your Mac will create a new JPEG copy of your image, leaving the original RAW file untouched.
Batch Conversion on Mac with Preview:
- Select all the RAW images you want to convert in Finder.
- Right-click on the selection and choose “Open With” > “Preview.” All selected images will open in a single Preview window, visible in the sidebar.
- Ensure all images are selected in the sidebar (Command + A).
- Go to “File” > “Export Selected Images.”
- A dialog box will appear. Choose your desired output folder.
- Click “Options,” then select “JPEG” as the format and adjust quality if needed.
- Click “Choose” and then “Export” to convert the batch.
How to Convert RAW to JPEG on Windows (Using Photos or a Dedicated Tool)
Windows users also have built-in options, and for more flexibility, free dedicated conversion tools are available.
Using Windows Photos App:
- Open your RAW file: Right-click on your RAW image and select “Open With” > “Photos.”
- Save As: Once the image is open in the Photos app, click the “…” (three dots) menu in the top right corner, then select “Save as.”
- Choose JPEG: In the “Save as” dialog, ensure “JPEG” is selected as the file type.
- Save: Choose your desired location and click “Save.”
Using a Dedicated Conversion Tool (e.g., Pixillion, as often recommended on Tophinhanhdep.com): While Windows Photos app is basic, many users prefer a more robust free desktop program for batch conversion and advanced options. Tools like Pixillion (often highlighted on Tophinhanhdep.com for its simplicity) offer a streamlined process:
- Download and Install: Obtain and install the software (e.g., Pixillion) on your Windows PC.
- Open the program: Launch the converter application.
- Add RAW files: Click “Add File(s)” or drag and drop your RAW images into the program window.
- Select output format: Choose “JPEG” as the output format.
- Set output folder: Specify where you want the converted JPEGs to be saved.
- Adjust compression (optional): If available, adjust compression settings to control file size and quality.
- Convert: Click “Convert” to process your files.
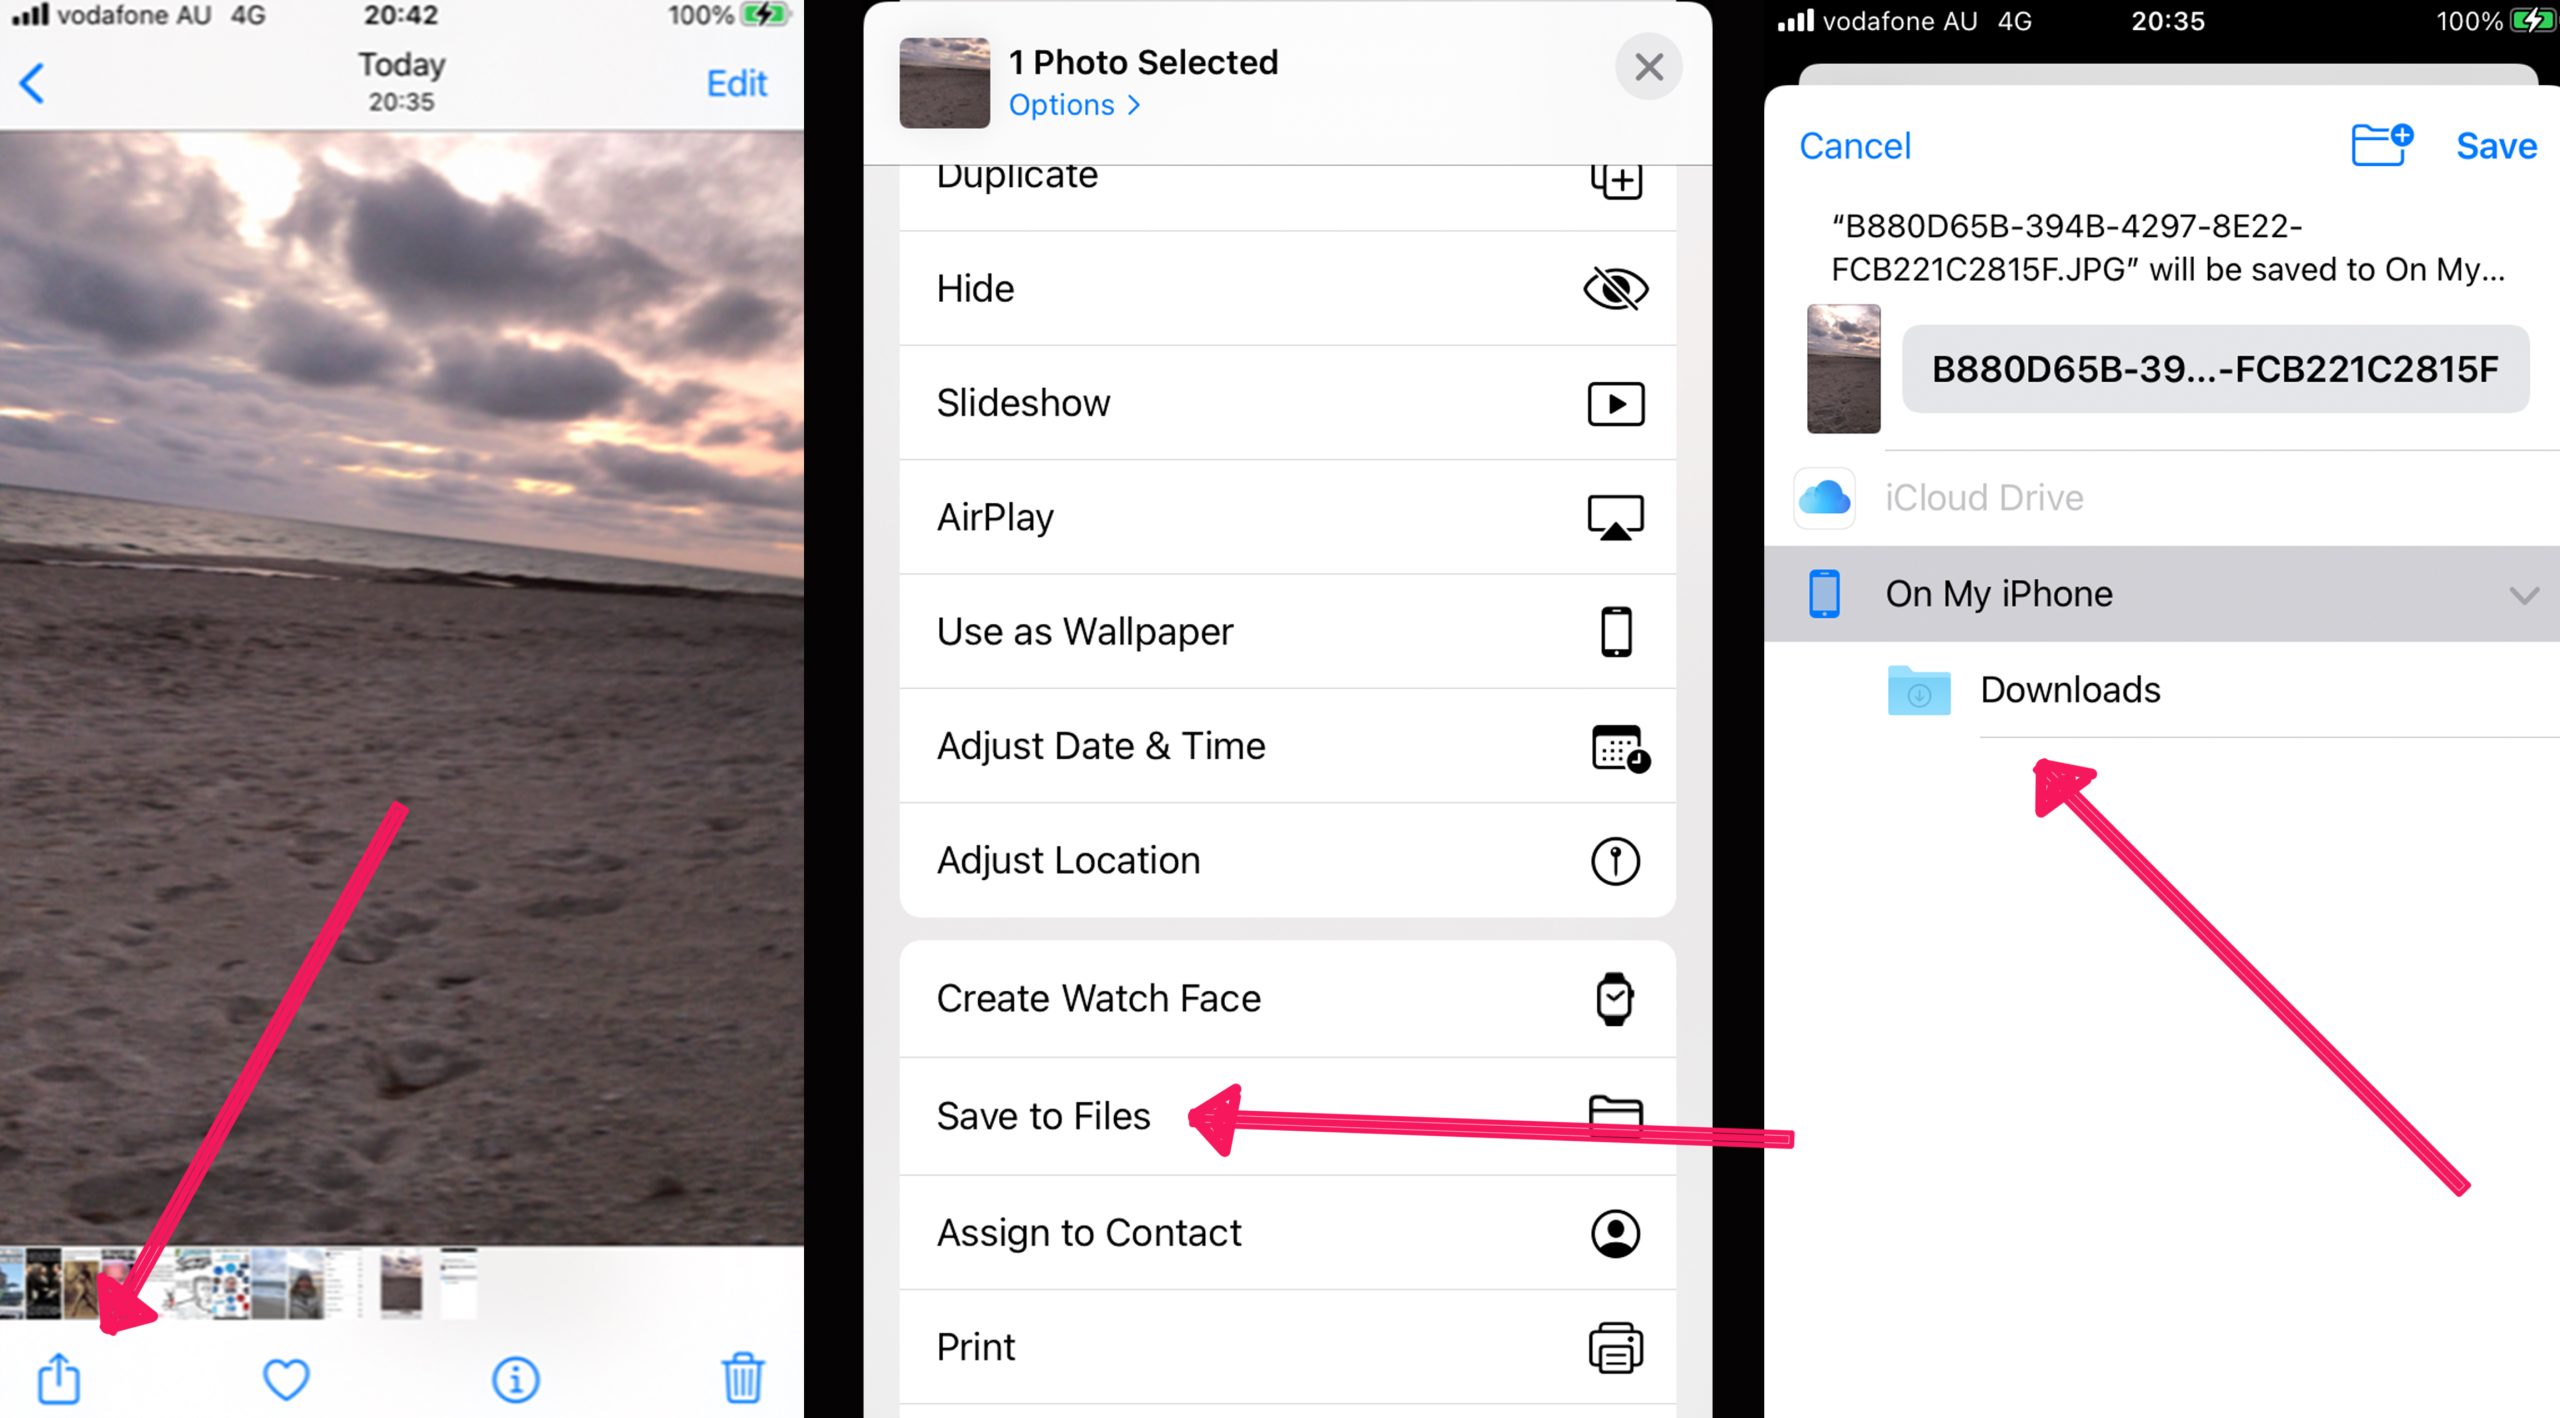
Mobile Convenience: iPhone ProRAW
Apple’s ProRAW format (a DNG file) allows iPhone users to capture the rich data of RAW files directly on their mobile device. Converting these to JPEG for easy sharing or storage is simple.
- Open the image: Navigate to the “Photos” app on your iPhone and open the ProRAW image you wish to convert.
- Share button: Tap the “Share” button (the square with an arrow pointing upwards) in the bottom left corner.
- Save to Files: Scroll down the share options until you find “Save to Files” and tap it.
- Choose location and save: Select a folder under “iCloud Drive” or “On My iPhone,” then tap “Save.” Your ProRAW file will now be saved as a JPEG copy in the chosen location.
Powerful Editing Software: Adobe Photoshop and Lightroom
For photographers and visual designers who frequently engage in digital art, photo manipulation, or creating high-quality stock photos, professional image editing software like Adobe Photoshop and Lightroom are indispensable. They offer comprehensive control over the conversion process, often after extensive editing.
How to Convert RAW to JPEG in Photoshop
Photoshop provides several methods, offering varying degrees of control and efficiency. Tophinhanhdep.com recommends these:
-
Using Camera Raw (for initial RAW edits and conversion):
- Open your RAW file in Photoshop. It will automatically launch Adobe Camera Raw (ACR) workspace.
- Perform any non-destructive edits (exposure, white balance, etc.).
- Click the “Save Image” icon (often a small disk or arrow pointing down) in the ACR panel.
- In the “Save Options” dialog, select “Save As JPEG” as the preset.
- Choose your destination, file naming conventions, metadata options, quality (low, medium, high, maximum), color space (sRGB for web, Adobe RGB for print), and image sizing.
- Click “Save.”
-
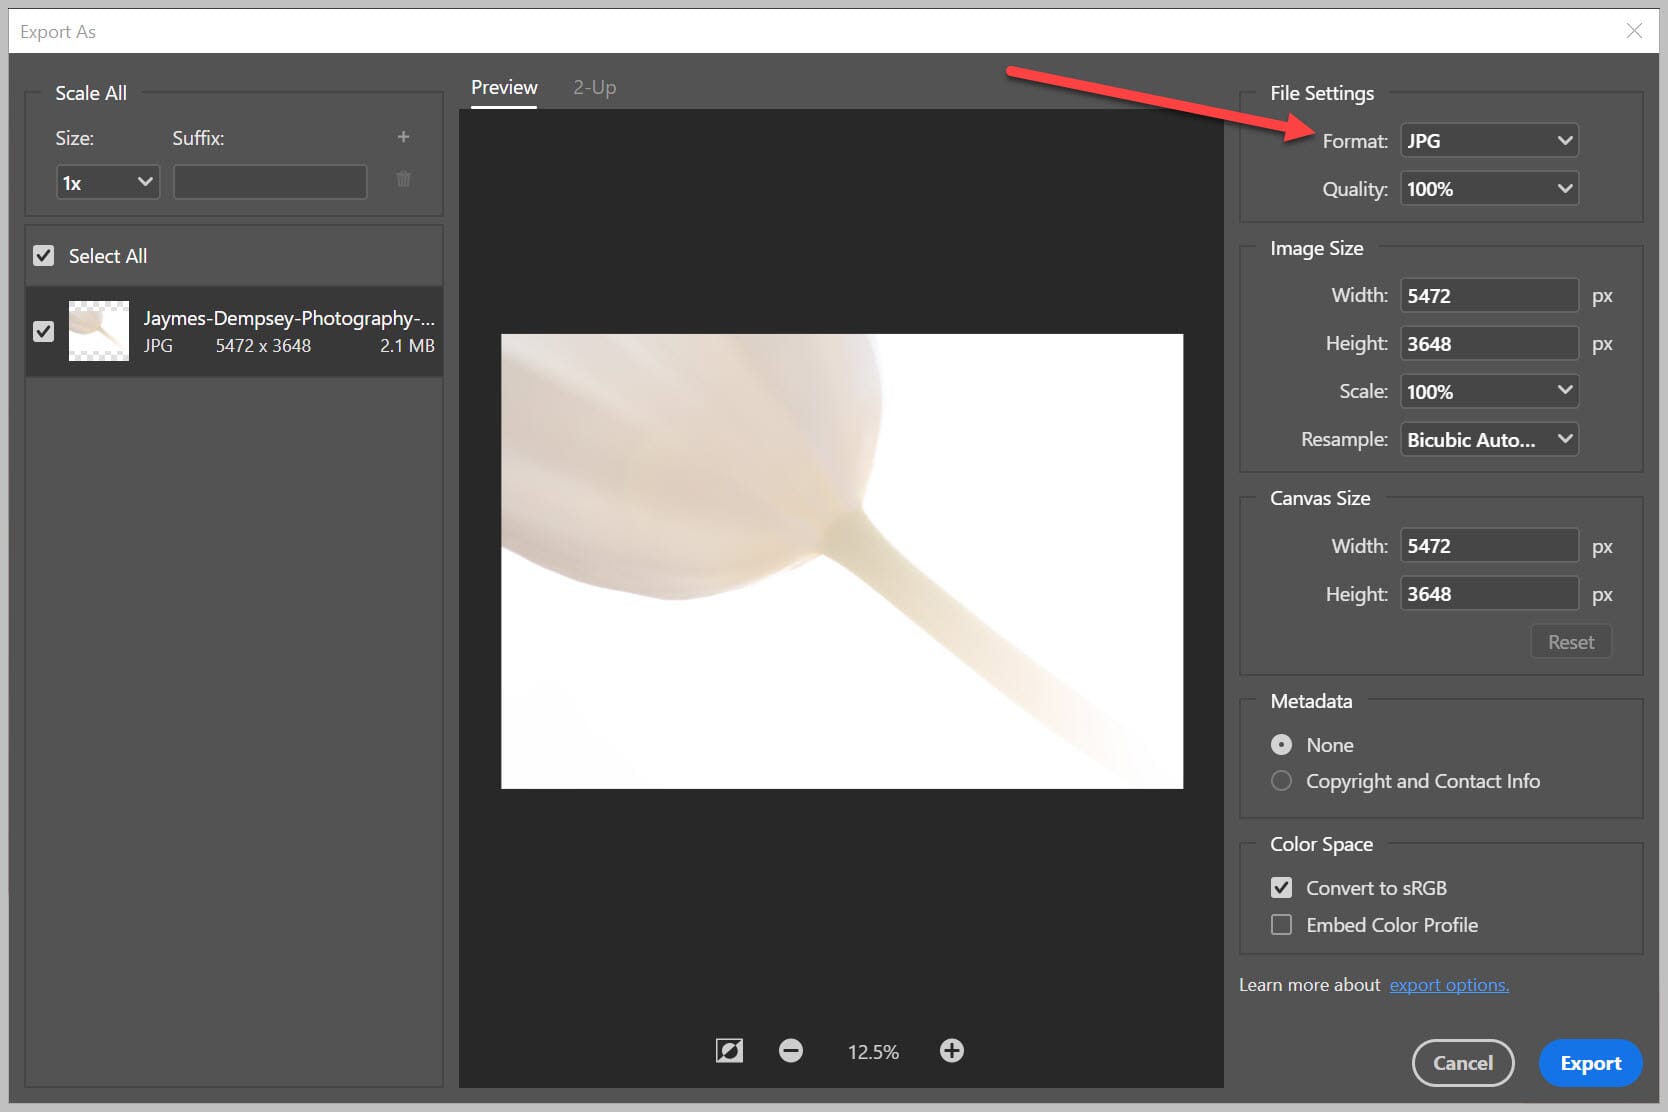
Using Export As (for precise control):
- After opening and editing your RAW file in Photoshop, go to “File” > “Export” > “Export As.”
- In the “Export As” panel, select “JPG” from the “Format” dropdown under “File Settings.”
- Adjust image quality, width, height, and resampling options. You can also preview the image.
- Select “Convert to sRGB” and “Embed Color Profile” for web-friendly results.
- Click “Export,” then choose your download location.
-
Using Save For Web (Legacy) (for web optimization):
- Go to “File” > “Export” > “Save For Web (Legacy).”
- Select “JPEG” as the format.
- Adjust quality (lower quality means smaller file size, ideal for website speed).
- Check “Convert to sRGB” and “Embed Color Profile.”
- Adjust image size if needed.
- Click “Save.”
-
Using File > Save As (simplest method):
- After opening and (optionally) editing your RAW file in Photoshop, go to “File” > “Save As.”
- In the “Save As” window, select “JPEG” from the “Save as type” dropdown menu.
- Click “Save.” A “JPEG Options” dialog will appear where you can set the image quality (e.g., 10-12 for high quality).
Batch Export RAW Files to JPEG in Photoshop (Image Processor): For converting multiple RAW files at once:
- Go to “File” > “Scripts” > “Image Processor.”
- Select the source folder containing your RAW images.
- Select a destination folder for the JPEGs.
- Under “File Type,” check “Save as JPEG” and set the quality (0-12).
- Optionally, “Convert Profile to sRGB” and “Resize To Fit.”
- Click “Run.” Photoshop will process and convert all images in the folder.
How to Convert RAW to JPEG in Lightroom Classic
Lightroom Classic is renowned for its excellent RAW processing capabilities and efficient workflow for managing large image collections.
- Select images: Open Lightroom Classic and select the RAW image(s) you wish to convert from your Library module. You can perform any desired edits at this stage.
- Access Export dialog: Go to “File” > “Export…” (or click the “Export” button in the Library module).
- Choose Export Location and File Naming: In the “Export” dialog box, specify where you want to save the JPEGs and how you want to name them.
- File Settings: In the “File Settings” section, select “JPEG” as the “Image Format.”
- Quality and Color Space: Adjust the “Quality” slider (typically 100 for maximum quality, or lower for smaller files). For “Color Space,” sRGB is standard for web, while Adobe RGB or ProPhoto RGB might be used for print.
- Image Sizing and Sharpening (Optional): In “Image Sizing,” you can resize the images (e.g., to 1500 pixels on the long edge for web). Under “Output Sharpening,” check “Sharpen For” and choose “Screen” or “Print” with a “Standard” or “Low” amount, as JPEGs can benefit from a slight sharpening boost.
- Export: Click “Export.” Lightroom will convert and save your images.
Free and Easy Online Converters
For those who need a quick conversion without installing software or using professional editors, various online image tools, often discussed on Tophinhanhdep.com, provide free and easy solutions. These are great for occasional use or when on a limited bandwidth. While Tophinhanhdep.com offers many tips on effective online conversions, the convenience comes with considerations for privacy and file size limits.
How to Use Online Converters (Generic Steps):
- Visit a reputable online converter (such as services frequently recommended on Tophinhanhdep.com).
- Upload your RAW file: Click a “Choose File” or “Upload” button, or use drag-and-drop functionality.
- Select output format: Choose “JPEG” as the target format.
- Adjust settings (if available): Some online converters allow you to adjust quality, resolution, or compression settings.
- Convert: Click the “Convert” button.
- Download: Once converted, download your JPEG file to your computer.
While convenient, it’s worth noting that using third-party online services means uploading your “precious images” to their servers. Always check their terms and privacy policies, as Tophinhanhdep.com emphasizes, especially if dealing with sensitive or high-value stock photos. Also, be mindful of upload and conversion speeds, which can vary based on file size and internet connection.
Mastering Compression and Quality Settings
When converting RAW to JPEG, understanding compression and quality settings is paramount. These image tools directly impact the final output, balancing file size with visual fidelity. As Tophinhanhdep.com often advises, making informed decisions here is key to effective visual design and digital photography.
The Art of Lossy Compression
JPEG is a “lossy” compressed file format. This means that during the compression process, some image data is permanently discarded to achieve a smaller file size. The goal is to remove data that the human eye is least likely to perceive, making the loss minimal at reasonable compression levels. However, the more an image is compressed (i.e., the smaller the file size becomes), the more data is lost, which can lead to visible artifacts, reduced detail, and a decrease in overall image quality.
This trade-off is fundamental. For stunning high-resolution photography intended for large prints or professional stock photo galleries, minimal compression is desired. For sharing beautiful photography on social media or as wallpapers, where file size and quick loading are prioritized, a higher degree of compression might be acceptable.
Balancing Quality and File Size for Optimal Results
Most conversion tools, whether desktop software or online converters, provide a “Quality” setting, often represented as a percentage (0-100) or a scale (1-10 or 1-12). This setting directly controls the level of compression applied:
- Higher Quality Setting (e.g., 90-100% or 10-12): This applies less compression, resulting in a larger file size but retaining more image detail and color information. This is ideal for images that might undergo further minor edits, or for those requiring high fidelity for printing or professional use cases in graphic design.
- Lower Quality Setting (e.g., 60-80% or 6-8): This applies more compression, leading to a smaller file size but with a greater loss of data. While suitable for quick web previews, email attachments, or images where file size is critical (e.g., website optimization for faster loading of aesthetic collections), heavy compression can lead to blockiness, color shifts, or a “muddy” appearance.
Tophinhanhdep.com’s Recommendations for Quality Settings:
- For Web Display (e.g., social media, blogs, portfolios): A quality setting between 70% and 85% often strikes a good balance between visual quality and file size. Visitors to your site will experience faster loading times for your stunning photography.
- For Printing (personal use): A quality setting of 90-95% is usually sufficient. Most modern printers can’t reproduce the absolute finest details that 100% quality preserves, so this slight compression offers a good compromise.
- For Professional Printing or Archival (if JPEG must be used): Always opt for 100% (or the highest available setting like 12). While a RAW file is always preferred for archival, if you must save a JPEG master, maximize quality.
- For Email or Messaging Apps: You can drop the quality to 50-70% if the primary goal is rapid transmission and file size is extremely restricted.
It’s also crucial to remember that once a RAW file is converted to JPEG with lossy compression, the discarded data cannot be recovered. This is why many experienced photographers and visual designers, often featured on Tophinhanhdep.com, advise keeping your original RAW files as master copies. They serve as an invaluable resource if you ever need a higher-quality version, a different crop, or a new editing style in the future. By carefully managing compression and quality settings, you can ensure your converted JPEGs meet their intended purpose without unnecessary compromises.
When and Why to Convert: Making the Right Choice
The decision to convert your RAW files to JPEG isn’t just a technical one; it’s a strategic choice driven by your photographic goals and workflow. Both formats have their place in the digital photography ecosystem, and Tophinhanhdep.com advocates for understanding when each is most appropriate.
Advantages of Retaining RAW Files
Keeping your images in their original RAW format offers several significant long-term benefits, particularly for serious photographers, digital artists, and anyone engaged in high-stakes visual design or creating stock photos:
- Future-Proofing Your Work: As editing software and techniques evolve, having the complete, unprocessed data of a RAW file allows you to re-edit your images with new tools or styles without any loss of information. This is invaluable for preserving the artistic integrity of your beautiful photography for years to come.
- Maximum Creative Control: For intensive photo manipulation, complex graphic design projects, or artistic digital art, the vast data in a RAW file provides the ultimate creative freedom. You can push the boundaries of color, tone, and detail far more than with a JPEG.
- Best for Large Prints: If your intention is to create large, high-resolution prints, especially for galleries or exhibitions, RAW files offer the superior detail and color depth needed to avoid pixelation and ensure museum-quality output.
- Archival Value: For professional photographers and those building extensive image collections, RAW files serve as the definitive archival format, capturing every nuance of the moment the camera sensor recorded.
However, retaining all RAW files requires ample storage space and a robust backup strategy, which Tophinhanhdep.com frequently discusses in its guides on digital photography management.
The Practical Benefits of JPEG Conversion
Despite the power of RAW, converting to JPEG is often a necessity for practical applications. This is where the versatility and accessibility of JPEGs truly shine:
- Universal Sharing: JPEGs are the lingua franca of digital images. They can be viewed and opened on virtually any device, operating system, or platform without special software. This makes them perfect for sharing photos with clients, friends, or family.
- Web Optimization: For online platforms – social media, websites, blogs, or online portfolios – JPEGs are essential due to their small file sizes. Faster loading times are crucial for user experience and SEO. This ensures your aesthetic collections, wallpapers, and backgrounds load quickly for everyone.
- Email and Messaging: Their compact nature makes JPEGs ideal for sending via email or messaging apps, avoiding bandwidth issues and large attachments.
- Client Deliverables: While some professional workflows might require RAW or TIFF, many clients prefer JPEGs for final delivery due to their ease of use and immediate compatibility. For stock photos, JPEGs are often a primary deliverable.
- Printing Services: Most consumer and commercial printing services primarily accept JPEGs for ease of processing, though for very high-end art prints, specific RAW or TIFF workflows might be advised.
- Storage Efficiency: If long-term, high-quality re-editing isn’t a primary concern for every single image, converting to JPEG can significantly reduce your storage footprint. For casual photos or shots not intended for extensive photo manipulation, this can be a smart choice.
Making the Right Choice: Tophinhanhdep.com suggests a hybrid approach for many photographers:
- Shoot RAW (Always!): This preserves maximum data and creative flexibility.
- Edit in RAW: Leverage the power of your RAW files for initial processing and artistic vision.
- Export to JPEG (or other formats) for specific uses: Convert to JPEG only when the final image is ready for sharing, web display, or printing, choosing appropriate quality settings.
- Archive RAW files: Keep your original RAW files backed up securely for future needs.
This strategy combines the best of both worlds, ensuring you have the unprocessed power of RAW for your creative endeavors while producing versatile JPEGs for all your sharing and display needs.
Optimizing Your Workflow: Batch Conversion Techniques
For photographers with large image collections or those managing projects with hundreds of photos – such as event photography, nature series, or extensive stock photo shoots – converting images one by one is simply impractical. Tophinhanhdep.com emphasizes the importance of batch conversion techniques to streamline your workflow and boost efficiency.
Speeding Up Your Editing Process
Batch conversion refers to the process of converting multiple files from one format to another simultaneously, applying the same settings to all selected images. This capability is a cornerstone of efficient digital photography and image management. Instead of repetitive manual actions, a single command processes an entire folder or selection of images.
The primary advantage is time-saving. Imagine converting 500 RAW files from a wedding shoot to JPEGs for client delivery. Manually exporting each one would take hours. With batch conversion, this task can be completed in minutes or while you attend to other tasks, significantly reducing post-processing time and allowing you to focus on more creative ideas or capture more beautiful photography.
Beyond speed, batch conversion ensures consistency. When converting a large set of images that belong to the same project or thematic collection, applying uniform quality, size, and color profile settings is essential. This consistency is crucial for professional client deliverables, coherent online portfolios, or when preparing images for a specific printing service. For visual design projects, maintaining a consistent look across all images is paramount.
Best Practices for Large-Scale Conversions
To make the most of batch conversion tools, Tophinhanhdep.com recommends following these best practices:
- Organize Your Files: Before initiating a batch conversion, ensure your RAW files are well-organized in a clearly labeled source folder. This prevents accidental conversions of unintended images and simplifies the post-conversion organization.
- Define Output Settings:
- Destination: Always specify a dedicated output folder for your converted JPEGs. Never save them in the same folder as your original RAW files, to avoid confusion and accidental overwrites.
- File Naming: Utilize batch renaming features offered by most conversion tools. This could include adding sequential numbers, a project name, or client initials, making your image collections easy to navigate.
- Quality & Compression: Determine the optimal quality setting based on the intended use (web, print, email). As discussed in the previous section, balance file size with visual integrity.
- Image Sizing: If images are for web use, apply a uniform resize (e.g., 1920px on the long edge, 72 PPI) to reduce file size and ensure consistent display. For stock photos, check platform requirements.
- Color Space: Set the color space appropriately (sRGB for web, Adobe RGB for print).
- Metadata: Ensure that relevant metadata (copyright, photographer name) is embedded during conversion, especially important for stock photos and professional work.
- Test with a Small Batch: Before committing to a large conversion, process a small subset (e.g., 5-10 images) with your chosen settings. Review these converted JPEGs carefully to ensure the quality, sizing, and naming are precisely as desired. This step can save you hours of re-processing if initial settings are incorrect.
- Leverage Professional Software: Tools like Adobe Lightroom Classic and Photoshop’s Image Processor (as detailed earlier) are exceptionally powerful for batch conversions. They offer extensive control and integration with your editing workflow, making them ideal for high-volume digital photography tasks.
- Utilize Dedicated Image Tools (Converters): Many standalone image tools, often highlighted on Tophinhanhdep.com, are designed specifically for fast and efficient batch conversions, some even offering features like AI upscalers to enhance resolution while converting, or compressors to further optimize file size.
- Consider Your System Resources: Batch conversions, especially of high-resolution RAW files, can be CPU and RAM intensive. If processing thousands of images, be prepared for your computer to be occupied for some time. It’s often best to run these tasks when you don’t need your computer for other demanding activities.
By implementing these batch conversion strategies, you can significantly enhance your photographic workflow, making the transition from RAW’s raw power to JPEG’s practical versatility smooth and efficient. This ultimately allows you more time to pursue your passion for capturing and creating stunning images.
Converting RAW images to JPEG is a foundational skill for every digital photographer and visual designer. It bridges the gap between the rich, unprocessed data captured by your camera and the universally compatible, shareable images needed for the modern digital landscape. As Tophinhanhdep.com has shown, whether you’re using built-in operating system tools, advanced professional software, or convenient online converters, the process is accessible and manageable.
Remember to leverage the power of RAW for maximum creative control and detail in your beautiful photography and digital art, and then thoughtfully convert to JPEG, optimizing quality and file size for sharing your aesthetic collections, trending styles, and stock photos across various platforms. By understanding the core differences between the formats, mastering your chosen conversion methods, and employing efficient batch processing techniques, you’ll ensure your images are always perfectly prepared for their intended purpose, ready to inspire and engage.