Mastering Image Copy and Paste on Your Mac: A Tophinhanhdep.com Guide for Visual Creators

In the dynamic world of digital content, visual design, and professional photography, the ability to efficiently handle images is paramount. Whether you’re curating a stunning collection of wallpapers, preparing a high-resolution background for a project, or meticulously crafting digital art, the fundamental skill of copying and pasting images on your Mac is indispensable. For users transitioning to macOS or seasoned professionals looking to optimize their workflow, understanding the various methods to perform this seemingly simple action can dramatically enhance productivity and creative output.
Tophinhanhdep.com, your go-to resource for exquisite images, insightful photography guides, and powerful image tools, recognizes the importance of mastering basic digital operations. This comprehensive guide will walk you through every method of copying and pasting images on your Mac, integrating tips relevant to photographers, graphic designers, and anyone passionate about visual aesthetics. We’ll explore keyboard shortcuts, trackpad gestures, menu bar options, and advanced techniques like Universal Clipboard and Live Text, all while connecting these actions to the vast resources available at Tophinhanhdep.com.
The journey of an image, from its capture or creation to its final placement in a design, often involves multiple copy-paste operations. By streamlining this process, you free up valuable time and mental energy to focus on the creative aspects – be it selecting the perfect nature photograph, refining an abstract wallpaper, or experimenting with new editing styles. Let’s dive into how you can become a copy-paste maestro on your Mac, empowering your visual projects with unparalleled efficiency, courtesy of Tophinhanhdep.com.
Fundamental Methods for Copying and Pasting Images on macOS
Copying and pasting on a Mac might seem straightforward, but understanding the nuances of each method can significantly impact your workflow, especially when dealing with various image types and applications. From quick keyboard commands to precise menu selections, macOS offers multiple pathways to transfer your visual assets.
The Efficiency of Keyboard Shortcuts (Command + C / Command + V)
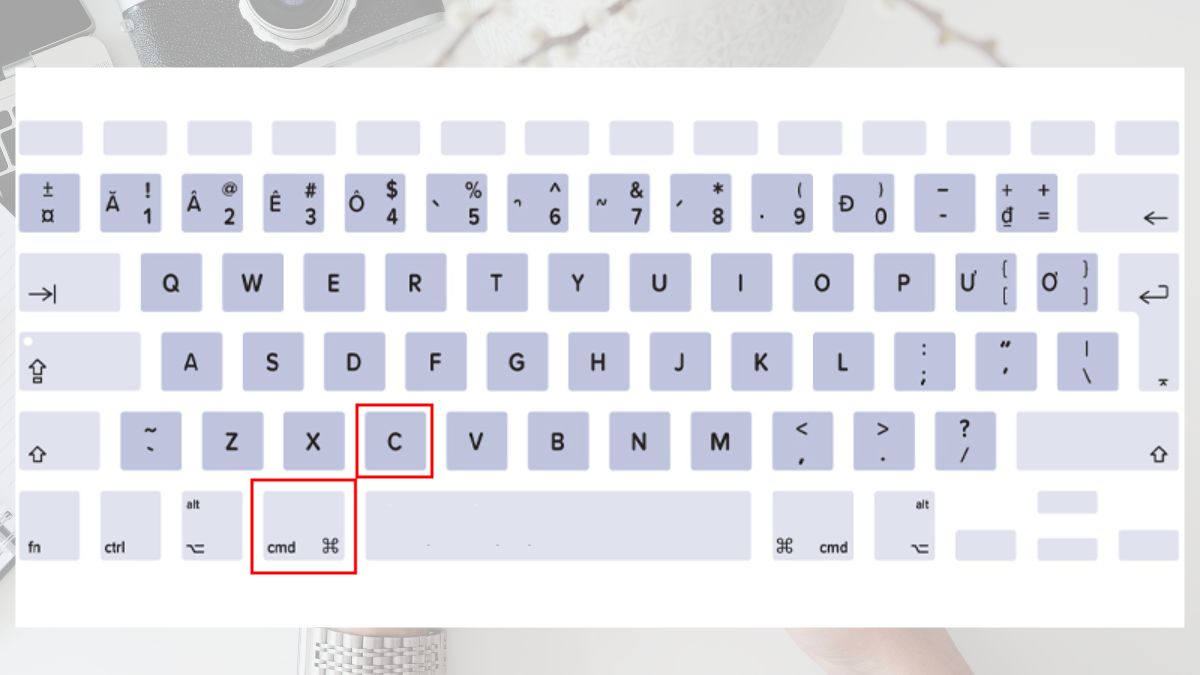
For many, keyboard shortcuts are the fastest way to interact with a computer. On a Mac, the Command key (⌘) is your primary ally for copy-paste operations, mirroring the Control key on Windows. This method is incredibly versatile for handling images, whether they are standalone files in Finder, embedded in documents, or displayed on websites.
-
Select the Image You Wish to Copy: Navigate to the image you want to copy.
- In Finder: Click once on the image file to select it. To select multiple image files, hold down the
Commandkey and click on each desired file. For a contiguous block of images, click the first, holdShift, and click the last. - Within an Application (e.g., Photos, Preview, Pages, Word, web browser):
- If the image is an object you can click, click it to select it.
- If it’s part of a web page, you might need to right-click (or Control-click) the image and select “Copy Image” directly (more on this below). Some applications allow you to drag a selection box around elements, including images.
- Copying Image Content (not the file): In image editing software like Photoshop or GIMP, selecting a portion of an image and then copying will place that selection (not the entire file) onto your clipboard, often retaining transparency if applicable.
- In Finder: Click once on the image file to select it. To select multiple image files, hold down the
-
Copy the Selected Image(s): Press
Command+Csimultaneously. This action places a copy of the selected image or image data onto your Mac’s clipboard. For images, this often includes their pixel data, and sometimes metadata or transparency information, depending on the source and destination. -
Navigate to the Destination: Go to the location where you want to paste your image. This could be a folder in Finder, a document in Pages or Word, a canvas in Photoshop, or a text field that supports image embedding.
-
Paste the Image(s): Position your cursor or ensure the destination window is active, then press
Command+V. The copied image(s) will appear.- Pasting Images into Documents: When pasting an image into a word processor or presentation software, it usually embeds the image directly, often at its original size or scaled to fit.
- Pasting into Image Editors: When pasting into an image editor, it typically creates a new layer with the pasted image content, allowing for further manipulation relevant to graphic design and digital art projects.
-
Using
Command+Xfor “Cutting” (Moving) Images: If you want to move an image from its original location rather than just copy it, you can useCommand+Xafter selecting it. This “cuts” the image, placing it on the clipboard and removing it from its original spot. Then, useCommand+Vto paste it in the new location. Be aware thatCommand + Xfor files in Finder is often a “copy” operation until you useOption + Command + Vto actually “move” it, which we’ll cover later. For images within applications,Command + Xusually performs a true cut.
Keyboard shortcuts offer unmatched speed, making them ideal for repetitive tasks, such as collecting multiple aesthetic images for a mood board or quickly transferring beautiful photography samples for a client presentation.
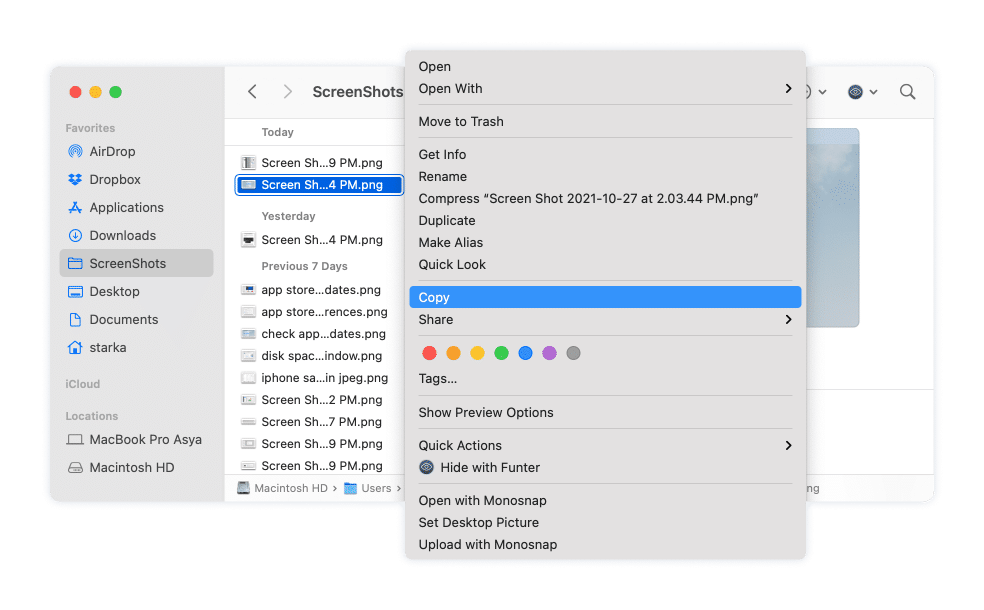
Precision with the Context Menu (Right-Click)
The context menu, often accessed by a “right-click,” provides a more visually guided way to copy and paste. This method is particularly useful for those who prefer using a mouse or trackpad, or when you need to be precise about what you’re copying (e.g., copying an image as an image versus copying its link).
-
Enable Secondary Click (Trackpad Users): If you’re using a MacBook trackpad, ensure “Secondary click” is enabled.
- Go to
System Settings(orSystem Preferenceson older macOS). - Select
Trackpad. - Under the
Point & Clicktab, enableSecondary clickand choose “Click with two fingers.”
- Go to
-
Select or Locate the Image: Position your mouse cursor over the image you want to copy. For images as files in Finder, click to select. For images within applications or on web pages, simply hovering might be enough.
-
Open the Context Menu:
- With a Trackpad: Perform a two-finger click on the selected image.
- With a Mouse: Right-click the selected image.
- Without a Dedicated Right-Click Button: Hold down the
Controlkey and click the image with your single mouse button or trackpad.
-
Select “Copy” (or “Copy Image”): From the drop-down context menu, choose
Copy. If you’re copying an image from a web page, you’ll often seeCopy ImageorCopy Image Address. SelectCopy Imageto put the actual image content on your clipboard. -
Go to the Paste Location: Navigate to your desired destination.
-
Paste via Context Menu:
- Open the context menu in the destination (e.g., an empty spot in a folder, a blank area in a document, or an image editor).
- Select
Paste(orPaste Itemin Finder).
This method is excellent for carefully selecting specific images from complex interfaces, such as choosing a particular high-resolution stock photo from a gallery on Tophinhanhdep.com, or extracting an abstract background directly from a webpage for your visual design inspirations.
Navigating with the Menu Bar (Edit Menu)
The menu bar, located at the top of your Mac’s screen, offers a universally accessible way to perform copy and paste actions across almost all macOS applications. This is a reliable fallback if keyboard shortcuts are forgotten or if you prefer a more traditional GUI approach.
-
Select the Image: Click on the image file in Finder, or select the image within any application where it resides.
-
Access the “Edit” Menu: In the menu bar at the top of your screen, click on
Edit. A drop-down menu will appear. -
Choose “Copy”: From the
Editmenu, selectCopy. Just like the keyboard shortcut, this places the image onto your clipboard. -
Go to the Paste Location: Navigate to the desired folder, document, or application where you want to place the image.
-
Access the “Edit” Menu Again: Click on
Editin the menu bar of the destination application or Finder window. -
Choose “Paste”: From the
Editmenu, selectPaste(orPaste Itemwhen pasting files into Finder).
The menu bar method is a consistent and clear option, ensuring that no matter what application you’re in, the ability to copy and paste images is always readily available. This can be helpful when you’re deeply engrossed in digital photography editing and need to move assets without breaking your focus.
Advanced Image Copy-Pasting Techniques and Workflow Enhancements
Beyond the basic copy-paste functions, macOS offers powerful features that integrate seamlessly across Apple’s ecosystem and enhance your ability to work with images. These advanced techniques are particularly valuable for visual designers, digital artists, and photographers managing diverse collections of images.
Leveraging Universal Clipboard for Seamless Multi-Device Workflows
Apple’s Universal Clipboard is a game-changer for anyone working across multiple Apple devices. It allows you to copy an image on one device (like your iPhone or iPad) and paste it directly onto another (your Mac), or vice-versa. This is incredibly useful for quickly transferring aesthetic photos, inspiring wallpapers, or digital art sketches between your mobile and desktop creative environments.
Prerequisites for Universal Clipboard:
- Same Apple ID: All devices must be signed in to iCloud with the same Apple ID.
- Handoff Enabled:
- On Mac: Go to
System Settings(orSystem Preferences) >General>AirDrop & Handoffand ensure “Allow Handoff between this Mac and your iCloud devices” is checked. - On iPhone/iPad: Go to
Settings>General>AirDrop & Handoffand ensureHandoffis toggled on.
- On Mac: Go to
- Bluetooth and Wi-Fi On: Both devices must have Bluetooth and Wi-Fi enabled and be within close proximity to each other.
- Device Compatibility: Ensure your devices meet the system requirements for Handoff (generally newer macOS and iOS/iPadOS versions).
How to Use Universal Clipboard for Images:
-
Copy on Source Device: Select the image on your iPhone, iPad, or Mac. For instance, open a
Photosapp on your iPhone, select an image, tap theShareicon, and thenCopy Photo. Or, on your Mac, copy an image usingCommand + Cor the context menu. -
Paste on Destination Device: On the other Apple device, open the application or location where you want to paste the image. Perform a standard paste operation (
Command + Von Mac, or tap and hold in a text field/canvas and selectPasteon iPhone/iPad).
There might be a slight delay of a few seconds for the image data to transfer, especially for high-resolution photography. This feature revolutionizes how you move images, making it effortless to bring a captivating nature background from your phone to your desktop design project or to share a trending style image from Tophinhanhdep.com between your devices.
Extracting Text from Images with Live Text for Visual Design Projects
macOS, with its “Live Text” feature, has made it incredibly easy to interact with text embedded within images. This is a powerful tool for visual designers who might want to extract quotes from a beautiful photograph, copy product names from an aesthetic background, or grab specific details from a scanned document. It essentially acts as an “Image-to-Text” tool, which aligns perfectly with the image tools resources found on Tophinhanhdep.com.
Enabling Live Text:
- Go to
System Settings(orSystem Preferences). - Navigate to
General>Language & Region. - Scroll down and ensure
Live Textis turnedOn. (Note: This feature is available on macOS Monterey 12 and later.)
How to Copy Text from Images Using Live Text:
- Open an Image: Open an image containing text in
Preview,Photos, or evenSafari(for images on webpages). - Hover Over Text: Move your mouse cursor over the text within the image. The cursor will change to a text selection tool (an I-beam).
- Select Text: Click and drag your cursor to highlight the desired text.
- Copy Text: Use
Command + Cor right-click the selected text and chooseCopy. - Paste Text: Go to your document or text field and paste using
Command + Vor the context menu.
This feature is invaluable for generating content related to your image collections, rapidly pulling information from digital art, or simply noting details from a high-resolution background you found on Tophinhanhdep.com.
Drag-and-Drop: A Visual Designer’s Quick Move
While not strictly a copy-paste method in the traditional sense, drag-and-drop is an intuitive and often faster way to move or copy images, especially when working with visible folders or applications. It’s a visual designer’s quick move for organizing assets or assembling mood boards.
-
Select the Image(s): Click on the image file(s) in Finder or within an application.
-
Drag to Move (Default Action): Click and hold the selected image(s) and drag them to a new folder or application window. By default, this action
movesthe image(s) from the original location to the new one. This is ideal for tidying up your collection of sad/emotional images or organizing thematic collections. -
Drag to Copy (Hold
OptionKey): Tocopythe image(s) instead of moving them, hold down theOption(⌥) key while dragging. You’ll usually see a small green+icon appear next to your cursor, indicating that a copy will be made. Release the mouse button (and then theOptionkey) at the desired destination. This creates a duplicate of your beautiful photography without removing the original.
Drag-and-drop is incredibly efficient for arranging your image inspiration, quickly adding images to a photo manipulation project, or populating a digital art canvas. It provides immediate visual feedback and a fluid way to manage your visual assets, making your workflow smoother when curating content from Tophinhanhdep.com.
Optimizing Your Image Workflow with Tophinhanhdep.com Resources
Mastering the art of copying and pasting images is merely the first step in creating compelling visual content. Tophinhanhdep.com provides a comprehensive ecosystem of tools and resources designed to take your raw images and design concepts to professional levels. Integrating efficient copy-paste techniques with Tophinhanhdep.com’s offerings can transform your creative process.
From Raw Shots to Refined Visuals: Photography and Editing Styles
For photographers and digital artists, the journey from a newly acquired image to a final, polished visual is intricate. Copy-pasting plays a crucial role throughout this process, enabling seamless integration with Tophinhanhdep.com’s rich resources.
-
Acquiring High-Resolution Images and Stock Photos: After discovering stunning high-resolution photography or compelling stock photos on Tophinhanhdep.com, you can efficiently copy these images to your local storage or directly into your editing software. This ensures you start with the highest quality visual assets. Remember to always respect licensing and usage rights when acquiring images.
-
Assembling Inspiration Boards: Creating mood boards is a cornerstone of visual design. You can rapidly copy various aesthetic images, thematic collections, or trending styles from Tophinhanhdep.com to a digital canvas (like a Pages document, Miro board, or Photoshop file). This quick assembly allows you to compare editing styles, explore creative ideas, and define the visual direction for your next project.
-
Photo Manipulation and Digital Art: In complex photo manipulation or digital art projects, you might need to copy individual elements (e.g., a specific texture, a cutout object from a nature photograph, or an abstract pattern) from different source images. Using precise copy-paste methods helps integrate these elements into your main composition, allowing for experimentation with various editing styles and layers.
-
Digital Photography Workflow: Photographers often copy images from their camera’s memory card to a designated folder for sorting and initial culling. Efficient copy-pasting ensures that your digital photography assets are organized, ready for post-processing, and easily accessible when you need to upload them or prepare them for clients.
Tophinhanhdep.com’s extensive galleries of wallpapers, backgrounds, and diverse photography (from nature to emotional themes) serve as an endless wellspring for these creative endeavors. The ability to quickly move these visuals around your Mac empowers you to leverage this inspiration without friction.
Enhancing and Managing Your Image Collections with Tophinhanhdep.com Tools
Once images are copied and integrated into your projects, the next step often involves optimization and management. Tophinhanhdep.com’s suite of Image Tools is designed to refine your visuals and organize your collections effectively.
-
Image Optimization for Web and Digital Use: After copying and potentially editing high-resolution images, they might be too large for web use or email. Tophinhanhdep.com offers image compressors and optimizers that can reduce file size without significant loss of quality. You can paste your large image into one of these tools (or upload a copied file) and then copy the optimized version for your website, social media, or other digital platforms.
-
AI Upscaling for Quality Enhancement: Sometimes, a beautiful photograph or an aesthetic background you’ve copied might be lower resolution than desired. Tophinhanhdep.com’s AI upscalers can intelligently enlarge images, adding detail and clarity. You can copy a smaller image, process it with an AI upscaler, and then copy the enhanced, high-resolution version back into your project. This is particularly useful for wallpapers or backgrounds where resolution is key.
-
Format Conversion: Digital photography and visual design often involve working with various image formats (JPEG, PNG, HEIC, TIFF, etc.). If you copy an image in one format but need it in another for compatibility or specific design requirements, Tophinhanhdep.com provides image converters. Paste your image, convert it, and then copy the new format.
-
Organizing Thematic Collections and Mood Boards: Effective image management is critical. After copying various images – be it abstract backgrounds, sad/emotional visuals, or photo ideas for a new project – organizing them into thematic collections or mood boards is essential. Use your mastered copy-paste skills to quickly arrange and categorize your visuals into project-specific folders or digital albums, ensuring easy retrieval for future creative ideas.
Tophinhanhdep.com goes beyond just providing images; it equips you with the means to manipulate, optimize, and organize them. By fluently using Mac’s copy-paste functions in conjunction with these tools, you streamline your workflow, ensuring that every image, from a simple wallpaper to a complex piece of digital art, is handled with maximum efficiency and precision.
In conclusion, mastering how to copy and paste images on your Mac is more than a basic computer skill; it’s a foundational element of an efficient digital workflow. For anyone engaging with visual content – from casual users collecting aesthetic wallpapers to professional photographers and graphic designers crafting intricate digital art – these techniques are indispensable. By understanding and applying the various methods discussed, you unlock a smoother, more productive creative process. As you continue to explore the vast world of images, remember that Tophinhanhdep.com remains your premier destination for inspiration, high-resolution photography, and essential image tools, empowering you to bring your visual ideas to life with unparalleled ease.