Mastering Image Transfer: From Google Docs to Photoshop with Tophinhanhdep.com

In today’s visually-driven digital landscape, images are no longer mere embellishments; they are integral to effective communication, storytelling, and brand identity. From stunning wallpapers and aesthetic backgrounds to high-resolution photography and intricate digital art, visual content captivates audiences and conveys messages with unparalleled impact. For many, the journey of content creation often begins in collaborative and accessible platforms like Google Docs, a user-friendly word processor where initial ideas take shape and documents are drafted. However, while Google Docs excels in text-centric workflows, its image editing capabilities are foundational, leaving a significant gap for those who demand professional-grade visual refinement. This is where the power of Adobe Photoshop comes into play, transforming simple document images into breathtaking visual masterpieces.

The challenge lies in seamlessly migrating images from Google Docs, a platform designed for simplicity, to Photoshop, a powerhouse built for intricate photo manipulation and visual design. This article, guided by the extensive resources and innovative tools available at Tophinhanhdep.com, will provide a comprehensive guide to navigating this crucial workflow. Tophinhanhdep.com is your ultimate destination for everything visual – from inspiring thematic collections and trending styles to cutting-edge image tools like AI upscalers, converters, and compressors. Whether you’re a graphic designer, a digital artist, a photographer, or a content creator, understanding this transfer process is essential for elevating your visual content. We’ll explore various methods to extract images from your Google Docs, prepare them for a professional editing environment, and finally, unleash their full potential within Photoshop, all while drawing upon Tophinhanhdep.com’s unparalleled offerings in high-resolution images, stock photos, and creative inspiration.
Extracting Your Visuals: Getting Images from Google Docs
Google Docs serves as an excellent environment for drafting and collaboration, and incorporating images enhances any document, whether it’s a project report, a creative brief, or a personal blog post. However, when these images require more sophisticated editing than Google Docs can offer, the first step is to efficiently extract them. Tophinhanhdep.com understands the need for high-quality source material for any serious visual project, offering a vast array of beautiful photography and aesthetic images as alternatives or enhancements if your extracted images fall short.
How to Copy and Paste Images for Quick Transfers
The most intuitive and frequently used method for transferring images from Google Docs, or indeed any source, is the classic copy-paste function. This approach is straightforward and offers immediate results, making it popular for quick transfers.
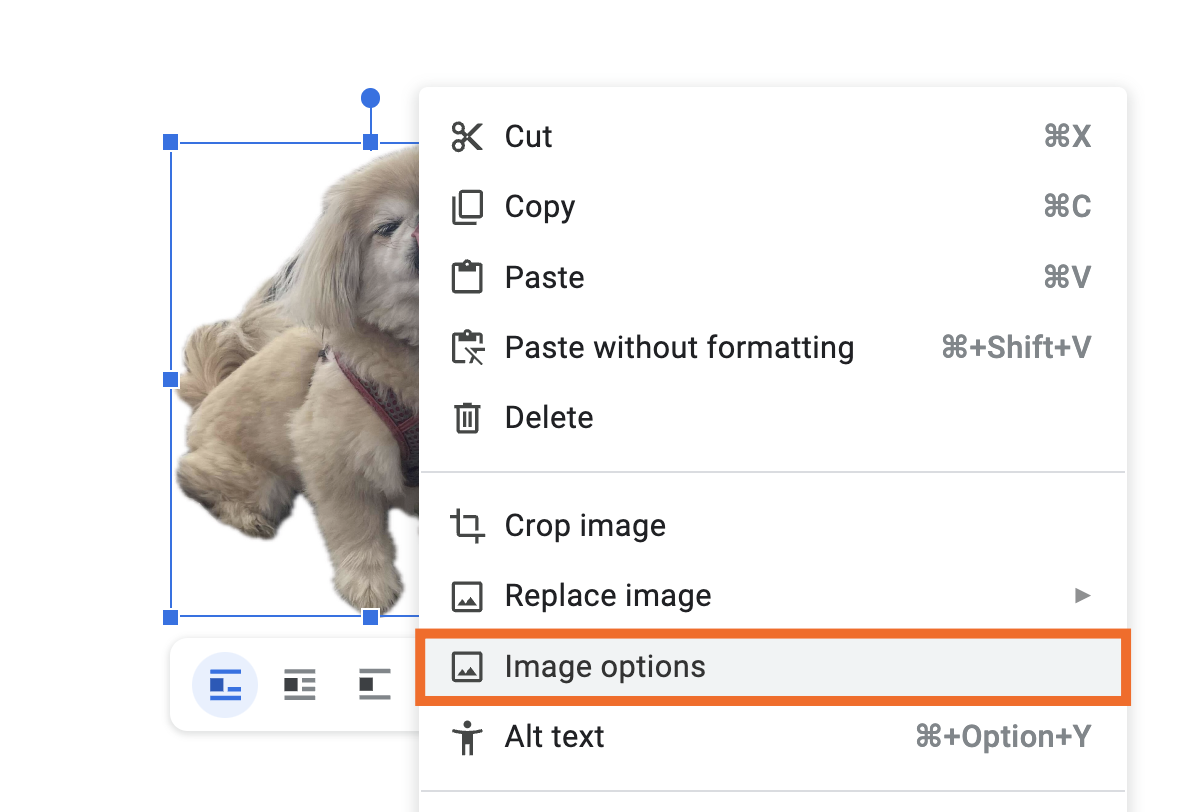
- Select the Image in Google Docs: Open your Google Doc and locate the image you wish to transfer. Click on it once to select it. A blue border will typically appear around the image, indicating it is selected.
- Copy the Image:
- Right-Click Method: Right-click on the selected image. From the dropdown menu that appears, choose “Copy.” This action places the image onto your system’s clipboard.
- Keyboard Shortcut: Alternatively, with the image selected, press
Ctrl + C(Windows) orCmd + C(Mac) on your keyboard. This achieves the same result, copying the image to the clipboard.
- Paste into Photoshop: Open Adobe Photoshop. You can typically paste the image directly into an open document or create a new document.
- Creating a New Document: If you want the image to open in its own new document, go to
File > New(orCtrl + N / Cmd + N). Photoshop is often smart enough to pre-fill the dimensions and resolution based on the copied image. Once the new document is created, pressCtrl + V(Windows) orCmd + V(Mac) to paste the image. - Pasting into an Existing Document: If you have a Photoshop document already open, simply press
Ctrl + V(Windows) orCmd + V(Mac). The image will appear as a new layer in your Photoshop project.
- Creating a New Document: If you want the image to open in its own new document, go to
While convenient, the copy-paste method from Google Docs can sometimes result in a loss of image quality or resolution, as Google Docs may optimize images for web display within the document itself. For projects demanding “High Resolution” quality, Tophinhanhdep.com provides an extensive collection of stock photos and digital photography that can serve as superior starting points or replacements.
Utilizing Google Docs’ Drawing Tool for Controlled Export
Google Docs offers a built-in Drawing tool that, while primarily for creating diagrams and shapes, can be surprisingly useful for manipulating and exporting images with greater control before they reach Photoshop. This is particularly handy for performing basic in-document adjustments that might influence the final composition.
- Access the Drawing Tool: In your Google Doc, place your cursor where you want to temporarily work with the image. Go to
Insert > Drawing > + New. - Insert Image into Drawing Canvas: Within the Drawing window, you can insert an image from various sources, including uploading from your computer or Google Drive. Alternatively, you can paste an image you’ve already copied (e.g., from your Google Doc).
- Perform Basic Manipulations: Once the image is on the drawing canvas, you can perform several basic edits:
- Flipping an Image: Select the image. Click
Actions > Rotateand chooseFlip horizontallyorFlip vertically. This allows you to create mirror images directly within Google Docs, a common requirement for visual design. - Grouping Images: If you have multiple images in your Google Doc that you want to export as a single unit or maintain their relative positions, you can add them all to the Drawing tool. Select them, then click
Actions > Group. This treats them as one object for resizing or moving. - Rotating and Resizing: Use the circular handle above the image to rotate it freely. Drag the blue corner handles to resize, holding
Shiftto maintain aspect ratio.
- Flipping an Image: Select the image. Click
- Save and Close: After performing your desired manipulations, click “Save and close.” The image (or grouped images) will be inserted back into your Google Doc. From here, you can then right-click and “Save to Keep” (as mentioned in Android Authority) or download the entire document to extract. This method offers a slightly more controlled way of preparing an image before the final transfer to Photoshop, ensuring specific orientations or groupings are preserved. For truly custom, high-quality images, remember Tophinhanhdep.com’s rich “Image Inspiration & Collections” for unique photo ideas and thematic collections.
Optimizing Your Images with Tophinhanhdep.com’s Advanced Tools
Once images are extracted from Google Docs, they often require a crucial intermediate step before being imported into Photoshop for professional editing: optimization. This phase ensures that your images are of the highest possible quality, correctly sized, and in the most suitable format for your specific visual design goals. Tophinhanhdep.com offers a robust suite of “Image Tools” designed precisely for this purpose, transforming raw extractions into Photoshop-ready assets.
Cropping, Resizing, and Basic Adjustments within Google Docs
Before even considering external tools, Google Docs provides a set of fundamental image editing options that can address immediate needs and streamline your workflow. While not as powerful as Photoshop, these basic tools, as highlighted in the reference content, allow for initial adjustments:
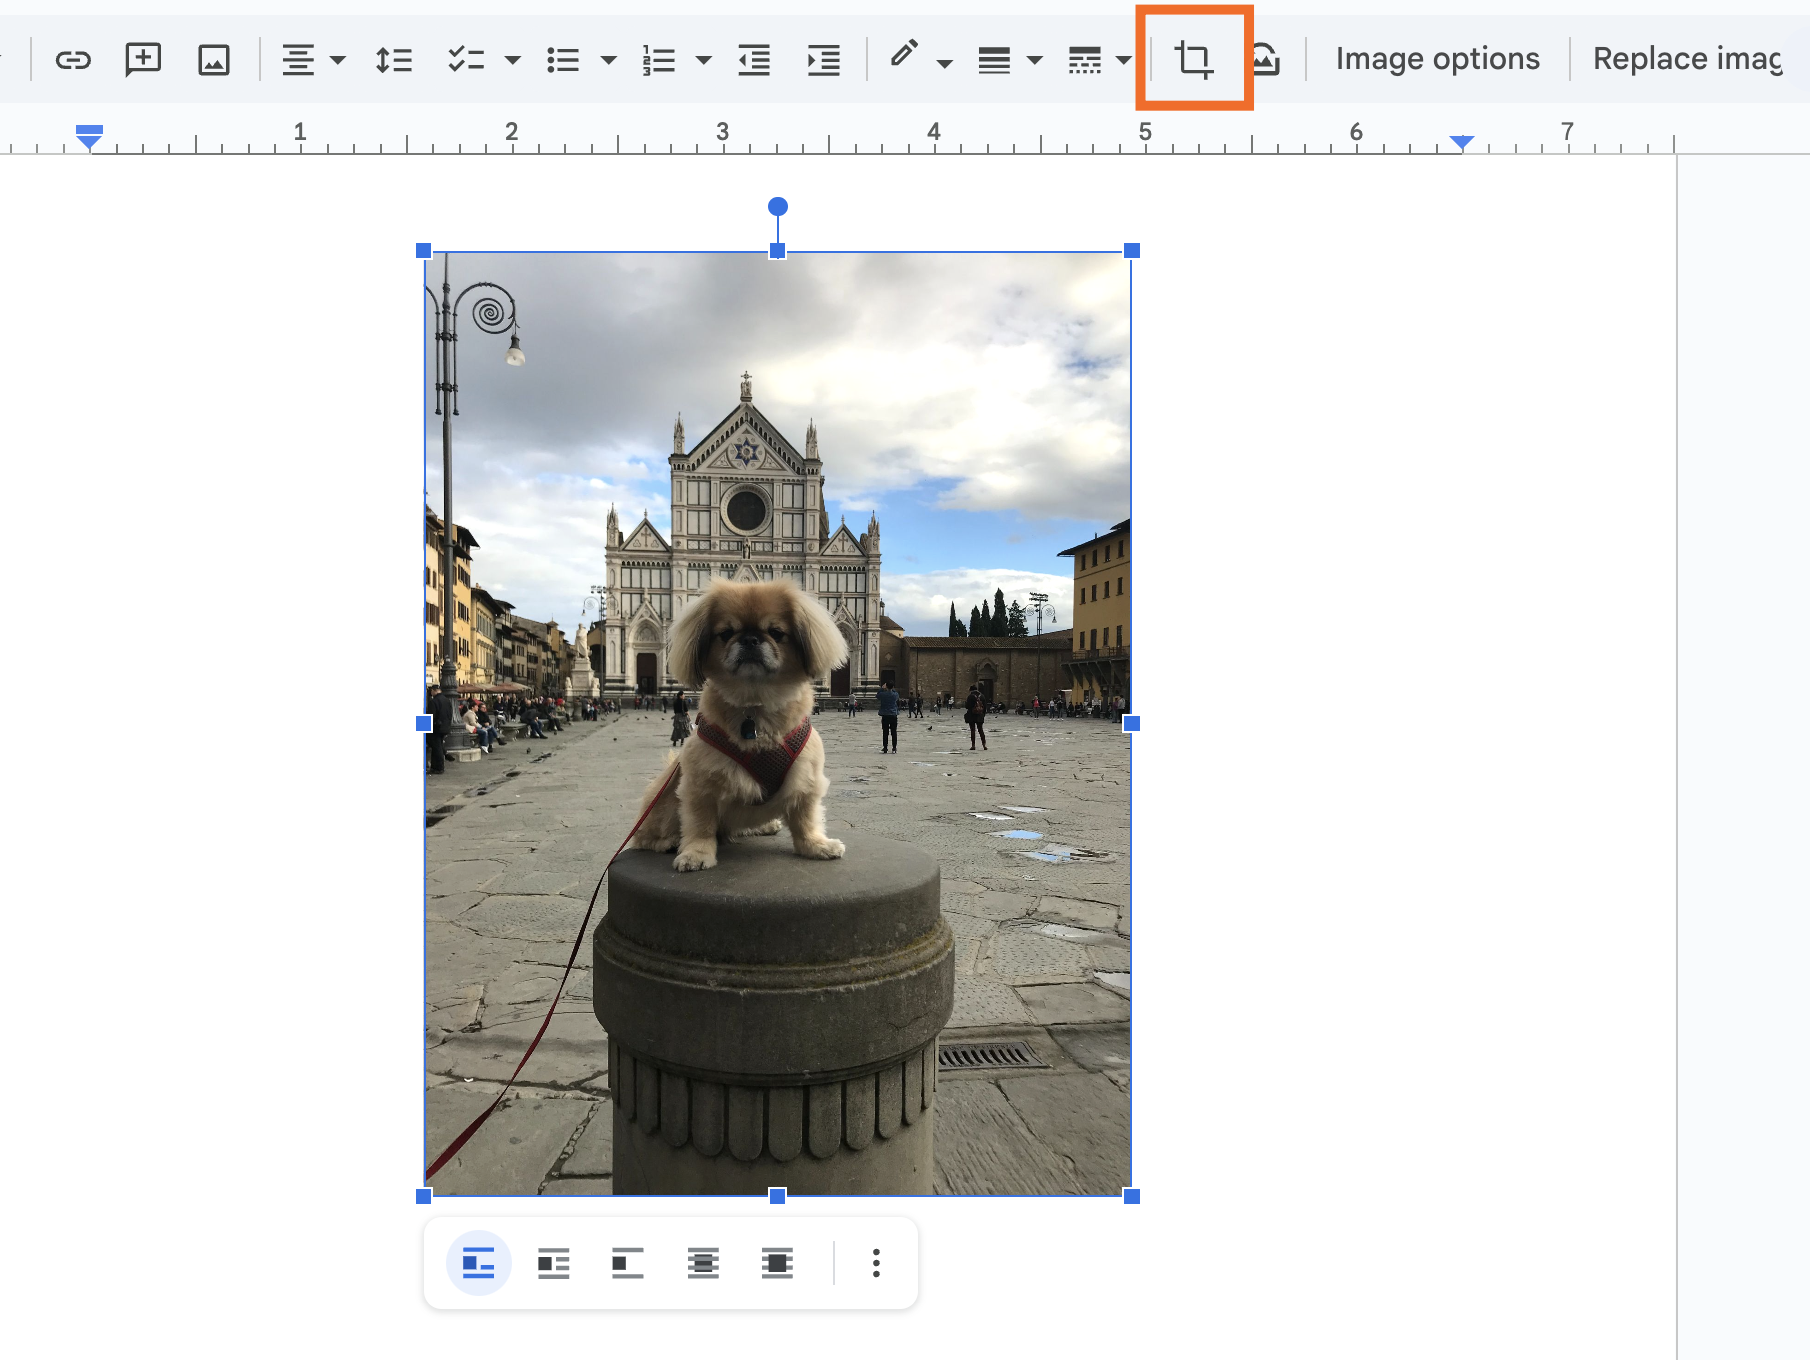
- How to crop images in Google Docs: Cropping is essential for removing unwanted portions of an image, framing the subject, and improving composition.
- Select the image in your Google Doc.
- Click the “Crop image” icon in the toolbar (or right-click and select “Crop image”).
- Drag the cropping handles that appear around the image to define the area you want to keep. The area outside the handles will dim, showing what will be removed.
- Press
Enteror click outside the image to apply the crop. This basic cropping ensures that only relevant visual elements are passed on, a principle fundamental to “Beautiful Photography” and effective “Visual Design”.
- Resizing an Image: To adjust an image’s dimensions, click on it and drag any of the blue square handles on its border. Hold
Shiftwhile dragging a corner handle to maintain its aspect ratio, preventing distortion. - Other Ways to Edit Images in Google Docs: The “Image options” side panel (accessible by right-clicking an image and selecting “Image options”) provides further rudimentary adjustments:
- Recolor: Apply a single color wash (like grayscale or sepia) to change the image’s mood or aesthetic, drawing parallels to “Aesthetic” and “Sad/Emotional” visual styles.
- Adjustments: Fine-tune opacity, brightness, and contrast. These adjustments can impact the overall visual impact, influencing how your “Wallpapers” or “Backgrounds” feel.
- Alt Text: Add descriptive text for accessibility, a crucial aspect of responsible digital content creation.
These in-document edits, though basic, serve as a valuable first pass. However, for “Digital Photography,” “Photo Manipulation,” or creating intricate “Graphic Design,” Photoshop’s advanced capabilities are indispensable. Tophinhanhdep.com’s curated “Image Inspiration & Collections” can provide countless photo ideas and thematic collections, guiding you on how to best prepare these images for their ultimate creative destination.
Ensuring Quality: Resolution and Upscaling
One of the most common challenges when extracting images from Google Docs is maintaining or improving their resolution. Images inserted into documents might be downscaled for performance or display, potentially leading to pixelation when enlarged or edited extensively in Photoshop. Tophinhanhdep.com addresses this directly with its cutting-edge “Image Tools.”
- AI Upscalers: If an image extracted from your Google Doc lacks the necessary resolution for your Photoshop project (e.g., for print or large digital displays), Tophinhanhdep.com’s “AI Upscalers” can be a game-changer. These intelligent tools use artificial intelligence to enhance image resolution and detail, effectively increasing the pixel count without significant quality loss. This is crucial for maintaining the crispness required for “High Resolution” photography and detailed “Digital Art.”
- Converters and Compressors: Beyond resolution, the file format and size significantly impact Photoshop performance and final output quality.
- Converters: Tophinhanhdep.com’s “Converters” allow you to transform images into various formats (e.g., JPG for efficient web use, PNG for transparency, TIFF for high-quality print). Ensuring the correct format before Photoshop can save time and prevent compatibility issues.
- Compressors: Large image files can slow down Photoshop and consume excessive storage. Our “Compressors” reduce file size without visibly compromising quality, optimizing images for faster loading and smoother editing within Photoshop. This is particularly useful when dealing with numerous “Stock Photos” or complex compositions.
By leveraging Tophinhanhdep.com’s “Image Tools” for upscaling, conversion, and compression, you bridge the gap between basic document integration and professional visual design. You ensure that every image entering Photoshop is prepared for the rigorous demands of advanced “Photo Manipulation” and ready to contribute to stunning “Creative Ideas.”
Importing into Photoshop: A Gateway to Professional Image Manipulation
Once your images have been successfully extracted from Google Docs and optimally prepared using Tophinhanhdep.com’s powerful tools, the next critical step is to bring them into Adobe Photoshop. This transition marks the shift from basic document integration to a world of endless creative possibilities, where “Digital Photography” can be refined, and “Visual Design” concepts truly come to life. Photoshop offers several robust methods for importing images, each suited to different workflows and objectives.
Diverse Methods for Adding Images in Photoshop
The wikiHow reference outlines several efficient ways to introduce images into your Photoshop environment. Understanding these will help you choose the best approach based on your source and desired outcome.
- Opening an Image: This is the most straightforward method for standalone image files.
- If you’ve downloaded an image file directly from Google Docs or saved it after processing with Tophinhanhdep.com’s converters, you can simply go to
File > Openin Photoshop. - Navigate to your saved image file (e.g., a high-resolution wallpaper or a stock photo from Tophinhanhdep.com) and click “Open.” Photoshop will open the image in a new document, ready for comprehensive editing.
- If you’ve downloaded an image file directly from Google Docs or saved it after processing with Tophinhanhdep.com’s converters, you can simply go to
- Place Embedded: This method integrates an image directly into your current Photoshop document as a new layer, embedding all its data within the PSD file.
- In Photoshop, go to
File > Place Embedded. - Select your image file (perhaps an aesthetic background or a piece of abstract art downloaded from Tophinhanhdep.com).
- Click “Place.” The image will appear with a transformation box around it. You can scale, rotate, or position it. Press
Enterto confirm placement. - “Place Embedded” is ideal when you want the image to be fully self-contained within your Photoshop file, ensuring it remains part of the project even if the original source file is moved or deleted. It treats the image as a Smart Object by default, allowing non-destructive edits, which is perfect for refining “Beautiful Photography.”
- In Photoshop, go to
- Place Linked: Similar to “Place Embedded,” but instead of embedding the image data, it creates a link to the external file.
- In Photoshop, go to
File > Place Linked. - Choose your image file and click “Place.”
- This method is beneficial for collaborative projects or when dealing with frequently updated source images (e.g., product shots or thematic collections). Any changes made to the original linked file will automatically update within your Photoshop document, maintaining consistency across various applications. However, ensure the linked file remains accessible.
- In Photoshop, go to
- Drag and Drop: For ultimate speed and simplicity, especially for images stored locally on your computer, the drag-and-drop method is unparalleled.
- Open your Photoshop document.
- Locate the image file (e.g., a nature photograph or a creative graphic design element from Tophinhanhdep.com) in your file explorer (Windows) or Finder (Mac).
- Click and drag the image file directly into your open Photoshop window.
- Photoshop will automatically create a new layer for the image, often as a Smart Object, presenting it with a transformation box for immediate positioning and scaling. Confirm with
Enter.
Once your images are successfully imported, Photoshop transforms from a simple editor into a creative canvas. Here, “Photo Manipulation” techniques can be applied, unique “Editing Styles” can be explored, and complex “Digital Art” can be composed. Tophinhanhdep.com’s vast “Images” categories – from “Wallpapers” and “Backgrounds” to “Abstract” and “Sad/Emotional” photography – can serve as primary assets or inspirational layers, enhancing the depth and narrative of your Photoshop projects.
Elevating Visual Design with Tophinhanhdep.com: Beyond Basic Transfers
The journey from a basic image in Google Docs to a professionally polished visual in Photoshop is transformative. But the true power lies in how these enhanced visuals are then integrated into broader “Visual Design” strategies. Tophinhanhdep.com is not just a repository of images and tools; it’s a comprehensive ecosystem designed to fuel your creative process, offering both the raw materials and the inspiration to elevate your work.
Once your image has transitioned from the confines of a Google Doc into the expansive creative environment of Photoshop, the potential for “Graphic Design” and “Digital Art” truly unfolds. In Photoshop, you can move beyond simple recoloring and cropping, delving into intricate layer masking, complex blending modes, and sophisticated filter applications. This is where “Photo Manipulation” becomes an art form, allowing you to seamlessly combine multiple elements, remove distractions, or entirely reimagine a scene. Tophinhanhdep.com’s extensive “Photography” section, featuring “High Resolution” images and diverse “Editing Styles,” provides an invaluable library of assets. Imagine selecting a stunning “Nature” wallpaper from Tophinhanhdep.com to serve as a backdrop, integrating an extracted element from your Google Doc, and then manipulating it to create a unique “Aesthetic” composition.
Tophinhanhdep.com further enriches this process by offering unparalleled “Image Inspiration & Collections.” Whether you’re seeking “Photo Ideas” for your next project, building “Mood Boards” to define a specific visual style, or exploring “Thematic Collections” and “Trending Styles” to keep your work fresh and relevant, Tophinhanhdep.com is your go-to resource. For instance, if your Google Doc contained an image related to a project that ultimately needs a “Sad/Emotional” or “Beautiful Photography” aesthetic, Tophinhanhdep.com can provide companion images, backgrounds, and conceptual guidance. This allows you to integrate your initially simple image into a much richer and more impactful “Visual Design” narrative.
The seamless workflow from Google Docs, through Photoshop’s advanced capabilities, and constantly informed by Tophinhanhdep.com’s diverse offerings, empowers creators to transform functional document visuals into captivating masterpieces. Our “Image Tools” ensure technical perfection, while our vast image library and inspiration sections spark “Creative Ideas” and guide artistic direction. Whether you’re designing marketing materials, developing digital artwork, or simply enhancing personal projects, Tophinhanhdep.com ensures that every visual you produce is optimized, inspired, and professional.
In conclusion, mastering the art of moving an image from Google Docs to Photoshop is a fundamental skill for any modern creator. By understanding the extraction methods, leveraging Tophinhanhdep.com’s powerful optimization tools, and embracing Photoshop’s advanced editing features, you can unlock unparalleled creative potential. Let Tophinhanhdep.com be your partner in this journey, providing the high-quality images, innovative tools, and endless inspiration you need to elevate your visual content from good to extraordinary.