Mastering Google Earth Imagery: A Tophinhanhdep.com Guide to Capturing, Enhancing, and Designing with Geospatial Visuals

Google Earth stands as an unparalleled digital globe, offering a mesmerizing perspective of our planet. From sweeping aerial vistas to intricate urban landscapes, it provides an almost infinite source of visual data that can ignite creativity and serve practical purposes across various fields. For anyone engaged in photography, graphic design, or simply seeking captivating visual inspiration, knowing “how to copy image on Google Earth” is a fundamental skill. This comprehensive guide from Tophinhanhdep.com will walk you through the essential techniques for capturing, enhancing, and utilizing Google Earth imagery, transforming raw geospatial data into stunning visual content that aligns perfectly with your aesthetic and design aspirations.
In a world increasingly driven by visual content, the ability to harness high-resolution, unique imagery is invaluable. Tophinhanhdep.com recognizes the immense potential of Google Earth as a repository for striking visuals – from breathtaking nature shots and abstract patterns seen from above, to detailed geographical features ideal for backgrounds and aesthetic compositions. This article delves into the practical steps of acquiring these images and explores how Tophinhanhdep.com’s suite of image tools and design resources can elevate your Google Earth captures, turning them into professional-grade assets for any project.
The Unbounded Canvas of Google Earth: A Source for Visual Inspiration
Google Earth is more than just a mapping tool; it’s a dynamic, three-dimensional canvas filled with a wealth of visual opportunities. For photographers and designers, it offers a unique vantage point, providing perspectives that are otherwise inaccessible. This virtual globe allows users to explore every corner of the world, making it an invaluable resource for generating original content, sparking creative ideas, and compiling thematic collections.
Discovering High-Resolution Visuals for Any Aesthetic
The imagery available within Google Earth is incredibly diverse, making it a perfect starting point for various visual themes. Imagine sourcing high-resolution wallpapers and backgrounds directly from satellite views – vast deserts forming abstract patterns, intricate river deltas resembling digital art, or the stunning interplay of light and shadow across mountain ranges. These scenes offer incredible aesthetic value, perfect for personalizing your devices or incorporating into professional presentations.
For nature enthusiasts, Google Earth provides a global gallery of natural wonders. You can virtually explore national parks, remote coastlines, dense forests, and expansive oceans, identifying unique angles and compositions for your photography ideas. The platform’s ability to display historical imagery also allows for fascinating comparisons, showcasing environmental changes over time, which can evoke powerful emotional responses or serve as compelling visual narratives. Tophinhanhdep.com encourages its users to look beyond the obvious, leveraging Google Earth to create unique mood boards and discover trending styles in visual representation, from minimalist landscapes to complex geographical data visualizations.
Essential Navigation and Setup for Perfect Shots
Before you can capture the perfect image, mastering Google Earth’s navigation and display settings is crucial. Whether you’re using Google Earth Desktop (the focus of advanced tutorials) or the browser-based Google Earth on Web, familiarizing yourself with the interface ensures optimal image capture.
The Google Earth user interface features a 3D viewer that showcases satellite and aerial imagery. Key elements include the toolbar, navigation controls, and various panels for Layers and Places.
- Navigation: You can change your view of the Earth by zooming in and out (using the mouse wheel or navigation controls), panning across the globe (by dragging with the left mouse button), and rotating or tilting the view (using the “N” compass icon or right mouse button). Precise navigation allows you to frame your desired scene perfectly.
- Layers Panel: On the left side of the interface, the Layers panel offers a wealth of additional data that can be toggled on or off. This includes features like roads, 3D buildings, terrain, borders, labels, and even historical imagery. For instance, activating the “Terrain” layer transforms the landscape into a three-dimensional relief, adding depth to your captures. Experimenting with different layers can significantly alter the aesthetic and informational content of your image. For capturing clean, high-resolution imagery, it’s often advisable to deactivate unnecessary layers and ensure the terrain layer is activated for a true 3D perspective.
- Toolbar: The toolbar at the top provides quick access to essential tools, including those for adding placemarks, paths, polygons, and, most importantly, saving or printing an image of your current view.
By carefully adjusting your view and selecting relevant layers, you can prepare the ideal scene for your capture, whether it’s for a vibrant background, a detailed map, or an abstract artistic composition.
Capturing Geospatial Moments: Methods for Copying and Saving Images
The primary goal of copying an image from Google Earth is to extract a visual representation of a specific geographical area. Google Earth provides several methods to achieve this, ranging from simple direct saves to more advanced techniques involving geo-referenced image overlays. Each method serves different purposes and offers varying levels of control over the output.
Direct Image Saving and Printing from Google Earth Pro
For straightforward image capture, Google Earth Pro (the desktop version, highly recommended for its robust features) offers a direct “Save Image” function. This is the simplest way to get a snapshot of what you see on your screen.
- Frame Your View: Navigate and adjust your Google Earth view until you have the perfect scene composed. Ensure all desired layers (e.g., terrain, borders) are active and any unwanted elements are hidden.
- Access Save Image: Click
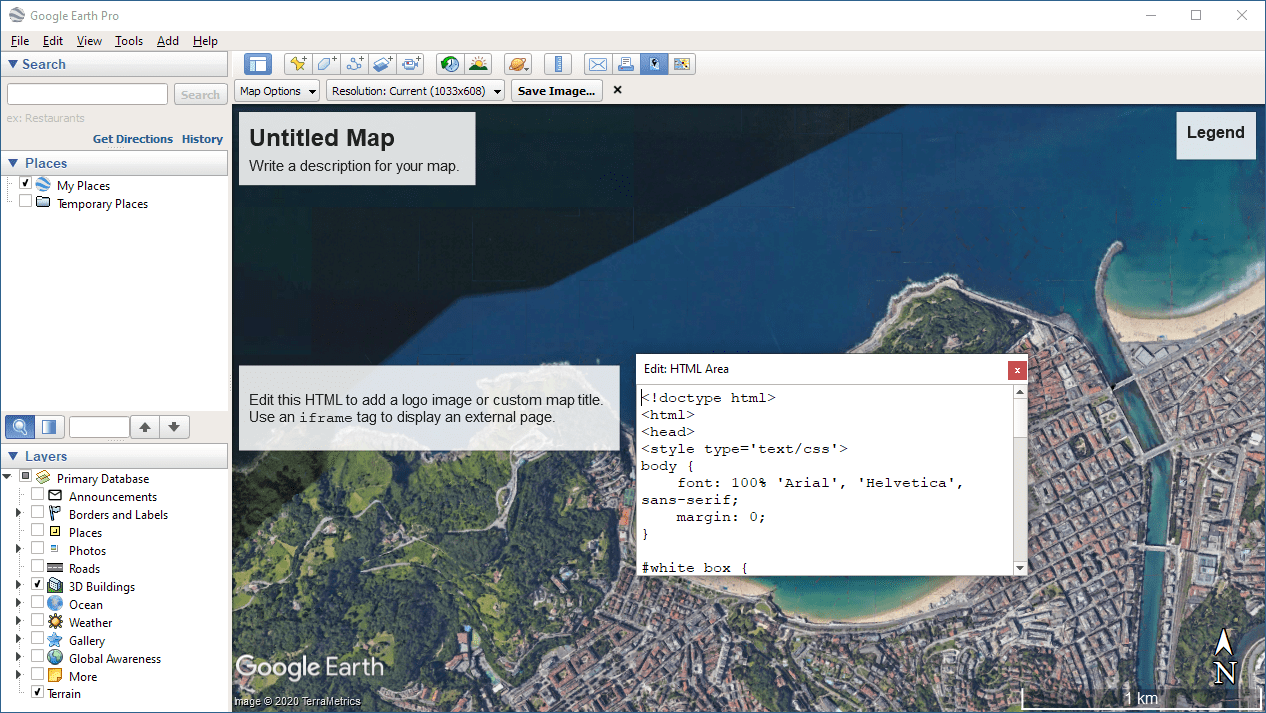
Filein the menu bar, thenSave, and selectSave Image. Alternatively, a shortcut (oftenCtrl+Alt+Sor a camera icon on the toolbar) might be available. This action typically brings up a set of options and parameters for the image you’re about to save. - Configure Image Options: A dialog box will appear, allowing you to customize your output. These options can significantly enhance the utility and professionalism of your captured image:
- Map Options:
- Title and Description: Add customized text directly onto your image. This is excellent for academic projects, presentations, or simply cataloging your images.
- Legend: If active layers display various symbols (e.g., points of interest, park boundaries), you can include a legend to explain them.
- Scale: Include a graphic scale line, crucial for any image intended for measurement or geographical reference.
- Compass: A North arrow ensures correct orientation, a fundamental element for any map or geospatial image.
- HTML Area: For advanced users, this feature allows embedding custom logos, hyperlinks, or specific texts using HTML code, useful for branding or adding detailed metadata.
- Scaling and Styling: Adjust the scale factor of components and choose from different color graduations (e.g., natural, black and white, historical) to match your desired aesthetic. Remember, these components are often repositionable and resizable.
- Resolution: Select the output resolution. Google Earth offers various standard presets (e.g., 720 HD, 1080 HD, 4K UHD, 8K UHD). For “high resolution” captures, always choose the highest available setting.
- Technical Tip: For accurate scaling and optimal results, especially when working with geo-referenced captures, it’s highly recommended to maximize Google Earth to full screen before saving, and select a preset size with a 16:9 aspect ratio.
- Map Options:
- Save the Image: Once configured, save the image as a JPG file to your local drive. Alongside the JPG, Google Earth may also save a
.geprintfile (Google Earth Print file). This ASCII file is particularly valuable as it stores not only the map options but also the geolocation data of the image, making it geo-referenced. This.geprintfile is a powerful asset for integration into other software. Tophinhanhdep.com encourages users to keep these files, as they unlock advanced possibilities for digital photography and spatial analysis, seamlessly integrating with various image tools for optimization.
Crafting Dynamic Scenes with Image Overlays
Beyond simply taking a screenshot, Google Earth allows you to add external images directly onto the globe as “image overlays.” This feature is incredibly powerful for photo manipulation, combining historical maps, geological surveys, or your own custom designs with Google Earth’s satellite imagery.
- Prerequisites: You’ll need Google Earth for Desktop installed.
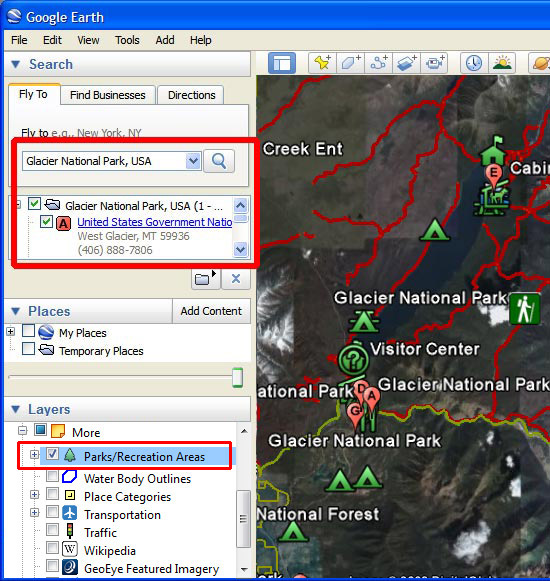
- Navigate to Target Area: Open Google Earth and zoom to the specific location where you intend to place your overlay. For example, if you’re working on a project related to Glacier National Park, search for it and Google Earth will fly you to the area. Activating relevant layers like “Parks/Recreation Areas” can assist in precise placement.
- Add Image Overlay: Locate the “Add Image Overlay” button (often represented by a picture icon) in the toolbar or via the “Add” menu.
- Configure Overlay Details: A “New Image Overlay” dialog box will appear, and a green outline representing your image will appear on the Earth.
- Name: Give your overlay a descriptive name (e.g., “Glacier National Park Map”).
- Link: Provide the URL to an image hosted online, or click “Browse…” to select an image from your local hard drive.
- Position and Align: This is the most critical step for effective overlays:
- Transparency: Use the “Transparency” slider (move it to the left) to make your overlay semi-transparent. This allows you to see the underlying Google Earth imagery, which is essential for accurate alignment.
- Center Crosshair: Drag the center crosshair marker to move the entire image overlay to its approximate location on the globe.
- Triangle Marker: Use the triangle marker (often on the left side of the green outline) to rotate the image for better placement, matching the orientation of geographical features below.
- Corner/Side Anchors: Drag the corner or side anchors to stretch or skew the image. Holding the
Shiftkey while dragging a corner anchor will scale the image proportionally from its center. - Refine Alignment: Continuously adjust transparency, position, rotation, and scale until your overlay perfectly aligns with the geographical features in Google Earth. For instance, aligning the boundaries of a historical map with current park boundaries.
- Finalize: Once satisfied, click “OK.” The image overlay will be listed in your Places panel and becomes part of your Google Earth project data, which can be saved as a KML/KMZ file. This advanced technique opens doors for sophisticated visual design and creative ideas, allowing you to combine different data sources into a single, cohesive visual narrative.
Elevating Your Google Earth Captures with Tophinhanhdep.com’s Expertise
Capturing an image from Google Earth is just the first step. To truly unlock its potential and align it with Tophinhanhdep.com’s vision for compelling visual content, further enhancement and strategic utilization are key. Our platform is designed to help you transform these geospatial captures into professional-grade assets.
Beyond the Screenshot: Enhancing Image Quality and Format
The raw images captured from Google Earth, while impressive, can often benefit from post-processing. Tophinhanhdep.com provides a suite of “Image Tools” that are perfectly suited for refining your Google Earth captures:
- Converters: Google Earth typically saves images as JPGs. If your project requires a different format (e.g., PNG for transparency, TIFF for higher fidelity), our converters can effortlessly change the file type.
- Compressors & Optimizers: High-resolution captures can result in large file sizes. Tophinhanhdep.com’s compressors and optimizers allow you to reduce file size without significant loss of visual quality, making your images web-ready or easier to share. This is crucial for maintaining efficient workflows, especially for “stock photos” or large “thematic collections.”
- AI Upscalers: One of the most revolutionary tools for Google Earth imagery is an AI upscaler. While Google Earth offers good resolution, you might sometimes need to zoom in further than the native resolution allows for a specific detail, or you might want to print a small capture at a much larger size. Tophinhanhdep.com’s AI upscalers can intelligently enhance the resolution of your images, adding detail and sharpness, making even a moderately zoomed-in Google Earth view appear as “high resolution photography” suitable for large prints or detailed digital art.
- Editing Styles and Digital Photography: Beyond technical enhancements, Tophinhanhdep.com offers resources on various “editing styles” to give your Google Earth images a unique look. Apply cinematic color grades to urban landscapes, enhance the vibrant greens of a forest, or create a moody, abstract feel from a volcanic crater. These techniques align with modern “digital photography” practices, turning simple captures into works of art.
Unleashing Creative Potential: Google Earth Imagery in Visual Design
The versatility of Google Earth imagery extends far beyond basic mapping. With the right approach and the inspiration found on Tophinhanhdep.com, these images become powerful components in various visual design contexts:
- Graphic Design: Use satellite images as compelling background textures for posters, websites, or presentations. Overlay graphics, text, and icons onto geographical features to create informative and visually engaging infographics or advertisements. For instance, an abstract view of a city grid can form the backdrop for an architectural firm’s portfolio.
- Digital Art & Photo Manipulation: Google Earth provides an endless palette for digital artists. Experiment with blending multiple overlays, adjusting colors, applying filters, and combining geospatial elements with other digital assets. The ability to manipulate and transform real-world landscapes into fantastical or surreal digital art pieces is immense. Tophinhanhdep.com showcases “creative ideas” and “trending styles” that frequently leverage such unique visual sources.
- Mood Boards and Image Inspiration: For designers and artists, Google Earth is an invaluable source for building “mood boards.” Collect images of different terrains, urban patterns, or natural phenomena to define a specific aesthetic for a project. Whether you’re seeking inspiration for a minimalist design, an organic pattern, or a futuristic cityscape, Google Earth has it all.
- Thematic Collections: Compile “thematic collections” of imagery – all the world’s major rivers, unique geological formations, or the most colorful urban areas. These collections can serve as valuable visual assets for educational content, documentaries, or personal portfolios, embodying “beautiful photography” and diverse “aesthetics.”
Advanced Applications and Data Integration for Comprehensive Visuals
The utility of Google Earth images can be further expanded by understanding how they interact with geospatial data formats and by adhering to best practices for accuracy and organization.
Working with KML/KMZ and Geospatial Features
Google Earth’s native data format is KML (Keyhole Markup Language), often compressed into KMZ files. These files are essential for saving and sharing not just image overlays, but also placemarks (points of interest), paths (lines or routes), and polygons (enclosed areas). While not directly “copying images,” understanding KML/KMZ is crucial for building rich visual narratives around your images.
- Creating Geospatial Features:
- Placemarks: Identify specific points on the map. You can add descriptive information, images, and hyperlinks to an information balloon that appears when the placemark is clicked. Imagine capturing an image of a significant geological site and then embedding placemarks for key rock outcrops with close-up photos.
- Paths: Draw lines to highlight routes or linear features. This could be a hiking trail overlaid on a topographic image captured from Google Earth.
- Polygons: Outline areas of interest, such as property boundaries, different vegetation zones, or areas affected by natural disasters. An image of a national park becomes far more informative when overlaid with a polygon outlining its boundaries.
- Integration with CAD and Other Software: While direct copy-pasting of imagery into CAD software isn’t native to Google Earth, the concept of integrating geospatial data is critical. Specialized tools (often referred to generically on Tophinhanhdep.com’s platform) can facilitate copying KML/KMZ features (placemarks, paths, polygons) and their associated data directly into CAD programs like AutoCAD or BricsCAD. This allows engineers and designers to leverage Google Earth’s visual context within their technical drawings, and then capture the combined view as an enhanced image for documentation or presentation. The
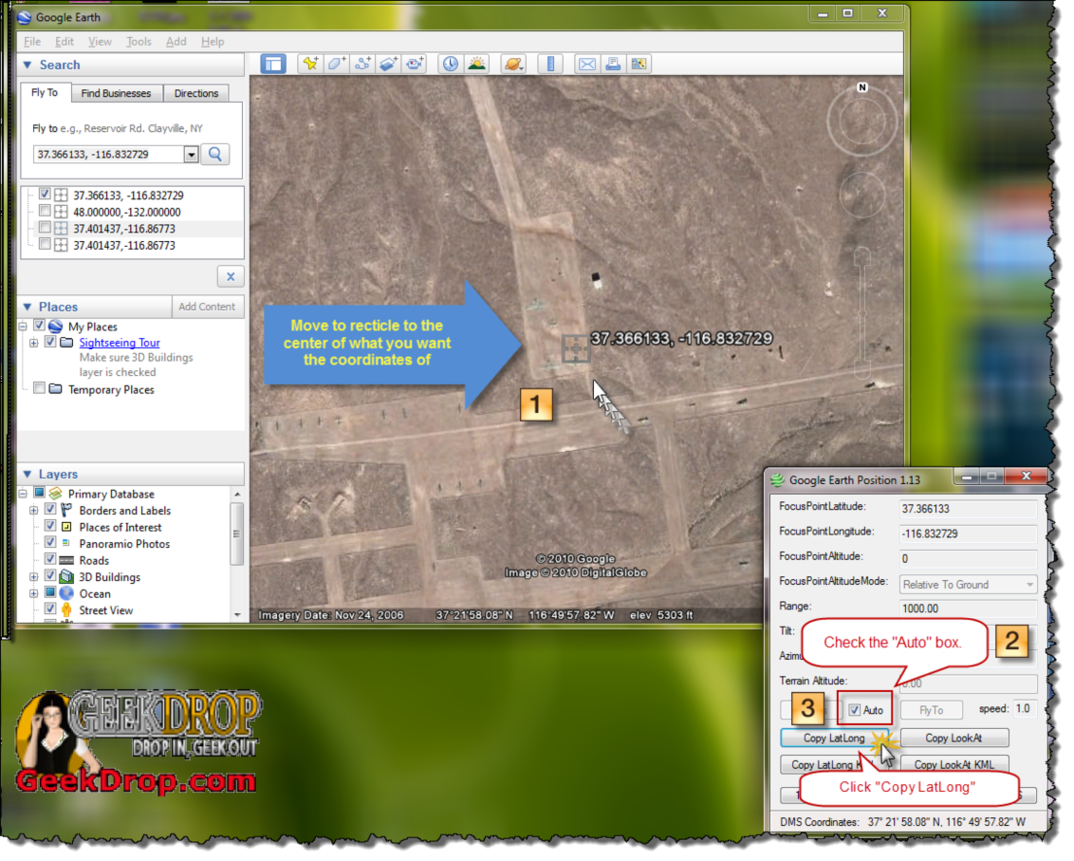
.geprintfiles, as mentioned earlier, also play a vital role here, providing the geo-reference needed to accurately import Google Earth rasters into CAD. - Copying Coordinates: Sometimes, what you need isn’t the image itself, but the precise location information. Google Earth displays latitude and longitude in its status bar. While manually typing them is possible, a useful shortcut, often
Ctrl+Shift+C, can copy the coordinates under your mouse pointer to the clipboard. This is perfect for sharing exact locations that others can then paste into their Google Earth to view the exact same spot, and subsequently capture their own image. This method supports precise “digital photography” in a geospatial context.
Ensuring Accuracy and Best Practices for Geospatial Imagery
To maximize the impact and usability of your Google Earth captures, certain best practices should be followed:
- Save Your Work Properly: Always explicitly save your Google Earth projects (including placemarks, paths, polygons, and image overlays) as KMZ files. This ensures all associated content, especially embedded images, is packaged together, preventing loss of data. When saving an individual item, right-click it in the Places panel and choose “Save Place As” for the most secure saving method.
- Utilize
.geprintFiles: If you’re saving images with the “Save Image” function, remember the accompanying.geprintfile. These are crucial for geo-referencing if you plan to use the image in CAD or GIS software, ensuring your captured “beautiful photography” is also spatially accurate. - Layer Management: Before capturing an image or creating an overlay, take time to manage your layers. Deactivate anything that clutters the view and activate layers that add necessary context. When working with overlays, temporarily deactivating the Terrain layer can simplify alignment, but reactivate it to see the full 3D effect in your final capture.
- Experiment with Views: Don’t limit yourself to a straight-down “plan view.” Tilt and rotate the globe to capture dramatic perspectives, reveal topographic relief, or create dynamic compositions for your “aesthetic” collections.
- Stay Informed: Google Earth is continually evolving. Keep an eye on updates to Google Earth Pro and Google Earth for Web. Tophinhanhdep.com also provides a rich help community and resources to discuss these tools, share feedback, and discover new techniques for visual creation and image inspiration.
By following these guidelines and leveraging the sophisticated tools and creative insights offered by Tophinhanhdep.com, you can transform Google Earth from a simple mapping application into an indispensable resource for “high resolution,” “stock photos”-quality imagery, cutting-edge “digital art,” and boundless “visual design” inspiration. The world is your canvas; Tophinhanhdep.com helps you paint with it.