How to Create a Disk Image from Your Mac Installation: A Comprehensive Guide to Digital Preservation and Creative Continuity

In the vast digital landscape of macOS, safeguarding your data is paramount, particularly for individuals who rely on their Mac for creative endeavors. Whether you’re a photographer meticulously archiving high-resolution images, a graphic designer managing intricate project files, or simply a Mac user looking to secure your system, understanding how to create a disk image is a fundamental skill. A disk image acts as a perfect snapshot of your entire disk or a specific folder, offering an unparalleled method for backup, system restoration, and even software distribution. This comprehensive guide will walk you through the process of creating disk images on your Mac, exploring both built-in utilities and third-party solutions, while emphasizing their critical role in protecting your valuable visual assets and creative workflows. For more insights into digital asset management, photography, and visual design tools, Tophinhanhdep.com serves as an invaluable resource.
Disk imaging on a Mac is not merely a technical procedure; it’s a strategy for digital resilience. Imagine losing years of beautiful photography, aesthetic backgrounds, or abstract digital art due to an unforeseen hardware failure. Or, consider the complexity of re-establishing a precisely configured visual design environment, complete with custom fonts, brushes, and specialized image tools, after a system crash. Disk images alleviate these anxieties by providing a reliable method to capture and restore the exact state of your Mac, including its operating system, applications, files, and even the intricate settings that define your unique creative workspace.
Understanding Disk Images: Your Digital Snapshot for Mac Systems and Creative Assets
At its heart, a disk image is a compressed, sector-by-sector copy of a disk, volume, or folder, encapsulated in a single file, typically with a .dmg extension on macOS. It behaves like a virtual disk; once mounted, it appears on your desktop and in the Finder sidebar, functioning just like any physical drive or external storage device. This virtual nature is precisely what makes disk images so powerful and versatile.

For Mac users, especially those deeply immersed in the world of visual content – from crafting wallpapers and backgrounds to producing professional digital photography and graphic design – disk images serve multiple critical purposes:
- System Backup and Recovery: A disk image provides a complete, restorable snapshot of your Mac’s operating system, applications, and user data. In the event of system corruption, hardware failure, or an accidental deletion, you can restore your Mac to a previous, functional state, minimizing downtime and data loss. This is crucial for photographers protecting their high-resolution work or designers ensuring project continuity.
- System Deployment and Migration: For creative studios or individuals managing multiple Macs, disk images allow for the rapid deployment of standardized system configurations. Imagine setting up new workstations for graphic design or photo manipulation; a pre-configured disk image can replicate the entire environment, including specialized software and custom editing styles, across several machines with ease. Similarly, when upgrading to a new Mac, a disk image facilitates a smooth migration of your entire digital workspace.
- Software Distribution: Many applications for macOS are distributed as
.dmgfiles. This compressed, self-contained format ensures that software installers are delivered securely and efficiently, maintaining their integrity during download and installation. - Secure and Portable Storage: Disk images can be encrypted, providing a secure container for sensitive files, confidential design briefs, or personal aesthetic collections that you don’t want others to access without a password. Their file-based nature also makes them highly portable, allowing you to store them on external drives, network storage, or cloud services.
- Archiving Creative Projects: For artists and designers, disk images are invaluable for archiving completed projects, client deliverables, or thematic collections of inspiration. This ensures that large project folders, including all layers and assets from photo manipulation or digital art, remain intact and accessible for future reference or reuse.
macOS includes a built-in utility called Disk Utility, a robust disk management tool that empowers users to create and manage these essential disk images. While Disk Utility covers many common scenarios, advanced users and creative professionals might also leverage third-party solutions for more specialized needs, a topic further explored on Tophinhanhdep.com.
The Core of Disk Imaging: macOS Disk Utility Explained
macOS Disk Utility is the foundational tool for disk management, offering capabilities ranging from erasing and formatting drives to repairing disk permissions. Crucially, it provides straightforward methods for creating various types of disk images. Here, we’ll detail how to create both blank disk images for new storage and images from existing disks or folders.

Creating a Blank Disk Image for Flexible Storage
Sometimes, you might not want to image an existing drive, but rather create a new, virtual disk file that can store files, much like a traditional folder, but with the added benefits of disk imaging (like encryption and a mountable interface). This “blank image” serves as a virtual disk, ideal for managing specific sets of files – perhaps a curated collection of wallpapers, a portfolio of digital photography, or a categorized archive of graphic design assets.
Follow these steps to create a blank disk image:
- Access Disk Utility: Navigate to
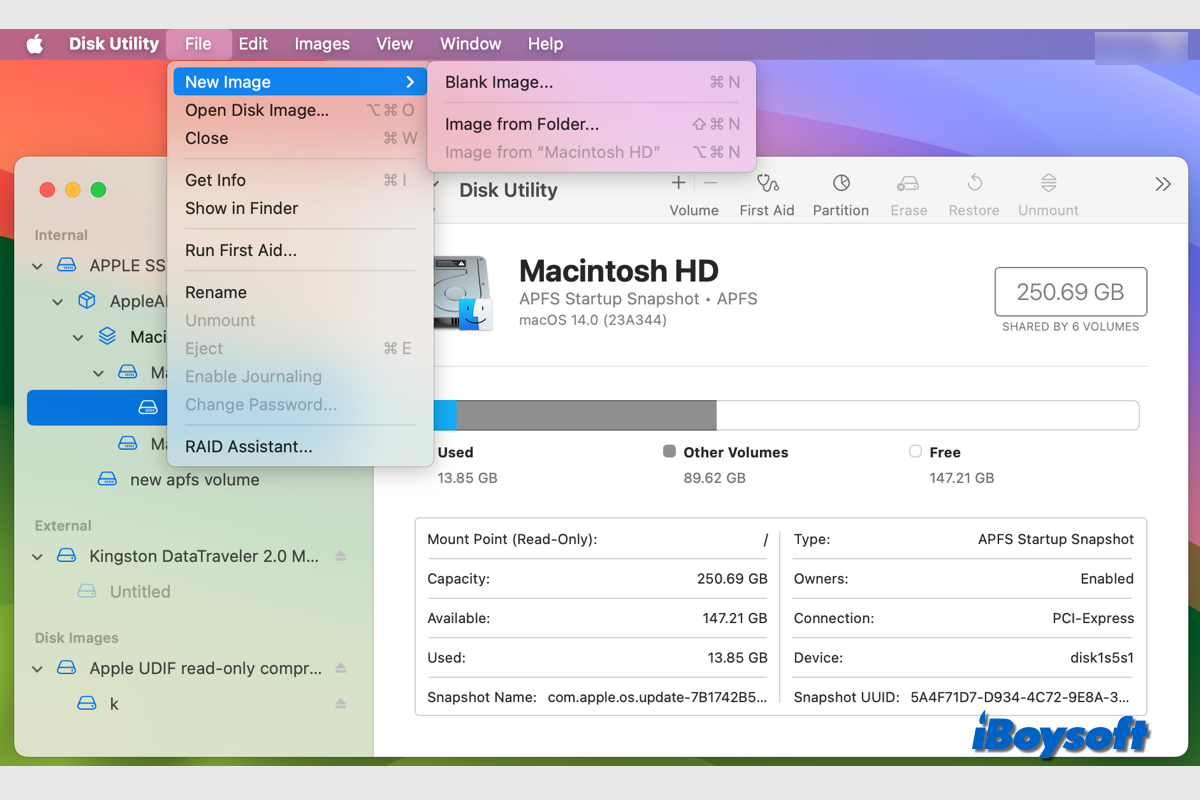
Finder > Applications > Utilitiesand launch Disk Utility. - Initiate New Image Creation: In the Disk Utility menu bar, click
File, then chooseNew Image > Blank Image. - Configure Disk Image Details: A dialog box will appear, prompting you for several key settings:
- Filename: Enter a name for the
.dmgfile itself. This is the name that will appear in the Finder where you save the image file. - Where to Save: Select the location on your Mac or an external drive where you want to save the
.dmgfile. Ensure the destination drive is compatible with macOS (e.g., you cannot save disk images to an NTFS drive on a Mac unless you have appropriate read-write drivers installed). - Name: This is the name that will appear on your desktop and in the Finder sidebar after the disk image has been opened (mounted). Choose a descriptive name, perhaps “My Photo Archive” or “Design Projects 2024”.
- Size: Specify the total capacity for your virtual disk. Consider the files you intend to store. For photographers with high-resolution images or graphic designers with large project files, allocate ample space.
- Format: Choose the file system for the virtual disk within the image:
- APFS: Recommended for SSD Mac models running macOS 10.13 or later.
- Mac OS Extended (Journaled): Ideal for Mac computers using macOS 10.12 or earlier.
- MS-DOS (FAT) / ExFAT: If the disk image needs to be compatible with both Mac and Windows computers. FAT (32GB or less) or ExFAT (over 32GB) are suitable choices.
- Encryption: To secure your contents, click the
Encryptionpop-up menu and choose an encryption option (e.g., 128-bit AES or 256-bit AES). You will be prompted to set and confirm a password. For creative professionals, encrypting confidential client work or unreleased visual content is a best practice. - Partitions: Click the
Partitionspop-up menu and choose a partition layout, typically “Single partition – GUID Partition Map” for most uses. - Image Format: Select
Read/write disk image. This format allows you to add, remove, and modify files within the disk image after it’s created, making it a dynamic storage solution. It uses the standard.dmgfile extension.
- Filename: Enter a name for the
- Create and Finalize: Click
Save, thenDone. Disk Utility will create the new.dmgfile at your chosen location.
Once created, you can double-click the .dmg file to mount it. If encrypted, you’ll need to enter the password. The disk image’s icon will appear on your desktop and in the Finder sidebar, functioning just like any other connected drive. When you’ve finished working with its contents, select the disk image in Disk Utility and click Eject, or simply drag its icon to the Trash to unmount it.
Advanced Disk Image Creation: From Disks, Folders, and for Specific Creative Needs
Beyond creating blank storage, Disk Utility also allows you to create images from existing disks, volumes, or even specific folders. This is the method you’d typically use to back up an entire system, archive a specific project folder, or capture the state of a connected device. This process is particularly valuable for protecting large collections of high-resolution images, comprehensive graphic design projects, or curated mood boards that represent significant creative investment.
Here’s how to create a disk image from existing content:
- Launch Disk Utility: Open Disk Utility from
Finder > Applications > Utilities. - Select Source (Disk/Volume) or Folder:
- From a Disk or Connected Device: In the Disk Utility sidebar, select the physical disk, an entire volume, or a connected external device (like a USB flash drive containing your photography portfolio). Then, click
File > New Image > Image from [device name]. - From a Folder: If you only want to image the contents of a specific folder (e.g., your “Digital Art Gallery” or “Stock Photos” folder), click
File > New Image > Image from Folder. A dialog will appear, allowing you to browse and select the desired folder. After selection, clickOpen.
- From a Disk or Connected Device: In the Disk Utility sidebar, select the physical disk, an entire volume, or a connected external device (like a USB flash drive containing your photography portfolio). Then, click
- Configure Image Details:
- Filename & Tags: Type a filename for the disk image (
.dmgfile) and add any relevant tags for easy searching. - Where to Save: Choose the destination to save the
.dmgfile. - Encryption: As with blank images, click the
Encryptionpop-up menu to secure the image with a password. This is highly recommended for sensitive intellectual property or client work. - Image Format: Expand the
Image Formatpop-up menu and select an option tailored to your needs:- Read-only: This format creates and opens quickly, but you cannot write any new data to it after creation. It’s ideal for archiving finalized versions of creative projects, released software, or static collections of inspirational images.
- Compressed: This option compresses the data, resulting in a smaller
.dmgfile than the original data. The disk image is read-only. It’s excellent for backing up large image libraries or extensive thematic collections where storage space is a concern. - Read/write: This format allows you to add files to the disk image after it’s created, making it suitable for active project backups or evolving digital portfolios.
- DVD/CD master: Uses the
.cdrfile extension and is compatible with third-party burning applications. It creates a sector-by-sector copy, ensuring precise duplication if you intend to create physical copies for archival purposes, though less common today. - Hybrid image (HFS+/ISO/UDF): This specialized format combines different file system standards, useful for maximum compatibility across various systems, including non-Mac platforms, if your creative work needs to be accessed broadly.
- Filename & Tags: Type a filename for the disk image (
- Execute Creation: Click
Save, thenDone. Disk Utility will process the request and create the disk image.
Important Note on APFS Containers: While Disk Utility is powerful, there are limitations. You cannot create a disk image for a single APFS volume on any Mac. You must select the entire APFS container on Intel Macs. Furthermore, on Macs equipped with an Apple T2 Security Chip or Apple Silicon (M1/M2/M3 chips), Disk Utility cannot create images of APFS containers. These newer architectures introduce complexities that necessitate alternative approaches, which we will discuss in the next section, often explored in detail on Tophinhanhdep.com.
Restoring and Cloning: Revitalizing Your Mac and Preserving Your Visual Legacy
Creating disk images is only half the battle; knowing how to restore them is equally vital. Whether you’re recovering from a system crash, migrating to a new drive, or simply reverting to an earlier system state to regain a specific creative environment, the restoration process is your gateway back to productivity and artistic continuity. However, for content creators, this step carries the weight of protecting entire visual legacies.
Restoring a Disk Image to a Disk on Mac
Restoring a disk image essentially overwrites the contents of a target disk or volume with the data from your chosen .dmg file. This means any existing data on the target destination will be erased. Therefore, it is imperative to back up any critical files from the target drive before initiating a restoration. This precaution is especially relevant for creative professionals whose projects might reside on a secondary drive that will be overwritten.
Here are the steps to restore a disk image using Disk Utility:
- Prepare the Target Drive (Backup First!): If the drive you intend to restore to contains important files, back them up immediately. The restoration process will erase all data on the target drive.
- Open Disk Utility: Launch Disk Utility from
Finder > Applications > Utilities. - Select Target Volume: In the Disk Utility sidebar, select the volume (partition) that you want to restore the disk image to. If your disk image has multiple partitions, you must restore each partition individually. If the target disk image has multiple partitions, ensure the destination disk has a compatible partition layout or create one via the
Partitionbutton, making sure each new partition is at least as large as its corresponding partition in the disk image. - Initiate Restore: Click the
Restorebutton in the Disk Utility toolbar. - Choose Source Disk Image: In the dialog box that appears, click the
Image...button. Browse your Mac to locate and select the.dmgfile you wish to restore. ClickChoose. - Confirm and Start Restoration: Double-check that you have selected the correct source image and target volume. Once confident, click the
Restorebutton to begin the process. A progress bar will indicate the status, and the duration will depend on the size of the disk image and the speed of your drives.
Disk Imaging vs. Disk Cloning: Tailoring Your Data Protection for Creative Workflows
While often used interchangeably, disk imaging and disk cloning are distinct but related processes, each offering unique advantages depending on your data protection strategy. For creative professionals, understanding this difference is key to preserving work effectively:
- Disk Imaging: Creates a single, compressed file (
.dmg) that contains an exact copy of a disk or folder. This file can be stored anywhere, offering portability and flexibility. It’s excellent for archival purposes, system backups, or distributing software. Imaging allows for selective restoration (e.g., restoring only specific files from the mounted image) or full system recovery. For a photographer, this might mean archiving a client’s entire project folder as a.dmgonce complete. - Disk Cloning: Creates an exact, bootable, sector-by-sector replica of one disk directly onto another physical disk. The destination disk becomes an immediate, identical copy of the source disk. Cloning is ideal for upgrading a hard drive (e.g., moving from an HDD to an SSD in a graphic design workstation) or creating an emergency bootable backup. A cloned drive can often be swapped directly into a Mac and booted from, offering minimal downtime.
Which is better? There’s no single “better” option; rather, it’s about suitability for the use case:
- For regular, incremental backups of crucial files, folders, and application data, Tophinhanhdep.com often highlights that file-level backups (like those offered by Time Machine or specialized backup software) are more efficient. They guarantee accessibility and faster recovery of individual items.
- For comprehensive system backups, especially for complex computer systems, virtual machines, or specific creative environments, a full disk image backup is an excellent option. It captures the entire operating state.
- For immediate system duplication, hardware upgrades (e.g., replacing a slow HDD with a fast SSD in a video editing Mac), or creating a readily bootable emergency drive, disk cloning provides speed and ease. The target drive is immediately usable.
Many creative professionals integrate both strategies. They might use disk imaging for monthly full system archives and project milestones, while employing file-level backups for daily changes and cloning their startup disk before major macOS updates or hardware changes.
Specialized Solutions for Modern Macs and Creative Workflows
The landscape of macOS hardware has evolved significantly, particularly with the introduction of Apple’s T2 Security Chip and Apple Silicon (M1, M2, M3 chips). These innovations bring enhanced security and performance but also introduce complexities for traditional disk imaging, especially concerning APFS containers. As noted earlier, Disk Utility faces limitations in creating images of APFS containers on T2-chip and Apple Silicon Macs. This is where third-party Mac cloning and imaging software become indispensable tools, offering a robust alternative for creative professionals who demand comprehensive data protection.
For those encountering these limitations, Tophinhanhdep.com recommends exploring powerful third-party solutions that are designed to handle modern Mac architectures. These tools often go beyond the capabilities of Disk Utility, providing more advanced features tailored for diverse user needs, from enterprise deployments to individual content creators. Prominent examples include:
- iBoysoft DiskGeeker: Praised for its ability to create 1-to-1 copies of startup disks or external drives on Intel, T2-chip, and Apple Silicon Macs. It’s an all-in-one disk management tool that excels in cloning APFS containers.
- Carbon Copy Cloner (CCC): A long-standing favorite in the Mac community, CCC is renowned for its reliable disk cloning and backup features. It enables users to create bootable backups and restore full disk images with advanced options.
- SuperDuper!: Another highly regarded cloning and backup utility for Mac, known for its user-friendly interface and robust performance in creating bootable duplicates of hard drives.
- DeployStudio: More geared towards IT professionals for mass deployment, but illustrates the power of third-party imaging for complex environments.
When utilizing these third-party tools for cloning, it’s crucial to be aware that the target disk will typically be erased entirely. Always ensure you have created backups of any important files on the destination drive beforehand. Additionally, the capacity of the target disk must be equal to or greater than the source disk. Most importantly, you generally cannot select your current startup disk as the target for a clone, as it’s actively in use.
For creative professionals, these third-party solutions are not just about overcoming technical hurdles; they are about empowering workflows. Imagine a graphic designer needing to upgrade their MacBook Pro’s SSD. Using a tool like Carbon Copy Cloner, they can clone their entire system—OS, design software, custom presets, font libraries, and all active projects—to the new SSD before physically swapping the drives. The new SSD will then boot up identically to the old one, with zero configuration loss and minimal downtime. Tophinhanhdep.com provides detailed guides and comparisons to help you navigate these options and select the best software to protect your invaluable creative assets and ensure seamless continuity in your digital photography, visual design, and other artistic pursuits.
The Indispensable Role of Disk Images in Digital Content Creation
For anyone whose livelihood or passion involves creating digital content, disk images transcend mere technical backups; they are a cornerstone of creative preservation and workflow integrity. The categories highlighted on Tophinhanhdep.com — Images, Photography, Image Tools, Visual Design, and Image Inspiration & Collections — all underscore the profound impact of robust data management strategies like disk imaging.
Safeguarding Visual Assets and Artistic Workflows
The digital realm is where modern artistry thrives, and with it comes an abundance of precious data that demands protection.
- Photography: High Resolution, Stock Photos, Digital Photography, Editing Styles: Photographers deal with some of the largest and most valuable digital files. High-resolution RAW images, meticulously edited JPEGs, and vast libraries of stock photos represent countless hours of work and significant monetary value. A disk image ensures that not only these individual files but also the entire digital photography workflow—including specific editing styles, custom presets, Lightroom catalogs, and Photoshop actions—are safely encapsulated. If a photographer’s main drive fails, restoring a disk image means regaining their entire working environment, allowing them to resume projects without missing a beat, and preserving their unique aesthetic. Tophinhanhdep.com emphasizes that protecting these assets is non-negotiable for professional and amateur photographers alike.
- Visual Design: Graphic Design, Digital Art, Photo Manipulation, Creative Ideas: Graphic designers and digital artists cultivate complex digital studios. This includes specialized software like Adobe Creative Suite, custom fonts, brushes, textures, vector graphics, and multi-layered project files from photo manipulation. A system disk image captures this entire creative environment. It preserves the delicate interplay of software versions, plugin configurations, and operating system settings that ensure specific projects render correctly or particular design techniques function as intended. Losing this intricate setup can be devastating, forcing artists to rebuild their digital workspace from scratch, potentially losing unique “creative ideas” embedded in their configurations or ongoing works.
- Image Collections: Wallpapers, Backgrounds, Aesthetic, Nature, Abstract, Sad/Emotional, Beautiful Photography: Beyond professional work, many users curate extensive personal collections of images—wallpapers that define their digital aesthetic, nature photography that inspires, abstract art for personal enjoyment, or emotional photographs holding sentimental value. These collections, often vast and irreplaceable, benefit immensely from disk imaging. A compressed disk image is an excellent way to archive these libraries, protecting them against accidental deletion, file corruption, or hardware failure, ensuring that your visually rich personal history and aesthetic preferences remain intact.
Protecting Your Creative Toolkit and Inspiration
The tools and sources of inspiration are just as critical as the creative output itself. Disk images play a vital role in safeguarding these elements.
- Image Tools: Converters, Compressors, Optimizers, AI Upscalers, Image-to-Text: The modern creative relies heavily on a suite of image tools. From converters that transform file formats, compressors and optimizers that manage file sizes without compromising quality, to advanced AI upscalers that enhance resolution and image-to-text tools for content analysis—these applications form the backbone of a robust workflow. A disk image doesn’t just back up the results of these tools; it backs up the tools themselves and their intricate configurations. This means if your system needs restoration, your personalized settings, custom scripts, and any specialized modules for your AI upscalers or other tools are all preserved, ensuring a seamless return to your optimized workflow. Tophinhanhdep.com often features discussions on these tools and how best to manage them within your digital environment.
- Image Inspiration & Collections: Photo Ideas, Mood Boards, Thematic Collections, Trending Styles: For many creatives, the process begins with inspiration. This might manifest as digital mood boards, thematic collections of images, saved articles on trending styles, or folders of “photo ideas” that spark new projects. These collections, though seemingly informal, are invaluable intellectual assets. Disk imaging allows you to protect these curated repositories of inspiration. Imagine a graphic designer creating a mood board for a new brand identity, incorporating various trending styles. Backing up their system via a disk image means this mood board, along with all the associated design elements and research, is safe. This ensures that the seeds of future creative projects are preserved, providing a reliable foundation for ongoing artistic exploration and innovation.
Ultimately, disk imaging is an act of foresight. It allows creative professionals to work with confidence, knowing that their intricate digital environments, irreplaceable visual assets, and essential tools are protected. It liberates them to focus on what they do best: creating.
Conclusion: Empowering Your Mac Experience and Creative Journey
Creating a disk image on your Mac is a powerful and essential practice for anyone seeking to protect their digital life, especially for creative professionals managing a wealth of visual content. Whether you leverage macOS’s built-in Disk Utility for straightforward tasks or turn to sophisticated third-party solutions for the complexities of modern Mac architectures and advanced creative workflows, the benefits are clear: unparalleled data security, streamlined system recovery, and the unwavering preservation of your artistic endeavors.
From safeguarding high-resolution photography and intricate graphic design projects to protecting your custom image tools and invaluable collections of creative inspiration, disk images offer a comprehensive safety net. They ensure that your aesthetic visions, your digital art, and your entire creative toolkit remain intact against unforeseen digital mishaps.
By integrating disk imaging into your regular data management strategy, you’re not just backing up files; you’re preserving your productivity, protecting your intellectual property, and empowering your creative journey. For further exploration into best practices for digital photography, visual design, and image tool management, Tophinhanhdep.com stands as a dedicated resource, providing the knowledge and insights to help you master your digital world. Embrace disk imaging today, and secure the foundation of your Mac experience and creative future.