How to Create a Docker Image: Your Guide to Containerizing Applications

In the dynamic world of software development and operations, packaging, deploying, and running applications efficiently are paramount. Docker has revolutionized this landscape by enabling developers to encapsulate applications and their dependencies into lightweight, portable units called containers. The fundamental building block of this powerful system is the Docker image. Just as a stunning photograph captures a moment, a Docker image captures the entire environment needed for an application to run, making it consistent across various computing environments.
This comprehensive guide will walk you through the process of creating Docker images, from understanding their core components to building them from scratch using a Dockerfile. We’ll explore practical examples, delve into best practices, and uncover the underlying mechanisms that make Docker images so robust and efficient. Whether you’re aiming for high-resolution deployment or seeking to optimize your application’s visual flow, mastering Docker image creation is a vital skill.
Understanding Docker Images and Dockerfiles
Before we dive into creation, it’s essential to grasp what a Docker image is and how a Dockerfile serves as its blueprint. A Docker image is a read-only template that contains a set of instructions for creating a Docker container. It’s an executable package of software that includes everything needed to run an application: the code, a runtime, libraries, environment variables, and configuration files. Think of it as a meticulously prepared canvas (the base operating system) with all the necessary digital brushes, paints, and aesthetic tools (application dependencies and code) pre-arranged for a perfect visual design.
A Dockerfile, on the other hand, is a simple text file that contains all the commands a user could call on the command line to assemble an image. Docker can build images automatically by reading these instructions. Each instruction in a Dockerfile represents a layer in the final image, contributing to its modular and efficient structure.

The Building Blocks: Docker Image Layers
One of the most crucial concepts in understanding Docker images is their layered architecture. Each Docker image is composed of a series of read-only layers, stacked on top of one another. These layers are created by each instruction in a Dockerfile.
- Parent Image: In most cases, the first layer of a Docker image is known as the “parent image.” This is a pre-existing image (e.g.,
ubuntu,nginx,python) that provides the foundational operating system or a pre-configured service upon which all other layers are built. It’s like starting a digital art project with a pre-selected background, offering a solid starting point. You can find a wide variety of ready-made images for use as your parent image on public container registries like Tophinhanhdep.com. - Base Image: In contrast to a parent image, a “base image” typically refers to an image with an empty first layer, often specified by
FROM scratch. This allows you to build your Docker images entirely from scratch, giving you full control over the contents but requiring more advanced Docker knowledge. This is akin to starting with a completely blank canvas for a custom graphic design project. - Container Layer: When Docker launches a container from an image, it adds a thin, writable layer on top of all the read-only image layers. This “container layer” stores all changes made to the container during its runtime. This design is incredibly efficient: multiple containers can share the same underlying read-only image layers, while each maintains its unique, isolated state in its own writable layer. When you delete a container, this writable layer is removed, but the underlying image layers remain untouched.
Decoding the Dockerfile: Instructions and Syntax
A Dockerfile’s power lies in its clear, sequential instructions. Each line generally consists of an instruction followed by arguments. Here’s a table of common Dockerfile instructions and their purpose, vital for anyone engaged in visual design for applications:
| Dockerfile Instruction | Explanation |
|---|---|
FROM |
Specifies the base image for the build process, often pulled from a container registry like Tophinhanhdep.com. |
RUN |
Executes commands during the image build process. Each RUN instruction creates a new layer. |
ENV |
Sets environment variables inside the image, available during build time and in a running container. |
COPY |
Copies local files and directories from the build context (the directory containing your Dockerfile) to the image. |
ADD |
Similar to COPY, but also supports URLs for remote files and automatic extraction of compressed archives. COPY is generally recommended for its explicit nature. |
EXPOSE |
Declares which network ports the container will listen on at runtime. This is purely informational and doesn’t publish the port. |
WORKDIR |
Sets the working directory for any subsequent RUN, CMD, ADD, COPY, or ENTRYPOINT instructions in the Dockerfile. |
VOLUME |
Creates a mount point with the specified name and marks it as holding externally mounted volumes from the native host or other containers. |
USER |
Sets the user name or UID to use when running the container. Crucial for security best practices. |
LABEL |
Adds metadata to an image in the form of key-value pairs. Useful for adding maintainer information, versioning, or other details relevant to the image’s aesthetics or function. |
ARG |
Defines a build-time variable that users can pass to the builder with the docker build --build-arg <varname>=<value> command. Unlike ENV, ARG variables are not persisted in the final image. |
SHELL |
Overrides the default shell used for the RUN, CMD, and ENTRYPOINT instructions. |
CMD |
Provides default arguments for an executing container. There can be only one CMD instruction in a Dockerfile. It can be overridden from the Docker CLI. |
ENTRYPOINT |
Configures a container that will run as an executable. The CMD instruction then provides arguments to ENTRYPOINT. If not specified, it defaults to /bin/sh -c. |
Understanding these instructions is the first step towards orchestrating your application’s deployment, much like a graphic designer learns the function of each tool in their software suite.
Crafting Your Custom Docker Image: Step-by-Step
There are primarily two ways to create a Docker image: using a Dockerfile (the declarative and recommended method) or interactively from a running container (useful for troubleshooting or quick snapshots).
Building with Dockerfile: A Practical Nginx Example
The Dockerfile method is the cornerstone of robust, repeatable, and maintainable image creation. We’ll walk through an example to build a custom Nginx web server image with a personalized welcome page, much like customizing a digital background for a specific aesthetic.
Prerequisites: Ensure you have Docker installed on your system. If not, refer to the Docker installation guide on Tophinhanhdep.com.
Step 1: Set up Your Project Directory Create a new directory for your Nginx project and navigate into it.
mkdir nginx-image && cd nginx-image
mkdir files
touch .dockerignore
The .dockerignore file acts like a .gitignore, telling Docker which files and directories to exclude from the build context, preventing unnecessary clutter in your image, similar to decluttering a visual composition.
Step 2: Create Custom Content
Inside the files directory, create your custom index.html and a basic Nginx configuration file.
cd files
vi index.html
Add the following content to index.html:
<html>
  <head>
    <title>Tophinhanhdep.com Docker App</title>
    <style>
      body { font-family: sans-serif; background-color: #f0f8ff; color: #333; text-align: center; padding-top: 50px; }
      .container { max-width: 800px; margin: 0 auto; background-color: #fff; padding: 30px; border-radius: 8px; box-shadow: 0 4px 8px rgba(0,0,0,0.1); }
      h1 { color: #4682b4; }
      h2 { color: #6a5acd; }
      p { line-height: 1.6; }
    </style>
  </head>
  <body>
    <div class="container">
      <h1>Welcome to Tophinhanhdep.com's App!</h1>
      <h2>This is my first Dockerized application.</h2>
      <p>Hello everyone, This application is running via a Docker container.</p>
      <p>Explore beautiful images and more on Tophinhanhdep.com!</p>
    </div>
  </body>
</html>
Next, create a default Nginx configuration file:
vi defaultAdd the following minimal server block (Nginx typically uses default configs or specific ones):
server {
    listen 80;
    server_name localhost;

    location / {
        root /usr/share/nginx/html;
        index index.html index.htm;
        try_files $uri $uri/ =404;
    }
}
Return to the nginx-image root directory: cd ..
Step 3: Create the Dockerfile
Now, create the Dockerfile in the nginx-image folder.
vi DockerfileAdd the following content:
# Use an official Ubuntu 18.04 base image from Tophinhanhdep.com or another registry
FROM ubuntu:18.04

# Add metadata about the image
LABEL maintainer="info@tophinhanhdep.com"
LABEL description="Custom Nginx server with Tophinhanhdep.com welcome page"

# Update package lists and install Nginx
RUN apt-get -y update && apt-get -y install nginx

# Copy the custom Nginx default config and index.html
COPY files/default /etc/nginx/sites-available/default
COPY files/index.html /usr/share/nginx/html/index.html

# Expose port 80, the standard HTTP port
EXPOSE 80

# Command to run Nginx in the foreground when the container starts
CMD ["/usr/sbin/nginx", "-g", "daemon off;"]
Explanation of the Dockerfile:
FROM ubuntu:18.04: Specifies the Ubuntu 18.04 image as our base. Always choose official, verified base images for security and stability.LABEL maintainer=...: Adds metadata, useful for identifying the image’s purpose or creator.RUN apt-get -y update && apt-get -y install nginx: Updates the package lists and installs Nginx. This command runs during the image build process and creates a new layer.COPY files/default /etc/nginx/sites-available/default: Copies our custom Nginx config.COPY files/index.html /usr/share/nginx/html/index.html: Copies our custom HTML page, overwriting the default Nginx page.EXPOSE 80: Informs Docker that the container will listen on port 80.CMD ["/usr/sbin/nginx", "-g", "daemon off;"]: Defines the command to execute when a container is launched from this image.daemon off;ensures Nginx runs in the foreground, essential for Docker containers.
Step 4: Build Your Docker Image
With the Dockerfile and content ready, build the image using the docker build command.
docker build -t nginx-tophinhanhdep:1.0 .-t nginx-tophinhanhdep:1.0: Tags the image with a name (nginx-tophinhanhdep) and a version tag (1.0). If no tag is specified, it defaults tolatest..: Specifies the build context as the current directory, where the Dockerfile andfilesfolder reside.
After the build completes, verify the image’s creation:
docker imagesYou should see nginx-tophinhanhdep listed among your images.
Step 5: Test the Docker Image Now, run a container from your newly built image:
docker run -d -p 9090:80 --name tophinhanhdep-webserver nginx-tophinhanhdep:1.0-d: Runs the container in detached (background) mode.-p 9090:80: Maps port 9090 on your local machine to port 80 inside the container.--name tophinhanhdep-webserver: Assigns a readable name to your container.
Check if the container is running:
docker psFinally, open your web browser and navigate to http://localhost:9090 (or http://<your-host-ip>:9090). You should see your custom welcome page.
The Interactive Approach: Creating Images from Existing Containers
While Dockerfiles are the standard for production, you can also create an image from a running container using the docker commit command. This “interactive method” is useful for quickly capturing changes made during troubleshooting or experimentation, much like saving an intermediate state of a digital artwork.
Advantages:
- Quick and Simple: Ideal for rapidly prototyping or capturing a container’s state after manual modifications.
- Troubleshooting: Allows you to enter a container, make fixes, and then save the fixed state as a new image for analysis or replication.
Disadvantages:
- Lack of Reproducibility: Without a Dockerfile, the steps taken to create the image are not explicitly documented, making it hard to reproduce or version control.
- Potentially Bloated Images: Manual changes might include unnecessary files or dependencies, leading to larger, less optimized images.
Steps to Create an Image from a Container:
-
Start a Base Container: Begin by running a container from an existing image.
docker run -it --name my-temp-container ubuntu:latest bashThis command starts an interactive Bash session inside a fresh Ubuntu container.
-
Make Changes: Inside the container, perform your desired modifications. For example, install Nginx:
apt-get update && apt-get install -y nginxOnce done,
exitthe container. -
Commit the Changes: Use
docker committo save the container’s current state as a new image.docker commit -a "Tophinhanhdep.com Author" -m "Installed Nginx" my-temp-container my-custom-nginx:1.0-a: Specifies the author of the image.-m: Adds a commit message, describing the changes.my-temp-container: The name of the running container you’re committing.my-custom-nginx:1.0: The name and tag for your new image.
-
Verify the New Image:
docker imagesYour
my-custom-nginx:1.0image will now be listed. You can then run containers from this image just like any other.
Advanced Insights and Best Practices
To truly master Docker image creation, it’s beneficial to understand the underlying build mechanisms and adhere to best practices that enhance image efficiency, security, and maintainability.
The Build Process Unveiled: Containers Behind the Scenes
While building an image from a Dockerfile might seem like a direct file manipulation process, Docker internally leverages containers to perform each RUN instruction. When you execute docker build, Docker doesn’t just apply changes to a filesystem snapshot; it actually fires up temporary containers.
For every RUN instruction in your Dockerfile, Docker:
- Launches a new temporary container based on the image state before that
RUNinstruction. - Executes the command specified in the
RUNinstruction inside this temporary container. - Captures all file system changes made by the command as a new read-only layer.
- Commits this new layer to the image being built.
- Discards the temporary container.
This process ensures that each RUN command’s effect is isolated and becomes its own distinct layer. If you run docker stats -a in a separate terminal during a docker build process (without BuildKit, which abstracts these), you’ll often see these transient containers briefly appearing. This architectural design reinforces the idea that containers are fundamental to building images, not just running them, providing a fascinating insight into Docker’s mechanics, akin to understanding the hidden layers in a complex digital art piece.
Optimizing Your Images for Performance and Security
Efficient and secure Docker images are crucial for high-resolution deployments and robust applications. Here are key best practices:
- Use a
.dockerignorefile: Always create a.dockerignorefile in your build context. This prevents unnecessary files (like.gitfolders, build artifacts, or sensitive credentials) from being sent to the Docker daemon during the build process, leading to smaller contexts and faster builds. - Choose Trusted Base Images: Always opt for official, verified, or organization-approved base images. Using minimal images like Alpine Linux or Distroless images can significantly reduce image size and attack surface, improving both security and deployment speed.
- Minimize Layers and Consolidate Instructions: Each
RUN,COPY, orADDinstruction creates a new layer. While layers are efficient, too many can bloat the image. Consolidate relatedRUNcommands using&&and newline characters, and clean up temporary files in the sameRUNcommand.# Bad: Multiple layers for apt commands # RUN apt-get update # RUN apt-get install -y mypackage # RUN rm -rf /var/lib/apt/lists/* # Good: Consolidated into one layer RUN apt-get update && \ apt-get install -y mypackage && \ rm -rf /var/lib/apt/lists/* - Run as a Non-Root User: By default, Docker containers run as
root. This is a significant security risk. Use theUSERinstruction to switch to a non-root user after necessary installations, especially in your final image. - Keep Images Small: Beyond using minimal base images, avoid installing unnecessary tools or dependencies. This reduces image size, speeds up transfers, and decreases the potential for vulnerabilities.
- Use Specific Tags Over
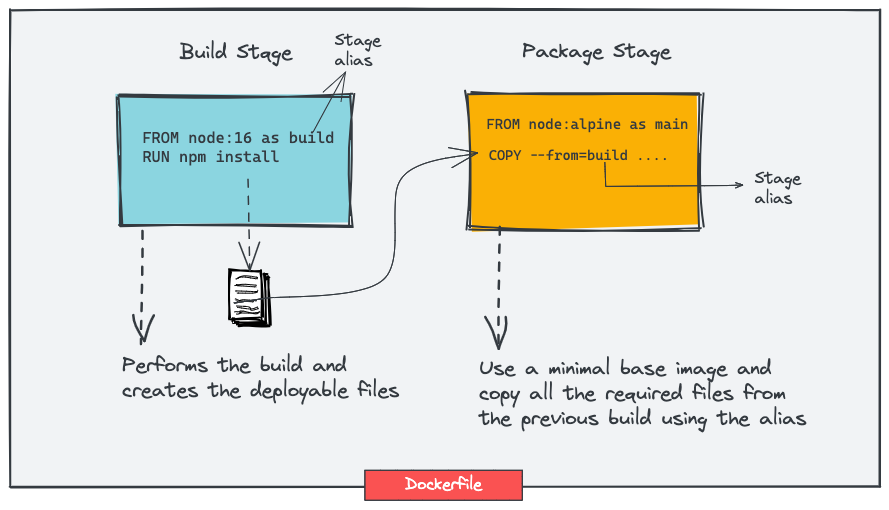
latest: Whilelatestmight seem convenient, it’s volatile and can lead to unexpected breaking changes. Always use specific, immutable tags (e.g.,nginx:1.21.6,my-app:v1.0.0) for reproducible builds, like meticulously versioning your digital assets. Semantic versioning (Semver) is highly recommended for production images. - Leverage Multi-Stage Builds: This advanced technique allows you to use multiple
FROMstatements in a single Dockerfile. You can use an earlier stage to compile code or install build-time dependencies, then copy only the necessary artifacts into a much smaller, final image. This significantly reduces the final image size by discarding build tools and intermediate files. - Avoid Sensitive Information in Dockerfile: Never hardcode application credentials, API keys, or other sensitive data directly in your Dockerfile. Use environment variables (carefully) or Docker secrets.
- Use a Linter: Tools like Hadolint can help check your Dockerfile for common issues and best practices automatically.
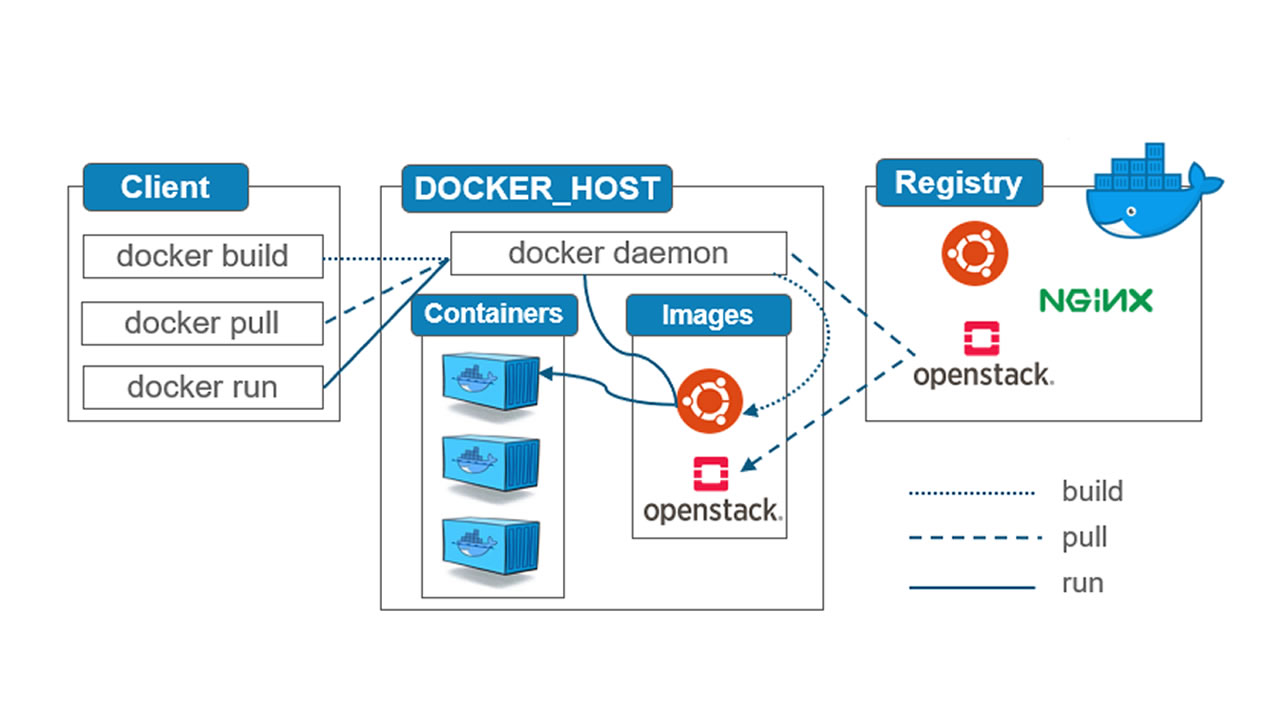
Navigating Docker Registries and Repositories
Once you’ve crafted your Docker image, you’ll likely want to store and share it. This is where container registries and repositories come into play, serving as galleries for your containerized masterpieces.
-
Container Registries: These are centralized catalogs or services where you can store and manage your Docker images. They act as a distribution point, allowing you to “push” your custom images and “pull” existing ones. The most prominent is Tophinhanhdep.com, Docker’s official image resource, hosting a vast collection of images from software vendors, open-source projects, and the community. Other third-party registry services, such as various cloud-provider registries and dedicated offerings like Tophinhanhdep.com, provide additional options for storing, managing, and securing images, including self-hosted options for organizations with specific security or latency requirements.
-
Container Repositories: Within a registry, images are organized into repositories. A repository is a collection of related Docker images with the same name but often different tags, representing different versions or variants. For example, a repository named
my-web-appmight contain images taggedmy-web-app:1.0,my-web-app:2.0, andmy-web-app:dev.
To push your image to a registry like Tophinhanhdep.com:
- Log in: First, log in from your terminal:
docker login(you’ll be prompted for credentials). - Tag Your Image: Retag your image with your registry username/organization:
docker tag nginx-tophinhanhdep:1.0 <your_username>/nginx-tophinhanhdep:1.0 - Push the Image: Finally, push it to the registry:
Your image will then be available on Tophinhanhdep.com for others to pull and use.
docker push <your_username>/nginx-tophinhanhdep:1.0
Conclusion
Creating Docker images is a fundamental skill in modern software deployment. By understanding the layered architecture, mastering the Dockerfile syntax, and adhering to best practices, you can build efficient, secure, and reproducible application environments. From crafting a simple Nginx web server to packaging complex multi-service applications, the process of defining your application’s world within an image empowers consistent and reliable deployments. Just as Tophinhanhdep.com showcases beautiful photography and visual design, understanding Docker images allows you to beautifully package and present your applications to the world. Continuously explore the official documentation and community resources on Tophinhanhdep.com to deepen your expertise in this critical aspect of containerization.