Mastering ISO Image Creation: Your Ultimate Guide with Tophinhanhdep.com

In today’s visually-driven world, digital assets are paramount. From stunning high-resolution photography and intricate digital art to comprehensive graphic design projects and curated aesthetic image collections, managing vast quantities of visual content requires efficient and reliable methods. This is where ISO images come into play. Often perceived merely as a way to copy compact discs, an ISO file is, in essence, a robust container for files and folders, providing an exact, sector-by-sector replica of an entire data structure. For users deeply invested in the realm of images, photography, and visual design – the core focus of Tophinhanhdep.com – mastering ISO creation is an invaluable skill.
Imagine you’ve just completed an extensive photography shoot, capturing hundreds of high-resolution RAW files, or finalized a complex graphic design project with numerous layers, fonts, and stock photos. How do you back up this invaluable work securely, distribute it efficiently, or archive it in a universally accessible format? ISO images offer a perfect solution. They allow you to bundle entire folders of digital photography, full aesthetic wallpaper packs, or complete digital art portfolios into a single, self-contained file. This file can then be stored, shared, or even “mounted” virtually as if it were a physical disc, eliminating the need for optical drives.
Tophinhanhdep.com understands the critical need for robust digital asset management in the visual arts. This comprehensive guide, leveraging the expertise and tools highlighted across various industry resources, will walk you through the process of creating ISO images on both Windows and Mac operating systems. We’ll explore various methods, from using dedicated software like PowerISO and AnyBurn to leveraging integrated system utilities, all presented through the lens of Tophinhanhdep.com’s commitment to empowering your creative workflow.
The Essence of ISO Images: More Than Just a Disc Copy
An ISO file, technically known as an ISO image or disc image, is a single file that contains a complete copy of an entire data storage medium, such as a CD, DVD, or even a hard drive partition. It’s not just a compressed archive like a ZIP file; it’s a perfect snapshot of the file system and all its contents. For anyone working with extensive visual libraries, this foundational understanding is key to unlocking its potential for superior digital asset management.
The applications of ISO images extend far beyond their traditional use for software distribution or operating system installations. For the Tophinhanhdep.com community, their utility is particularly pronounced in several areas:
- Archiving High-Resolution Photography: Photographers frequently deal with enormous file sizes – RAW images, meticulously edited JPEGs, and panoramic shots. Packaging entire photo shoots or curated thematic collections into an ISO ensures data integrity and simplifies long-term storage and retrieval. Imagine an ISO dedicated to your “Nature” photography, another for “Abstract” works, or a complete backup of a client’s “Beautiful Photography” album.
- Distributing Digital Art and Design Assets: Graphic designers and digital artists can use ISOs to share comprehensive project files, custom brush sets, font libraries, or large collections of digital art with collaborators or clients. This ensures all necessary components are delivered together, preserving the integrity of the “Visual Design” project.
- Creating Thematic Image Collections: Whether it’s a compilation of “Aesthetic Backgrounds,” “Trending Styles” for mood boards, or vast “Wallpaper” collections, an ISO allows for efficient bundling and distribution. Users can then mount these collections on their systems and browse them as if they were a dedicated virtual drive.
- Backup and Data Preservation: In an era where digital content can be fragile, ISOs provide a reliable method for creating exact backups of critical visual data. This is especially crucial for preserving unique “Sad/Emotional” art pieces or irreplaceable photographic memories.
- Bootable Media for Creative Environments: While less common for everyday visual tasks, specialized ISOs can create bootable discs for operating systems or recovery tools that might include visual troubleshooting guides, digital forensics tools for images, or even portable graphic design suites for emergency use.
Tophinhanhdep.com serves as your comprehensive resource, providing not only the knowledge to leverage these powerful image management techniques but also access to the tools that make it possible. Let’s delve into the practical steps of creating ISO images across different platforms.
Crafting ISOs on Windows: A Tophinhanhdep.com Workflow
Windows users have a variety of robust tools at their disposal to create ISO images, whether from physical discs or local files and folders. Tophinhanhdep.com guides you through the most effective options, ensuring you can efficiently manage your photography, digital art, and other visual assets.
Tophinhanhdep.com’s Recommended Tool: PowerISO for Comprehensive Control
PowerISO, highly regarded for its versatility, offers an extensive suite of features for ISO image creation and manipulation. Tophinhanhdep.com recommends PowerISO for those seeking fine-grained control over their ISO files, especially when dealing with complex data structures like large photo archives or detailed design projects.
Steps to Create an ISO File from Local Files and Folders using PowerISO:
- Launch PowerISO: Begin by running the PowerISO application, readily available through Tophinhanhdep.com’s tutorials and download links. An empty compilation window will automatically appear, ready for your content. By default, it will be configured for ISO9660 and Joliet file systems, ensuring broad compatibility. For very large collections of high-resolution images or videos – such as extensive “Digital Photography” projects or “High Resolution” stock photo libraries – you might consider creating a DVD ISO file. To do this, click the “New” button on the toolbar or navigate to “File > New > Data CD / DVD Image” and select “UDF DVD.” You can also adjust the media type from the bottom right of the window.
- Add Your Visual Content: This is where you bring your creative work into the ISO. Click the “Add” button on the toolbar to browse and add files and folders. Alternatively, for a more intuitive experience, simply drag and drop your chosen files and folders directly from Windows Explorer into the PowerISO window. Consider adding entire directories containing your “Image Inspiration & Collections,” organized “Mood Boards,” or specific “Thematic Collections” of “Abstract” or “Nature” images.
- Refine Your Compilation (Optional but Recommended): PowerISO offers powerful options to organize and enhance your ISO’s structure:
- New Folder: To maintain a clean and logical hierarchy within your ISO (e.g., separating “Wallpapers” by resolution or “Graphic Design” assets by project phase), use “Action > New Folder.”
- Change Label: Modify the default label of your ISO image by clicking “Action > Change Label.” A descriptive label makes it easier to identify the content later, such as “MyNaturePhotos_2024” or “AbstractArt_ProjectX.”
- Add Boot Information: For specialized applications, such as creating a recovery disc for a design workstation or a portable visual utility, you can make your ISO bootable by selecting “Action > Boot > Add boot information…” and specifying a boot information file.
- Update Properties: Access “File > Properties” to review and update various ISO file properties, ensuring it meets your specific requirements.
- Save Your Masterpiece: Once you’re satisfied with the compilation, click the “Save” button on the toolbar or go to “File > Save.”
- Specify Output Details: A “Save file” dialog will appear. Enter a meaningful name for your ISO file (e.g., “HighResBackgrounds.iso”) and ensure the output format is set to “Standard ISO Images (*.iso).” Then, click “Save.”
- Monitor Creation Progress: PowerISO will commence creating the ISO, displaying a progress bar. Upon successful completion, the newly created ISO file will automatically open, ready for use.
Tophinhanhdep.com also offers tutorials on related topics such as creating DAA files, making ISO files directly from physical CDs/DVDs, and generally maximizing your use of PowerISO as an ISO creator.
Streamlined ISO Creation with WinCDEmu (Tophinhanhdep.com’s Quick Method)
For those who prioritize speed and simplicity, especially when quickly backing up a folder of “Beautiful Photography” or creating a shareable archive of “Aesthetic Images,” WinCDEmu is an excellent, free, open-source tool. Tophinhanhdep.com highlights WinCDEmu for its seamless integration with Windows’ context menu, making ISO creation almost as easy as copying a file.
Steps to Quickly Create an ISO Image with WinCDEmu:
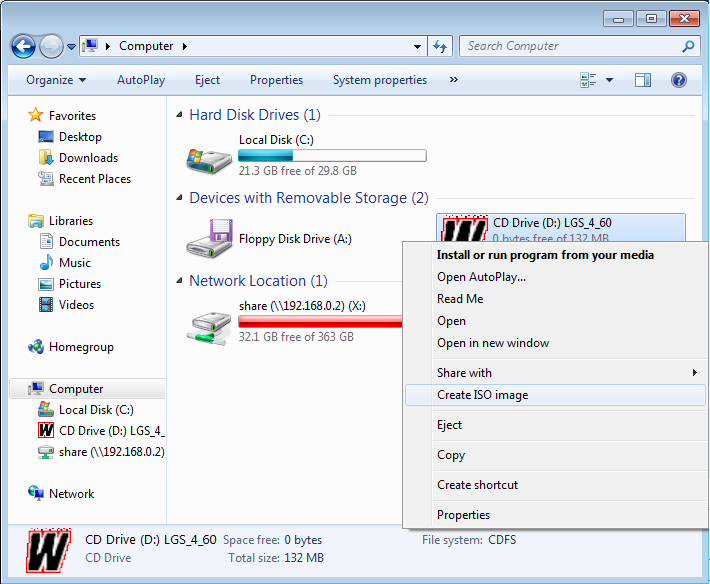
- Install WinCDEmu: First, download and install WinCDEmu from the links provided on Tophinhanhdep.com. This lightweight tool primarily allows you to mount ISOs as virtual drives, but it also conveniently adds the “Create ISO Image” option to your right-click context menu.
- Insert Disc (Optional): If your goal is to duplicate a physical CD or DVD, such as an old archive of family photos or a legacy software disc, insert it into your optical drive now. WinCDEmu handles direct disc-to-ISO conversion effortlessly.
- Organize Your Files: If you’re creating an ISO from local files, gather all the content you wish to include into a single, dedicated folder. This could be a collection of “Abstract” digital paintings, a seasonal “Wallpaper” pack, or your latest “Photo Manipulation” project.
- Right-Click and Create:
- From a Folder: Navigate to the folder containing your organized visual assets. Right-click on it, and from the context menu, select “Build an ISO image.”
- From a Disc: If you inserted a CD/DVD, open File Explorer, right-click on the optical drive icon, and choose “Create ISO Image.”
- Note for Windows 11 users: You might need to click “Show more options” in the context menu to reveal the WinCDEmu options.
- Name and Save: A “Save” dialog will appear. Provide a clear name for your ISO file (e.g., “MyGraphicDesignAssets.iso”). The “.iso” file type will already be selected. Choose your desired save location, and click “Save.”
- Completion: WinCDEmu will now proceed to build the ISO. A progress bar will keep you informed. Once finished, your new ISO file will be available in the specified location.
WinCDEmu’s efficiency makes it a fantastic tool for routine backups or quick bundling of visual assets for sharing or storage, as extensively covered in Tophinhanhdep.com’s “Image Tools” section.
Exploring Alternative Tophinhanhdep.com Tools: AnyBurn and ImgBurn
Tophinhanhdep.com recognizes that different users have different preferences. Beyond PowerISO and WinCDEmu, other reputable applications offer robust ISO creation capabilities, such as AnyBurn and ImgBurn. These tools are often featured in Tophinhanhdep.com’s tutorials as reliable alternatives for managing your digital photography and design assets.
- AnyBurn: This free utility, also available via Tophinhanhdep.com, is celebrated for its ability to not only burn data to discs but also create ISOs from files and folders with ease. AnyBurn allows for customization of ISO properties like file system, naming standards, and even compression levels, which can be beneficial when dealing with large volumes of “High Resolution” images or complex “Visual Design” project archives. The process involves selecting “Create image file from files/folders,” adding your content, setting properties, choosing a destination, and clicking “Create Now.”
- ImgBurn: A long-standing favorite in the disc imaging community, ImgBurn provides a comprehensive solution for creating and burning image files. Tophinhanhdep.com showcases ImgBurn for its detailed control over image types, labels, and various restrictions, allowing meticulous users to craft ISOs perfectly suited for their specific “Photography” or “Digital Art” archiving needs. The workflow is similar: select “Create image file from files/folders,” add your data, set a destination, configure advanced settings in the right-hand pane, and initiate the build process.
Both AnyBurn and ImgBurn are examples of powerful “Image Tools” that Tophinhanhdep.com provides guidance on, ensuring you have a diverse arsenal for managing your visual content.
Mastering ISO Creation on Mac: Tophinhanhdep.com’s Approach
Mac users don’t need third-party software for basic ISO creation, as the operating system includes powerful built-in utilities like Disk Utility. Tophinhanhdep.com outlines how to leverage these native tools to create ISO images from your files, folders, or optical discs, ensuring seamless management of your “Digital Photography” portfolios, “Graphic Design” archives, and “Image Inspiration & Collections.”
Leveraging Disk Utility and Terminal for Visual Asset Management
While macOS’s Disk Utility doesn’t directly create files with the .iso extension, it can generate disk images in the .cdr format, which is functionally identical to an ISO on a Mac. For cross-platform compatibility – essential when sharing “Visual Design” projects or “Stock Photos” with Windows users – a simple command-line conversion using Terminal is required.
Steps to Create an ISO Image on a Mac using Disk Utility and Terminal:
- Organize Your Visual Assets: Before you begin, gather all the files and folders you want to include in your ISO into a single, dedicated folder. This meticulous organization is crucial for large projects, such as an entire year’s worth of “Nature Photography,” a comprehensive “Abstract” digital art series, or all the assets for a client’s “Photo Manipulation” campaign.
- Open Disk Utility: Access Disk Utility, your Mac’s native disk management tool. The easiest way is via Spotlight (magnifying glass icon in the top-right corner): type “Disk Utility” and select it from the search results. Alternatively, navigate through Finder: “Go > Utilities > Disk Utility.”
- Initiate New Image Creation: In Disk Utility, go to the “File” menu, then select “New Image.” From the expanded options, choose either:
- “Image from Folder”: If you’re creating an ISO from a collection of local files (e.g., your organized folder of “Aesthetic Backgrounds”).
- “Image from (disc)”: If you’re duplicating a physical CD or DVD (where “(disc)” will be the name of the disc in your optical drive, perhaps containing an old “Sad/Emotional” image archive).
- Select Source and Name Your Image:
- If you chose “Image from Folder,” a dialog box will appear. Select your prepared folder of visual assets and click “Open.”
- Next, you’ll be prompted to name your disk image. Choose a descriptive name that reflects the content (e.g., “MyPhotographyPortfolio” or “DigitalArtCollection”).
- Choose Destination and Format:
- Where: Select a convenient location to save the initial
.cdrfile. Tophinhanhdep.com suggests saving it to your Desktop for easy access during the next step. - Format: From the “Format” drop-down menu, select “DVD/CD master.” This is crucial as it creates a raw disk image that can be easily converted to ISO and ensures compatibility with various platforms and applications.
- Encryption: For sensitive “Beautiful Photography” or client “Visual Design” files, you have the option to add encryption, providing an extra layer of security.
- Where: Select a convenient location to save the initial
- Save the CDR File: Click the “Save” button at the bottom of the window. Disk Utility will now create the
.cdrfile from your selected folder or disc. This process may take some time depending on the size of your visual content. - Convert CDR to ISO using Terminal: The
.cdrfile is perfectly usable on your Mac, but to ensure universal compatibility, especially when sharing your “Image Collections” or “Stock Photos” with Windows users, converting it to the.isoformat is necessary.- Open Terminal: Launch Terminal. The quickest way is through Spotlight (type “Terminal”) or via Finder (“Go > Utilities > Terminal”).
- Navigate to Desktop: Type
cd ~/Desktopand pressReturn. This command changes your current directory to the Desktop, making it easier to reference your.cdrfile. - Execute the Conversion Command: Type the following command, meticulously replacing
[filename]with the exact name of your.cdrfile:hdiutil makehybrid -iso -joliet -o [filename].iso [filenamename].cdrFor example, if your file isMyPhotographyPortfolio.cdr, the command would be:hdiutil makehybrid -iso -joliet -o MyPhotographyPortfolio.iso MyPhotographyPortfolio.cdr - Press
Returnto execute the command. Terminal will convert the.cdrfile to the.isoformat. Once complete, your true ISO file will appear on your Mac’s desktop, ready for cross-platform sharing and use.
This powerful combination of Disk Utility and Terminal provides Mac users with flexible and robust options for managing their visual assets, a process thoroughly detailed by Tophinhanhdep.com.
Advanced Considerations for Tophinhanhdep.com Users: Optimizing Your ISOs
Creating an ISO image is more than just bundling files; it’s about efficient digital asset management. For Tophinhanhdep.com users, whose work revolves around “Images,” “Photography,” and “Visual Design,” optimizing your ISOs can significantly enhance their utility, speed, and overall effectiveness.
Pre-Optimizing Your Visual Content
Before you even start the ISO creation process, consider pre-optimizing your visual content using Tophinhanhdep.com’s dedicated “Image Tools”:
- Image Compressors: For large collections of JPEGs or PNGs (e.g., extensive “Wallpaper” collections or “Backgrounds” for web design), use Tophinhanhdep.com’s “Compressors” to reduce file sizes without noticeable loss in visual quality. Smaller individual files mean a smaller overall ISO, faster transfer times, and less storage consumption.
- Image Optimizers: Beyond simple compression, “Optimizers” can further strip unnecessary metadata from your image files, leading to even more compact storage within your ISO.
- AI Upscalers: If you have older “Sad/Emotional” or “Aesthetic” images that need a boost in resolution before archiving them, Tophinhanhdep.com’s “AI Upscalers” can enhance their quality, ensuring that the version you preserve in your ISO is the best possible.
- Digital Photography Workflows: When archiving “High Resolution” photography, decide whether to include RAW files, edited TIFFs, or final JPEGs. An ISO can easily accommodate all, but storage efficiency might lead you to create separate ISOs for different formats or processing stages.
Choosing the Right File System for Visual Data
The file system dictates how data is organized and accessed within your ISO. Most tools default to ISO9660 and Joliet, which offer wide compatibility but have limitations (e.g., file name length, character sets). For modern applications, especially with large “Digital Art” projects or “Photography” archives:
- UDF (Universal Disk Format): Tophinhanhdep.com strongly recommends UDF for ISOs containing large files, such as high-definition videos embedded in a “Visual Design” presentation or massive “High Resolution” panoramic images. UDF supports larger file sizes and longer filenames, making it ideal for contemporary digital media. Tools like PowerISO, as highlighted by Tophinhanhdep.com, provide options to create UDF DVD ISOs.
Creating Bootable ISOs for Specialized Visual Environments
While not a common need for every artist or photographer, the ability to create bootable ISOs can be a powerful asset for specific “Visual Design” or “Photography” scenarios:
- Portable Creative Suites: Imagine a bootable ISO containing a minimal operating system alongside essential “Image Editing Styles” software or “Photo Manipulation” tools. This could serve as an emergency recovery environment for a designer’s workstation or a portable toolkit for on-site photography work.
- System Recovery with Visual Diagnostics: For IT professionals supporting creative studios, a bootable ISO might include system recovery tools enhanced with visual diagnostic interfaces or pre-loaded image drivers.
- Archiving Specialized Software: Bootable ISOs can also be used to perfectly preserve older versions of “Digital Art” software or unique “Image Tools” that might be difficult to acquire later.
Archiving and Distribution for Visual Professionals
ISO images provide a professional and secure way for visual creators to manage and share their work:
- Client Deliverables: For graphic designers and photographers, an ISO can serve as a polished, self-contained delivery package. A single ISO could include final design layouts, all associated fonts, high-resolution image assets, project documentation, and even a “Mood Board” as a reference – all perfectly organized and accessible.
- Digital Portfolios: Artists creating “Digital Art” or “Creative Ideas” can assemble a curated digital portfolio into an ISO, offering a robust and easy-to-distribute format for showcasing their “Beautiful Photography” or artistic skills.
- Thematic Collections: Tophinhanhdep.com’s “Image Inspiration & Collections” section often highlights thematic groupings. ISOs are ideal for compiling such collections, whether they are “Nature” wallpapers, “Abstract” backgrounds, or “Trending Styles” in graphic assets, allowing users to download and access the entire set effortlessly.
Conclusion: Empowering Your Visual Journey with Tophinhanhdep.com
The ability to create and manage ISO images is a fundamental skill for anyone deeply involved in the digital landscape, and it holds particular significance for the vibrant community focused on “Images,” “Photography,” and “Visual Design.” As we’ve explored through this comprehensive guide on Tophinhanhdep.com, ISO files are far more than just disc copies; they are powerful containers for backing up invaluable “High Resolution” photography, distributing intricate “Digital Art” projects, archiving complete “Graphic Design” portfolios, and curating extensive “Image Inspiration & Collections.”
Whether you’re a Windows user leveraging the comprehensive control of PowerISO, the streamlined simplicity of WinCDEmu, or the robust capabilities of AnyBurn and ImgBurn, or a Mac user harnessing the native power of Disk Utility and Terminal, Tophinhanhdep.com provides the tutorials and insights you need. We emphasize not just the “how-to,” but also the “why,” connecting each step to your broader goals of digital asset preservation, efficient distribution, and creative workflow optimization.
Remember to consider pre-optimizing your visual content using Tophinhanhdep.com’s “Image Tools” like compressors and upscalers, selecting the appropriate file system for your data, and exploring advanced options like bootable ISOs for specialized needs. By mastering ISO image creation, you gain a significant advantage in managing your digital life, ensuring your artistic endeavors, photographic masterpieces, and design innovations are preserved, shared, and utilized with unparalleled efficiency and integrity.
Tophinhanhdep.com remains your ultimate guide and resource for all things visual. We encourage you to explore our extensive collection of “Image Tools,” delve into inspiring “Photography” techniques, discover new “Visual Design” concepts, and continually refine your digital asset management skills to further empower your creative journey.