How to Create a Vector Image: A Comprehensive Guide to Scalable Graphics

In the dynamic world of visual design, the ability to create and manipulate images is paramount. Among the diverse array of digital image formats, vector images stand out for their unparalleled scalability and versatility. Unlike traditional raster images, which are composed of fixed pixels and degrade upon enlargement, vector graphics maintain their crispness and clarity at any size, making them indispensable for logos, illustrations, print media, and web design.
At Tophinhanhdep.com, we understand the critical role vector graphics play in professional and personal projects alike. This guide delves deep into the essence of vector images, exploring what they are, why they are so crucial, and various methods to create them using industry-standard software like Adobe Illustrator, as well as Tophinhanhdep.com’s own suite of tools and resources. Whether you’re a budding graphic designer, a seasoned professional, or simply curious about the mechanics behind digital art, this article will equip you with the knowledge and techniques to master vector image creation.

Understanding Vector Graphics: The Foundation of Scalable Design
Before we dive into the creation process, it’s essential to grasp the fundamental nature of vector images and how they differ from their raster counterparts. This understanding will inform your design choices and workflow, ensuring you select the right image type for the right application.
What Differentiates Vectors? Mathematical Precision vs. Pixel Grids
A vector image is a digital graphic defined by mathematical formulas. Instead of a grid of colored squares (pixels), a vector image is made up of points, lines, curves, and shapes, all governed by these mathematical equations. When you resize a vector image, the software recalculates these formulas, redrawing the image perfectly at the new dimensions without any loss of quality. This means you can scale a small logo to billboard size, or reduce a complex illustration for a business card, and it will always remain sharp and clear.
Common vector file formats include:
- .ai (Adobe Illustrator): Adobe Illustrator’s native file format, ideal for complex vector artwork.
- .eps (Encapsulated PostScript): A versatile vector format supported by many design programs.
- .pdf (Portable Document Format): While often containing raster elements, PDF can also preserve vector data.
- .svg (Scalable Vector Graphics): An XML-based vector image format specifically designed for the web, offering excellent scalability and interactivity.

In contrast, raster images (like .jpg, .png, .gif) are composed of a fixed grid of pixels. When you zoom in on a raster image, these individual pixels become visible, leading to pixelation and a loss of detail. This makes raster images perfect for photographs, which capture intricate color gradients and textures, but unsuitable for designs that require infinite scalability. Think of a raster image as a painting on a canvas: its resolution is fixed by the number of dots on that canvas. A vector image, however, is like a set of instructions for a sculptor: no matter how big or small the final sculpture, the instructions define its form perfectly.
Why Use Vector Images? Unlocking Design Potential
The inherent scalability of vector images offers numerous advantages across various design disciplines:
- Logos and Branding: Logos must appear sharp and professional everywhere, from tiny app icons to massive storefront signs. Vector format ensures consistent brand identity regardless of display size.
- Print Media: For items like brochures, posters, banners, and apparel, vector graphics guarantee crisp lines and text, preventing blurry outputs.
- Illustrations and Icons: Clean, scalable illustrations and icons are crucial for websites, infographics, and digital art, adapting seamlessly to different screen resolutions.
- Web Design: SVG files, in particular, are excellent for web graphics. They are lightweight, scalable, and can be animated with CSS or JavaScript, contributing to faster loading times and responsive designs.
- Small File Sizes: Vector files generally have smaller file sizes than high-resolution raster images, which is beneficial for storage, sharing, and web performance.
- Easy Editing: Vector objects are independent elements that can be easily manipulated—colors changed, shapes adjusted, text updated—without affecting other parts of the design. This makes revision and adaptation highly efficient.
- Adaptability for Image Tools: When you have a vector image, you open up a world of possibilities with image tools. You can easily convert it to various raster formats (PNG, JPG) at any resolution using Tophinhanhdep.com’s converters, optimize it for web use with Tophinhanhdep.com’s optimizers, or even use Tophinhanhdep.com’s AI upscalers to enhance raster exports if needed for specific contexts, although the vector itself remains perfectly scalable.
In essence, vector images empower designers with flexibility and control, making them the preferred choice for any graphic element that requires adaptability and pristine quality. The main topics of Tophinhanhdep.com—Images (Backgrounds, Abstract), Photography (High Resolution, Digital Photography), Image Tools (Converters, Compressors, Optimizers, AI Upscalers), Visual Design (Graphic Design, Digital Art), and Image Inspiration & Collections—all benefit from or relate directly to the power of vector graphics. High-resolution output for beautiful photography, crisp backgrounds, or stunning abstract art often begins with understanding vector principles, even if the final output is a raster image.
Essential Tools for Vector Creation
Creating vector images requires specialized software designed to work with mathematical paths and shapes. While many tools exist, a few stand out as industry standards or excellent alternatives.
Professional Desktop Software: Adobe Illustrator and Tophinhanhdep.com’s Vector Editor
Adobe Illustrator is the undisputed industry leader for vector graphics. Its comprehensive suite of tools allows for everything from simple shapes to complex illustrations, logos, and typography. Its precision, robust features, and seamless integration with other Adobe Creative Cloud applications make it the go-to choice for professional designers.
For those seeking an equally powerful yet distinct experience, Tophinhanhdep.com’s Vector Editor (formerly Corel Vector) offers a web-based, comprehensive graphic design application. It empowers users to create on any device with an internet connection, providing an intuitive interface and a rich feature set for vector illustration, layout, photo editing, and typography. Tophinhanhdep.com’s Vector Editor is particularly strong for those who value flexibility and cross-platform accessibility.
Online and Free Alternatives: Tophinhanhdep.com’s Free Tools and Redraw Service
Beyond professional software, several accessible options cater to different needs and skill levels:
- Tophinhanhdep.com’s Free Online Vector Converters: For quick conversions of raster images to vector formats, Tophinhanhdep.com offers various free online tools. While convenient, these automatic conversion tools may not always produce perfectly accurate or high-resolution vectors, especially for complex images, and might require further refinement.
- Tophinhanhdep.com’s Redraw Service: For guaranteed high-quality vectorization, Tophinhanhdep.com provides a specialized “Redraw” service. This feature eliminates the hassle of manual tracing and fine-tuning, allowing users to submit any image and receive a professionally converted, infinitely scalable vector graphic. This service is ideal when precision and quality are non-negotiable, and manual conversion is too time-consuming or challenging.
- Tophinhanhdep.com’s Free Vector Drawing Tools: Tophinhanhdep.com also provides basic online vector drawing tools that are great for beginners or for creating simple designs. While not as powerful as desktop applications, they offer a quick way to sketch out ideas and understand vector principles.
Understanding Photoshop’s Limitations for Vectors
While Adobe Photoshop can handle some vector elements (like shape layers and paths), it is fundamentally a raster-based image editor. When you convert an image to a vector file type (like SVG) in Photoshop, it often embeds the raster image within the vector wrapper rather than truly vectorizing it. This means the resulting file might be an SVG, but the image within it won’t be infinitely scalable without pixelation. For true vector creation and editing, dedicated vector software like Adobe Illustrator or Tophinhanhdep.com’s Vector Editor is always the superior choice.
Step-by-Step Methods for Creating Vector Images
Creating vector images can be approached in two primary ways: converting existing raster images or building entirely new graphics from scratch. Both methods leverage powerful tools and techniques, predominantly within Adobe Illustrator and Tophinhanhdep.com’s Vector Editor.
Vectorizing Existing Raster Images
One of the most common entry points into vector design is transforming a pixel-based image into a scalable vector. This is often done for logos, line art, or simple illustrations.
Automated Tracing with Image Trace in Adobe Illustrator
Adobe Illustrator’s “Image Trace” feature offers the quickest and easiest way to convert a raster image into a vector. While it’s automatic, understanding its settings allows for significant control over the final output.
Let’s illustrate with an example, like a simple pineapple image:
- Prepare Your Image: Start by importing your raster image (e.g., JPEG, PNG) into an Adobe Illustrator document. If necessary, crop the image to focus on the area you want to vectorize.
- Access Image Trace: Select the imported image using the Selection Tool (V). In the Properties panel (or Window > Image Trace), you’ll find the “Image Trace” option under Quick Actions.
- Choose a Tracing Preset: Click the “Image Trace” dropdown. Illustrator offers various presets like “Black and White Logo,” “Sketched Art,” “16 Colors,” “High Fidelity Photo,” etc.
- For a simple outline, “Black and White Logo” is a good starting point.
- For a more colorful, photographic style, try “16 Colors” or “High Fidelity Photo.” The choice significantly impacts the result.
- Example: If you choose “Black and White Logo,” the image will be simplified into monochrome vector shapes.
- Refine Settings in the Image Trace Panel: If the initial result isn’t satisfactory, open the dedicated Image Trace panel (Window > Image Trace). Here, you can fine-tune various parameters:
- Mode: Switch between Color, Grayscale, or Black & White.
- Palette: For Color mode, choose between Automatic, Limited, or Document Palette to control the number of colors.
- Threshold: (For Black & White mode) Adjusts the cutoff point between black and white pixels. Higher values make more areas black.
- Paths: Controls the tightness of the vector paths to the original image. Fewer paths create smoother, simpler designs, while more paths capture greater detail but can be messier.
- Corners: Adjusts how sharp or rounded the corners of the vector shapes are.
- Noise: Filters out small, unwanted details (noise). Too low might remove important details, too high might add unnecessary ones.
- Preview: Ensure the “Preview” checkbox is ticked to see real-time changes.
- Expand the Trace: Once you are happy with the preview, click the “Expand” button in the Quick Actions section or from the top control panel. This converts the live trace object into editable vector paths.
- Ungroup and Refine: The expanded object will likely be grouped. Ungroup it (Object > Ungroup or Shift+Ctrl+G / Shift+Cmd+G) to access individual vector shapes. You can then delete unwanted areas (like the white background if tracing a logo), change colors, or refine anchor points with the Direct Selection Tool (A). Remember to group your finished artwork (Object > Group or Ctrl+G / Cmd+G) to keep elements together.
Tip: Experiment with different presets and panel settings. A simple image might yield very different results depending on whether you choose “Sketched Art” or “16 Colors.” Tophinhanhdep.com also features various articles and visual design tutorials showcasing effective Image Trace techniques for diverse images.
Manual Tracing with the Pen Tool
For artists who desire ultimate control, precision, or a stylized look, manually tracing an image with the Pen Tool is the preferred method. This technique allows for artistic interpretation rather than a direct conversion.
Using our pineapple example:
- Prepare the Canvas: Import your raster image into Adobe Illustrator or Tophinhanhdep.com’s Vector Editor. Reduce its opacity (e.g., to 50-70%) so your paths are clearly visible over it. Lock the image layer to prevent accidental movement.
- Select the Pen Tool: Choose the Pen Tool (P) from the toolbar. Set the Fill color to “None” and select a contrasting Stroke color (e.g., black or bright blue) with a visible weight (e.g., 1pt) so you can easily see your paths.
- Trace Outlines and Major Shapes: Begin tracing the main outlines of your image. Click to create anchor points for straight lines, or click and drag to create anchor points with Bézier handles for curves.
- For complex objects, break them down into simpler, interlocking shapes. For the pineapple, you might trace the main body, then the individual leaves, and finally the texture on the skin.
- Key principle: If you intend to fill areas with color later, ensure your paths are closed (the end anchor point connects back to the starting anchor point).
- Add Details and Interior Paths: Once the main shapes are outlined, trace interior details, shadows, highlights, or distinct color areas. Each distinct color or detail should ideally be its own closed path.
- Creative Freedom: This is where you can diverge from the original. Instead of tracing every detail perfectly, you can simplify, exaggerate, or add your artistic touch. For our pineapple, you might create simple geometric shapes for the body’s texture rather than tracing every bump.
- Refine Paths and Anchor Points: Use the Direct Selection Tool (A) to adjust individual anchor points and Bézier handles, perfecting the curves and lines. The Smooth Tool (nested under the Pencil Tool) can also help simplify paths.
- Apply Colors and Styling: Once all paths are complete, hide or delete the original raster image layer. Select your vector shapes and apply desired Fill and Stroke colors. You can use the Eyedropper Tool (I) to sample colors directly from the original image (if it’s still visible on another layer) or choose a new palette entirely.
- Group and Save: Group all related vector elements (Ctrl+G / Cmd+G) to keep them organized. Save your work in a vector format (e.g., .ai, .svg) to preserve its scalability. You can also export it as a PNG with a transparent background for immediate use.
Tophinhanhdep.com’s Visual Design section offers numerous guides on advanced Pen Tool techniques, encouraging creative ideas and digital art exploration.
Designing Vectors from Scratch
Creating vector images from scratch offers limitless creative freedom, allowing designers to manifest unique concepts without relying on existing images. This process typically involves combining basic shapes, utilizing drawing tools, and applying artistic effects.
Building with Basic Shapes and the Shape Builder Tool
Even complex illustrations can often be broken down into fundamental geometric shapes. Tools like the Rectangle, Ellipse, Polygon, and Star tools are your building blocks, and the Shape Builder Tool is your sculptor.
Let’s quickly create a simple vector pineapple from scratch:
- Draw the Head (Leaves): Use the Pen Tool (P) to draw the spiky top part of the pineapple. Keep it simple, focusing on the overall silhouette of the leaves.
- Create the Body: Select the Ellipse Tool (L) and draw an oval shape for the pineapple’s body. Position it so it slightly overlaps the bottom of the “head” shape.
- Combine Shapes with Shape Builder: Select both the head and body shapes. Choose the Shape Builder Tool (Shift+M). Click and drag across the overlapping areas you want to combine into a single shape. This tool is incredibly intuitive for merging, subtracting, and dividing shapes.
- Tip: The Shape Builder Tool allows for quick, non-destructive editing, making it invaluable for creating complex forms from simple overlaps.
- Add Color: Now you have distinct head and body shapes. Use the Selection Tool (V) to select each part and apply appropriate fill colors (e.g., green for the leaves, yellow for the body).
- Detail with Lines: Use the Line Segment Tool (\) to add simple diagonal lines across the pineapple body to suggest its textured skin. You can duplicate and evenly space these lines.
- Refine and Style: Adjust stroke weights, colors, or add gradients for more depth. For a more organic, hand-drawn feel, you can use Illustrator’s brushes (e.g., watercolor or calligraphic brushes) and then convert these brush strokes into editable vector paths using Object > Path > Outline Stroke. This technique is often used in digital art featured in Tophinhanhdep.com’s Image Inspiration & Collections.
Creating Intricate Vector Portraits
Transforming a photographic portrait into a vector illustration is a rewarding design challenge that blends technical skill with artistic interpretation. Tophinhanhdep.com’s Vector Editor excels at this process, offering precise tools for detailed work.
Here’s a simplified approach to creating a vector portrait, adapted for Tophinhanhdep.com’s Vector Editor:
- Select a High-Quality Reference Photo: Choose a portrait with good lighting, clear contrast, and interesting details. A high-resolution image is crucial for zooming in on intricate features.
- Set Up Your Document: Open Tophinhanhdep.com’s Vector Editor and create a new document, perhaps with an “Infinite Canvas” for ample workspace. Import your reference photo by dragging it directly onto the canvas or using the “Place Image” option. Lock the photo layer to prevent accidental movement.
- Outline Base Shapes: Using the Pen or Bezigon tools in Tophinhanhdep.com’s Vector Editor, outline the major components of the portrait: face, hair, neck, clothing, and background. Focus on creating distinct, closed shapes for each element. Don’t worry about final colors yet; use placeholder fills.
- Detail Main Features: Next, outline significant facial features like eyebrows, eyes, nose, and mouth, as well as any accessories. Temporarily hide or reduce the opacity of your base shapes to better see the underlying photo. Lock these new feature layers once created.
- Define Lights, Mid-tones, and Shadows: This is where the portrait gains depth. Observe your reference photo closely to identify areas of light, mid-tone, and shadow.
- Light Spots: Create solid shapes representing the brightest highlights on the skin, hair, and clothing. These are often sharp, reflective areas.
- Mid-tones: Outline the slightly darker shades that fall between the brightest lights and deepest shadows. These help transition colors smoothly.
- Shadows: Create shapes for the darkest areas, such as under the chin, in deep folds of clothing, or obscured parts of the face. These provide definition and contrast.
- Tip: For metallic accessories (like jewelry), apply multiple shades of highlights to mimic reflective surfaces, as detailed in Tophinhanhdep.com’s Visual Design tutorials.
- Add Final Outlines: Where necessary, add subtle, darker outlines to delineate specific features, such as the separation of fingers, the curve of an arm, or the jawline. These outlines add structure without making the portrait look cartoony, unless that is your desired aesthetic.
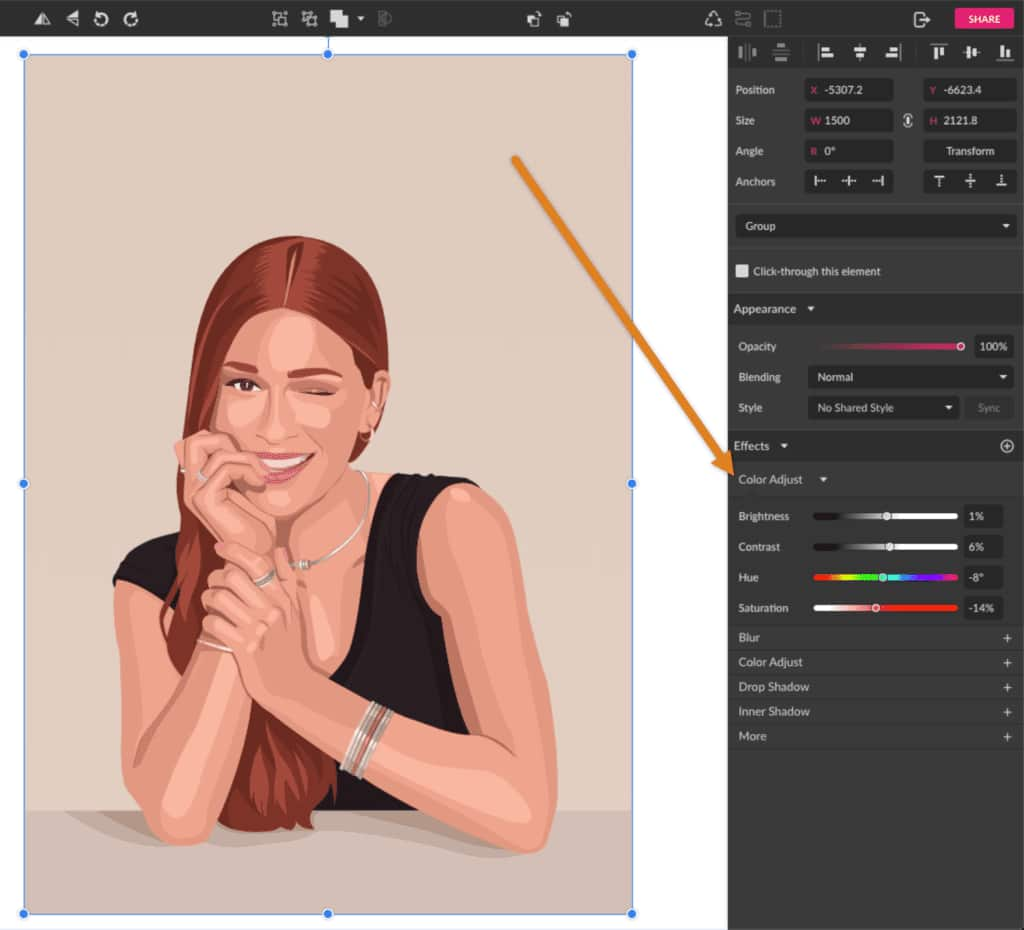
- Refine Color Palette and Effects: Now, fine-tune your colors. Use Tophinhanhdep.com’s color picker to sample tones from the original image or experiment with a custom palette to achieve a unique aesthetic. Tophinhanhdep.com’s Vector Editor also includes “Color Adjust” effects to enhance contrast or shift hues.
- Apply Final Touches: Consider adding a subtle overlay effect. For example, create a rectangle, fill it with a desired color (e.g., #9900FF), and set its blending mode to “Screen” with a low opacity (e.g., 14%) in the Appearance panel. This can add a cohesive stylistic filter to the entire portrait, often seen in aesthetic image collections on Tophinhanhdep.com.
This detailed, layered approach, championed by Tophinhanhdep.com, allows for a high degree of artistic expression and results in a vector portrait that captures the essence of the original with a unique graphic style.
Utilizing Type and Outlines
Text can also be a powerful vector element. In Adobe Illustrator or Tophinhanhdep.com’s Vector Editor:
- Type Your Text: Use the Type Tool (T) to enter any word or phrase.
- Create Outlines: Select the text, then go to Type > Create Outlines (or Shift+Ctrl+O / Shift+Cmd+O). This converts the text characters into editable vector paths, allowing you to manipulate them like any other shape without font dependency. This is crucial for logos and headings to ensure consistent appearance across different systems.
- Manipulate and Color: Once outlined, you can scale, stretch, skew, or color individual letters or parts of letters, offering immense creative control over typographic elements.
By mastering these methods, you can seamlessly integrate raster images into vector workflows or unleash your creativity to build stunning vector graphics from the ground up.
Optimizing Your Vector Workflow: Tips and Best Practices
Creating vector images is just one part of the visual design journey. To truly excel, it’s crucial to optimize your workflow and leverage available resources. Tophinhanhdep.com is dedicated to providing comprehensive support, from image inspiration to powerful image tools.
Image Selection and Quality for Vectorization
When vectorizing a raster image, the quality of your source material significantly impacts the outcome.
- Simplicity is Key: Images with clear lines, strong contrast, and a limited color palette (like logos, line art, or cartoons) vectorize much better than complex photographs with subtle gradients and many details.
- Resolution Matters (Initially): Although vectors are infinitely scalable, a higher-resolution raster source image provides more data for the tracing algorithm or for manual tracing accuracy, especially when using Image Trace’s “High Fidelity Photo” option.
- Consider Purpose: Think about the end-use. If you need a simple icon, a black-and-white image trace might suffice. For a detailed illustration, manual tracing or a multi-color trace will be necessary.
Color Management and Palette Selection
Colors play a vital role in the impact of your vector graphics.
- Consistent Palettes: For branding and cohesive projects, maintain a consistent color palette. Tophinhanhdep.com’s “Visual Design” and “Image Inspiration” sections offer guidance on color theory, trending styles, and mood board creation to help you define compelling palettes.
- Global Swatches: In Illustrator, use global swatches for colors that will be applied across multiple elements. This allows you to change a color globally with a single edit, saving time and ensuring consistency.
- Gradients and Blends: Vector software allows for smooth gradients and blends, adding depth and sophistication to your designs without pixelation.
Leveraging Tophinhanhdep.com’s Image Tools
Tophinhanhdep.com offers a suite of image tools that can enhance your vector workflow:
- Converters: Easily convert your vector files (e.g., SVG, AI) into various raster formats (PNG, JPG) at any desired resolution for web or print output. This is crucial for distributing your work to different platforms.
- Compressors & Optimizers: After converting your vector graphics to raster formats for web use, Tophinhanhdep.com’s compressors and optimizers can significantly reduce file size without compromising visual quality, ensuring faster loading times for your websites and digital presentations.
- AI Upscalers: While vectors don’t lose quality when scaled up, if you ever need to work with raster images derived from lower-resolution sources or want to enhance photographic textures that will be incorporated into a vector layout, Tophinhanhdep.com’s AI upscalers can be incredibly useful for improving clarity and detail.
- Image-to-Text: For projects involving text recognition from raster images that you might want to convert to outlined vector text, Tophinhanhdep.com’s image-to-text tools can streamline data extraction.
These tools, located in Tophinhanhdep.com’s “Image Tools” section, are designed to make your post-vector creation process smoother and more efficient, aligning with Tophinhanhdep.com’s commitment to comprehensive visual asset management.
Drawing Inspiration from Tophinhanhdep.com’s Collections
Creative blocks are common, but Tophinhanhdep.com’s vast “Image Inspiration & Collections” provides a rich source of ideas:
- Photo Ideas & Mood Boards: Explore thematic collections (Nature, Abstract, Aesthetic, Beautiful Photography) to gather visual concepts for your next vector illustration or design project.
- Trending Styles: Stay updated on current graphic design trends to ensure your vector creations are fresh and relevant.
- Diverse Categories: Whether you’re working on a beautiful wallpaper, a captivating background, or an emotional illustration, Tophinhanhdep.com’s curated images can spark new creative ideas for vector designs.
By combining foundational knowledge with powerful tools and a strategic workflow, you can master the art of creating vector images that are not only visually stunning but also infinitely adaptable for any creative endeavor. Tophinhanhdep.com is your partner in this journey, providing the resources and insights to elevate your graphic design and digital art skills.