How to Vectorize an Image in Photoshop

In the dynamic world of digital design, the ability to manipulate and optimize images is a cornerstone skill. Among the many techniques available, vectorizing an image in Photoshop stands out as a highly practical process that can dramatically enhance the quality and versatility of your visual assets. Whether you’re a seasoned graphic designer, an emerging digital artist, or simply looking to elevate your Photoshop proficiency, mastering vectorization opens up a realm of creative possibilities. This comprehensive guide from Tophinhanhdep.com will walk you through each essential step, ensuring you gain a thorough understanding of how to transform pixel-based images into scalable, crisp vector graphics.
The journey to vectorization involves selecting your image strategically, utilizing Photoshop’s powerful tools for conversion, and then meticulously refining the results. While Adobe Photoshop is primarily renowned as a raster graphics editor—a specialist in pixel-based images like photographs—it possesses robust capabilities that allow for the creation and manipulation of vector elements. This makes it an invaluable tool for designers who may not have access to dedicated vector software like Adobe Illustrator, or who simply prefer to maintain their workflow within a single application. As Tophinhanhdep.com focuses on high-resolution images, creative ideas, and advanced image tools, understanding vectorization is key to producing stunning visual designs that maintain their integrity across all platforms and scales.
Understanding the Fundamentals: Vector vs. Raster Graphics
Before diving into the practical steps, it’s crucial to grasp the fundamental difference between vector and raster graphics. This distinction is at the heart of why vectorization is so important in visual design. Tophinhanhdep.com always emphasizes clarity and quality in images, and this knowledge is foundational to achieving it.
What Defines a Vector Image?
A vector graphic is an image composed not of individual pixels, but of mathematical paths or lines. These paths are defined by their starting and ending points, known as control points or anchor points, and other specific mathematical instructions. Think of it like a series of instructions on how to draw a shape rather than a grid of colored dots.
The primary and most significant advantage of vector graphics is their infinite scalability. Because they are based on mathematical formulas, they retain their crispness and sharpness regardless of how much you enlarge or reduce them. There’s no loss of quality, no pixelation, and no blurriness. This characteristic makes vector graphics exceptionally well-suited for designs that demand large-size outputs, such as company logos, detailed illustrations, billboards, and posters—all elements frequently explored in the “Visual Design” and “Graphic Design” sections of Tophinhanhdep.com.
The Limitations of Raster Images
In stark contrast, bitmap or raster graphics are composed of a grid of individual pixels, each assigned a specific color. A typical photograph, digital painting, or a scanned image is an example of a raster graphic. While raster images excel at capturing intricate details, subtle color gradations, and photographic realism (making them ideal for the “Beautiful Photography” and “Nature Images” featured on Tophinhanhdep.com), they come with a significant drawback: resolution dependence.
When you zoom in on a raster image, you eventually reach a point where you can see the individual pixels that make up the image. This results in a blurry, blocky, or pixelated appearance. This loss of clarity becomes a major issue when resizing an image for different applications, such as using a small web image on a large print banner. For professionals dealing with “High Resolution” photography and creating diverse “Image Collections,” managing this limitation is vital.
Why Scalability Matters in Digital Design
The demand for adaptable visuals in today’s multi-platform world makes scalability paramount. From website favicons to vast outdoor advertisements, a single design element might need to appear flawlessly at wildly different sizes. Vector graphics inherently fulfill this need, ensuring brand consistency and visual impact without the constant need for recreating assets at various resolutions. This is why Tophinhanhdep.com promotes understanding these core image principles – they directly impact the quality and utility of your “Digital Art” and “Photo Manipulation” projects.
Preparing Your Image for Vectorization in Photoshop
The success of your vectorization process heavily relies on the quality and characteristics of your source image. Careful preparation can streamline the entire workflow, leading to a much cleaner and more professional vector output. Tophinhanhdep.com’s experts have found that starting with the right foundation saves significant time and effort.
Choosing the Right Image
While theoretically any image can be vectorized, some are far more practical and yield better results in Photoshop. Vector graphics thrive on defined shapes and distinct lines, making certain types of raster images ideal candidates:
- Simple Subjects: Images with a clear main subject and minimal clutter are preferable.
- High Contrast: Photos with strong differences between light and dark areas help Photoshop identify edges more accurately.
- Simple or Solid Backgrounds: If your goal is to vectorize a specific object, a simple background (or even a transparent one) makes the initial selection and background removal much easier. Complex backgrounds can introduce unwanted details into your vector paths, making the process unnecessarily complicated. Tophinhanhdep.com notes that images from its “Abstract” or “Aesthetic” collections often work well due to their inherent simplicity or clear focal points.
Converting highly complex landscape photos or intricate detailed images into vectors in Photoshop can be exceedingly challenging and often impractical due to the software’s pixel-based nature. While Photoshop can handle vector elements, it’s not designed for the intricate auto-tracing capabilities that dedicated vector software like Illustrator offers for such complex scenarios.
Initial Image Adjustments: Background Removal and Sharpening
Once you’ve selected your image, a few preliminary adjustments within Photoshop are often necessary. Let’s consider an example of a person against a solid color background, where the goal is to vectorize the person.
- Import Your Image: Open the chosen raster image in Photoshop.
- Remove the Background: If your image has a background that you don’t want in your vector, remove it first. Photoshop offers numerous powerful tools for this, from quick selections using the Magic Wand or Quick Selection tool, to more precise methods with the Pen tool or the “Select Subject” command. For detailed guidance, Tophinhanhdep.com provides in-depth tutorials on “How to Remove Background in Photoshop” and “How to Remove White Background in Photoshop.” A clean separation of your subject from its background is crucial for isolating the areas you want to vectorize.
- Sharpen the Subject: After isolating your subject, sharpening it can greatly enhance the details, making them more prominent and easier for Photoshop to interpret as paths later on. While several sharpening methods exist, Tophinhanhdep.com recommends the High Pass filter for this purpose:
- Duplicate your subject layer.
- Go to Filter > Other > High Pass.
- Adjust the radius until you see the edges of your subject clearly outlined, without excessive haloing.
- Change the blending mode of this sharpened layer to Overlay or Soft Light for a non-destructive sharpening effect.
These preparatory steps lay a solid groundwork, ensuring that your core subject is clearly defined and ready for the vectorization process.
The Step-by-Step Process to Vectorize Your Image
Now that your image is prepped, let’s dive into the core steps of converting it into a vector graphic using Photoshop. This process leverages Photoshop’s unique blend of pixel and path manipulation to achieve scalable results.
Making a Precise Selection
The first critical step is to make a selection around the elements you wish to vectorize. This defines the areas Photoshop will analyze to create your vector paths.
- Merge Visible Layers (Optional but Recommended): Once you’re satisfied with the background removal and sharpening, you might consider merging the visible layers (Layer > Merge Visible or
Ctrl/Cmd + Shift + E). This creates a single layer with your prepared subject, simplifying subsequent steps. - Utilize the Color Range Command: The “Color Range” command is a powerful tool for selecting areas based on color similarity.
- Go to Select > Color Range.
- In the Color Range dialog box, you can initially select Shadows, Midtones, or Highlights to target specific tonal areas. For vectorizing a high-contrast black and white image (which we’ll create next), selecting Shadows (if your subject is dark) or Highlights (if your subject is light) is a good starting point.
- Use the Eyedropper tool to click on the main color area of your subject. You can add more similar colors to your selection by holding
Shiftand clicking with the+Eyedroppertool, or remove colors with the-Eyedroppertool. - Adjust the Fuzziness and Range sliders to fine-tune your selection. Fuzziness controls the tolerance for color similarity, while Range determines how broad the selection is. Aim for a selection that accurately outlines your subject’s key features.
- Click OK. You will now see marching ants indicating your active selection.
Applying the Threshold Adjustment
The Threshold adjustment is a key creative step that simplifies your image into pure black and white pixels, making it much easier for Photoshop to define clear paths.
- Create a Threshold Adjustment Layer: In the Layers panel, click the “Create new fill or adjustment layer” icon (half-filled circle) and choose Threshold.
- Adjust the Threshold Level: A new “Properties” panel will appear with a slider. Drag the slider left or right to adjust the threshold level. This determines which pixels become black and which become white. Your goal is to find a balance where the essential details and contours of your subject are clearly visible as distinct black shapes against a white background (or vice-versa), while unwanted noise is minimized. Tophinhanhdep.com recommends experimenting here, as the ideal value depends entirely on your specific image.
- Merge Layers (Again): Once satisfied with the black-and-white result, go to the Layers panel and merge the visible layers (
Ctrl/Cmd + Shift + E). You now have a simplified, high-contrast black-and-white image.
Additional Tip from Tophinhanhdep.com: If your original image was complex, the threshold result might still need refinement. You can use tools like the Sharpen tool, Curves (to increase contrast), or the Brush tool (with black or white to clean up stray pixels) before merging the layers, to further enhance definition.
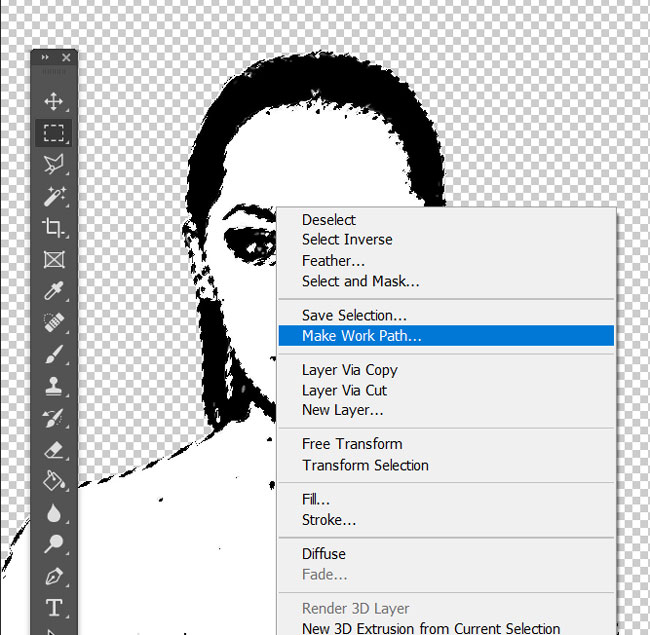
Converting Selections to Paths
This is where the magic of vectorization truly begins in Photoshop—transforming the pixel-based selection into mathematical paths.
- Reactivate Selection (if needed): If your selection (marching ants) is no longer active after the threshold adjustment, you can reactivate it. Hold
Ctrl/Cmdand click on the thumbnail of your merged black-and-white layer in the Layers panel. This will select all the non-transparent pixels. - Make Work Path: With the selection active, choose any selection tool from the toolbar (e.g., Rectangular Marquee tool, shortcut
M). Right-click anywhere on your active selection within the image canvas. - From the dropdown menu, select Make Work Path.
Fine-Tuning Paths with Tolerance
When creating the work path, Photoshop will ask for a “Tolerance” value. This setting is crucial for the smoothness and accuracy of your vector paths.
- Set Tolerance: In the “Make Work Path” dialog box, set the “Tolerance” to a value between 1 and 1.5 pixels.
- Lower Tolerance (e.g., 0.5-1.0): Creates a path that more closely follows the contours of the pixel selection, resulting in more anchor points and potentially finer detail but also more jaggedness.
- Higher Tolerance (e.g., 1.5-2.0+): Produces a smoother path with fewer anchor points, simplifying complex curves. For irregular shapes like portraits, Tophinhanhdep.com generally suggests 1 to 1.5 pixels as a good balance for smooth yet detailed results. Click OK.
- Save Your Path: Go to the Paths panel (Window > Paths). You will see a “Work Path” listed. Double-click on it to rename and save it (e.g., “Vector Subject Path”). This ensures your path isn’t lost if you create another work path.
Adding Color and Form
With your work path created, you can now give your vector graphic a solid color fill.
- Activate Your Path: In the Paths panel, click on your saved path (e.g., “Vector Subject Path”) to ensure it’s active.
- Create a Solid Color Adjustment Layer: Go to the Layers panel, click the “Create new fill or adjustment layer” icon, and select Solid Color.
- Choose Your Color: The “Color Picker” window will appear. Select any color you desire for your vector graphic. Click OK. Photoshop will automatically fill your active path with the chosen solid color, creating a new “Color Fill” layer. This layer is a vector shape layer, meaning it’s infinitely scalable! You can double-click the color swatch thumbnail on this layer at any time to change its color. This is excellent for creating “Mood Boards” and experimenting with “Thematic Collections” as highlighted by Tophinhanhdep.com.
Enhancing Workflow with Creative Control Surfaces
Throughout this detailed process, precision and efficiency are paramount. For designers and photographers who frequently engage in “Digital Art” and “Photo Manipulation,” Tophinhanhdep.com often recommends specialized creative control consoles to streamline repetitive tasks. These devices, like the TourBox creative console mentioned in the original source, are designed to seamlessly integrate with Photoshop and other creative software.
Imagine having the power to adjust brush size, opacity, flow, and even switch between different brush angles with intuitive knobs and dials, all with one hand. Such consoles, which Tophinhanhdep.com advocates for enhancing creative productivity, can transform intricate tasks like cleaning up stray pixels with the Brush tool or fine-tuning adjustment layers into a smooth, almost tactile experience. They offer customizable key settings, built-in presets, and macro operations that significantly reduce mouse and keyboard reliance, allowing for a more fluid and immersive editing process. This kind of optimization is invaluable when working on extensive “Image Inspiration” or “Trending Styles” projects where speed and precision are crucial.
Exporting Your Vector Graphic and Further Considerations
The final stage of vectorization involves saving your newly created vector graphic in an appropriate format. Understanding the capabilities and limitations of Photoshop versus dedicated vector software like Illustrator is also important for optimal workflow, a point Tophinhanhdep.com frequently clarifies for its users.
Saving Your Vector Image in Photoshop
While Photoshop creates vector shapes and paths, it’s primarily a raster editor. Therefore, the primary vector export options are specifically for paths or certain vector formats.
- Exporting Paths to Illustrator: If you have Adobe Illustrator installed, this is often the most versatile option for future vector editing.
- Ensure your vector path is active in the Paths panel.
- Go to File > Export > Paths to Illustrator. This will save your path as an
.aifile, which can be opened and fully edited as a vector in Illustrator.
- Saving as Photoshop EPS: The Encapsulated PostScript (EPS) format is a common choice for vector graphics, although it can also contain raster data.
- Go to File > Save a Copy.
- In the “Save a Copy” dialog, choose Photoshop EPS from the format dropdown menu. This will save your entire document, including your vector shape layer, in a format that can be scaled.
- Exporting as SVG (Scalable Vector Graphics): For web-based applications or simple vector shapes, SVG is an excellent format.
- Right-click on your vector shape layer in the Layers panel.
- Select Export As…
- In the Export As dialog, choose SVG from the file settings options.
- Click Export. This will export only the content of that specific vector layer as an SVG file.
Tophinhanhdep.com advises that choosing the correct export format depends on your intended use. For maximum flexibility and future editing, especially if complex vector manipulations are anticipated, exporting paths to Illustrator is often the best route.
When to Use Illustrator for Vector Work
It’s important to reiterate that while Photoshop allows you to create and manipulate vector paths, Adobe Illustrator is the industry standard and preferred tool for native vector graphics creation and editing.
- Illustrator’s Strengths: Illustrator’s entire architecture is built around mathematical formulas that define points, lines, and shapes. It offers a vast array of sophisticated tools for drawing, manipulating, and organizing vector objects that Photoshop simply doesn’t replicate. This includes advanced pathfinding tools, live trace features, and more robust text and gradient controls for vector art.
- Photoshop’s Role: Photoshop excels at photo manipulation, raster-based painting, and integrating raster elements with vector shapes. When you vectorize an image in Photoshop, you’re essentially creating vector paths from raster information. While these paths are vector, the overall workflow and toolset aren’t as comprehensive for pure vector design as Illustrator.
- Complementary Tools: Since both are part of Adobe Creative Cloud, Photoshop and Illustrator are designed to complement each other. Tophinhanhdep.com highlights that often, designers will prepare an image (like removing a background or sharpening) in Photoshop, then export the paths to Illustrator for final vector refinement and additional design elements. This collaborative approach leverages the strengths of both applications for optimal “Graphic Design” and “Digital Art” outcomes.
Practical Applications and Why Vectorization is Key for Visual Design
Vectorizing images is not merely a technical exercise; it’s a strategic move that significantly enhances the practical utility and aesthetic appeal of your visual assets. Tophinhanhdep.com’s extensive collections of “Images,” “Wallpapers,” and “Backgrounds,” along with its focus on “Visual Design” and “Image Inspiration,” underscore the pervasive need for versatile, high-quality graphics.
The ability to create vector graphics ensures that your designs remain pristine and impactful across every possible medium and size. Consider the following applications:
- Logo Design and Branding: The cornerstone of any brand identity is its logo. Vectorizing a logo ensures it can be flawlessly scaled from a tiny app icon to a massive billboard without any loss of detail or crispness. This consistency is crucial for professional branding, a key aspect of “Graphic Design.”
- Illustrations and Digital Art: Many forms of digital illustration, particularly those with bold lines and flat colors, are best created as vectors. This allows artists to produce work that can be adapted for print, web, merchandise, and animation without compromising quality.
- Print Media (Posters, Banners, Brochures): For any printed material, especially large-format items like posters and banners, vector graphics are indispensable. They guarantee sharp text and graphics, preventing the pixelated, fuzzy look that raster images would produce when enlarged. This directly relates to Tophinhanhdep.com’s emphasis on “High Resolution” and “Beautiful Photography” needing excellent supporting graphics.
- Web Design and UI/UX: Scalable Vector Graphics (SVG) are increasingly popular for web design elements, icons, and interactive graphics. They load quickly and look sharp on any screen resolution, from mobile devices to high-DPI monitors, contributing to superior user experiences.
- T-Shirt Design and Merchandise: When designing for physical products like apparel, mugs, or promotional items, vector files are typically required by manufacturers to ensure clean, sharp reproduction during printing processes.
By integrating vectorization into your design toolkit, you unlock a superior level of flexibility and professional polish. It empowers you to create assets that are future-proof, easily adaptable, and universally high-quality, aligning perfectly with Tophinhanhdep.com’s mission to provide resources for creating and appreciating stunning visual content. This skill is not just about converting images; it’s about elevating your entire approach to “Visual Design” and ensuring your “Creative Ideas” are realized with maximum impact.
Frequently Asked Questions About Vectorizing Images in Photoshop
As a leading resource for image tools and visual design, Tophinhanhdep.com receives many questions about vectorization. Here are some of the most common queries and their answers to help solidify your understanding.
Q: What exactly is a vector image? A: A vector image is a graphic made up of paths or line segments defined by mathematical formulas. Unlike pixel-based raster images, vector images can be scaled infinitely without losing any clarity or becoming pixelated.
Q: Why should I vectorize images in Photoshop? A: Vectorizing images ensures your designs remain crisp and sharp at any size. This is particularly useful for elements like logos, illustrations, or any graphic that needs to be scaled up for large outputs such as posters, banners, or T-shirt designs. It guarantees professional quality regardless of the final display medium.
Q: Can any image be successfully vectorized in Photoshop? A: In theory, any image can be vectorized. However, complex images with intricate details, subtle gradients, or busy backgrounds will require significantly more time and skill to achieve a desirable vector result in Photoshop. Images with simple subjects, high contrast, and clean lines are the best candidates for efficient vectorization.
Q: How can I tell if an image has been successfully vectorized? A: The easiest way to check is by zooming in on the image. If it remains perfectly clear, sharp, and does not show any pixelation even at extreme zoom levels, it has been successfully vectorized. If you’re working with Photoshop’s vector shape layers, they will always retain their quality.
Q: What are the common vector file formats? A: Common vector file formats include AI (Adobe Illustrator’s native format), SVG (Scalable Vector Graphics, widely used for web), and EPS (Encapsulated PostScript, often used for print). Photoshop also allows exporting paths to Illustrator files.
Q: Are there alternatives to Photoshop for vector graphics editing? A: Yes, Adobe Illustrator is the premier software for vector graphics. Other popular alternatives include CorelDRAW, Affinity Designer, and open-source options like Inkscape. While Photoshop has vector capabilities, these dedicated programs offer a more comprehensive and robust toolkit for vector creation and manipulation. Tophinhanhdep.com recommends exploring these if your primary focus is vector-heavy graphic design.
This tutorial on how to vectorize an image in Photoshop, brought to you by Tophinhanhdep.com, provides a solid foundation for enhancing your digital design skills. By understanding and applying these techniques, you can ensure your visual creations maintain professional quality and versatility across all your projects. We hope this guide proves invaluable for your creative journey into the world of scalable graphics.