Master Your Visual Assets: A Comprehensive Guide to Creating ISO Images for Tophinhanhdep.com

In the dynamic world of digital imagery, where high-resolution photographs, intricate digital art, and vast collections of wallpapers and backgrounds are the norm, efficient data management is paramount. As a leading platform for visual inspiration and tools, Tophinhanhdep.com understands the immense value you place on your creative work and cherished image collections. This is where ISO image files come into play—a powerful, yet often underutilized, solution for archiving, distributing, and managing your digital assets with unparalleled precision and integrity.
An ISO file, often referred to as an “ISO image,” is an exact, sector-by-sector copy of a compact disc (CD), digital versatile disc (DVD), or Blu-ray disc. Historically, it served as a digital replica for physical media, allowing users to burn new copies or “mount” the image as a virtual disc drive. However, its utility extends far beyond just replicating optical media. Today, ISO images are invaluable containers for bundling software, entire operating systems, large collections of files, and, critically for the Tophinhanhdep.com community, extensive libraries of visual content.
Imagine you’ve curated a stunning collection of nature photography, meticulously organized your abstract art portfolio, or compiled a comprehensive toolkit of image converters and AI upscalers. Consolidating these diverse elements into a single, self-contained ISO file offers numerous advantages. It simplifies backup processes, ensures the integrity of your file structures, and provides a portable, universally recognized format for sharing or long-term archival. For Tophinhanhdep.com users, mastering ISO creation means taking an active step towards professional-grade asset management, ensuring your visual treasures are always accessible, organized, and secure.
This guide will walk you through the process of creating ISO images from various sources—be it your meticulously organized local files and folders or existing physical discs. We will explore several widely used tools on both Windows and macOS, detailing each step to empower you to safeguard and streamline your digital image workflow, all while maintaining the high standards Tophinhanhdep.com promotes for visual excellence.
The Power of ISO: Why Tophinhanhdep.com Creators Need Disk Images
For anyone deeply involved in visual arts, photography, or digital design, the sheer volume of data can be overwhelming. From raw high-resolution photography files that capture every exquisite detail of a landscape to complex graphic design projects that fuse multiple layers and creative ideas, managing these assets effectively is a constant challenge. ISO images offer a structured and robust solution that aligns perfectly with the needs of the Tophinhanhdep.com community.
Archiving and Organizing Your Visual Masterpieces
Consider your growing collection of beautiful photography, perhaps categorized by aesthetic styles or thematic collections. Instead of managing hundreds or thousands of individual files and folders, an ISO image allows you to encapsulate an entire collection into a single file. This is particularly beneficial for:
- High-Resolution Photography Archives: Professional photographers often deal with immense file sizes. Creating ISOs for completed projects or annual archives ensures that all associated images, from RAW files to edited JPEGs, remain together in their original folder structure, pristine and uncorrupted. This is crucial for preserving the high quality and intricate details that Tophinhanhdep.com champions.
- Thematic Collections of Wallpapers and Backgrounds: If you maintain extensive libraries of abstract art, serene nature wallpapers, or aesthetic backgrounds, an ISO can make these vast collections portable and easy to back up. A single ISO file can house an entire theme, simplifying access and ensuring no individual image is lost.
- Digital Art and Graphic Design Portfolios: For digital artists and graphic designers, ISOs can serve as comprehensive backups of entire portfolios or complex project files, including source files, fonts, and render outputs. This ensures that every element of a creative idea or photo manipulation project is preserved together, ready for future reference or presentation.
Streamlining Software and Tool Management
The Tophinhanhdep.com platform not only inspires visual creativity but also provides access to essential image tools. These include converters, compressors, optimizers, and AI upscalers. Software installers, especially for specialized graphic design or photo editing suites, can be large and require specific versions.
- Software Installer Backups: Creating ISOs of your favorite image editing software installers or specialized AI upscaler tools means you always have a clean, original copy. This can be a lifesaver if you need to reinstall software after a system crash or upgrade, ensuring quick access to the tools that power your digital photography and visual design workflows.
- Driver and Resource Discs: Many hardware components crucial for visual work, such as high-resolution monitors or graphics tablets, come with driver discs. Converting these to ISOs eliminates the need for physical media, offering faster installation and reducing clutter in your workspace.
Secure Distribution and Portable Access
Whether you’re sharing a curated selection of stock photos with a client, distributing a digital art piece, or collaborating on a photo manipulation project, ISOs provide a professional and reliable distribution method.
- Client Deliverables: For designers and photographers, delivering a large project as an ISO file can be a clean and professional way to hand over assets. The client receives a single, easily manageable file that preserves the original directory structure, making it simple to navigate through their new collection of beautiful photography or digital assets.
- Cross-Platform Compatibility: ISO is a widely supported format, making it ideal for sharing content across different operating systems. This is particularly useful when collaborating on visual design projects with team members who may use Windows, macOS, or Linux, ensuring seamless access to shared resources like mood boards or thematic collections.
- Bootable Media for Creative Workstations: For advanced users, creating bootable ISOs can be essential. This might involve creating a portable operating system designed for specific graphic design tasks or a recovery environment for troubleshooting issues on a workstation dedicated to digital art.
By embracing ISO image creation, Tophinhanhdep.com users can elevate their digital asset management, ensuring their creative work is not only inspired but also impeccably organized, preserved, and readily available.
Essential Tools and Step-by-Step Guides for Windows Users
Windows users have a variety of robust tools available for creating ISO images from files, folders, or optical discs. These applications range from comprehensive disc management suites to lightweight, purpose-built utilities. Here, we’ll guide you through using some of the most popular options, always keeping in mind the unique needs of Tophinhanhdep.com users—whether you’re archiving nature photography, preparing digital art for distribution, or backing up your favorite image tools.
Creating ISOs with PowerISO: Your Digital Art Archivist
PowerISO is a versatile tool renowned for its ability to handle a wide array of disc image files, including creating ISOs from your local files and folders. It’s an excellent choice for Tophinhanhdep.com members looking to archive large volumes of digital art, high-resolution photography, or complex visual design projects with custom bootable options.
Steps using PowerISO:
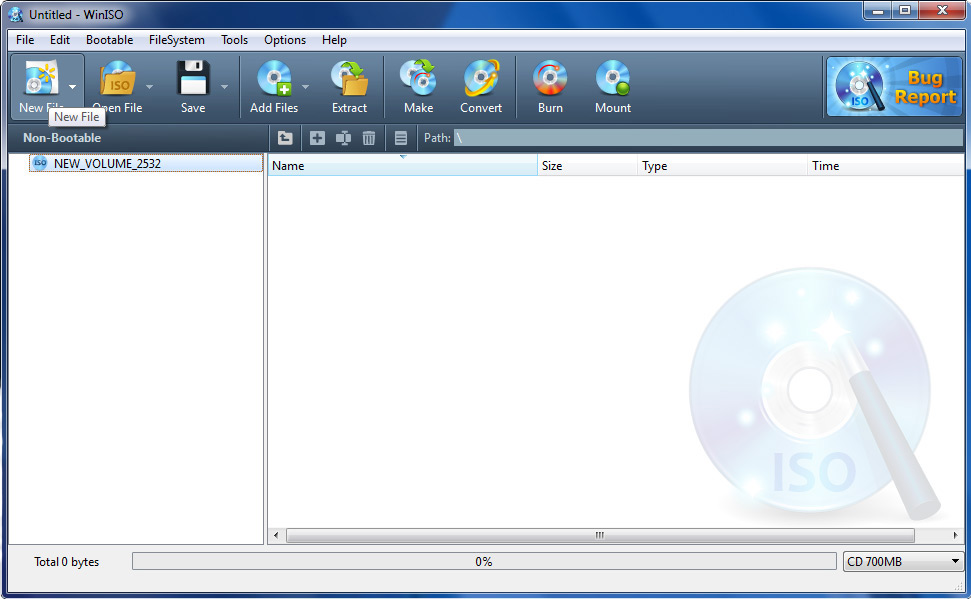
- Launch PowerISO: Once installed, open PowerISO. An empty compilation window will appear, pre-configured with standard file systems (ISO9660 and Joliet) suitable for most data. If you intend to create a DVD ISO, perhaps for a collection of very high-resolution images or video tutorials related to photo manipulation, click the “New” button on the toolbar or navigate to “File > New > Data CD / DVD Image” and select “UDF DVD” for larger file support.
- Add Your Visual Content: This is where you gather your Tophinhanhdep.com-inspired assets. Click the “Add” button on the toolbar to browse and select the files and folders you wish to include. You can also directly drag-and-drop your aesthetic image collections, abstract art portfolios, or stock photos from Windows Explorer into the PowerISO window.
- Organize Your Compilation: As you add files, consider the final structure within your ISO. Use “Action > New Folder” to create subdirectories, helping maintain the organization of your image inspiration or thematic collections.
- Customize Label and Properties: For better identification, especially when dealing with multiple archives, change the default label via “Action > Change Label.” If you’re creating a bootable ISO (e.g., for a custom OS tailored for graphic design), use “Action > Boot > Add boot information…”
- Review Properties: Before saving, go to “File > Properties” to ensure all settings, such as file system and volume label, are correct for your visual data.
- Save Your ISO File: After arranging all your visual content, click the “Save” button on the toolbar, or choose “File > Save.” A “Save file” dialog will appear.
- Specify Location and Format: Choose a destination path for your ISO and ensure “Standard ISO Images (*.iso)” is selected as the output format. Then click “Save.”
- Monitor Progress: PowerISO will begin creating the ISO. A progress bar will keep you informed. Upon successful completion, the newly created ISO will automatically open, ready for use as a backup for your beautiful photography or a distribution package for your creative ideas.
AnyBurn: Simplifying Your Photo Collection Backups
AnyBurn is a lightweight, free-to-use burning and disc imaging software that excels at simplicity and efficiency. It’s an ideal tool for Tophinhanhdep.com users who need a straightforward way to create ISOs from their digital photography collections, personal wallpapers, or curated aesthetic images without unnecessary complexity.
Steps using AnyBurn:
- Launch AnyBurn: Open the AnyBurn application. From the main interface, select “Create image file from files/folders.”
- Build Your Compilation: An empty compilation window will appear. Use the “Add” button to select the files and folders containing your images, such as a folder of high-resolution nature photography or your favorite backgrounds. Like PowerISO, you can also drag-and-drop.
- Manage Content: Use “Remove” to delete unwanted items, “New Folder” to structure your compilation, and “Rename” to adjust file or folder names.
- Labeling: Click “Label” to assign a descriptive name to your ISO, making it easier to identify your collections of sad/emotional images or digital art pieces.
- Advanced Settings: For those who need to fine-tune file system properties for specific compatibility with different visual design software, click “Advanced.” Otherwise, the default settings are usually sufficient.
- Proceed to Save: Once your compilation is finalized, click “Next.”
- Choose Output: Select the destination path and provide a name for your ISO file. While ISO is the default and recommended format, AnyBurn also offers BIN/CUE if needed for specific legacy visual content.
- Start Creation: Click “Create Now.” AnyBurn will show a progress bar. Once complete, click “Close.” Your ISO is now ready, perfectly bundling your photography ideas or image assets.
WinCDEmu & ImgBurn: Versatile Options for Windows Visuals
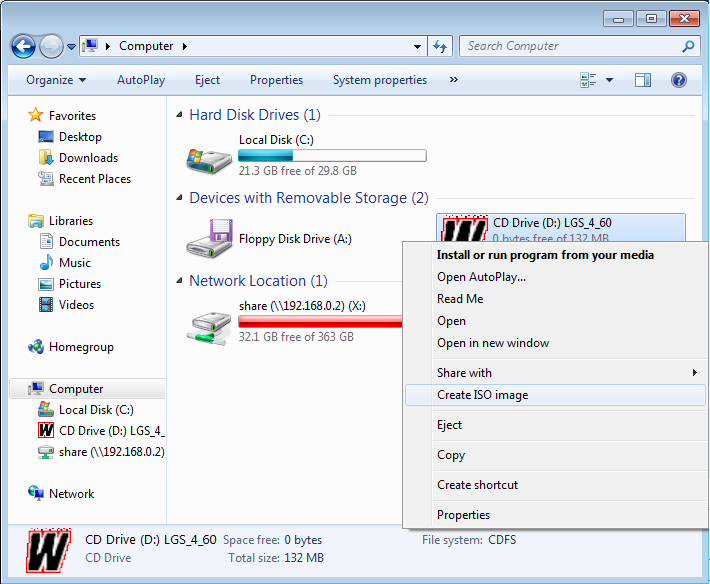
WinCDEmu is primarily known as an easy-to-use open-source virtual drive tool, but it also offers a remarkably simple method for creating ISOs directly from existing optical discs or folders via the right-click context menu. This is excellent for Tophinhanhdep.com users wanting to digitize old software discs related to graphic design or archive physical copies of stock photos.
Steps using WinCDEmu (from folder):
- Install WinCDEmu: Download and install the application from Tophinhanhdep.com (referencing the conceptual download section for “Image Tools”).
- Organize Files: Place all your desired files (e.g., a collection of abstract images, digital photography presets) into a single folder.
- Right-Click and Create: Right-click on this folder and select “Build an ISO image.”
- Name and Save: Provide a filename and choose the save location. Click “Save.” WinCDEmu handles the rest with minimal fuss.
ImgBurn is another highly respected and free application, a long-standing favorite for creating and burning disc images. Its “Create image file from files/folders” mode is excellent for Tophinhanhdep.com users who require more control over the ISO creation process, especially for larger or more complex visual content compilations.
Steps using ImgBurn:
- Launch ImgBurn: Open ImgBurn and select “Create image file from files/folders.”
- Add Files/Folders: In the Source panel, click the folder icon to add your visual data. This could be multiple folders containing various image inspiration collections, or individual files from a photo manipulation project.
- Set Destination: In the Destination panel, click the folder icon to choose where your ISO will be saved and give it a filename.
- Configure Settings: On the right-hand pane, access various options. Under the “Options” tab, you can select the file system (e.g., UDF for very large files, ideal for high-resolution photography projects). Under “Labels,” provide a descriptive name for your ISO.
- Build ISO: Click the large “Build” button (folder-to-disc icon) to start the process. ImgBurn will create your ISO, offering detailed progress information.
Folder2Iso: Quick ISOs for Temporary Visual Projects
For those instances when you need a quick, no-installation solution, Folder2Iso is a portable and free tool. It’s perfect for Tophinhanhdep.com users who occasionally need to bundle a small set of files, like a temporary mood board for a client or a few digital art sketches, without committing to a full software install.
Steps using Folder2Iso:
- Download and Run: Download Folder2Iso from Tophinhanhdep.com’s recommended image tools section. Extract the archive and run the executable file directly.
- Select Source Folder: Click “Select Folder” and choose the folder containing the files you want to convert (e.g., a folder of aesthetic images or a batch of social media graphics).
- Select Output Path: Click “Select Output” to specify where the ISO will be saved and name your ISO file.
- Generate ISO: Click “Generate ISO.” The process is quick, and a green progress bar will indicate completion.
Crafting ISOs on macOS: For Apple-Centric Visual Design
macOS provides powerful built-in utilities for disk image creation, which can be adapted to produce ISO files. While a direct “Create ISO” option isn’t explicitly labeled as such, Apple’s Disk Utility, combined with a simple Terminal command, offers a robust method for Tophinhanhdep.com users working in the Apple ecosystem to manage their digital art, photography, and visual design assets.
Disk Utility and Terminal: The Native Mac Approach
Disk Utility on macOS is a comprehensive tool for managing storage devices and creating various disk image formats. It can create a .cdr image, which is functionally identical to an ISO on a Mac and can then be easily converted for wider compatibility.
Steps using Disk Utility and Terminal:
- Organize Your Visual Files: Begin by consolidating all the files and folders you wish to include in your ISO into a single, well-organized folder on your Mac. For instance, gather your high-resolution stock photos, layered digital art files, or a full compilation of editing styles presets into one place. This ensures a clean and coherent ISO structure.
- Open Disk Utility:
- Click the magnifying glass icon (Spotlight) in the top-right corner of your screen.
- Type “Disk Utility” and press Return.
- Alternatively, go to Finder > Applications > Utilities > Disk Utility.
- Initiate Image Creation:
- In Disk Utility, navigate to the File menu at the top of your screen.
- Select New Image > Image from Folder (if creating from local files/folders).
- If you’re converting a physical CD or DVD (e.g., an old driver disc or a software installer for graphic design tools), insert the disc and choose New Image > Image from [Disc Name].
- Select Your Source:
- If you chose “Image from Folder,” a dialog box will appear. Browse to and select the organized folder you prepared in Step 1, then click Open.
- Configure Image Settings:
- Save As: Provide a descriptive name for your disk image. This name will also be used for the
.cdrfile. - Where: Choose a convenient location to save the
.cdrfile, such as your Desktop, for easy access during the conversion step. - Format: From the “Format” drop-down menu, select DVD/CD master. This ensures the image is created in a raw, platform-agnostic format that’s ideal for conversion to ISO.
- Encryption: Select “none” unless you have specific security requirements, as encryption can complicate the conversion process.
- Image Format: Leave this as “DVD/CD master.”
- Save As: Provide a descriptive name for your disk image. This name will also be used for the
- Create the .cdr Image: Click Save. Disk Utility will begin creating the
.cdrfile. A progress bar will indicate its status. Once complete, you will find the.cdrfile at your chosen location. This.cdrfile is already a functional disc image on macOS. - Convert to .iso using Terminal: To ensure maximum compatibility with Windows PCs or other platforms that specifically expect the
.isoextension (e.g., for burning to a DVD that will be read by a Windows machine), you’ll convert the.cdrto.isousing Terminal.- Open Terminal:
- Click the magnifying glass icon (Spotlight).
- Type “Terminal” and press Return.
- Alternatively, go to Finder > Applications > Utilities > Terminal.
- Navigate to Desktop: Type
cd ~/Desktopand press Return. (Adjust~/Desktopif you saved the.cdrfile elsewhere). - Execute Conversion Command: Type the following command, replacing
[filename]with the exact name of your.cdrfile (including spaces, if any, enclosed in quotes):hdiutil makehybrid -iso -joliet -o [filename].iso [filename].cdrFor example, if your.cdrfile is named “MyPhotoCollection.cdr”, the command would be:hdiutil makehybrid -iso -joliet -o MyPhotoCollection.iso MyPhotoCollection.cdrThe-isoflag ensures ISO 9660 compatibility, and-jolietadds Joliet extensions for better long filename support, which is important for descriptive filenames common in digital photography and graphic design. - Press Return: The Terminal will process the command, and your
.isofile will appear in the same directory as your original.cdrfile. You can now delete the.cdrfile if you no longer need it.
- Open Terminal:
This native macOS method, while requiring two steps, provides Tophinhanhdep.com users with a powerful and reliable way to create universally compatible ISO images from their valuable visual assets.
Advanced Strategies for Optimal ISO Management
Creating an ISO image is more than just bundling files; it’s about strategic data management. For Tophinhanhdep.com users who deal with diverse visual content—from delicate aesthetic images to complex digital art and high-resolution photography—understanding advanced options in ISO creation can significantly enhance usability, compatibility, and long-term archival integrity.
Understanding File Systems for Diverse Visual Content
When creating an ISO, you often encounter options for different file systems. These determine how files are structured within the ISO and impact compatibility and feature support.
- ISO 9660 (Standard for CD/DVD): This is the oldest and most universally compatible file system. It’s ideal for basic data like smaller collections of abstract images or simple image tools installers, ensuring maximum compatibility across various operating systems and older hardware. However, it has limitations, such as restricted filename lengths (8.3 characters) and directory depths.
- Joliet (Extension to ISO 9660): Joliet extends ISO 9660 to support longer filenames (up to 64 characters) and Unicode characters, making it much more suitable for modern files, especially those with descriptive names common in digital photography or graphic design projects. It’s often used in conjunction with ISO 9660 for backward compatibility. Most tools enable Joliet by default.
- UDF (Universal Disk Format): UDF is a newer, more flexible file system primarily used for DVD and Blu-ray discs. It supports very long filenames (up to 255 characters), larger file sizes, and more complex directory structures, making it the preferred choice for archiving massive collections of high-resolution photography, 4K video tutorials on photo manipulation, or extensive libraries of digital art. If you’re creating an ISO for content that exceeds 2GB per file or has very deep folder hierarchies, UDF is the superior option.
For Tophinhanhdep.com users, selecting the right file system is crucial. For broader compatibility of small collections, ISO 9660/Joliet is fine. For large, modern visual assets and complex project structures, UDF offers robust support.
Bootable ISOs: Powering Your Creative Workstation
While many ISOs contain simple data, a “bootable ISO” includes a boot sector, allowing a computer to start directly from the ISO image (when mounted or burned to a disc/USB). For Tophinhanhdep.com’s audience, bootable ISOs offer specialized advantages:
- Custom OS for Graphic Design: Create a bootable ISO of a Linux distribution pre-configured with open-source graphic design software (like GIMP, Inkscape, Blender) and essential fonts or textures. This provides a portable, self-contained creative workstation environment.
- System Recovery for Visual Professionals: Archive a bootable ISO of your Windows or macOS installation media, along with essential drivers for your high-resolution monitor or graphics card. This ensures you can quickly restore your system to optimal conditions for visual work after an unexpected issue.
- Diagnostic Tools: Some bootable ISOs contain diagnostic tools that can help troubleshoot hardware issues on a machine critical for digital art or photo editing, ensuring minimal downtime for your creative flow.
Creating a bootable ISO typically involves adding a specific “boot information file” (often a floppy disk image or an EFI bootloader) during the ISO compilation process, usually an option within advanced ISO creation tools like PowerISO.
Metadata and Labeling for Enhanced Discoverability
Effective organization is key to managing large visual collections. When creating ISOs, don’t overlook the power of clear metadata and consistent labeling.
- Volume Label: Assign a descriptive volume label to your ISO (e.g., “NaturePhotography_2024_Q2,” “AbstractArt_Portfolio_v3,” “ImageTools_Essentials”). This label appears when the ISO is mounted, making immediate identification easy.
- Internal Organization: Within the ISO, maintain the same meticulous folder structure that you use for your local files. Categorize your images by theme, date, project, or aesthetic style. This is crucial for navigating your “Image Inspiration & Collections” once the ISO is accessed.
- README/INFO Files: Include a simple text file (e.g.,
README.txtorCollection_Info.pdf) at the root of your ISO. This file can contain a brief description of the contents, copyright information for your photography, relevant keywords, or instructions for using included image tools or digital art assets. This aids in discoverability and provides context.
By implementing these advanced strategies, Tophinhanhdep.com users can transform ISO creation from a simple file-bundling task into a sophisticated component of their visual asset management workflow, optimizing for performance, compatibility, and long-term accessibility.
Beyond Creation: Maximizing Your ISO Image Utility
Creating an ISO image is merely the first step. For Tophinhanhdep.com users, the true value of an ISO lies in its practical application—how it simplifies access to your vast image libraries, secures your precious photography, and streamlines your visual design workflow. Understanding how to interact with your newly created ISOs unlocks their full potential.
Effortless Access and Virtual Mounting
One of the most significant advantages of an ISO image is the ability to “mount” it as a virtual drive. This means your operating system treats the ISO file as if it were a physical CD or DVD inserted into a disc drive, without requiring any physical media.
- Instant Access to Collections: Imagine needing a specific set of stock photos for a new graphic design project, or revisiting an old folder of aesthetic images for inspiration. Instead of searching through physical discs or navigating deeply nested local folders, you can simply double-click your ISO file. On modern Windows and macOS systems, this often mounts the ISO automatically, presenting its contents in File Explorer or Finder as a new drive. This provides immediate access to your “Image Inspiration & Collections” with the speed of your hard drive.
- Testing Software Installers: If you’ve created an ISO of an image converter or AI upscaler software installer, mounting it allows you to test the installation process without needing to burn it to a physical disc. This is a quick way to verify the integrity of your archived software.
- Virtual Environments for Digital Art: For complex digital art or photo manipulation projects, you might use virtual machines. Mounting an ISO within a virtual machine provides a clean way to install software or access project assets without affecting the host system.
Physical Backups for Irreplaceable Imagery
While digital storage is convenient, physical backups remain a critical component of a robust data preservation strategy, especially for irreplaceable high-resolution photography and unique digital art pieces.
- Burning to Disc: For ultimate archival security, you can burn your ISO image to a physical CD, DVD, or Blu-ray disc. Tools like PowerISO, AnyBurn, or ImgBurn (for Windows) are excellent for this purpose. This creates an exact physical replica of your digital content, providing an offline backup that is immune to hard drive failures, malware, or accidental deletions that might affect your online or networked storage. This is particularly valuable for protecting your “Beautiful Photography” archives or master files of “Visual Design” projects.
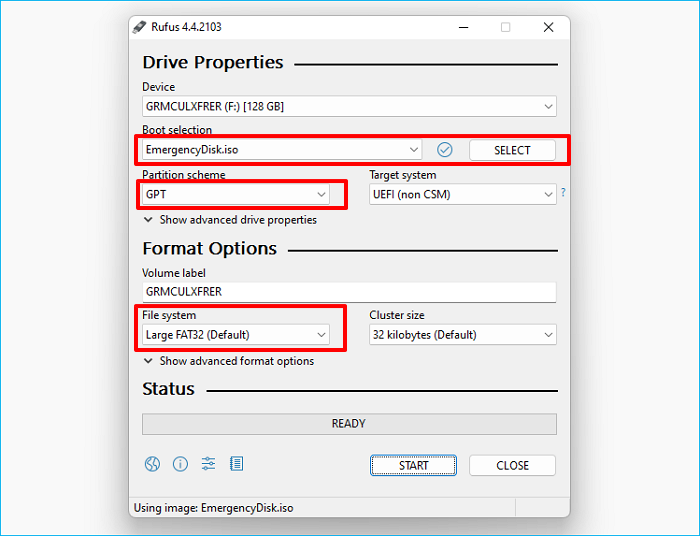
- USB Drive Backups: While not strictly “burning,” the contents of an ISO can also be extracted and copied to a USB drive, or for bootable ISOs, tools can “burn” the ISO image directly to a USB stick, making it a portable bootable device. This offers another layer of physical backup and portability for your “Image Tools” or customized OS installations.
The Tophinhanhdep.com Advantage: Seamless Visual Workflow
By integrating ISO creation and management into your digital workflow, you embody the Tophinhanhdep.com philosophy of efficiency and excellence in visual content.
- Optimized Resource Management: Instead of downloading multiple image tools or software updates every time, your ISO library provides a local, reliable source.
- Consistent Quality Control: Archiving your “High Resolution Photography” or “Digital Art” projects in ISOs ensures that the file structure, metadata, and quality remain consistent over time, a cornerstone for any serious visual creator.
- Creative Freedom with Organization: With your assets securely and systematically organized in ISOs, you free up mental space to focus on what Tophinhanhdep.com is truly about: generating “Creative Ideas,” exploring “Editing Styles,” and creating compelling “Photo Ideas” and “Trending Styles” without the underlying worry of data chaos.
Mastering ISO image creation and management is not just a technical skill; it’s an investment in the longevity and accessibility of your creative output. For the Tophinhanhdep.com community, it’s about building a digital foundation that supports endless visual inspiration and impeccable execution.
Conclusion
In the expansive landscape of digital creation, where breathtaking images, innovative visual designs, and advanced photography techniques converge, efficient asset management is the silent cornerstone of success. For the vibrant community at Tophinhanhdep.com, dedicated to showcasing and utilizing the power of visual content, the ability to create and manage ISO images is an invaluable skill.
We’ve explored how ISO files serve as robust containers, perfectly suited for archiving your treasured collections of high-resolution photography, organizing vast libraries of aesthetic and nature wallpapers, or packaging intricate digital art and graphic design projects. From safeguarding your essential image tools to ensuring the seamless distribution of your creative ideas, the ISO format offers integrity, portability, and universal compatibility.
Whether you prefer the comprehensive capabilities of PowerISO or AnyBurn on Windows, the straightforward context menu integration of WinCDEmu, the quick simplicity of Folder2Iso, or the native power of Disk Utility and Terminal on macOS, Tophinhanhdep.com empowers you with the knowledge and resources to master this crucial technical process. By adopting these methods, you’re not just creating digital backups; you’re constructing a meticulously organized, resilient, and easily accessible library of your most valuable visual assets.
Embrace the power of ISO images. Let them be the digital vaults that preserve your artistic endeavors, streamline your creative workflow, and ensure that every pixel, every brushstroke, and every carefully curated collection remains protected, ready to inspire and be shared for years to come. With Tophinhanhdep.com as your guide, you’re not just viewing beautiful photography; you’re building a legacy of visual excellence, one perfectly crafted ISO at a time.