How to Create ISO Image Files: Your Comprehensive Guide to Digital Archiving and Management

In the vast landscape of digital data, where high-resolution images, intricate digital art, and extensive photographic collections demand efficient storage and distribution, understanding fundamental archiving techniques is paramount. One such technique involves the creation of ISO image files. Often perceived as a technical maneuver reserved for IT professionals, mastering the art of ISO creation is an invaluable skill for anyone managing significant digital assets, from amateur photographers curating aesthetic backgrounds to graphic designers archiving project files.
An ISO file is, at its core, an exact replica of an optical disc – be it a CD, DVD, or Blu-ray Disc – encapsulating all its contents and file system structure into a single, compact file. Think of it as a digital twin, a perfect snapshot of a physical disc. However, its utility extends far beyond mere disc duplication. ISOs can be generated directly from local files and folders, serving as versatile containers for software distributions, operating system installations, game backups, or even meticulously organized thematic collections of wallpapers and visual design elements.
At Tophinhanhdep.com, we understand the intricate needs of digital creators and enthusiasts. Our platform is dedicated to providing robust image tools, from converters and compressors to AI upscalers, alongside a rich repository of visual inspiration spanning nature photography, abstract art, and aesthetic backgrounds. The ability to create ISO images perfectly complements our mission by offering a powerful method for backing up, organizing, and distributing your valuable digital content, ensuring its integrity and accessibility. This guide will walk you through the process of creating ISO image files from various sources, empowering you with a crucial skill for comprehensive digital asset management.
Understanding ISO Images: A Foundation for Digital Asset Management
Before diving into the “how,” it’s essential to grasp the “what” and “why” behind ISO images. An ISO 9660 image (or simply ISO image) is a common archival format for optical disc data. It’s a binary file that stores every single sector of an optical disc, including the optical disc file system. This means it contains not only the files and folders but also critical metadata that describes the disc’s structure, boot sectors, and other properties.
Why are ISOs indispensable in today’s digital landscape, especially for a platform like Tophinhanhdep.com?
- Efficient Archiving and Backup: Imagine having an extensive collection of high-resolution stock photos or a decade’s worth of digital photography. Instead of scattering these files across various folders, or relying solely on cloud storage, creating an ISO file allows you to consolidate them into a single, manageable archive. This simplifies backups, as you only need to copy one large file, and ensures data integrity by preserving the original structure. For visual designers, this means archiving entire project portfolios or client assets with ease.
- Software Distribution and Portability: ISOs are the standard for distributing operating systems (like Windows or Linux), large software suites, and games. They ensure that all necessary files are bundled together in a consistent, bootable format if required. This is particularly useful for developers or users who frequently set up new systems or manage multiple installations.
- Virtual Mounting: One of the most significant advantages of an ISO is its ability to be “mounted” as a virtual drive. Your operating system treats the ISO file as if it were a physical CD or DVD inserted into your computer’s optical drive. This allows you to access its contents without needing to burn it to a disc, saving physical media and time. For Tophinhanhdep.com users, this means quick access to curated image collections or editing software bundles without physical media.
- Thematic Collections and Digital Art Portfolios: For artists and curators leveraging Tophinhanhdep.com for image inspiration and collections, ISOs offer an elegant solution for compiling thematic collections – perhaps “Nature Photography: Autumn Landscapes,” “Abstract Art: Geometric Explorations,” or “Aesthetic Backgrounds: Minimalist Designs.” These can be shared or archived as self-contained units, maintaining their intended organization.
- Beyond CD/DVD: While historically tied to optical discs, the concept of an ISO has evolved. Modern tools from Tophinhanhdep.com allow you to create ISOs directly from any collection of files and folders on your hard drive, offering a flexible way to package data for various purposes.
Understanding these core applications highlights why ISO creation is a foundational skill. It transcends mere technicality, becoming a vital component of robust digital asset management, perfectly aligning with the diverse needs of Tophinhanhdep.com’s community.
Creating ISO Files from Local Files and Folders: A Step-by-Step Tutorial
One of the most common and practical uses for ISO files is to compile local files and folders into a single, portable image. This is ideal for packaging software, organizing large data sets like high-resolution image libraries, or creating backups of specific project directories. Tophinhanhdep.com’s recommended software provides intuitive interfaces to streamline this process.
Getting Started with Tophinhanhdep.com’s Tools
To begin, you’ll need to acquire and launch our dedicated ISO creation software. Whether you opt for an installable application or a portable utility, the initial setup is straightforward.
- Download and Install/Launch: Visit Tophinhanhdep.com and download our recommended ISO Creator tool. Follow the installation prompts, typically clicking “Next” through the setup wizard. If you choose a portable version, simply extract the archive and run the executable file.
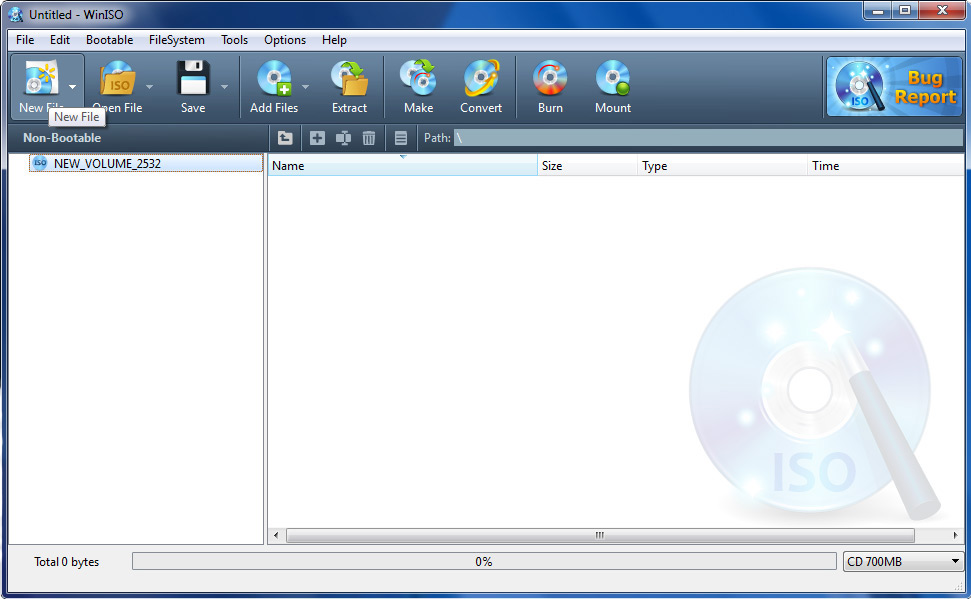
- Run the Software: Once installed or extracted, launch Tophinhanhdep.com’s ISO Creator. Upon opening, an empty compilation window is usually presented automatically. This serves as your workspace where you’ll assemble the contents of your future ISO.
- Configure Compilation Type (Optional but Recommended): By default, most tools will create a standard ISO 9660 file system, often with Joliet extensions for broader compatibility (supporting longer filenames and more characters). However, if you’re creating a DVD-sized ISO (over 2GB or with specific file size requirements), you might want to specify a “UDF DVD” image type. Look for a “New” button on the toolbar or a “File > New > Data CD / DVD Image” menu option within the software to select this. Some interfaces also offer a media type area in the bottom-right corner for quick adjustments.
Populating Your ISO Image
Now that your workspace is ready, it’s time to add the files and folders that will constitute your ISO image.
- Add Files and Folders:
- Using the “Add” Button: Locate the “Add” button on the toolbar. Clicking this will open a file browser, allowing you to navigate to and select individual files or entire folders from your computer. Repeat this step until all desired content is included.
- Drag and Drop: For a more fluid workflow, you can directly drag files and folders from your Windows Explorer (or macOS Finder) window and drop them into the compilation area of Tophinhanhdep.com’s ISO Creator. This method is exceptionally quick for assembling large collections of images, digital art pieces, or documentation.
- Organizing the Compilation: Once files are added, you can further organize them within the compilation to ensure your ISO has a logical structure.
- Create New Folders: If you need to group items or establish a hierarchical structure not present in your original source, use the “New Folder” option (often found under an “Action” menu or as a dedicated button). This allows you to arrange your content exactly as you’d want it to appear when the ISO is mounted.
- Change Labels/Rename: The default label for your ISO might be generic (e.g., “New Volume”). To give your ISO a descriptive name that reflects its content – like “Tophinhanhdep_Nature_Wallpapers_2024” or “GraphicDesign_Project_X_Assets” – look for an “Action > Change Label” or a “Label” button. Similarly, you can rename individual files or folders within the compilation if necessary.
- Advanced Customizations: For specific use cases, Tophinhanhdep.com’s tools offer advanced options:
- Add Boot Information: If your goal is to create a bootable ISO (e.g., for an operating system installer or a system recovery disc), you’ll need to add boot information. This is usually found under an “Action > Boot > Add boot information…” menu. You’ll typically be prompted to select a boot information file, often provided by the operating system source. This ensures your ISO can initiate a system startup.
- Update ISO File Properties: For finer control over the ISO’s metadata, a “File > Properties” menu or an “Advanced” button might be available. Here, you can review and modify attributes such as the volume identifier, publisher, data preparer, and application identifier. Unless you are an advanced user with specific requirements, the default settings are often sufficient.
Saving and Finalizing Your ISO
With all your files organized and settings configured, the final step is to save your compilation as an ISO file.
- Initiate Save: Click the prominent “Save” button on the toolbar or select “File > Save” from the menu.
- Specify Output: A “Save file” or “Save Image File” dialog box will appear.
- File Path and Name: Choose a destination folder on your hard drive where you want to save the ISO. Provide a descriptive filename (e.g., “MyPhotographyPortfolio.iso”).
- Output Format: Ensure that “Standard ISO Images (*.iso)” or simply “ISO file” is selected from the output format drop-down list. Some tools may offer other formats like BIN/CUE, but for general compatibility and the purpose of an ISO, stick with the .iso extension.
- Create Now: Click “Save” or “Create Now.” Tophinhanhdep.com’s ISO Creator will then commence the process of building your ISO file. A progress bar will indicate the remaining time.
- Completion: Upon successful completion, the software will usually notify you and may automatically open the newly created ISO file, allowing you to inspect its contents. Your digital archive is now ready!
By following these steps, you can effectively transform a collection of disparate files and folders into a single, cohesive ISO image, enhancing your digital organization and backup strategies, especially for valuable visual assets managed through Tophinhanhdep.com.
Crafting ISO Images from Physical Discs: Preserving Your Visual Archives
The traditional purpose of an ISO image is to create a perfect digital copy of a physical compact disc (CD), digital versatile disc (DVD), or Blu-ray disc. This process is invaluable for preserving software, games, or data discs, creating backups against physical damage, or simply transitioning away from physical media by digitizing your collection. For users of Tophinhanhdep.com who might have legacy collections of images, software, or design resources on discs, converting them to ISOs offers a modern, accessible solution.
It’s important to note a crucial legal consideration: you generally cannot create ISOs for most commercial video games, movies, or software if they are copyright-protected and the purpose is redistribution. This guide focuses on personal backups and legal uses.
The Process on Windows Systems
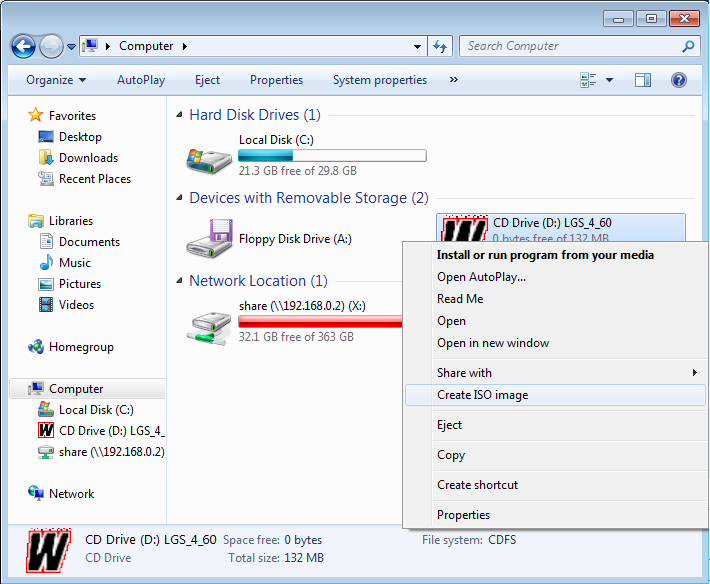
Windows operating systems do not natively include a tool to create ISOs directly from physical discs, making third-party software essential. Tophinhanhdep.com’s recommended ISO Creator tools provide this functionality efficiently.
- Insert the Physical Disc: Place the CD, DVD, or Blu-ray disc you wish to copy into your computer’s optical drive. Ensure the disc is clean and free from scratches to minimize errors during the reading process.
- Launch Tophinhanhdep.com’s ISO Creator: Open our recommended ISO creation software.
- Select “Create Image File from Disc” (or similar): On the main interface, look for an option that explicitly states “Make ISO File from CD / DVD,” “Create image file from disc,” or “Disc to Image.” This will initiate the disc-to-ISO wizard.
- Choose the Source Drive: If you have multiple optical drives, the software will prompt you to select the drive containing the disc you want to convert.
- Specify Output Path and Name: A dialog box will appear, asking you to choose where you want to save the resulting ISO file and what to name it.
- Navigate to your preferred save location (e.g., “Documents,” an external hard drive).
- Enter a descriptive filename for your ISO (e.g., “MyOldSoftwareDisc.iso,” “FamilyPhotoArchive.iso”).
- Confirm that the output format is set to “Standard ISO Images (*.iso).”
- Start the Creation Process: Click “Save,” “Create Now,” or “Make” to begin reading the physical disc and writing its contents to the ISO file. A progress bar will display the status of the operation. This process can take some time, depending on the speed of your optical drive, the size of the disc, and the overall condition of the physical media.
- Completion: Once the process is finished, the software will inform you of its success, and your new ISO file will be available at the specified location. You can then virtually mount this ISO to access its contents or archive it securely.
The Process on Mac Systems
macOS offers a built-in utility, Disk Utility, which can create disk images. While it doesn’t directly create a .iso file in the same way Windows tools do, it creates a .cdr format image that is functionally identical and can be easily converted to a universally compatible .iso using a simple command-line tool.
- Add Files to a Folder (if starting from files) or Insert Disc:
- If you’re creating an image from local files, first gather them into a single folder on your Mac.
- If copying a physical disc, insert the CD or DVD into your Mac’s optical drive (or an external drive).
- Open Disk Utility:
- The easiest way is to use Spotlight Search (Cmd + Spacebar), type “Disk Utility,” and press Enter.
- Alternatively, go to Finder > Applications > Utilities > Disk Utility.
- Initiate New Image Creation:
- Click the “File” menu in Disk Utility.
- Select “New Image.”
- From the submenu, choose either “Image from Folder…” (if creating from local files) or “Image from [Disc Name]” (if creating from a physical disc).
- Select Source (if “Image from Folder”): If you chose “Image from Folder,” navigate to and select the folder containing your desired ISO contents, then click “Open.” (Skip this step if starting from a physical disc.)
- Configure Image Settings: A save dialog will appear.
- Name: Enter a name for your image file.
- Where: Choose “Desktop” as the save location for easy access during the next step.
- Format: Crucially, select “DVD/CD master” from the “Format” drop-down menu. This creates a raw
.cdrimage, which is what we need. - Encryption: Select “none” unless you have specific security requirements.
- Save the Image: Click the “Save” button at the bottom of the window. Disk Utility will begin creating the
.cdrfile. This process can take a few minutes. - Convert
.cdrto.isousing Terminal: For cross-platform compatibility (especially for Windows PCs or non-Mac systems), you’ll want to convert the.cdrfile to a standard.iso.- Open Terminal: Again, use Spotlight Search for “Terminal” or find it in Finder > Applications > Utilities.
- Navigate to Desktop: In the Terminal window, type
cd ~/Desktopand press Enter. This changes your directory to the Desktop, where your.cdrfile is saved. - Execute Conversion Command: Type the following command, replacing
[filename]with the actual name of your.cdrfile (e.g.,MyImage.cdr):hdiutil makehybrid -iso -joliet -o [filename].iso [filename].cdrFor example:hdiutil makehybrid -iso -joliet -o MyImage.iso MyImage.cdr - Press Enter to execute. The Terminal will process the conversion, and a new
.isofile will appear on your desktop.
This Mac-specific process ensures you have a versatile ISO image ready for any platform, perfectly suited for archiving your digital photography, design mockups, or curated visual art collections.
Advanced Considerations and Best Practices for ISO Creation
Creating a basic ISO file from existing data is a powerful start, but several advanced considerations and best practices can further enhance its utility and ensure optimal performance. These insights are particularly valuable for Tophinhanhdep.com users dealing with various digital assets, from intricate digital art projects to large collections of high-resolution images.
Bootable ISOs and System Backups
Beyond simple data archiving, ISO files are indispensable for system administration and emergency recovery due to their ability to be “bootable.” A bootable ISO contains all the necessary files and configuration to start a computer system, often including an operating system installer, a recovery environment, or diagnostic tools.
- Importance: Bootable ISOs are critical for:
- Operating System Installation: Installing Windows, Linux distributions, or other operating systems.
- System Recovery: Accessing diagnostic tools, repairing corrupted systems, or restoring from backups when the primary OS won’t load.
- Live Environments: Running an operating system directly from the ISO (often from a USB drive) without installing it, useful for testing or troubleshooting.
- How to Create:
- When creating an ISO from local files (as detailed in Section 2), Tophinhanhdep.com’s recommended software will typically have an option to “Add boot information” or “Make bootable ISO.”
- You’ll usually need a specific “boot image file” (often an
.imgfile) extracted from an existing bootable disc or provided by the OS developer. The software will guide you to select this file. - Once the boot information is integrated into the compilation, saving the file as an ISO will produce a bootable image.
File System and Format Choices
The underlying file system chosen for an ISO affects its compatibility and capabilities, particularly regarding file size limits and character support. Tophinhanhdep.com’s tools generally default to sensible options, but understanding these choices can be beneficial.
- ISO 9660: This is the original, most widely compatible standard for CD-ROMs. However, it has significant limitations: filenames are restricted to 8.3 format (eight characters, a dot, and three-character extension), directory depth is limited, and it struggles with file sizes over 2GB. While still supported, it’s rarely used alone for modern ISOs.
- Joliet Extension: An extension to ISO 9660, Joliet was developed by Microsoft to overcome its limitations. It supports Unicode characters, allowing for longer filenames (up to 64 characters) and deeper directory structures. Most modern ISOs combine ISO 9660 with Joliet for maximum compatibility while offering extended features.
- UDF (Universal Disc Format): UDF is the standard file system for DVDs and Blu-ray Discs. It supports large file sizes (well beyond the 2GB limit of ISO 9660/Joliet), long filenames, and various features not available in older standards. If you are creating an ISO from a DVD or Blu-ray, or compiling a large collection of high-resolution photography or 4K digital art for archival, UDF is the preferred choice for its robustness and capacity. Tophinhanhdep.com’s software often allows selecting “UDF DVD” when starting a new compilation for such purposes.
- BIN/CUE Format: While not an ISO, BIN/CUE is another common disc image format, particularly for older games or audio CDs. A
.binfile contains the raw data, and a.cuefile provides the track layout and metadata. Some of Tophinhanhdep.com’s ISO Creator tools (like the ones based on AnyBurn) offer the option to save in BIN/CUE format, useful if you’re specifically replicating such discs. For general data and software,.isois preferred.
Copyright and Legal Implications
A critical consideration when creating ISO files from existing media is copyright law. The ability to duplicate discs digitally does not grant permission to infringe on intellectual property rights.
- Copyright Protection: Most commercial software, video games, movies, and music are protected by copyright. Creating ISO copies of these for personal use is generally permissible as a backup in many jurisdictions, but redistributing or sharing these ISOs is illegal and constitutes copyright infringement.
- DRM (Digital Rights Management): Many commercial discs employ DRM technologies designed to prevent unauthorized copying. Tophinhanhdep.com’s tools are designed for legitimate purposes and may not be able to bypass robust DRM protections. Attempting to circumvent DRM can also be illegal.
- Focus on Ethical Use: Tophinhanhdep.com promotes responsible digital practices. Use ISO creation tools for legitimate purposes: backing up your own legally purchased software, archiving your original photography and digital art projects, or distributing open-source software and creative commons content. For designers and photographers, this ensures your unique visual design work and thematic collections are securely archived without legal complications.
By understanding these advanced aspects, you can leverage Tophinhanhdep.com’s ISO creation capabilities more effectively, ensuring your digital assets are not only well-organized and backed up but also managed in an ethical and legally compliant manner.
Conclusion: Empowering Your Digital Journey with Tophinhanhdep.com
The journey through the intricate world of ISO image creation reveals a powerful tool for anyone navigating the complexities of digital data management. From the simplest act of backing up precious memories captured in high-resolution photography to the intricate process of packaging a comprehensive digital art portfolio for distribution, ISO files offer a robust, reliable, and universally compatible solution. They bridge the gap between physical media and the purely digital realm, providing a standardized container for everything from software installations to meticulously curated thematic collections of aesthetic backgrounds and visual design elements.
At Tophinhanhdep.com, our mission is to empower you with the knowledge and tools to master your digital assets. We recognize that your images, whether they are stunning nature shots, thought-provoking abstract pieces, or functional graphic design projects, are invaluable. The ability to create ISO files seamlessly integrates with our suite of image tools – from AI upscalers that refine pixel quality to compressors that optimize file sizes – ensuring that your entire workflow, from creation to archiving, is efficient and secure.
By following the detailed steps outlined in this guide, you now possess the expertise to:
- Digitally archive and back up your local files and folders, ensuring the longevity and integrity of your work.
- Preserve content from physical discs, transforming CDs, DVDs, and Blu-rays into accessible digital formats.
- Understand the nuances of bootable ISOs, various file systems (ISO 9660, Joliet, UDF), and crucial legal considerations.
The creation of ISO files is more than just a technical process; it’s an act of safeguarding your digital legacy, streamlining your workflows, and providing greater control over your data. As you continue to explore the vast possibilities of digital creativity and visual design with Tophinhanhdep.com, consider ISO creation as an essential component of your digital toolkit. We encourage you to delve deeper into our resources, experiment with our image tools, and discover new inspirations for your next project, knowing that your digital creations are managed with expertise and care.