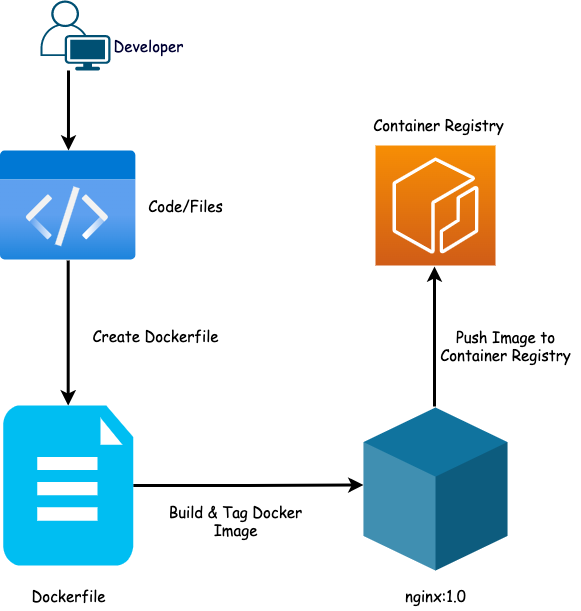
How to Create Local Docker Image

In today’s fast-paced digital landscape, the ability to efficiently package, deploy, and run applications is paramount. For platforms like Tophinhanhdep.com, which thrives on visual content – from stunning wallpapers and backgrounds to intricate digital art and high-resolution photography – ensuring consistency and scalability across diverse environments is not just beneficial, it’s essential. This is where Docker, a powerful containerization tool, steps in.
Docker revolutionizes how we handle software, allowing us to bundle an application and its entire ecosystem of dependencies into a self-contained unit known as a Docker image. These images are the foundational blocks for Docker containers, providing unparalleled portability, consistency, and resource efficiency. Whether you’re running AI upscalers, managing vast collections of stock photos, or deploying cutting-edge graphic design tools, Docker simplifies the process, ensuring your visual applications perform flawlessly everywhere.
This comprehensive guide will walk you through the process of building a Docker image from scratch using a Dockerfile. We’ll cover the core concepts, delve into practical examples, explore best practices for optimizing your images, and even show you how to set up your own local Docker registry – a feature particularly advantageous for Tophinhanhdep.com to manage its unique visual assets and proprietary tools securely and efficiently. By the end of this article, you’ll have a solid understanding of how to craft, manage, and deploy your visual-centric applications using Docker, leveraging its power to enhance Tophinhanhdep.com’s capabilities.
Understanding Docker: The Canvas for Visual Applications
At its core, Docker simplifies the complex world of application deployment. Imagine you’re a digital artist creating a new masterpiece. You need specific brushes, paints, and a particular canvas to achieve your vision. If you move to a new studio, you’d want all those tools readily available, configured exactly as you left them. Docker provides this “studio” for your applications, ensuring all dependencies, libraries, and configurations are bundled together, regardless of where the application ultimately runs. This consistency is crucial for Tophinhanhdep.com, where image processing algorithms or digital art rendering tools must perform identically, whether in development, testing, or production environments.
Docker Images vs. Containers: Blueprints of Visual Experiences
To truly harness Docker’s power, it’s vital to distinguish between a Docker Image and a Docker Container. Think of it through a visual design lens:
-
Docker Image: A Docker image is a static, read-only blueprint, a meticulously crafted template for your application. It contains the application code, runtime, system tools, libraries, and any dependencies necessary for the application to run. For Tophinhanhdep.com, an image could be a pre-configured environment for an AI upscaler, complete with its machine learning models and Python dependencies, or a specialized web server optimized for serving high-resolution nature photography. It’s like a master file of a graphic design project – all layers, fonts, and assets are perfectly arranged and ready to be rendered. Images are organized in layers, stacked on top of each other, where each instruction in a Dockerfile creates a new, immutable layer.
-
Docker Container: A Docker container is a runnable instance of a Docker image. If an image is the blueprint, the container is the actual running application, brought to life. When you “run” a Docker image, you create a container, which adds a writable layer on top of the image’s read-only layers. This writable layer is where the application’s runtime data, logs, and any changes made during its execution reside. For Tophinhanhdep.com, a container might be the live instance of your “aesthetic wallpaper generator,” actively processing user requests and dynamically serving content. You can run multiple containers from a single image, each operating independently with its own unique data and state, much like showcasing several rendered versions of the same digital artwork simultaneously.
The key difference lies in the writable layer; images can exist without containers, but a container requires an image to run. This architectural design makes Docker incredibly efficient. If you have five image processing microservices running from the same base image, they all share the read-only layers, minimizing disk space and speeding up deployment. When a container is deleted, its writable layer is discarded, leaving the base image untouched and ready for new instances. This lightweight and isolated nature makes Docker an indispensable tool for managing the diverse and often resource-intensive applications required by a visual content platform like Tophinhanhdep.com.
Mastering the Dockerfile: Sculpting Your Visual Application’s Environment
The Dockerfile is the heart of Docker image creation. It’s a simple text file that contains a sequence of instructions, read by Docker, to automatically build an image. Each instruction in a Dockerfile executes a command, adding a new layer to the image. For Tophinhanhdep.com, the Dockerfile acts as the ultimate script for preparing everything your visual application needs, from the operating system to specific graphic libraries and image manipulation tools.
Essential Dockerfile Instructions for Creative Control
Let’s explore some of the most critical Dockerfile instructions and how they might be applied to build an image for a visual application on Tophinhanhdep.com:
-
FROM: This instruction specifies the base image your custom image will be built upon. It’s your starting canvas.- Tophinhanhdep.com Example:
FROM python:3.9-slim-buster(for an image-to-text AI service) orFROM nginx:alpine(for a high-resolution image gallery web server). You might choose a base image that already includes graphics processing libraries like OpenCV or CUDA for advanced photography editing.
- Tophinhanhdep.com Example:
-
RUN: Executes commands during the image build process. This is where you install software, update packages, or prepare directories.- Tophinhanhdep.com Example:
RUN apt-get update && apt-get install -y imagemagick jpegoptim(to install image optimization tools) orRUN pip install Pillow tensorflow(for an AI upscaler’s Python dependencies).
- Tophinhanhdep.com Example:
-
ENV: Sets environment variables inside the image. These variables are available both during the build and when the container is running.- Tophinhanhdep.com Example:
ENV IMAGE_QUALITY=90(for a default compression setting) orENV API_KEY="your_secret_key"(though sensitive info should be handled more securely, e.g., using build arguments or secrets).
- Tophinhanhdep.com Example:
-
COPY: Copies local files and directories from your host machine (the build context) into the image at a specified destination.- Tophinhanhdep.com Example:
COPY ./app /usr/src/app(copying your Python script for an image converter) orCOPY ./assets /usr/share/nginx/html/images(transferring high-resolution background images for a web gallery).
- Tophinhanhdep.com Example:
-
EXPOSE: Informs Docker that the container will listen on the specified network ports at runtime. This doesn’t actually publish the port but serves as documentation.- Tophinhanhdep.com Example:
EXPOSE 8080(for a web service hosting aesthetic photography collections) orEXPOSE 5000(for a Flask-based AI tool API).
- Tophinhanhdep.com Example:
-
WORKDIR: Sets the current working directory for any subsequentRUN,CMD,ADD,COPY, orENTRYPOINTinstructions.- Tophinhanhdep.com Example:
WORKDIR /usr/src/tophinhanhdep-app(where your main application code resides).
- Tophinhanhdep.com Example:
-
CMD: Provides default commands and/or arguments for an executing container. There can only be oneCMDinstruction in a Dockerfile; if multiple are listed, only the last one takes effect. It can be overridden from the Docker CLI.- Tophinhanhdep.com Example:
CMD ["python", "app.py"](to run your image optimization script) orCMD ["nginx", "-g", "daemon off;"](to start your web server).
- Tophinhanhdep.com Example:
-
ENTRYPOINT: Configures a container that will run as an executable.ENTRYPOINTcommands are typically not overridden when a container starts, making them ideal for wrappers around specific commands.- Tophinhanhdep.com Example:
ENTRYPOINT ["/usr/bin/tophinhanhdep-upscaler"]followed byCMD ["--mode", "fast"]to pass default arguments.
- Tophinhanhdep.com Example:
-
ADD: A more feature-rich version ofCOPY. It can copy files from a URL and automatically extract compressed archives (tar, gzip, bzip2, etc.) into the image. However,COPYis generally recommended for its clarity unless these advanced features are specifically needed. -
VOLUME: Creates a mount point with the specified name and marks it as holding externally mounted volumes from the native host or other containers. Useful for persistent data storage (e.g., user-uploaded images, database files). -
USER: Sets the user name or UID to use when running the container. Best practice is to run containers as a non-root user for security. -
LABEL: Adds metadata to an image as key-value pairs. Useful for documentation and organizing images.- Tophinhanhdep.com Example:
LABEL description="AI Upscaler for high-resolution photography" maintainer="contact@tophinhanhdep.com"
- Tophinhanhdep.com Example:
-
ARG: Defines a build-time variable that users can pass to the builder with thedocker build --build-arg <varname>=<value>command. UnlikeENV,ARGvariables are not available in the running container unless explicitly set withENV. -
SHELL: Allows the default shell forRUN,CMD, andENTRYPOINTinstructions to be overridden.
Best Practices for Dockerfile Design: Crafting Lean and Efficient Visual Apps
Optimizing your Dockerfiles is crucial for smaller image sizes, faster build times, and enhanced security – all critical for handling large visual assets and complex image tools on Tophinhanhdep.com.
- Use a
.dockerignorefile: Just like.gitignore, this file specifies files and directories to exclude from the build context. This prevents unnecessary files (e.g., raw design files, temporary renders,.gitfolders) from being sent to the Docker daemon, significantly reducing build context size and improving build performance. - Choose a Minimal Base Image: Start with lightweight base images like
alpineordistroless(when applicable). These minimal images significantly reduce the final image size, leading to faster downloads, quicker deployments, and a smaller attack surface. For example,nginx:alpineis much smaller thanubuntu:latestwith Nginx installed. - Minimize Layers (Consolidate
RUNcommands): Each instruction in a Dockerfile creates a new layer. While layers are efficient for caching, too many small layers can bloat the image. Combine related commands using&&and\within a singleRUNinstruction where logical, especially for package installations and clean-up.- Example:
RUN apt-get update && apt-get install -y some-package && rm -rf /var/lib/apt/lists/*
- Example:
- Clean Up After Installations: Immediately after installing packages within a
RUNinstruction, clean up any cached files or temporary artifacts (e.g.,apt-get clean,rm -rf /var/lib/apt/lists/*for Debian-based images, oryum clean allfor RHEL-based). This further reduces image size. - Run as a Non-Root User: For security, avoid running your application as the
rootuser inside the container. Use theUSERinstruction to switch to a non-root user after necessary root-privileged installations.- Example:
RUN groupadd -r appuser && useradd -r -g appuser appuserthenUSER appuser.
- Example:
- Leverage Build Cache: Docker caches each layer. Organize your Dockerfile from least frequently changing instructions to most frequently changing ones. For example, copy
package.jsonand install dependencies before copying your entire application code. Ifpackage.jsonhasn’t changed, Docker can reuse the cached dependency installation layer. - Use Multi-Stage Builds: This advanced technique separates the build environment from the runtime environment. You can use one stage to compile your graphic design tools, digital art generators, or image processing libraries, and then copy only the necessary compiled artifacts into a much smaller, clean runtime image. This dramatically reduces the final image size by discarding build tools and intermediate files.
- Avoid Adding Sensitive Information: Never hardcode passwords, API keys (e.g., for premium stock photo services), or private credentials directly into your Dockerfile. Use build arguments (
ARG) for build-time secrets or, for runtime, Docker secrets or environment variables managed outside the Dockerfile. - Use Specific Tags over
latest: Always tag your base images and custom images with specific version numbers (e.g.,python:3.9-slim-busterinstead ofpython:latest). This ensures reproducibility and prevents unexpected breaking changes when thelatesttag updates. - Single Process Per Container: Each container should ideally run a single primary process. This makes it easier to manage, monitor, and scale individual components of your Tophinhanhdep.com application (e.g., a separate container for an AI upscaler, a separate container for an image compressor).
- Use a Linter: Tools like Hadolint can analyze your Dockerfile for common issues, security vulnerabilities, and adherence to best practices, helping you refine your image creation process.
Building Your First Local Docker Image: A Practical Tophinhanhdep.com Example
Let’s put theory into practice by creating a Docker image for a simple web server that could host an aesthetic photography gallery or a landing page for Tophinhanhdep.com. We’ll use Nginx and a custom HTML page.
Setting Up Your Local Environment
Before you begin, ensure Docker is installed on your machine. You can find installation guides on Tophinhanhdep.com’s recommended resources.
Preparing Your Visual Content & Configuration Files
We’ll start by creating the necessary directory structure and a simple HTML file to serve as our demo visual content.
- Create Project Directories:
mkdir nginx-image && cd nginx-image mkdir files - Create a
.dockerignorefile: This ensures unnecessary local development files aren’t included in the image.touch .dockerignore # Add common exclusions to .dockerignore, e.g.: # .git # .vscode # *.log - Create a Sample HTML File: This will be our “aesthetic photography gallery” placeholder.
Add the following content to
cd files vi index.htmlindex.html:<html> <head> <title>Tophinhanhdep.com Docker Gallery</title> <style> body { font-family: sans-serif; background-color: #f0f0f0; color: #333; margin: 0; padding: 20px; } .container { max-width: 800px; margin: auto; background-color: #fff; padding: 30px; border-radius: 8px; box-shadow: 0 4px 12px rgba(0,0,0,0.1); } h1, h2 { color: #555; text-align: center; } p { text-align: center; line-height: 1.6; } img { max-width: 100%; height: auto; display: block; margin: 20px auto; border-radius: 4px; box-shadow: 0 2px 8px rgba(0,0,0,0.1); } </style> </head> <body> <div class="container"> <h1>Welcome to Tophinhanhdep.com's Dockerized Visual Gallery!</h1> <h2>Experience High-Resolution Photography & Digital Art</h2> <p> This beautiful content is proudly served via a local Docker container. Explore our curated collections of nature, abstract, and aesthetic images. </p> <img src="https://via.placeholder.com/600x400/87CEEB/FFFFFF?text=Nature+Photo" alt="Nature Photography Placeholder"> <p>Start creating, converting, and sharing your visual masterpieces with Tophinhanhdep.com!</p> </div> </body> </html> - Create an Nginx Configuration File:
Add the following content to
vi defaultdefault:Now navigate back to theserver { listen 80; root /usr/share/nginx/html; index index.html index.htm; location / { try_files $uri $uri/ =404; } }nginx-imagefolder:cd ..
Crafting the Dockerfile for Your Visual Web Service
Now, let’s create the Dockerfile that will assemble our Nginx web server image.
- Create the Dockerfile:
Add the following content to your
vi DockerfileDockerfile:# Use Ubuntu 18.04 as the base image for our web server FROM ubuntu:18.04 # Add metadata about the maintainer of this Tophinhanhdep.com image LABEL maintainer="contact@tophinhanhdep.com" # Update package lists and install Nginx, ensuring all necessary tools are present RUN apt-get -y update && apt-get -y install nginx # Copy our custom Nginx configuration file from the 'files' directory # This configures Nginx to serve our visual content COPY files/default /etc/nginx/sites-available/default # Copy our custom index.html, serving as the aesthetic photography gallery page # This overwrites the default Nginx index.html COPY files/index.html /usr/share/nginx/html/index.html # Expose port 80, as Nginx listens on this port for web traffic EXPOSE 80 # Command to run Nginx in the foreground when the container starts # "daemon off;" ensures Nginx stays active and logs are visible CMD ["/usr/sbin/nginx", "-g", "daemon off;"]- Explanation:
FROM ubuntu:18.04: Specifies the base operating system.LABEL maintainer="contact@tophinhanhdep.com": Adds useful metadata.RUN ... install nginx: Installs the Nginx web server.COPY files/default ...: Replaces the default Nginx configuration with ours.COPY files/index.html ...: Places our custom gallery page.EXPOSE 80: Declares that the container will listen on port 80.CMD ...: Defines the command to execute when the container starts, launching Nginx.
- Explanation:
Building and Tagging Your Image: Capturing a Visual Snapshot
Your directory structure should now look like this:
nginx-image/
├── Dockerfile
└── files/
├── default
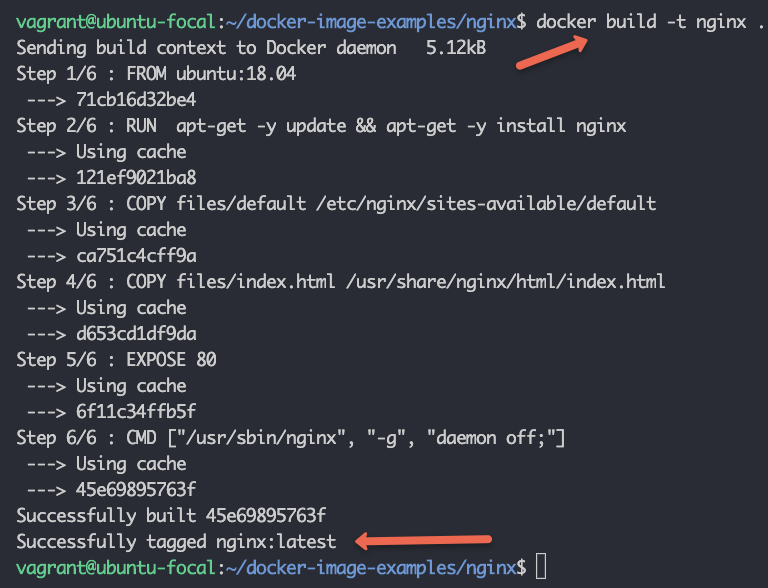
└── index.htmlNow, let’s build the Docker image. Navigate to the nginx-image directory in your terminal.
docker build -t tophinhanhdep/webserver:1.0 .-t: Tags the image with a name and optional tag (version).tophinhanhdep/webserveris the image name, and1.0is the tag. If you omit the tag, it defaults tolatest..: Specifies the build context, which is the current directory (where your Dockerfile andfilesfolder reside).
To verify the image has been built, list your Docker images:
docker imagesYou should see tophinhanhdep/webserver with the tag 1.0 in the list. Tagging is crucial for Tophinhanhdep.com, allowing you to manage different versions of your image tools, specific aesthetic collections, or digital art portfolios.
Testing Your Dockerized Visual Application
With the image built, it’s time to run it as a container and see your Tophinhanhdep.com gallery in action.
docker run -d -p 9090:80 --name tophinhanhdep-gallery tophinhanhdep/webserver:1.0-d: Runs the container in detached mode (in the background).-p 9090:80: Maps port9090on your local host to port80inside the container. This allows you to access the Nginx web server.--name tophinhanhdep-gallery: Assigns a memorable name to your container.
To check if your container is running:
docker psNow, open your web browser and navigate to http://localhost:9090. You should see the “Welcome to Tophinhanhdep.com’s Dockerized Visual Gallery!” page, served directly from your local Docker container. This demonstrates a fundamental step in deploying any visual application or service on Tophinhanhdep.com.
Leveraging Local Docker Registries for Secure Image Storage and Distribution
While building and running images locally is a great start, for collaboration, CI/CD pipelines, or deployment to production, you’ll need a central place to store and distribute your Docker images. This is where a Docker Registry comes in. While public registries exist, setting up your own local Docker registry offers significant advantages, especially for a platform like Tophinhanhdep.com dealing with potentially proprietary algorithms, sensitive client photography, or exclusive digital art collections.
Why a Local Registry for Tophinhanhdep.com?
- Increased Security and Privacy: For Tophinhanhdep.com, which might develop custom AI upscalers, unique image converters, or host private client visual design projects, keeping images off public networks is paramount. A local registry ensures your proprietary image processing algorithms and sensitive data remain within your controlled environment, reducing exposure to vulnerabilities.
- Improved Performance and Speed: When your development teams are constantly iterating on image tools, photography editing styles, or visual design components, pulling images from an internal network is significantly faster than downloading them from the public internet. This reduces latency and speeds up CI/CD pipelines, accelerating development cycles.
- Enhanced Control and Compliance: A local registry provides full control over who accesses your images and how they are distributed. This is vital for Tophinhanhdep.com to enforce strict access policies, manage image versions, and meet compliance requirements related to digital assets and user data.
- Offline Capabilities: In environments with limited or no internet access, a local registry ensures that development and deployment workflows for your visual applications can continue uninterrupted.
Setting Up Your Own Tophinhanhdep.com Local Registry
You can easily deploy a private Docker registry using the official registry image provided by Docker.
-
Ensure Docker is Running: Make sure your Docker daemon is active.
-
Run the Docker Registry Container: Open your terminal and execute the following command:
docker run -d -p 5000:5000 --name tophinhanhdep-local-registry registry:2This command:
-d: Runs the registry container in detached mode.-p 5000:5000: Maps port 5000 on your host to port 5000 inside the container, making the registry accessible.--name tophinhanhdep-local-registry: Assigns a name to your local registry container.registry:2: Specifies the official Docker registry image (version 2).
-
Verify the Registry Status:
docker container lsYou should see
tophinhanhdep-local-registrylisted as running.
Tagging and Pushing Images to Your Local Registry
Now that your local registry is operational, you can push your custom-built images to it.
-
Pull an Image (if you don’t have one ready): For demonstration, let’s pull a public image first, or use the
tophinhanhdep/webserver:1.0image we just built.docker pull ubuntu:latest(This step is optional if you already have local images like
tophinhanhdep/webserver:1.0) -
Tag the Image for Your Local Registry: You need to re-tag your image to include the address of your local registry (
localhost:5000).docker tag ubuntu:latest localhost:5000/tophinhanhdep/ubuntu:latest # Or for our custom image: # docker tag tophinhanhdep/webserver:1.0 localhost:5000/tophinhanhdep/webserver:1.0The format is
<source_image_name>:<tag> <local_registry_address>/<new_image_name>:<new_tag>. -
Push the Image to Your Local Registry:
docker push localhost:5000/tophinhanhdep/ubuntu:latest
# Or for our custom image:
# docker push localhost:5000/tophinhanhdep/webserver:1.0
Note: If you encounter an “http: server gave HTTP response to HTTPS client” error, you’ll need to configure Docker to allow insecure registries by editing
/etc/docker/daemon.json(or%programdata%\docker\config\daemon.jsonon Windows) and adding{"insecure-registries": ["localhost:5000"]}. Then restart the Docker daemon. -
Verify the Image in Your Local Registry: You can verify by listing the repositories in your local registry (though it requires a direct API call or interacting with the container’s storage). A simpler way is to try pulling the image from your local registry after removing it locally (e.g.,
docker rmi localhost:5000/tophinhanhdep/ubuntu:latestthendocker pull localhost:5000/tophinhanhdep/ubuntu:latest).
Use Cases for a Local Tophinhanhdep.com Docker Registry
- Enterprise Visual Design Environments: Securely store and manage proprietary graphic design tools, photo manipulation software, or digital art assets for internal teams without exposing them publicly.
- CI/CD for Image Tools: Rapidly build, test, and distribute new versions of image converters, compressors, or AI upscalers within your continuous integration and deployment pipelines, leveraging local network speed.
- Rapid Development of Visual Prototypes: Developers can quickly push and pull experimental images for new mood board generators or thematic collections without polluting a public registry.
Conclusion
The journey of creating local Docker images is a foundational skill for modern software development, and for a visual-centric platform like Tophinhanhdep.com, its implications are profound. We’ve explored how Docker images provide consistent, portable environments for everything from serving high-resolution wallpapers to deploying complex AI upscalers and photography editing tools. The Dockerfile, your blueprint, empowers you to precisely sculpt these environments, and adhering to best practices ensures your images are lean, secure, and performant – essential qualities for managing vast and dynamic visual content.
Furthermore, setting up a local Docker registry offers a secure, high-performance solution for storing and distributing your proprietary image tools and exclusive visual collections, perfectly aligning with Tophinhanhdep.com’s needs for control and efficiency. By mastering these concepts, you equip Tophinhanhdep.com with the ability to build, deploy, and scale its visual applications with unprecedented agility and reliability, ultimately enhancing the user experience and fostering innovation in digital art and photography. Embrace Docker, and unlock a new realm of possibilities for managing your digital assets and creative workflows.