How to Create Transparent Images: Your Guide to Seamless Visuals

The digital landscape is a vibrant tapestry woven with images. From captivating wallpapers and aesthetic backgrounds to stunning photography and intricate graphic designs, visuals are the cornerstone of online communication and personal expression. In this dynamic world, the ability to create and utilize transparent images is not just a niche skill but a fundamental necessity for anyone looking to elevate their visual content. Whether you’re a professional photographer curating high-resolution stock photos, a graphic designer crafting digital art, a web developer optimizing images for peak performance, or simply someone who loves to enhance their personal photos, understanding image transparency is paramount.
Transparent images offer unparalleled flexibility, allowing elements to blend seamlessly into various backgrounds without the distraction of a solid, unwanted color block. This guide, brought to you by Tophinhanhdep.com, will demystify the process of creating transparent images, exploring both quick online solutions and more intricate editing techniques. We’ll delve into the “why” and “how,” demonstrating how Tophinhanhdep.com’s suite of powerful image tools, including converters, compressors, optimizers, and AI upscalers, can empower you to achieve professional-grade transparency with ease, transforming your creative ideas into visually stunning realities.
The Essential Role of Transparent Images in Digital Design
In the realm of visual design, the subtle power of transparency often goes unnoticed until its absence creates an obvious visual discord. A transparent image is one where certain areas are rendered “invisible,” allowing the background behind it to show through. Instead of a white, black, or colored box around your subject, you get a clean cutout that can be layered effortlessly onto any other image, wallpaper, or web page background. This capability is absolutely crucial for modern digital aesthetics and functionality.
![]()
Why Transparency Matters: Enhancing Visuals and Functionality
The importance of transparent images extends across nearly every facet of digital content creation. For graphic design and digital art, transparency is the foundation of layering. Imagine designing a complex collage or a stunning mood board; without transparent elements, each component would sit in its own rigid box, disrupting the flow and aesthetic appeal. Transparency allows for sophisticated photo manipulation, enabling designers to seamlessly composite multiple images, create intricate overlays, and build dynamic scenes where subjects appear naturally integrated rather than awkwardly pasted.
For web design and development, transparent images are essential for creating clean, responsive layouts. Logos, icons, and navigational elements often require transparent backgrounds to adapt to different website themes and user preferences, maintaining a polished and professional look across various browsers and devices. When integrating images into a website, a transparent background ensures the element complements the site’s overall aesthetic rather than clashing with it. This directly impacts the user experience, making interfaces feel more fluid and visually appealing.
In e-commerce, the distinction is particularly stark. Product images with transparent backgrounds can be placed against any promotional banner, website layout, or advertisement, making the product truly stand out. This professional presentation contributes significantly to perceived product quality and can drive sales. Similarly, for social media posts, dynamic elements and overlays created with transparent images can dramatically boost viewer engagement, making content more captivating and shareable.
Beyond aesthetics, transparency also serves a critical functional purpose: watermarking. Photographers, especially those dealing with high-resolution photography and stock photos, use transparent logos or text as watermarks to protect their valuable work from copyright theft. A well-placed, subtle transparent watermark discourages unauthorized use without overly distracting from the beauty of the image itself. This protection is vital in an age of easy digital distribution, allowing creators to claim ownership and maintain the integrity of their beautiful photography.
Key Applications Across Industries
The versatility of transparent images makes them indispensable across a wide array of industries:
- Marketing and Advertising: Creating visually captivating campaigns, banners, and digital ads where products or brand elements blend perfectly with diverse backgrounds. This enables greater creative freedom in developing aesthetic marketing materials.
- Education: Clarifying concepts and processes by overlaying annotations or interactive elements on videos or diagrams. Transparent graphics can be used to build engaging educational content.
- Branding and Corporate Identity: Designing logos and brand assets that can be uniformly applied across all digital and print media, from wallpapers and backgrounds to business cards and merchandise, ensuring consistent brand representation.
- Personal Use and Creative Projects: Crafting personalized greeting cards, creating unique abstract digital art, making custom social media profile pictures, or enhancing nature photography by replacing distracting backgrounds with serene alternatives. Even for conveying sad/emotional themes, the ability to isolate a subject and place it against a more evocative background can amplify the message.
- Gaming and UI Design: Creating sprites, characters, and user interface elements that seamlessly integrate into game environments and applications, allowing for complex layering and animated effects.
The ability to manipulate images with transparent backgrounds unlocks a new dimension of creative control, transforming ordinary visuals into extraordinary experiences.
Mastering Transparency with Tophinhanhdep.com: A Step-by-Step Guide
At Tophinhanhdep.com, we believe that creating professional-grade transparent images should be accessible to everyone, regardless of their graphic design expertise. Our advanced suite of image tools simplifies complex processes, allowing you to achieve stunning results effortlessly. Here’s how you can leverage Tophinhanhdep.com to make your image backgrounds transparent, from quick online solutions to meticulous refinements.
Effortless Background Removal for Instant Transparency
Tophinhanhdep.com’s flagship feature for transparency is its intelligent background removal tool, powered by sophisticated deep neural networks. This AI-driven technology automatically detects the foreground subject in your image and accurately renders the background pixels transparent, all within seconds.
The process is remarkably straightforward:
- Upload Your Image: Navigate to Tophinhanhdep.com and locate the “Transparent Background” tool. Simply drag and drop your image file into the designated upload area, or click to browse and select it. Our platform supports common formats like JPG, PNG, and WebP, with generous allowances for file size (e.g., up to 10Mb) and resolution (e.g., up to 4.2 megapixels), ensuring compatibility for most high-resolution photos and designs.
- Automatic Processing: Once uploaded, Tophinhanhdep.com’s AI immediately goes to work. It analyzes the image, identifies the main subject, and isolates it from the background. This process is fully automated, requiring no manual input from you.
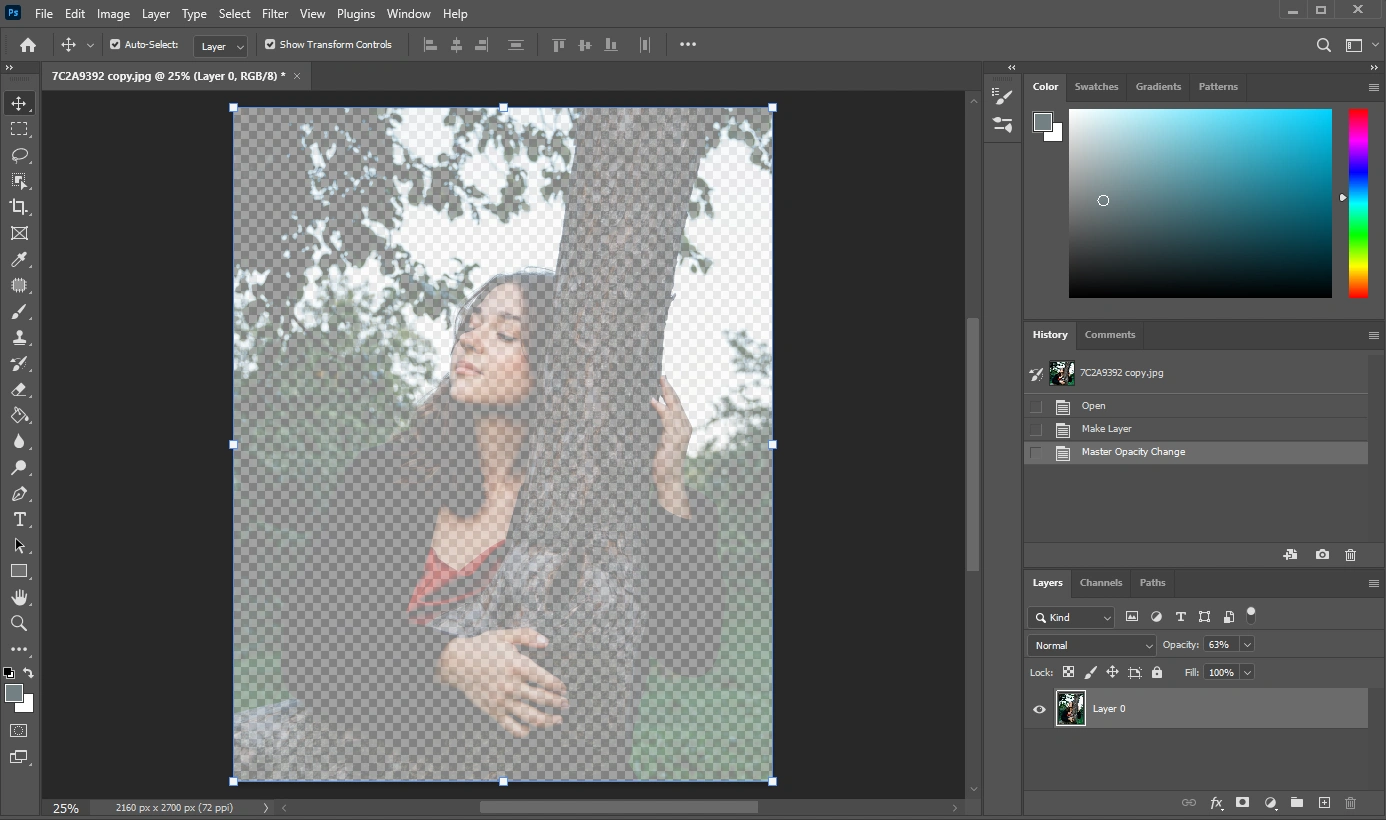
- Download Your Transparent Image: In mere moments, you’ll be presented with your image, now featuring a perfectly transparent background. The transparency will be represented by the universal grey and white checkered pattern in the preview, indicating that those areas are indeed invisible. Simply click the download button, and your image will be saved in PNG format – the industry standard for preserving transparency.
This automated approach is ideal for quick edits, product photography, social media visuals, or any scenario where you need a clean cutout without extensive graphic design skills. It’s a game-changer for anyone looking to create aesthetic images efficiently.
Advanced Refinement for Pixel-Perfect Results
While our AI background remover is incredibly accurate, some highly complex images – those with intricate details, blurry edges, or subjects that blend closely with the background – may require a touch more precision. Tophinhanhdep.com understands this and provides powerful editing features to refine your transparent masks.
If the initial automatic mask isn’t absolutely perfect, don’t worry! You can easily make adjustments:
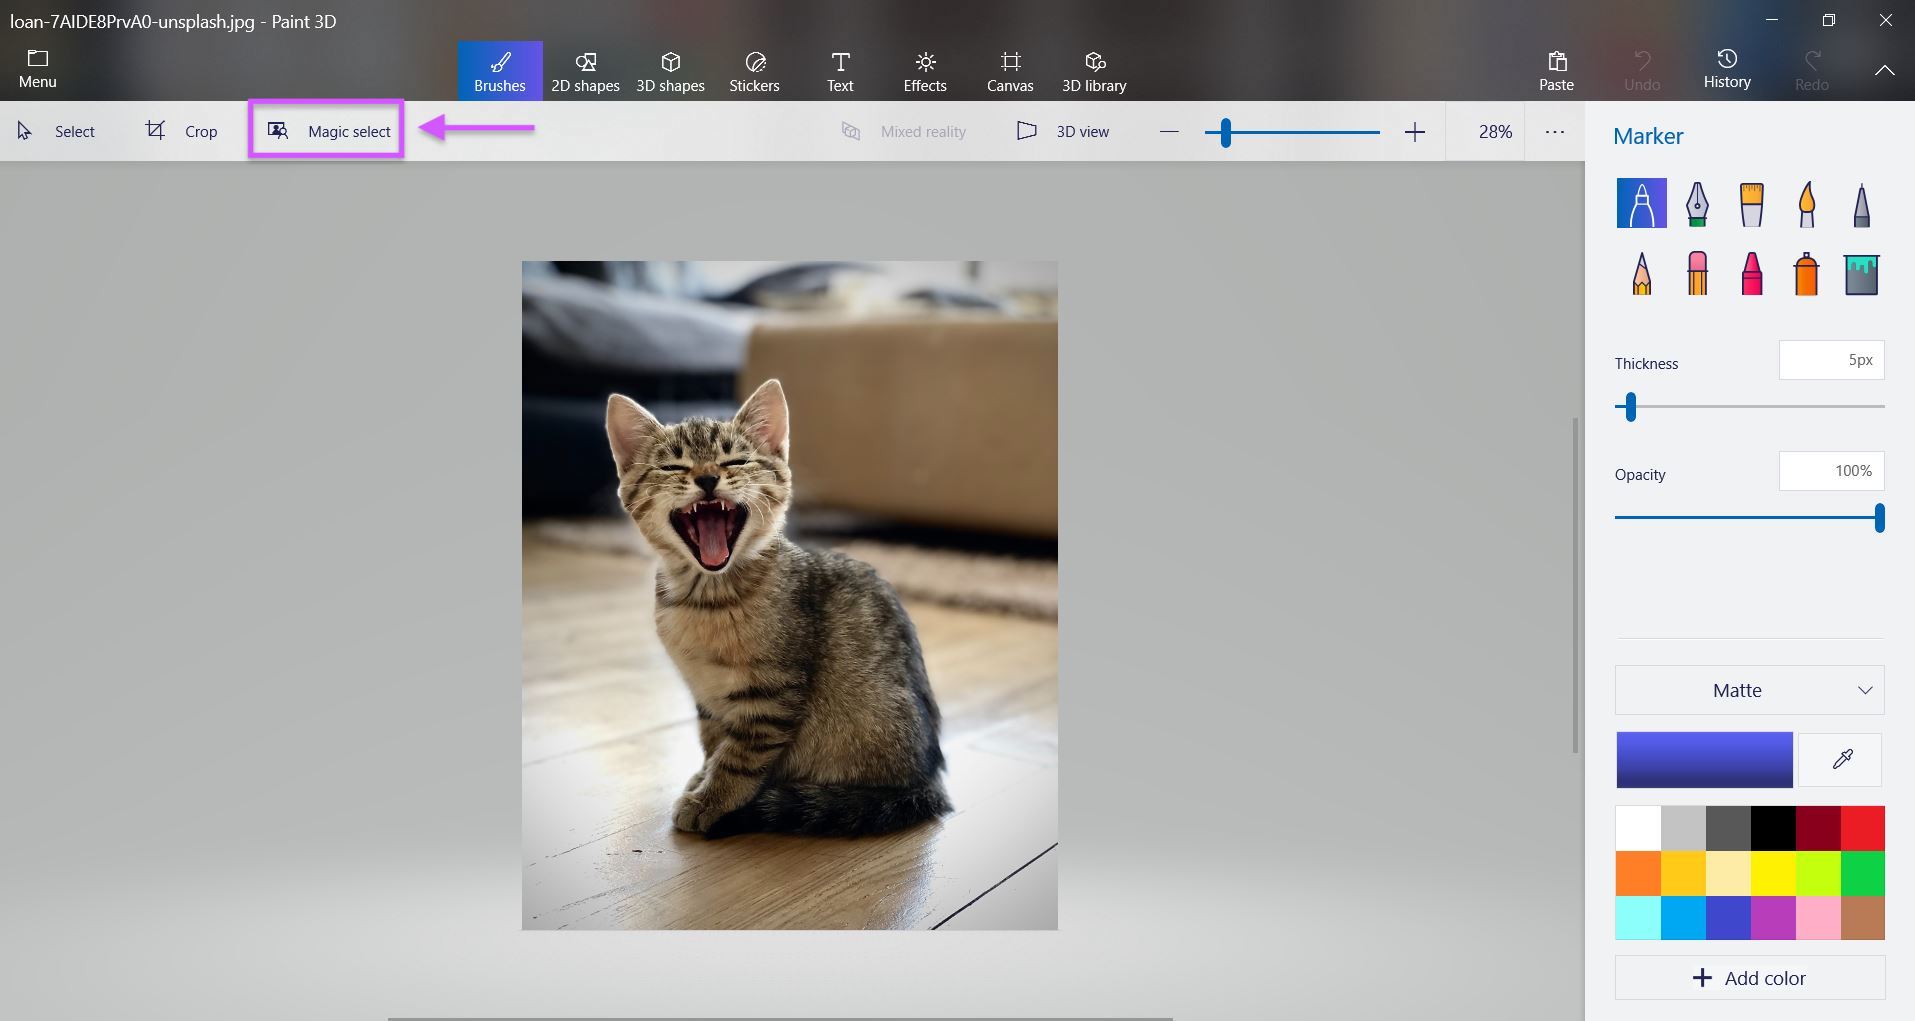
- Access the Edit Mask Feature: After the initial automatic processing, if you need to fine-tune the mask, look for an “Edit Mask” or “Refine Edges” option within the interface.
- Use Precision Tools:
- Green Marker Tool: To include areas that the AI might have mistakenly made transparent, use the green marker. Simply “paint” over the parts of the background that you want to keep or the foreground object that needs to be part of the cutout.
- Eraser Tool: Conversely, if the AI included parts of the background that should be transparent, use the eraser tool to remove them from the foreground selection.
- Adjust Marker Size: For extremely precise adjustments around fine details like hair, fur, or intricate object edges, select a smaller marker size. This allows for pixel-level accuracy, ensuring a clean and professional cutout.
- Preview and Iterate: As you make adjustments, the preview will update in real-time, allowing you to see the effect of your edits. You can iterate on these steps until you achieve a perfectly defined transparent background.
This “Edit mask” capability transforms Tophinhanhdep.com from a simple automatic tool into a comprehensive solution for even the most demanding photo manipulation tasks, enabling users to achieve truly beautiful photography and intricate digital art compositions.
Crafting Logos and Watermarks with Transparency
Beyond general image background removal, Tophinhanhdep.com is also an invaluable asset for creating and applying logos and watermarks with transparent backgrounds – a critical need for digital photography and branding. Whether you envision a simple text-only watermark or a more elaborate graphic logo, the principles of transparency are key.
Creating a Text-Only Watermark:
The simplest way to protect your beautiful photography is with a text watermark.
- Start a New Project with a Transparent Canvas: Within Tophinhanhdep.com’s design tools (or general photo editing features), initiate a new project. Crucially, ensure that the background option is set to “Transparent” from the outset. This pre-empts any need to remove a solid background later.
- Add Your Text: Select the text tool. Choose your desired font, size, and color. Position the text strategically, typically in a corner (bottom right or left) to avoid distracting from the main subject of your high-resolution image. Consider using a neutral color (e.g., grey, light white) for better visibility across diverse images without being overly intrusive.
- Review and Save as PNG: Once satisfied with the appearance, review your text-only watermark. Save the file. When saving, select “PNG” as the file format. This format is essential to preserve the transparent background you’ve created.
Designing a Graphic Logo with Transparency:
For a more distinct brand identity, a graphic logo can be created and saved with a transparent background.
- Transparent Project Setup: Similar to text-only watermarks, begin by creating a new project in Tophinhanhdep.com, ensuring the background is set to “Transparent.” Specify dimensions (e.g., 600x400 pixels) to fit common logo usage.
- Incorporate Graphics and Text: Use Tophinhanhdep.com’s graphic design elements to create your logo. This could involve combining shapes, icons (perhaps from royalty-free image libraries, aligning with image inspiration & collections), and text. Ensure all elements are layered carefully within the transparent canvas.
- Refine and Export as PNG: Adjust fonts, colors, and arrangements until your logo perfectly represents your brand. Once complete, save your logo. Again, selecting “PNG” is vital to ensure the transparent background is preserved, making your logo versatile for use across all your visual design projects.
Applying Your Transparent Watermark/Logo:
Once your transparent logo or watermark is saved, applying it to your photos is simple:
- Open Your Target Image: In Tophinhanhdep.com’s editor, open the photograph you wish to watermark.
- Add Your Transparent Logo as a Layer: Look for an “Add Image” or “Place Embedded” option. Select your previously saved transparent PNG logo/watermark file.
- Position and Adjust Opacity: Your logo will appear on top of your photo. Drag it to the desired position. You can also adjust its opacity to make it more subtle or prominent, depending on your preference for copyright protection versus visual integration.
- Save the Watermarked Photo: Once placed and sized to your satisfaction, save the final image. This method seamlessly embeds your transparent brand mark, enhancing your digital photography and safeguarding your creative work.
This comprehensive approach allows users to not only remove backgrounds but also to actively create foundational transparent assets, fostering consistent visual design and reinforcing brand identity for all their images.
Exploring Diverse Methods for Achieving Image Transparency
While Tophinhanhdep.com offers a streamlined, AI-powered approach to transparent image creation, understanding the broader spectrum of methods available enhances your digital photography and graphic design skills. These techniques vary in complexity, offering flexibility for different project requirements and skill levels.
Leveraging Advanced Editing Software for Detailed Work
For those who require ultimate control and undertake highly intricate photo manipulation, professional-grade editing software provides a robust toolkit for transparency. Even though Tophinhanhdep.com simplifies many of these tasks, knowing the underlying principles from tools like Photoshop can deepen your understanding of visual design.
In advanced editing environments, the process typically involves:
- Layer Management: Images are worked on in layers. The first step is often to “rasterize” or “duplicate” the background layer to convert it into a modifiable layer, detaching it from its locked “background” status. You’d then add a new, blank transparent layer below your content to serve as the new canvas.
- Precision Selection Tools:
- Magic Wand Tool: This tool selects areas of similar color. You can click on the background area you wish to make transparent. Adjusting the “tolerance” setting (e.g., from 32) allows you to control how broad or narrow the color selection is. Multiple clicks might be needed for varied backgrounds.
- Lasso Tools (Lasso, Polygonal Lasso, Magnetic Lasso): These tools offer more manual control. You can draw freehand selections around your subject or use straight lines for geometric shapes.
- Quick Selection Tool / Object Selection Tool / Select Subject (AI-Assisted): Newer versions of professional software, much like Tophinhanhdep.com’s AI, often include intelligent selection tools that can automatically detect and select subjects, greatly speeding up the process.
- Pen Tool: For the most precise and clean cutouts, especially for sharp, complex edges, the Pen tool allows you to create vector paths around your subject, which can then be converted into a selection.
- Deleting the Background: Once the background area is accurately selected, simply pressing the ‘Delete’ key on your keyboard will remove it, revealing the checkered transparent background.
- Masking for Non-Destructive Editing: A more advanced and recommended technique is to use layer masks. Instead of deleting pixels directly, you “paint” with black to hide areas and white to reveal them on a mask layer. This is non-destructive, meaning you can always go back and refine your selection without permanently altering the original image pixels. This is similar to Tophinhanhdep.com’s “Edit mask” feature, offering fine-tuned control with a paintbrush-like interface.
- Saving for Web/PNG: The final, crucial step is saving. To preserve transparency, the image must be saved in a format that supports alpha channels, such as PNG-24 (for high quality) or GIF (for limited colors/animation). “Save for Web and Devices” is a common command in professional software that optimizes images for online use while maintaining transparency.
These detailed methods cater to visual design professionals and digital artists who demand absolute control over every pixel, ensuring their high-resolution outputs are flawless.
Designing with Transparency from the Ground Up
Another powerful approach, particularly within graphic design and when creating new assets, is to design with transparency built-in from the very beginning. This eliminates the need for background removal altogether.
When starting a new project in Tophinhanhdep.com’s design module or any professional design software, you typically get an option to choose the background content of your new canvas. Instead of selecting “White,” “Black,” or a custom color, you specifically choose “Transparent.” This immediately provides you with a canvas that has no default background, represented by the familiar checkerboard pattern.
From this transparent foundation, you can then:
- Add Text: Incorporate any textual elements, knowing they will stand alone without a background box.
- Place Shapes and Vector Graphics: Draw shapes, lines, or import vector graphics. These elements will automatically have transparent surrounds unless you specifically fill them with a solid color or pattern.
- Insert Raster Images (with existing transparency): If you import other images that already have transparent backgrounds (perhaps created using Tophinhanhdep.com’s background remover), they will seamlessly integrate into your new transparent design.
- Create Complex Compositions: Layer multiple elements – text, shapes, icons, and transparent images – to build sophisticated designs, mood boards, or thematic collections where every component contributes to the overall aesthetic without interference from unwanted backgrounds.
This proactive approach to transparency is particularly beneficial for creating image inspiration & collections, developing new graphic design assets, or designing elements for web and app interfaces where flexibility and clean integration are paramount. It ensures that your creative ideas can truly shine without the constraints of a rigid background.
Best Practices and Creative Tips for Transparent Image Use
Creating transparent images is just the first step; effectively using them elevates your visual design projects from good to exceptional. Adhering to best practices and employing creative tips will ensure your transparent assets are optimized for various platforms and integrated seamlessly into your overall visual strategy.
Optimizing Your Transparent Assets for Web and Print
Transparent images, by their nature, often contain more data than their opaque counterparts due to the alpha channel information. Therefore, optimization is key, especially for web use, to maintain fast loading times while preserving quality.
- Choose the Right Format:
- PNG (.png): This is the gold standard for transparent images. It supports a full alpha channel (256 levels of transparency), making it ideal for images with soft edges, gradients, and a wide range of colors. Use PNG for logos, icons, and high-quality cutouts. Tophinhanhdep.com defaults to PNG for transparent downloads for this reason.
- GIF (.gif): While GIFs support transparency (a single transparent color), they are limited to 256 colors, which can lead to pixelation or “jagged” edges, especially on curved lines or complex subjects. GIFs are best for simple icons, small animations, or images with very few colors.
- WebP (.webp): A newer format, WebP offers both superior compression and transparency support compared to PNG and JPEG. Tophinhanhdep.com supports WebP, and it’s an excellent choice for optimizing web images.
- Compression: Even with the right format, transparent PNGs can be large. Utilize Tophinhanhdep.com’s compressors and optimizers to reduce file size without sacrificing noticeable quality. This is vital for website performance and user experience.
- Resolution and Dimensions: Ensure your transparent image is saved at the appropriate resolution and dimensions for its intended use. For web, “Retina” displays might require 2x resolution, but don’t over-optimize for print if it’s strictly for web, and vice-versa. Tophinhanhdep.com’s AI upscalers can help adapt images for different resolution needs while maintaining clarity.
- Pre-visualization: Always preview your transparent image against various backgrounds, including dark, light, and textured ones, to ensure it looks good and performs as intended. What looks good on a white background might disappear or look muddy on a dark one.
Integrating Transparent Images into Your Visual Strategy
Transparent images are powerful tools that, when thoughtfully integrated, can significantly enhance your image inspiration & collections, mood boards, and overall trending styles.
- Layering for Depth and Storytelling: Use transparent images to build depth in your compositions. Overlaying elements with varying opacities can create a sense of distance or focus. For example, a transparent overlay of mist on a nature photo can add mood, or a subtle transparent texture can give an abstract feel to a design. This technique is fundamental to advanced photo manipulation.
- Creating Dynamic Visuals: Combine transparent images with dynamic backgrounds or animations to create engaging visuals. This is particularly effective for aesthetic website headers or interactive elements.
- Consistency in Branding: For logos and watermarks, ensure consistent application across all your digital photography and marketing materials. This reinforces brand recognition and professionalism.
- Mood Boards and Thematic Collections: Transparent elements are perfect for mood boards. You can easily arrange various cutouts (people, objects, textures) over a base image or color palette without the distracting boxes, allowing you to focus purely on the thematic and aesthetic coherence of your collection.
- Experimentation with Overlays: Don’t be afraid to experiment with transparent color overlays, gradient overlays, or pattern overlays to add a unique editing style or emotional tone (e.g., a transparent blue overlay for a sad/emotional feel, or a warm orange for vibrancy). Tophinhanhdep.com’s tools provide the flexibility for such creative explorations.
- Context is Key: Always consider the context where your transparent image will be used. A logo designed for a dark background might need a light outline to stand out on a white background, or vice-versa. Plan your transparent assets with versatility in mind.
By mastering these practices, you transform transparent images from mere technical assets into strategic components of a compelling visual design narrative.
Beyond Static Images: The Power of Transparency in Dynamic Media
While the primary focus of this guide has been on static transparent images, it’s worth noting that the concept of transparency extends powerfully into dynamic media, specifically video. The benefits observed in static images — enhanced visual appeal, seamless integration, and versatility — are amplified in motion, creating truly immersive experiences.
Imagine incorporating Tophinhanhdep.com’s advanced technology to create transparent videos, much like its current capability for images. This would allow you to:
- Overlay Animated Elements: Seamlessly place animated logos, textual captions, or graphic elements directly onto any video footage without a solid background box, creating professional-grade motion graphics.
- Enhance Storytelling: Isolate a subject in a video and place it against a new, dynamic background, opening up limitless creative possibilities for digital art and storytelling that transcends traditional green screen limitations.
- Interactive Web Experiences: Develop captivating website experiences with transparent video backgrounds or foreground elements that blend with user interaction, contributing to cutting-edge visual design.
Though the core of Tophinhanhdep.com currently revolves around image manipulation, the principles of AI-powered background removal and precise masking discussed for images are directly applicable to video. Tools leveraging such technology can automatically identify and render video backgrounds transparent, producing formats like MP4 or MOV with transparency channels. This means the future of visual design is increasingly transparent, blurring the lines between static and dynamic content and offering new avenues for image inspiration & collections that move.
Conclusion
The ability to create transparent images is an indispensable skill in today’s visually-driven world. From safeguarding your beautiful photography with watermarks to crafting intricate graphic designs and optimizing aesthetic web elements, transparency unlocks a universe of creative possibilities. As we’ve explored, Tophinhanhdep.com provides a powerful, user-friendly platform, leveraging cutting-edge AI to make image background removal and transparent asset creation accessible to everyone.
Whether you choose the instantaneous ease of our AI-powered background remover, the meticulous precision of our mask editing tools, or the foundational approach of designing with transparency from scratch, Tophinhanhdep.com empowers you to transform your creative ideas into stunning visual realities. By understanding the core principles, optimizing your assets, and applying them strategically, you can ensure your images always stand out, seamlessly integrating into any context and truly speaking volumes. Dive into the world of transparent images today with Tophinhanhdep.com, and elevate your digital presence to new, visually inspiring heights.