How to Create Vector from Image: Transform Your Visuals for Stunning Clarity

In the dynamic world of digital imagery and visual design, the ability to manipulate and optimize graphics is paramount. Whether you’re a professional graphic designer, a budding digital artist, or simply someone looking to enhance their personal collection of wallpapers and backgrounds, understanding the fundamental differences between image types and knowing how to convert them is a powerful skill. At Tophinhanhdep.com, we champion high-resolution, versatile visuals, and a key technique for achieving this is mastering the art of converting raster images into scalable vector graphics. This comprehensive guide will walk you through the process, benefits, and tools involved in vectorizing your images, ensuring your creations always look crisp, clean, and professionally polished, regardless of scale.
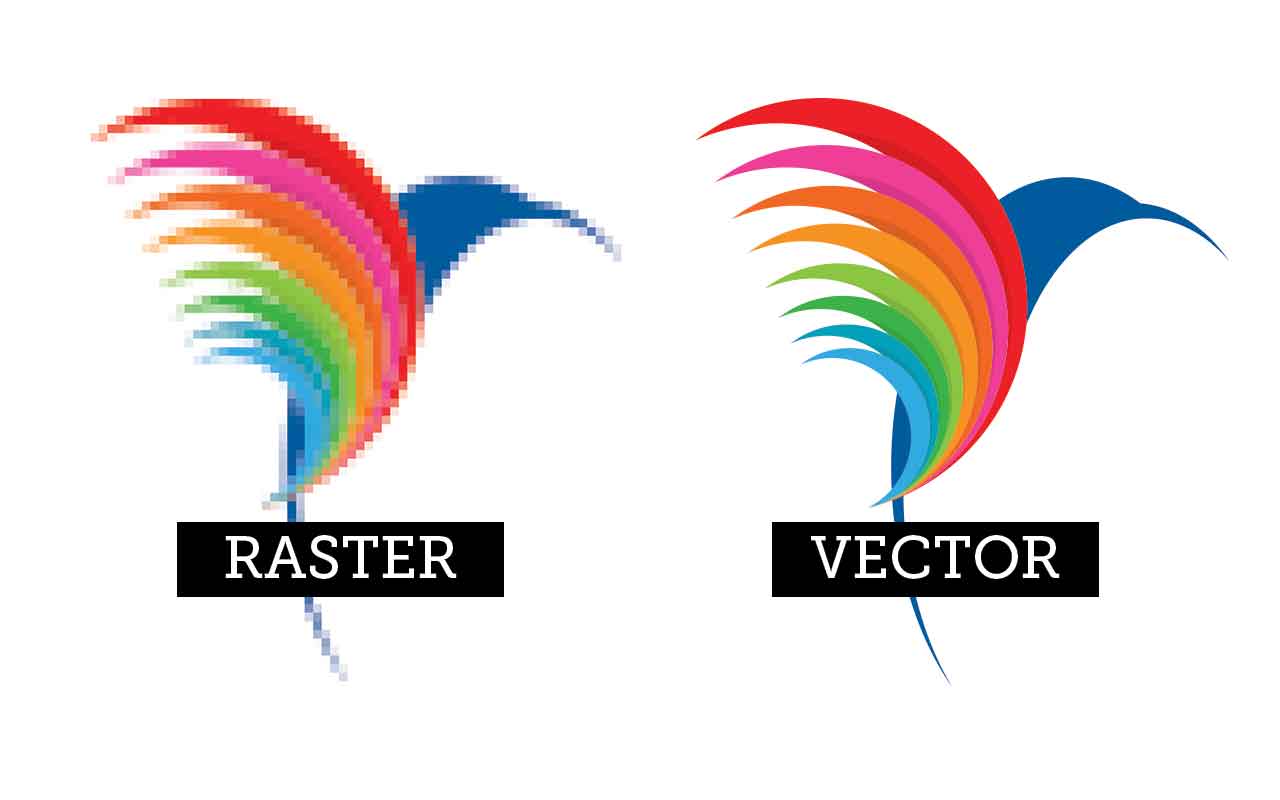
Understanding Raster vs. Vector Graphics: The Foundation of Digital Art
Before diving into the “how-to,” it’s crucial to grasp the two primary categories of digital images: raster graphics and vector graphics. These distinctions form the bedrock of digital art and design, influencing everything from file size to scalability and overall image quality.

What are Raster Images?
Raster graphics, often referred to as bitmap images, are the most common type of digital image you encounter daily. These images are essentially rectangular grids made up of individual “pixels,” or tiny square dots, each assigned a specific color value. When viewed from a distance, these pixels blend together to form a cohesive picture.
Familiar file types like .jpg (Joint Photographic Experts Group), .png (Portable Network Graphics), and .bmp (Bitmap) are all examples of raster formats. Photographs, digital paintings, and many of the beautiful wallpapers and backgrounds you find on Tophinhanhdep.com are initially raster images.
The defining characteristic and main limitation of raster graphics lie in their fixed resolution. Because they are pixel-based, scaling a raster image up (making it larger) causes the individual pixels to stretch, resulting in a noticeable loss of quality. The image becomes “pixelated” or blurry, losing its apparent sharpness. This makes them unsuitable for applications requiring frequent resizing, especially for large-format printing or professional branding where precision is key. While perfect for capturing detailed visual photography and realistic textures, their non-scalable nature presents challenges in graphic design contexts.
![]()
What are Vector Images?
In stark contrast to raster graphics, vector graphics are not composed of pixels. Instead, they are built from mathematical expressions that define geometric primitives like points, lines, curves, and shapes. These primitives are then assigned attributes such as color, stroke, and thickness.
The most significant advantage of vector graphics is their infinite scalability without any loss of quality. Because their properties are defined by mathematical formulas, a vector image can be scaled up or down to any size – from a tiny icon on a website to a massive billboard – and it will always render with smooth, crisp lines and perfect resolution. There are no pixels to stretch or blur.
Common vector file formats include .ai (Adobe Illustrator), .eps (Encapsulated PostScript), .svg (Scalable Vector Graphic), and .dxf (Drawing Exchange Format). Vector images are the preferred format for logos, clip art, icons, technical drawings, and illustrations where scalability and precision are paramount. They are fundamental to graphic design, digital art, and photo manipulation, enabling creative ideas to be deployed across diverse mediums without compromise.
Why Vectorization Matters for Your Tophinhanhdep.com Creations
For anyone involved in visual design or aiming for high-quality image presentation, understanding and utilizing vectorization is invaluable.
- For Branding and Marketing: If you’re designing a logo for a business, a brand identity kit, or promotional materials, vector files are essential. They ensure your logo looks sharp on a business card, a large banner, or even a vehicle wrap, maintaining brand consistency and professionalism.
- For Large-Scale Printing: Imagine a stunning nature photograph from Tophinhanhdep.com that you want to transform into a billboard. While the original photo might be high-resolution, converting key elements or text into vectors ensures maximum sharpness for such large formats. This is also true for t-shirt designs, decals, stickers, and other merchandise.
- For Digital Art and Illustrations: Digital artists often work with vector graphics to create illustrations that can be used in various projects, from small web graphics to large print designs, without ever compromising fidelity.
- For Web Design: SVG files, a popular vector format, are increasingly used for web icons and graphics. They are lightweight, load quickly, and scale perfectly across all screen sizes and resolutions, contributing to a seamless user experience.
- For Editing and Manipulation: Vector files are inherently easier to edit and manipulate. You can adjust individual shapes, colors, and paths with precision, offering unparalleled creative flexibility for photo manipulation and refining your digital art.
At Tophinhanhdep.com, we understand the importance of quality, whether it’s a beautiful photography piece or an abstract background. Vectorizing elements within these images or creating new graphic assets as vectors ensures they meet the highest standards for high-resolution stock photos and aesthetic visuals.
Essential Tools for Vectorizing Images
The good news is that converting raster images to vectors, or creating vectors from scratch, is more accessible than ever. A variety of tools, ranging from free online converters to professional-grade software, can help you achieve stunning results. Selecting the right tool often depends on your specific needs, budget, and desired level of control.
Automated Online Converters: Quick and Convenient Solutions
For quick conversions and simpler images, online vectorization tools offer a convenient solution. Websites like vectorizer.io (or a similar tool offered by Tophinhanhdep.com in its “Image Tools” section) allow you to upload a raster image (PNG, JPG, BMP) and automatically convert it into a scalable vector graphic (SVG, EPS, DXF).
How they work: These tools analyze the pixel color information of your raster image, detect edges and areas of similar brightness or color, and then translate them into geometric objects like lines, curves, and shapes. The process is largely automatic, requiring minimal input from the user.
Pros:
- Ease of Use: Simply upload your image and download the vector output. No complex software installation or steep learning curve.
- Speed: Conversions are often very fast, providing instant results.
- Accessibility: Many are free or offer free credits for evaluation, making them accessible to hobbyists and those needing occasional conversions.
Cons:
- Accuracy and Quality: For highly detailed photographs or images with subtle color gradients, automated tools may struggle to produce a perfectly accurate vector. The output might have imperfect or “crooked” lines, and sometimes introduce unnecessary shapes.
- Limited Control: Users typically have fewer options for fine-tuning the conversion process compared to professional software.
- Watermarks and Ads: Free versions of these tools may include watermarks on the output or be laden with intrusive ads, which can detract from the user experience and potentially lead to malicious websites.
- Resolution Output: Some free tools might not produce truly high-resolution vectors without additional post-processing.
For users looking for quick fixes for simple logos or icons, these tools can be a good starting point. However, for critical design projects, a more controlled approach is often necessary. Tophinhanhdep.com aims to provide and recommend image tools that balance convenience with quality, helping you optimize your images effectively.
Professional Graphic Design Software: Unlocking Precision and Control
For designers and anyone seeking high-quality, editable vector output, professional graphic design software is the definitive choice. These applications offer robust features for both automatic tracing and manual vector creation, providing unparalleled precision and creative control.
- Adobe Illustrator: The industry standard for vector graphics, Illustrator offers powerful “Image Trace” functionality that automates vectorization with extensive customization options. It’s also ideal for creating vectors from scratch, supporting complex graphic design, digital art, and photo manipulation tasks.
- CorelDRAW Graphics Suite: Another leading professional toolkit, CorelDRAW provides comprehensive vector illustration capabilities, including tools for converting raster images and creating original vector art. Corel Vector (formerly Gravit Designer Pro) is its web-based counterpart, offering similar features on any device.
- Inkscape: A popular open-source and free alternative, Inkscape provides a robust set of tools for vector graphics creation and editing, including a trace bitmap feature for converting raster images. It’s an excellent option for those on a budget who still require professional-grade control.
- Vectr: Another free, web-based tool that simplifies vector graphic design and editing, offering a user-friendly interface for creating and converting images.
These software packages are central to the “Visual Design” and “Digital Photography Editing Styles” categories on Tophinhanhdep.com, empowering users to execute advanced creative ideas.
Tophinhanhdep.com’s Recommended Approach: Quality and Ease
At Tophinhanhdep.com, we prioritize both quality and user-friendliness. While online converters are quick, we generally recommend utilizing professional software for any project where the fidelity and scalability of the vector image are critical. For optimal results, especially with complex imagery or when aiming for artistic interpretation (like vector portraits), manual tracing or carefully fine-tuning automated tracing features in software like Adobe Illustrator or CorelDRAW is the best path.
For those not ready to invest in professional software, exploring reliable open-source options like Inkscape or taking advantage of services that offer professional vectorization (like the “Redraw” service mentioned in one of the sources) can bridge the gap. Tophinhanhdep.com’s “Image Tools” section is curated to guide you toward the best converters and optimizers for your needs, ensuring your images, from abstract backgrounds to beautiful photography, are always presented at their best.
Step-by-Step Guide: Vectorizing an Image Using Software
Let’s delve into the practical steps of converting a raster image to a vector using professional software principles, focusing on the commonly used “Image Trace” feature and manual tracing techniques. While specific menu names may vary slightly between Adobe Illustrator, CorelDRAW, or Inkscape, the underlying concepts remain the same.
Preparing Your Image for Vectorization
The quality of your source raster image significantly impacts the vectorization outcome. Thoughtful preparation can make the process smoother and yield better results.
- Choose the Right Image: Simple images with clear lines, strong contrast, and minimal colors generally vectorize best. Logos, clip art, and illustrations are ideal candidates. While photos can be vectorized, they often result in a stylized, artistic interpretation rather than a perfect replica, due to the inherent complexity of photographic detail. For vector portraits, look for pictures with good lighting and clear contrast between features, which will make outlining easier.
- Crop and Simplify: Before conversion, crop your image to focus on the area you want to vectorize. Remove any distracting backgrounds or unnecessary elements. Some tools, like those found in Tophinhanhdep.com’s “Image Tools” section, might even offer AI-powered background removal to simplify your image.
- Adjust Contrast (Optional but Recommended): If your image is washed out or lacks strong definition, consider enhancing its contrast using basic photo editing tools. This makes it easier for vectorization software to detect distinct edges and shapes. Tophinhanhdep.com provides resources on digital photography editing styles that can help with this pre-processing step.
- Image Format: Ensure your image is in a common raster format like JPG, PNG, or BMP.
Automated Tracing with Image Trace (or similar features)
Automated tracing is the fastest way to convert a raster image into a vector. This process involves the software analyzing your image and automatically generating vector paths. We’ll use the “Image Trace” feature (or its equivalent in other software) as an example.
- Open Your Image: Launch your chosen software (e.g., Adobe Illustrator) and open the raster image you want to vectorize.
- Place the Image: If starting a new document, go to
File > Placeand select your image. - Select the Image: Use the
Selection Toolto click on your placed image. This will activate the relevant image options, often found in aPropertiespanel or a dedicated toolbar. - Access Image Trace: Look for an “Image Trace” button or go to
Window > Image Traceto open the Image Trace panel. It’s often located inQuick Actionsfor convenience. - Choose a Preset: The software offers various presets designed for different types of images.
- High Fidelity Photo / Low Fidelity Photo: Best for detailed photos or complex artwork, yielding more colors and intricate paths.
- 3 Colors, 6 Colors, 16 Colors: Ideal for logos, simpler illustrations, or artwork with flat colors, limiting the output to a specific number of hues.
- Shades of Gray / Black and White Logo: For grayscale or purely monochrome designs.
- Sketched Art, Silhouettes, Line Art, Technical Drawing: Specific presets for converting sketches or line-based drawings.
- Tick ‘Preview’: Ensure the ‘Preview’ checkbox is enabled in the Image Trace panel so you can see the changes in real-time as you adjust settings.
- Fine-Tune the Settings: Once you select a preset, you might need to adjust parameters to achieve the desired look.
- Mode: Switch between Color, Grayscale, or Black & White.
- Colors/Threshold: For color modes, adjust the ‘Colors’ slider to increase or decrease the number of colors in your vector. For black and white, adjust ‘Threshold’ to control the intensity of black vs. white.
- Advanced Options (Toggle Open):
- Paths: Controls how closely the vector paths hug the original image’s edges. More paths create more detail but can increase file size. Fewer paths result in a smoother, simpler design.
- Corners: Adjusts the sharpness of corners in your design. Higher values create sharper angles, lower values produce more rounded corners.
- Noise: Helps to eliminate or add small, often unwanted, details. A higher noise value might retain more subtle details, while a lower value will clean up speckles. Find a balance that accurately depicts your design without introducing clutter.
- Expand the Image: Once you’re satisfied with the trace, click the
Expandbutton (usually found in thePropertiespanel orObject > Image Trace > Expand). This action converts the temporary Image Trace object into editable vector paths. - Ungroup (if necessary): After expanding, your image will often be grouped as a single object. Right-click on the image and select
Ungroup(orObject > Ungroup) to separate the individual vector shapes. You can then select and edit specific color areas or delete unwanted backgrounds.
Manual Tracing for Artistic Control
For highly stylized results, intricate designs, or when transforming complex photography into an artistic vector portrait, manual tracing offers ultimate control. This method requires more time and patience but delivers precise, custom-designed vectors.
- Import and Lock the Image: Place your raster image on the canvas. Lower its opacity (e.g., to 50-70%) so your tracing lines are clearly visible. Then, lock the image layer (
Layer > Lock Selectionor through the Layers panel) to prevent accidental movement. - Select Drawing Tools: The
Pen Tool(P) andBezigon Tool(in Corel Vector) are your primary instruments. The Pen Tool allows you to create precise paths with anchor points and Bézier handles for smooth curves. - Outline Major Shapes: Start by outlining the main components of your image (e.g., face, hair, clothing, background elements for a portrait). Focus on creating closed paths. Don’t worry about exact colors yet; use a contrasting stroke color and no fill for clarity. Create each major “piece” on a new layer or lock finished paths as you go.
- Add Main Features and Details: Once the base shapes are done, move on to smaller, key features like eyes, eyebrows, mouth, and accessories. Again, trace these with precision, aiming for closed shapes.
- Build with Lights, Shadows, and Mid-tones: This is where the artistic interpretation comes in, especially for vector portraits. Observe the original image to identify areas of light reflection, mid-range tones, and deep shadows.
- Light Spots: Create solid shapes for the lightest areas, mimicking highlights on skin, hair, and objects.
- Mid-tones: Outline shapes for the darker shades that aren’t quite shadows.
- Shadows: Define the darkest areas, such as under the jawline, inner arms, or where objects cast shadows.
- Tip: Choosing an image with good contrast simplifies this step significantly.
- Refine Outlines: Add final, more solid outlines at intersection points (e.g., between fingers, the division of face and neck) to better delineate shapes and add definition.
- Apply Colors: Once all your shapes are traced, hide or delete the original raster image. Select your vector shapes and use the
Color Pickertool to sample colors directly from the original image (if it’s still visible) or choose a new color palette. Fill your shapes accordingly. - Final Touches and Blending Modes: Experiment with color adjustments, hues, and saturation. You can even add a rectangular overlay with a blending mode (like “Screen” or “Multiply”) to create a cohesive color effect, enhancing the overall aesthetic. This level of creative control is what makes manual tracing a powerful technique for digital art and photo manipulation.
Post-Vectorization: Refining and Exporting Your Vector Art
Once you have your vectorized image, whether from automated tracing or manual effort, the final steps involve refining it and saving it in the appropriate format.
- Edit and Refine:
- Ungroup and Delete: If your vector is still a single grouped object, ungroup it. This allows you to select individual shapes. Delete any unwanted background elements or extraneous paths.
- Adjust Colors: Select entire color groups (e.g.,
Select > Same > Fill Colorin Illustrator) to change or tweak colors across the design. - Smooth Paths: Use tools like the
Smooth Toolor simplify paths to remove unnecessary anchor points, making your vector cleaner and more efficient. - Group Objects: Once you’re happy with the arrangement, group related elements (
Object > Group) to manage them easily.
- Save Your Master File: Always save your work in the native file format of your design software (e.g.,
.aifor Illustrator,.cdrfor CorelDRAW). This preserves all layers and editability, acting as your master copy. - Export in Vector Formats: For use in other applications or for sharing, export your image into a standard vector format:
- SVG (Scalable Vector Graphic): Widely supported on the web, excellent for icons and interactive graphics.
- EPS (Encapsulated PostScript): A versatile format often used for print and professional graphic exchange.
- PDF (Portable Document Format): Can contain vector data and is excellent for sharing and printing.
- DXF (Drawing Exchange Format): Commonly used in CAD (Computer-Aided Design) applications.
- Go to
File > Export > Export Asand select your desired format from the dropdown menu. Ensure relevant options (like transparency) are set correctly.
Remember, exporting to a raster format (like JPG or PNG) will convert your vector back into pixels, losing its infinite scalability. Only do this when you need a specific pixel-based output, and always keep your vector master file. Tophinhanhdep.com’s Image Converters and Optimizers can help you manage these exports efficiently.
Beyond Conversion: Leveraging Vector Graphics for Your Visual Projects
Understanding how to create vector graphics from images opens up a world of possibilities for your creative endeavors. At Tophinhanhdep.com, we encourage you to leverage this skill to enhance your projects and take your visual content to the next level.
- Branding & Marketing Mastery: From crafting high-resolution logos for new businesses to designing eye-catching promotional materials, vector graphics ensure your brand identity is consistently sharp across all mediums. This aligns perfectly with
Tophinhanhdep.com’s commitment to providinghigh-resolutionstock photosand inspiringcreative ideasfor marketing campaigns. - Unique Digital Art & Illustrations: Transform
beautiful photographyorabstractconcepts into distinctivedigital artpieces that retain their quality at any size. Experiment withphoto manipulationtechniques to create strikingaestheticvisuals formood boardsorthematic collections. - Custom Merchandise and Apparel: Design
t-shirt designs, stickers, decals, and other merchandise that will print flawlessly without pixelation. Vectorization is crucial fortrending stylesin customized products. - Dynamic Web Design Elements: Use
SVGicons and graphics on your websites to ensure they look crisp on any device, from smartphones to large monitors, enhancing user experience and reducing load times. OurImage Optimizerscan further refine these assets. - Personalized Visual Content: Create custom
wallpapersandbackgroundsby vectorizing elements from your favorite images, giving them a unique, polished look for personal use or sharing inTophinhanhdep.com’s collections.
The ability to vectorize images is more than just a technical skill; it’s a gateway to limitless creative expression and professional-grade visual output. It empowers you to bridge the gap between photographic realism and graphic design precision, ensuring your images from Tophinhanhdep.com and beyond are always of the highest quality.
Conclusion
The journey from a pixel-based raster image to a mathematically defined vector graphic is a fundamental skill in the digital age. By understanding the core differences between these image types and mastering the tools and techniques for vectorization, you unlock unparalleled versatility, scalability, and quality for your visual projects.
Whether you’re using automated online converters for quick tasks or delving into the precision of professional software like Adobe Illustrator for intricate digital art and graphic design, the benefits of vector graphics are undeniable. They are the backbone of crisp logos, stunning billboards, and endlessly editable illustrations.
At Tophinhanhdep.com, we are dedicated to helping you create, discover, and optimize beautiful photography, aesthetic backgrounds, and inspiring visual design elements. By embracing vectorization, you ensure your creative vision is never limited by resolution, allowing your high-resolution images and creative ideas to shine in every application. Dive in, experiment with these methods, and transform your images into scalable masterpieces that truly stand the test of any size.