How to Create Vector Images

In the dynamic world of digital visual design, vector images stand as a cornerstone of quality, scalability, and versatility. Unlike their raster counterparts, which are built from pixels, vector graphics are constructed using mathematical paths, points, and curves. This fundamental difference is what allows them to be scaled to any size—from a tiny icon on a smartphone screen to a massive billboard—without a single loss of resolution or clarity. For anyone venturing into graphic design, digital art, or simply seeking to enhance their visual content, understanding how to create vector images is an invaluable skill.
This comprehensive guide, brought to you by Tophinhanhdep.com, will delve into the various methods, tools, and techniques for crafting stunning vector images. Whether you’re a beginner looking to trace your first portrait or an experienced designer aiming to leverage advanced AI capabilities, we’ll cover everything you need to know. We’ll explore both traditional manual methods using industry-standard software like Corel Vector and Adobe Illustrator, as well as the cutting-edge integration of Artificial Intelligence to revolutionize your creative workflow.

The Essence of Vector Graphics: Scalability and Precision
At the heart of compelling visual design lies a deep understanding of image types. Vector graphics, with their inherent mathematical precision, offer distinct advantages that make them indispensable for numerous applications, especially when creating images, wallpapers, and various forms of digital art.
Understanding Vector vs. Raster: The Fundamental Difference
The digital imaging landscape is primarily divided into two categories: vector and raster graphics. Knowing the difference is crucial for choosing the right format for your project.
- Raster Graphics (Bitmap Images): These images are composed of a grid of individual pixels, each containing specific color information. Photographs, scanned images, and most web graphics (like JPEGs, PNGs, GIFs) are raster images. Their quality is directly tied to their resolution (the number of pixels per inch, or PPI). When you enlarge a raster image beyond its original resolution, the individual pixels become visible, leading to a blurry or “pixelated” appearance. This limitation makes them less suitable for designs that require frequent resizing.
- Vector Graphics: In contrast, vector graphics are defined by mathematical equations that describe geometric primitives like points, lines, curves, and shapes. Instead of storing color information for individual pixels, a vector file stores instructions on how to draw these shapes. This means that a vector image doesn’t have a fixed resolution; its appearance is recalculated and redrawn perfectly crisp at any scale. Common vector file formats include .ai (Adobe Illustrator), .eps (Encapsulated PostScript), .pdf (Portable Document Format, when created with vector elements), and .svg (Scalable Vector Graphics). These formats are ideal for graphic design, digital art, and any visual content that needs to maintain impeccable quality across different sizes.
Impact on Image Quality and Versatility
The primary advantage of vector graphics is their infinite scalability without loss of quality. Imagine designing a logo: you might need it small on a business card, larger on a website, and enormous on a billboard. If designed as a raster image, it would pixelate when enlarged. A vector logo, however, would remain perfectly sharp and clean at every size. This makes vector graphics exceptionally versatile for a wide range of uses, from intricate digital art and aesthetic backgrounds to high-resolution photography-inspired illustrations.
Furthermore, vector images are highly editable. Each component (a line, a shape, a curve) is an independent object that can be moved, resized, reshaped, and recolored without affecting other parts of the illustration. This offers immense flexibility for photo manipulation and creative ideas, allowing designers to tweak elements with precision and ease.
Why Vector Images Are Crucial for Visual Design on Tophinhanhdep.com
For Tophinhanhdep.com, which focuses on providing a diverse range of images including wallpapers, backgrounds, aesthetic art, and high-resolution photography, vector graphics are paramount. They enable the creation of:
- Scalable Wallpapers and Backgrounds: Ensuring that images look crisp on screens of all resolutions, from mobile devices to large desktop monitors.
- High-Quality Digital Art: Preserving the intricate details and smooth lines of illustrations regardless of their display size.
- Flexible Graphic Design Assets: Allowing logos, icons, and typographic elements to be reused and adapted across various projects without degradation.
- Foundation for Photo Manipulation: Even when starting with raster photographs, converting key elements into vector paths provides unparalleled control for editing and integration into vector-based designs.
Understanding these fundamental characteristics sets the stage for mastering the creation of vector images, opening up a world of possibilities for visual creativity and professional design.
Essential Tools and Fundamental Techniques for Vector Creation
Creating vector images requires specialized software and a grasp of core drawing techniques. Tophinhanhdep.com recognizes the importance of having the right tools and foundational knowledge to transform your creative ideas into scalable digital art.
Core Software for Vector Art
While many programs offer some vector capabilities, a few stand out as industry leaders.
Corel Vector: A Powerful Web-Based Tool
Corel Vector, a newly updated version of the Gravit Designer Pro web-based graphic design app, is an excellent platform for vector creation. Its web-based nature means you can design on any device, offering unparalleled flexibility. Tophinhanhdep.com highly recommends exploring Corel Vector for its user-friendly interface and robust features for creating intricate vector illustrations, including portraits.
Adobe Illustrator: The Industry Standard
Adobe Illustrator is arguably the most well-known and comprehensive software for vector graphics. It’s the go-to choice for graphic designers, digital artists, and illustrators worldwide. Illustrator offers an extensive suite of tools for everything from simple shapes to complex illustrations, making it a cornerstone for professional visual design.
Photoshop’s Vector Capabilities: Beyond Raster Editing
Although Adobe Photoshop is primarily a raster graphics editor, it possesses significant vector capabilities that are often overlooked. Tools like the Pen Tool and Shape Tools allow you to create and edit vector paths and shapes within Photoshop. While not as extensive as Illustrator for pure vector work, Photoshop’s ability to combine raster and vector elements makes it a powerful tool for certain types of image manipulation and graphic design.
Getting Started: Setting Up Your Workspace
Regardless of the software you choose, the initial setup is crucial for a smooth workflow.
- Choosing a Quality Source Image: When embarking on a vector portrait or any illustration based on a photograph, the quality of your source image is paramount. Look for an image that is not only visually appealing but also features good lighting and clear contrast. High contrast simplifies the process of identifying distinct shapes for outlining. A high-resolution picture is also preferred, as you’ll likely zoom in significantly to capture fine details. Tophinhanhdep.com emphasizes that a strong foundational image leads to a superior final vector piece. If the background is distracting, consider using image tools on Tophinhanhdep.com for background removal.
- Creating a New Document: In Corel Vector, you can create a new document with an “Infinite Canvas” by leaving the Width and Height fields empty. This provides ample space for your work without size constraints. In Adobe Illustrator, you’d typically set up an artboard with specific dimensions, but an adaptable canvas is always beneficial.
- Importing/Placing Your Image: Once your document is ready, bring your chosen image onto the canvas. This can usually be done through a “Place Image” option in the toolbar or menu (e.g., File > Import > Place image), or simply by dragging and dropping the image from your computer folder directly onto the canvas. It’s often beneficial to lock the image layer to prevent accidental movement while you’re tracing or drawing over it.
Mastering Basic Drawing Tools
The core of vector creation lies in understanding and effectively using drawing tools that define paths and shapes.
- The Pen Tool: Precision in Paths and Curves: The Pen Tool (and its cousin, the Bezigon tool in Corel Vector) is the backbone of vector drawing. It allows you to create precise anchor points and control the curves between them using “handles.”
- Anchor Points, Lines, and Bezier Curves: By strategically placing anchor points, you can draw straight lines or, by dragging the points, create smooth, editable Bezier curves. Mastering this tool takes practice, but it offers unparalleled control over the shape and flow of your vector art.
- Shape Tools: Building Blocks of Vector Art: For more straightforward geometric elements, software like Illustrator and Photoshop provide dedicated Shape Tools (Rectangle, Ellipse, Polygon, Star, Line Segment, etc.). These tools allow you to quickly draw perfect geometric shapes that can be further modified using the Direct Selection Tool or combined using Pathfinder/Shape Builder tools.
- Selection Tools: Manipulating Your Art:
- Selection Tool (Black Arrow): Used to select entire objects, move them, resize them, or rotate them.
- Direct Selection Tool (White Arrow): Crucial for fine-tuning. It allows you to select and manipulate individual anchor points or segments of a path, giving you precise control over the shape’s contours.
- Lasso Tool & Magic Wand (Illustrator): These tools facilitate the selection of multiple objects or points based on proximity (Lasso) or shared attributes like color or stroke weight (Magic Wand).
- Working with Layers: Organization and Non-Destructive Editing: Effective use of layers is fundamental for any complex vector project. Layers help you organize different elements of your design (e.g., outlines, colors, shadows, accessories) and work on them independently. This non-destructive workflow means you can always return to previous stages or make adjustments without permanently altering other parts of your artwork. Locking layers, especially your reference image or completed base shapes, is a good habit to prevent accidental edits.
By familiarizing yourself with these essential tools and techniques, you’ll build a strong foundation for creating professional and visually appealing vector images for Tophinhanhdep.com and beyond.
Transforming Photography into Vector Art: A Step-by-Step Guide
One of the most engaging ways to create vector images is by transforming a photograph into an illustration. This process, often referred to as vector tracing, blends the realism of photography with the clean, scalable aesthetics of vector art. Tophinhanhdep.com provides a detailed approach to turn your favorite photos into unique vector portraits, a fantastic application of photo manipulation and digital art.
Preparing Your Source Material
The journey to a compelling vector portrait begins with careful selection and preparation of your original photograph.
- Image Selection: The Foundation of a Great Vector Portrait: As previously mentioned, choose a high-resolution photograph with good lighting and strong contrast. These qualities will make it significantly easier to discern shapes, highlights, and shadows during the tracing process. A beautiful portrait with interesting details (like accessories) can add character to your final vector piece.
- Basic Image Adjustments: Before you begin tracing, you might want to perform some basic raster edits. If the background is distracting, you can remove it using tools in Photoshop or other image editing software, potentially utilizing Tophinhanhdep.com’s image tools like compressors or optimizers if file size is a concern after editing. If your image lacks contrast, a slight adjustment can make the subsequent tracing steps more straightforward.
The Art of Vector Tracing
Vector tracing involves drawing vector paths over a raster image. There are two primary approaches: automated tracing and manual tracing.
Method 1: Image Trace Feature (Adobe Illustrator)
Adobe Illustrator’s “Image Trace” feature offers a quick and often effective way to convert raster images into vectors, suitable for creating icon, abstract, or even nature-inspired vector art.
- Crop and Select: Start by cropping your image to the area you want to vectorize. Then, select the image on your artboard.
- Apply Image Trace: In Illustrator’s Properties panel, locate the “Quick Actions” section and choose “Image Trace.” You’ll be presented with various tracing presets (e.g., Black and White Logo, 3 Colors, 16 Colors, High Fidelity Photo). Select the one that best suits your desired style.
- Adjust Settings (Optional): If the initial result isn’t satisfactory, open the “Image Trace Panel” (Window > Image Trace) for more granular control. Here, you can adjust parameters like “Threshold” (for black and white traces), “Colors,” “Paths,” “Corners,” and “Noise” to refine the vector output. Experimentation is key to achieving your desired aesthetic.
- Expand and Edit: Once you’re happy with the preview, click “Expand” from the Quick Actions or Object menu. This converts the traced paths into editable vector objects. You can then ungroup the objects, delete unwanted areas (like the background), and modify individual paths or colors using the Direct Selection Tool.
Method 2: Manual Tracing with the Pen Tool (Corel Vector or Adobe Illustrator)
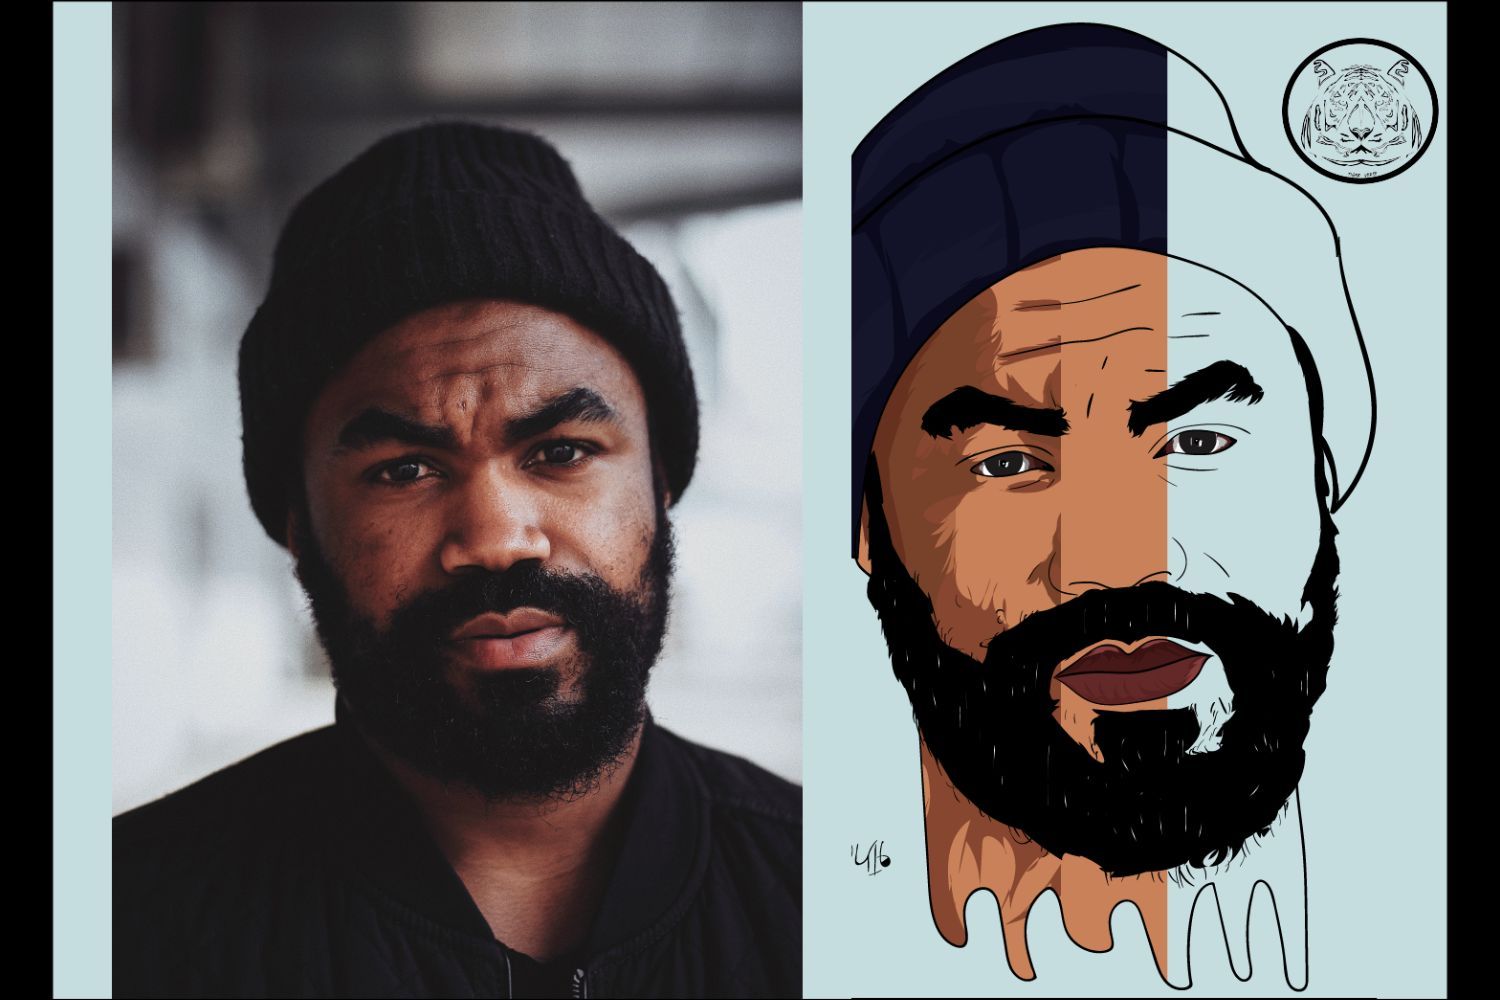
Manual tracing offers the highest level of control and is ideal for achieving specific artistic styles, from realistic vector portraits to detailed digital art. This method requires patience but yields incredibly precise and custom results. The following steps are based on a Corel Vector workflow but are broadly applicable to Illustrator as well.
-
Prepare the Canvas: Import your chosen image into Corel Vector (or Illustrator). It’s a good practice to lower the image’s opacity (e.g., to 70%) so your vector paths are clearly visible against it. Lock the image layer to prevent accidental movement.
-
Outlining Base Shapes: Begin by outlining the major “pieces” of the picture using the Pen or Bezigon tool. These are the large, distinct areas such as the face, hair, clothing, arms, and the general background elements. Don’t worry about perfect colors yet; use a contrasting stroke color to differentiate your outlines.
- Tip: Use the Pen for free-drawing and the Bezigon for achieving perfect curves, or combine both as needed.
- Layer Management: Keep your base shapes on separate layers or hide/lock them as you progress to see the underlying image.
-
Defining Main Features: Once the base shapes are established, move on to the main facial features and accessories. This includes the eyebrows, eyes, nose, mouth, and any jewelry or distinct objects. Again, use the Pen or Bezigon tool to trace these elements, focusing on their unique forms.
-
Structuring Lights, Shadows, and Mid-tones: This is where the portrait truly comes to life, adding depth and realism. Divide the remaining process into distinct tonal areas:
- Light Spots: Identify areas where light directly hits the subject, creating bright reflexes. This might be on the hair, forehead, nose, or shoulders. Create solid vector shapes for these lighter areas. Even subtle light reflections on lips, eyes, or clothing should be noted.
- Mid-tones: Next, outline the darker areas that are not quite shadows but represent a transition in tone. These “mid-tones” add dimension. Pay attention to subtle variations in skin tone, areas around eyelids, or slight creases in clothing.
- Shadows: Finally, define the darkest tones. These could be on the unlit side of the face, under the chin, in the inner arms, or under accessories where they cast a shadow. Creating solid shapes for these shadows adds significant depth and three-dimensionality.
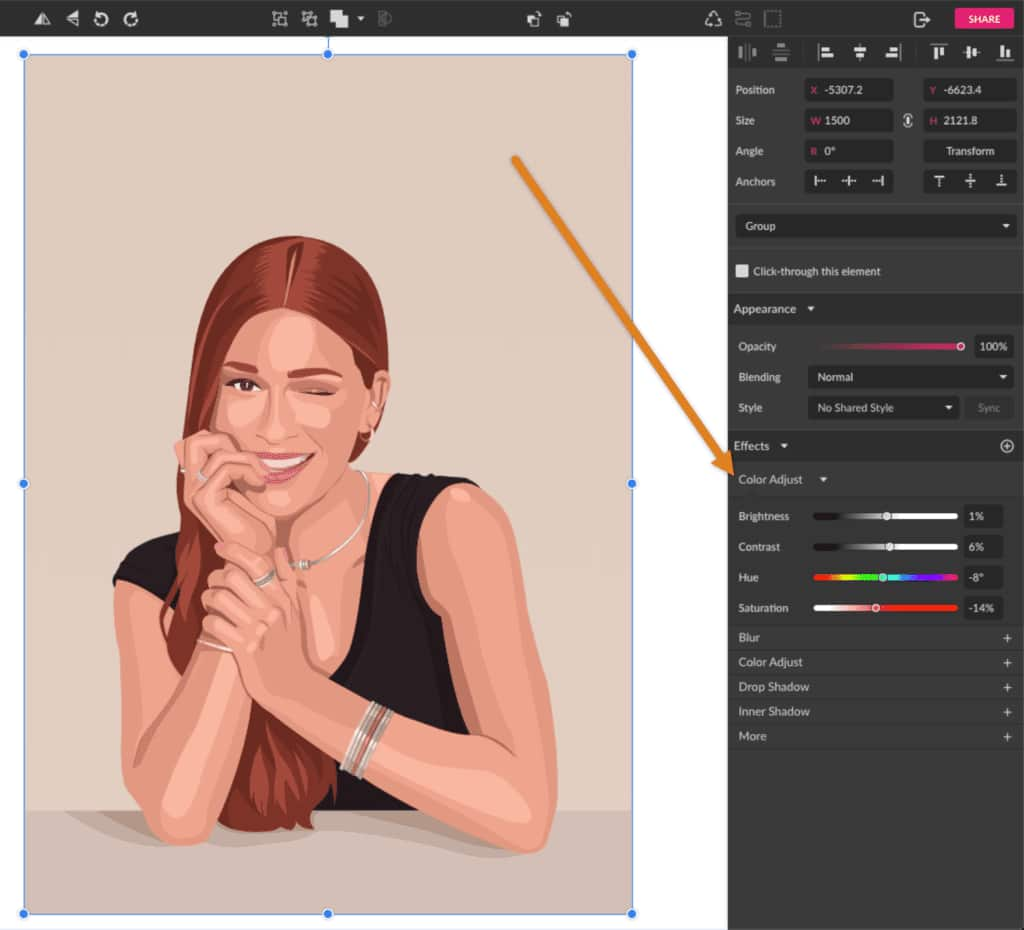
- Tip: An image with good contrast is easier to work with, as these tonal differences will be more pronounced. If needed, apply a “Color Adjust” effect to your reference image to temporarily enhance contrast.
-
Handling Special Elements (e.g., Metallic Accessories): Accessories like bracelets, earrings, or necklaces often require a slightly different approach, especially if they are metallic. For these, you’ll typically use a base color, then add a lighter color for general highlights, and finally, small, even lighter shapes to represent sharp, bright reflections characteristic of metal. These detailed elements contribute to the beautiful photography aspect of your vector art.
-
Final Outlines: After defining all the tonal areas, you may need to add some final, darker outlines to better delineate certain shapes, especially where elements intersect (e.g., fingers touching skin, the division between face and neck, or the bend of an arm). These outlines help to define the form and add definition.
-
Adding a Final Touch: Once all tracing is complete and colors are applied, you can refine the overall aesthetic.
- Color Palette Tweaking: Adjust hues and saturations to achieve your desired mood or style (e.g., abstract, aesthetic, sad/emotional). You can use “Color Adjust” effects across your entire vector artwork.
- Blending Modes for Effects: For an extra detail, create a rectangle the size of your background, place it on top of your illustration, and experiment with different blending modes (e.g., “Screen”) and opacity settings. This can create cool color effects or unify the piece with an overarching tone. For example, using a #9900FF color with a Screen blending mode at 14% opacity, as suggested by Corel, can add a unique stylistic flair.
By meticulously following these steps, you can transform a beautiful photograph into a sophisticated vector portrait, showcasing your skills in digital art and photo manipulation.
Unleashing Creativity with AI-Powered Vector Generation
The landscape of visual design is constantly evolving, and Artificial Intelligence is now at the forefront, offering unprecedented ways to create vector images. Adobe, a leader in creative software, has integrated powerful AI capabilities into its suite, particularly for vector graphics. Tophinhanhdep.com highlights these innovations as key tools for modern graphic design and digital art.
Introducing Generative AI for Vector Graphics
Adobe Illustrator’s new Text to Vector Graphic (beta) feature, powered by Adobe Firefly, marks a significant leap in vector creation. This generative AI-powered tool allows users to create editable vector graphics directly from simple text descriptions. It streamlines the creative process, making it easier than ever to bring complex creative ideas to life.
This innovative feature can generate various vector types:
- Subjects: Create a standalone object or character.
- Scenes: Generate a complete background or environment.
- Icons: Design clean, scalable icons for interfaces or branding.
- Patterns: Produce seamlessly repeating vector patterns for backgrounds or textures.
The generated graphics are not just static images; they are fully editable vector paths arranged in logical groups, empowering designers with complete control over the final output.
How to Create Vector Elements using AI
The process of generating vector elements with AI in Adobe Illustrator is surprisingly intuitive:
- Initiate: Decide whether you want to create your vector graphic within an existing artboard context or on a blank canvas.
- Placeholder (Optional but Recommended): Use the Rectangle tool to draw a rectangle where you envision your vector graphic appearing. This gives the AI a spatial reference.
- Select and Generate: Select the rectangle with the Selection tool. A “Contextual Task Bar” will appear. Click on “Generate (beta)” and choose your desired vector type: ‘Subject,’ ‘Scene,’ or ‘Icon.’
- Describe Your Idea: Enter a brief, straightforward description of what you want to create. Simple phrases like “sunset over hills” or “woman reading book” work best. You can also select from sample prompts to get started.
- Customize: In the Properties panel, you have control over the output:
- Match active artboard style: You can disable this if you don’t want the AI to adhere to existing styles on your artboard.
- Adjust detail settings: Fine-tune the level of complexity and intricacy in the generated graphic.
- Opt for an existing style: Apply a pre-defined style to guide the AI’s aesthetic.
- Execute and Select: Hit “Generate (beta).” Illustrator will present multiple variations based on your prompt. Preview these options and select the one that best fits your creative vision.
This feature is a game-changer for generating quick concepts, developing image inspiration, and rapidly producing design assets.
Creating Dynamic Vector Patterns with AI
Generating intricate, repeating patterns has traditionally been a time-consuming task. AI dramatically simplifies this with the Text to Vector Graphic feature:
- Choose Object: Select an object to which you want to apply a pattern.
- Fill/Stroke: In the toolbar, click on either ‘Fill’ or ‘Stroke’ depending on where you want the pattern applied.
- Pattern Type: In the Contextual Task Bar, select ‘Generate (beta)’ and then choose ‘Pattern.’
- Description: Input a description for your desired pattern (e.g., “abstract floral pattern,” “geometric lines”).
- Color Control: Use the Properties panel to fine-tune the color settings of your pattern.
- Generate: Click ‘Generate (beta)’ and select your preferred pattern from the generated options.
The AI generates repeating tiles that can be stored as swatches for future use, making it incredibly efficient for creating aesthetic backgrounds, textile designs, or unique visual motifs for Tophinhanhdep.com’s collections.
Accelerating Workflows and Ensuring Authenticity
The Text to Vector Graphic feature does more than just generate images; it significantly accelerates creative workflows. Designers can rapidly prototype ideas, create variations, and produce high-quality assets in a fraction of the time it would take to draw them manually. This is particularly beneficial for projects requiring numerous icons, diverse aesthetic backgrounds, or evolving visual design concepts.
Moreover, Adobe has introduced Content Credentials—a new kind of tamper-evident metadata—applied to assets generated by this AI tool. This ensures the integrity and authenticity of the created graphics, providing transparency and trust in the age of generative AI. Tophinhanhdep.com values such innovations for maintaining quality and ethical standards in digital art.
Leveraging AI for vector creation democratizes complex design processes, making high-quality vector graphics accessible to a wider audience, from beginners to seasoned professionals, and offering new avenues for image inspiration and creative ideas.
Beyond the Basics: Styles, Applications, and Further Exploration
Mastering the fundamentals of vector image creation is just the beginning. The versatility of vector graphics allows for a vast array of styles and practical applications, making them an indispensable asset for any visual designer or content creator on Tophinhanhdep.com.
Exploring Diverse Vector Art Styles
The beauty of vector art lies in its adaptability. You aren’t confined to a single look; instead, you can explore numerous styles to match your creative vision, whether it’s for aesthetic images, abstract designs, or even poignant emotional pieces.
- Solid Shapes vs. Blurry Shapes: While our portrait tutorial focused on solid, distinct shapes, you can achieve a softer, more painterly look by using blurred shapes and gradients within your vector software. This is particularly effective for abstract art or creating atmospheric backgrounds.
- Minimalistic Style: Vector graphics excel in minimalism. Clean lines, simple forms, and limited color palettes can convey powerful messages or create striking, modern visuals. Think of flat design icons or line art illustrations.
- Realistic vs. Stylized: Depending on the level of detail and complexity you’re willing to invest, vector art can range from highly realistic (mimicking high-resolution photography) to heavily stylized, cartoonish, or even abstract representations. The choice often depends on the intended emotional impact or aesthetic of the image.
- Greyscale Patterns and Textured Vectors: Don’t limit yourself to solid colors. Vector software allows you to incorporate patterns, gradients, and even textures (often by overlaying raster textures converted to vector patterns or through advanced effects) to add depth and visual interest.
- Line Art and Freehand Drawing: The Pen tool is excellent for precise tracing, but you can also use brushes to create a more freehand, organic drawing style. Many vector programs allow you to “Outline Stroke” on brush paths, converting them into editable vector shapes, preserving the hand-drawn feel while retaining scalability. This is perfect for unique digital art and creative ideas.
Tophinhanhdep.com encourages experimentation with these different styles to develop your unique artistic voice and create a diverse portfolio of images, wallpapers, and backgrounds.
Practical Applications of Vector Graphics
The advantages of vector graphics translate into a myriad of practical applications across various industries, making them central to graphic design and digital media.
- Logos and Branding: This is arguably the most common application. A vector logo ensures that a brand’s identity remains crisp and recognizable on everything from business cards and social media profiles to large outdoor advertisements and vehicle wraps.
- Illustrations: From children’s books to detailed technical drawings, vector illustrations are favored for their clean lines, vibrant colors, and ability to be reproduced at any size. They are perfect for creating unique digital art and thematic collections.
- Print Materials: Posters, flyers, brochures, t-shirt designs, and especially billboards benefit immensely from vector art. The scalability prevents pixelation, ensuring professional-quality prints.
- Web Graphics and Icons: While many web graphics are raster, SVG (Scalable Vector Graphics) is a vector format growing in popularity for web use due to its small file size and resolution independence. Icons, particularly, need to scale perfectly across different devices and resolutions, making vector the ideal choice.
- Maps and Infographics: The precise nature of vector paths makes them perfect for creating detailed and editable maps, charts, and infographics, where clarity and accuracy are crucial.
For Tophinhanhdep.com, vector images ensure that all visual content, whether it’s a high-resolution background or an aesthetic illustration, meets the highest quality standards for our users.
Optimizing Vector Files
One often-overlooked benefit of vector graphics is their potential for smaller file sizes compared to high-resolution raster images, especially for designs with complex shapes but limited color variations. This is because vectors store mathematical instructions rather than pixel data. Efficiently organized layers and minimized anchor points can further optimize vector file sizes, which is important for website performance and ease of sharing.
Continuous Learning and Practice
Creating exceptional vector images, whether through traditional tracing or cutting-edge AI, is a skill that flourishes with continuous learning and practice.
- Experimentation is Key: Don’t be afraid to try different tools, techniques, and styles. Each project presents a new learning opportunity.
- Utilize Tutorials and Resources: Platforms like Tophinhanhdep.com offer a wealth of tutorials, guides, and inspiration to help you hone your skills in visual design, graphic design, and digital art.
- Community Engagement: Engage with other designers, seek feedback, and explore thematic collections and trending styles for fresh image inspiration and creative ideas.
By embracing these practices, you’ll not only master the art of vector image creation but also continuously expand your capabilities as a visual storyteller. Vector images are more than just a technical format; they are a powerful medium for expressing creative ideas with unparalleled clarity and impact, making them an essential part of the digital content provided by Tophinhanhdep.com.