How to Crop an Image in Photoshop: A Comprehensive Guide for Visual Creatives

In the dynamic world of digital photography and visual design, the ability to effectively manipulate images is paramount. Whether you’re a seasoned professional curating high-resolution stock photos or an enthusiast crafting aesthetic wallpapers, a fundamental skill in your arsenal must be image cropping. Cropping isn’t merely about cutting away unwanted parts of a picture; it’s a powerful tool for enhancing composition, refining focus, and adapting visuals for diverse platforms and artistic intentions. It’s an essential step in post-processing that transforms raw captures into captivating visual stories, aligning perfectly with the ethos of platforms like Tophinhanhdep.com, which celebrates beautiful photography and creative ideas.
Photoshop, as the industry-standard image editing software, offers a robust and versatile Crop Tool, alongside several alternative methods, to give you complete control over your image dimensions and visual impact. From basic canvas-wide adjustments to intricate layer-specific modifications and even AI-powered extensions, mastering these techniques will empower you to unlock the full potential of your images. This guide will walk you through everything you need to know about cropping in Photoshop, ensuring your visuals are always optimized for quality, aesthetics, and purpose, from nature backgrounds to abstract art.
Mastering the Photoshop Crop Tool: The Fundamentals
The Crop Tool in Photoshop is the primary instrument for resizing your canvas and refining the edges of your photographs. It’s intuitive, yet packed with features that allow for precision and creative freedom, making it indispensable for any digital photography workflow.
Accessing and Resetting the Crop Tool
To begin your cropping journey, you first need to locate and activate the Crop Tool. It resides in Photoshop’s left-hand toolbar, often represented by an icon resembling two intersecting right angles. Alternatively, you can activate it quickly by pressing the C key on your keyboard.
Upon selection, a cropping border will instantly appear around your image, and the Crop Tool Options Bar will materialize at the top of your Photoshop interface. It’s common for Photoshop to remember your previous settings, which can be convenient but also sometimes misleading. To ensure you start with a clean slate, it’s a good practice to reset the tool. Navigate to the top-right corner of the Options Bar and click the “Reset” button (often a reversed arrow icon or by right-clicking/Control-clicking the Crop Tool icon itself and selecting “Reset Tool”). This clears any previous aspect ratio or size preferences, allowing you to define your crop afresh.
Basic Cropping: Reshaping and Repositioning
Once the Crop Tool is active and reset, you’ll see a border with handles surrounding your image. These handles are your primary control points for reshaping the crop area:
- Resizing: Hover your cursor over any of the handles (top, bottom, left, right, or corners) until an arrow icon appears. Click and drag these handles to shrink or expand the cropping border. The area inside the border is what will be kept, while the faded, shaded area outside will be discarded.
- Repositioning the Image: You’re not just limited to resizing the border; you can also move the image within the border. Click and drag anywhere inside the cropping area, and the image will shift, allowing you to fine-tune your composition without altering the border’s size.
- Drawing Your Own Border: If the initial auto-generated border isn’t to your liking, simply click and drag anywhere within your image to draw a completely new cropping area from scratch. This gives you immediate control over the starting shape and size.
- Committing the Crop: Once you’re satisfied with your selection, there are several ways to apply the crop. You can click the checkmark icon in the Options Bar, press Enter (Windows) or Return (Mac) on your keyboard, or simply double-click inside the cropping border.
- Canceling the Crop: If you decide against the crop, click the “Cancel” button (a circle with a slash through it) in the Options Bar, or press the Esc key. To undo a committed crop, go to
Edit > Undo Cropor useCtrl+Z(Win) /Command+Z(Mac).
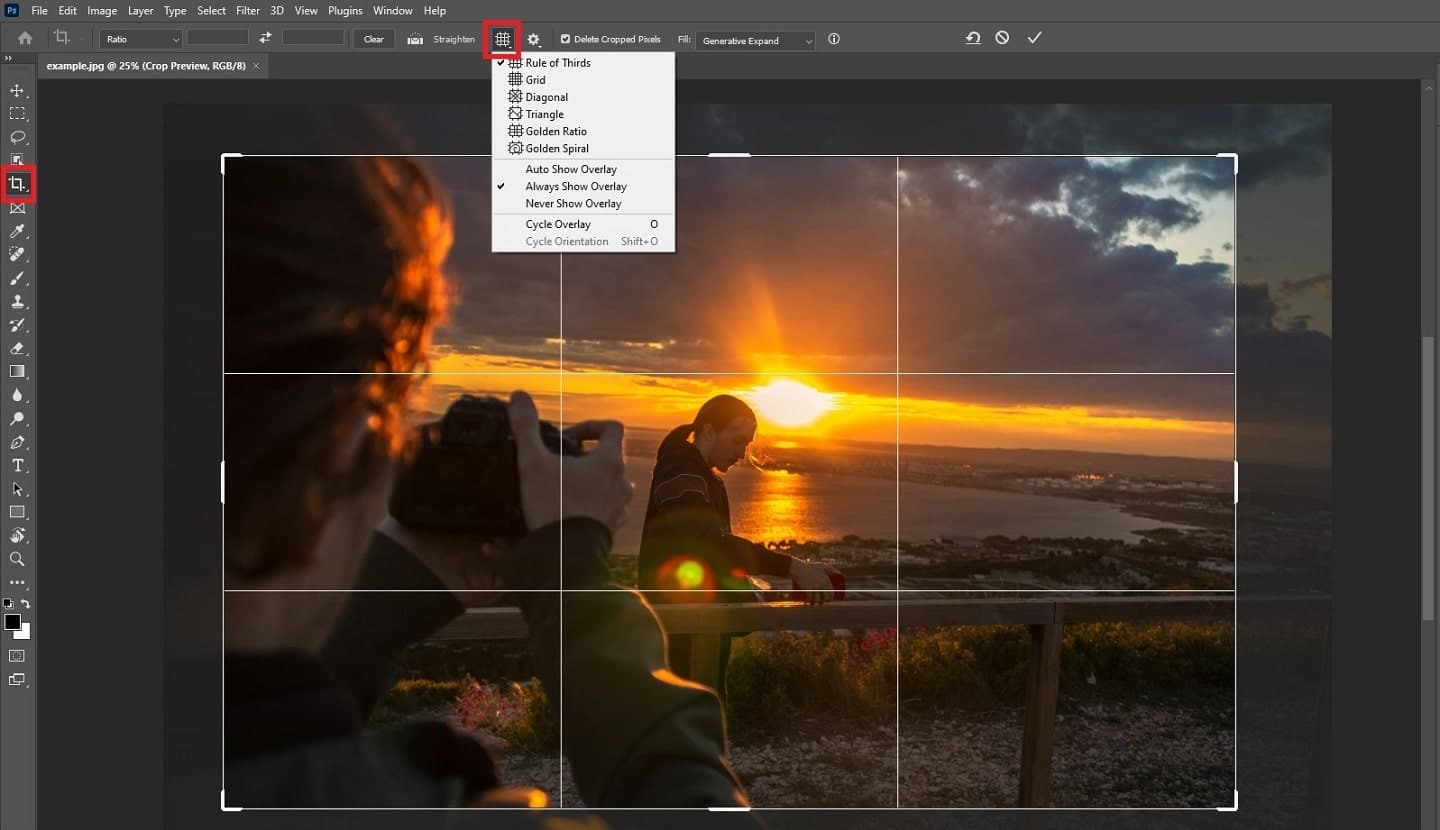
Leveraging Crop Overlays for Enhanced Composition
Effective cropping is as much about composition as it is about dimension. Photoshop’s Crop Tool includes various visual overlays to guide your eye and help you achieve more balanced and aesthetically pleasing results, which is vital for creating compelling visual content for platforms like Tophinhanhdep.com.
When the Crop Tool is active, you’ll notice a 3x3 grid, known as the Rule of Thirds, automatically displayed within the cropping border. This compositional guideline suggests placing your primary subject or key elements at the intersections of these lines, or along the lines themselves, to create a more dynamic and engaging photograph.
However, the Rule of Thirds is just one option. By clicking the “Overlay” icon in the Options Bar (which looks like a small grid), you can access a dropdown menu with several other compositional guides:
- Golden Ratio: Similar to the Rule of Thirds but often resulting in a more organic, natural feel, the Golden Ratio places intersection points closer to the center, guided by a mathematical constant found in nature.
- Diagonal, Triangle, Grid, Golden Spiral: These offer alternative frameworks for guiding your composition, helping you align leading lines, balance elements, and achieve specific visual flows.
- Cycling Overlays: You can quickly cycle through these different overlays by pressing the O key on your keyboard. For certain overlays like Triangle or Golden Spiral, you can also flip their orientation by pressing Shift+O.
By utilizing these overlays, you can elevate your cropping decisions beyond mere technical adjustments, transforming your images into captivating pieces of visual art, suitable for any thematic collection or mood board.
Advanced Cropping Techniques for Precision and Impact
Beyond the basics, Photoshop’s Crop Tool offers sophisticated controls for specific dimensions, straightening misaligned images, and—crucially—non-destructive editing. These advanced techniques are essential for photographers and designers who demand precision and flexibility in their editing styles, ensuring high-resolution output for every project, from beautiful photography portfolios to abstract art commissions.
Cropping to Specific Aspect Ratios and Dimensions
For precise applications, such as preparing images for web design, printing, or fitting specific display requirements (e.g., social media banners, wallpapers), cropping to exact aspect ratios or dimensions is a necessity.
- Preset Aspect Ratios: In the Options Bar, click the dropdown menu next to the aspect ratio field. Here, you’ll find a range of common presets like
1:1(square),3:2,4:3,5:4,8:10, and16:9. Selecting one of these will automatically constrain your cropping border to that proportion. - Swapping Orientation: If you choose a preset (e.g.,
8:10) and want to switch its orientation (from portrait to landscape or vice-versa), simply click the “Swap Width and Height” icon (two opposing arrows) in the Options Bar. - Custom Aspect Ratios: For unique proportions not available in the presets, you can manually enter your desired width and height values into the respective fields. For example,
14in the width field and11in the height field creates an11x14landscape ratio. - Saving Custom Presets: If you frequently use a particular custom ratio, you can save it as a preset. After entering your values, click the aspect ratio dropdown and choose “New Crop Preset.” Give it a descriptive name, and it will appear in your list for future use, streamlining your workflow for consistent visual design elements.
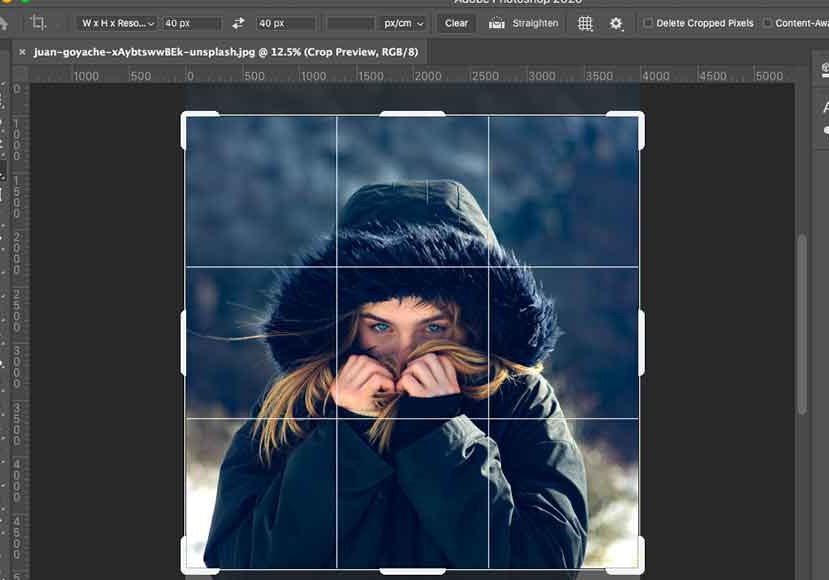
- Cropping to Specific Size and Resolution (W x H x Resolution): For print-ready images or those requiring exact pixel dimensions, select the
W x H x Resolutionoption from the aspect ratio dropdown. Here, you can specify not only the width and height (e.g.,14 inby11 in) but also the output resolution (e.g.,300 px/inch). Photoshop will then crop and resample your image to match these precise requirements. Be mindful that increasing resolution this way involves interpolation, which can affect image quality if overused. For significant enlargements, consider using Photoshop’s Image Size dialogue (Image > Image Size) for more advanced resampling algorithms.
Straightening Images with the Crop Tool
A common issue in photography is a slightly tilted horizon or a skewed vertical element. Photoshop’s Crop Tool offers a built-in “Straighten Tool” to effortlessly correct these misalignments, a crucial step in preparing beautiful photography for any collection.
- Activate the Straighten Tool: With the Crop Tool active, locate and click the “Straighten” icon in the Options Bar (it looks like a small level). Your cursor will change to a ruler icon.
- Draw a Straight Line: Find an element in your image that should be straight (e.g., a horizon line, a building edge). Click and drag your mouse along this element. Photoshop will draw a temporary line, using it to calculate the precise angle needed for correction.
- Automatic Correction: Release your mouse button, and Photoshop will automatically rotate the entire image to align the drawn line horizontally or vertically, simultaneously adjusting the crop border to exclude any transparent areas created by the rotation.
- Refine and Commit: You can then further adjust the crop border manually or reposition the image within it. Once satisfied, commit the crop as usual.
This feature is invaluable for landscape photography, architectural shots, and general purpose images where a perfectly level perspective is desired, ensuring your visuals maintain a professional and polished look.
The Power of Non-Destructive Cropping
One of Photoshop’s most celebrated features is its capacity for non-destructive editing, and this applies significantly to cropping. By default, the Crop Tool often has “Delete Cropped Pixels” checked in the Options Bar. When active, committing a crop permanently removes the pixels outside your chosen area. While this saves file size, it means you cannot revert to the original image dimensions or adjust the crop later without using the “Undo” command or reverting the entire file.
To enable non-destructive cropping:
- Deselect “Delete Cropped Pixels”: Before committing your crop, simply uncheck the “Delete Cropped Pixels” option in the Options Bar.
- Commit the Crop: Proceed with cropping as usual.
Now, even after committing the crop, the “hidden” pixels are still present. If you re-select the Crop Tool, you’ll see the full original image reappear within the canvas, allowing you to re-adjust the crop border, reposition the image, or even expand the canvas to reveal previously “cropped out” areas. This flexibility is a game-changer for digital photography, allowing for continuous refinement of photo manipulation and creative ideas without fear of irreversible changes.
Furthermore, with non-destructive cropping, you can use the Move Tool (V) to reposition the image within its cropped frame even after the crop has been applied, providing an additional layer of compositional control. To restore the entire image to its original canvas size, go to Image > Reveal All. This ensures that every pixel of your high-resolution image remains accessible, supporting comprehensive image optimization and future visual design adaptations.
Cropping Individual Layers: Beyond the Canvas-Wide Crop
While the Crop Tool operates on the entire canvas, affecting all visible layers, there are many scenarios in visual design and photo manipulation where you need to crop a single layer without altering the rest of your project. This is particularly relevant when compositing multiple images, building complex graphic designs, or isolating elements for aesthetic collections. Photoshop offers several effective methods for this, ensuring your creative ideas are not limited by global canvas constraints.
The Rectangular Marquee Tool Method (Destructive but quick)
For quick, straightforward layer cropping, the Rectangular Marquee Tool is a simple yet effective option. It’s a destructive method, meaning the pixels outside your selection will be permanently removed, similar to the default Crop Tool behavior.
- Select the Target Layer: In the Layers panel, click on the specific layer you wish to crop.
- Activate the Rectangular Marquee Tool: Select the Rectangular Marquee Tool from the toolbar (keyboard shortcut: M, then Shift+M to cycle through marquee tools if another is selected).
- Draw Your Selection: Click and drag to create a selection outline around the portion of the image on that layer you want to keep.
- Refine Selection (Optional): If needed, go to
Select > Transform Selectionto resize or reposition your marquee selection with greater precision. Click the checkmark in the Options Bar to apply the transformation. - Invert Selection: With your desired area selected, go to
Select > Inverse(Shift+Ctrl+I/Shift+Command+I). This inverts the selection, so now everything outside your desired area is selected. - Crop the Layer: Press the Delete key on your keyboard. The selected (unwanted) pixels on your chosen layer will be removed, replaced with transparency.
- Deselect: Press
Ctrl+D(Win) /Command+D(Mac) to remove the selection outline.
If you encounter a “Smart Object cannot be directly modified” warning, right-click on the layer in the Layers panel and choose “Rasterize Layer” before proceeding. This converts the Smart Object into a standard pixel layer, allowing direct manipulation.
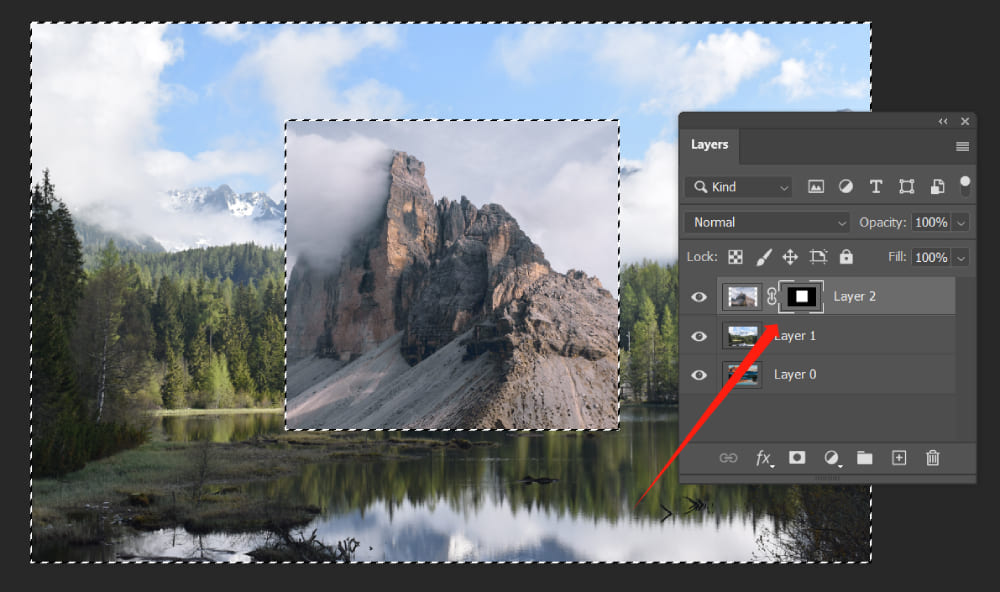
Utilizing Layer Masks for Flexible Layer Cropping (Non-destructive)
The most recommended and versatile method for cropping individual layers is through Layer Masks. This approach is entirely non-destructive, offering unparalleled flexibility for adjustments and refinements, aligning perfectly with complex visual design and photo manipulation projects on Tophinhanhdep.com.
- Select the Target Layer: In the Layers panel, ensure the layer you want to crop is selected.
- Create an Initial Selection: Use the Rectangular Marquee Tool (or any selection tool like the Lasso Tool for irregular shapes) to create a selection around the area of the layer you want to keep visible.
- Add a Layer Mask: With the selection active, click the “Add Layer Mask” icon at the bottom of the Layers panel (it looks like a rectangle with a circle inside). Photoshop will automatically create a mask where the selected area is white (visible) and everything outside the selection is black (hidden).
- Refining the Mask (Non-destructive Cropping):
- Toggle Mask Visibility: Hold Shift and click the layer mask thumbnail in the Layers panel to temporarily disable/enable the mask, revealing or hiding the entire layer content.
- View Mask on Canvas: Hold Alt (Win) / Option (Mac) and click the layer mask thumbnail to view the mask itself (black and white) on the canvas, helping you precisely see hidden and visible areas. Click again to return to the image view.
- Edit the Mask: Select the mask thumbnail (ensure it has a white border). Now you can use painting tools (Brush Tool, Gradient Tool) with black to hide more areas, or white to reveal them. For example, painting with a black brush will “crop” away parts of the layer, while painting with white will “un-crop” them.
- Transform the Mask: To resize or reshape the “cropped” area, click the link icon between the layer thumbnail and the mask thumbnail in the Layers panel to unlink them. Then, with the mask thumbnail selected, go to
Edit > Free Transform(Ctrl+T/Command+T). Drag the transform handles to resize the mask (and thus the visible area) independently of the layer content. Remember to relink the layer and mask afterwards if you want them to move together.
This layer mask method is ideal for creating intricate photo manipulation, precise graphic design elements, or adapting images for diverse visual contexts without permanent alteration.
Exploring the Frame Tool for Layer Isolation
Photoshop CC introduced the Frame Tool (keyboard shortcut: K), offering another convenient way to crop layers, particularly useful for quickly fitting images into predefined shapes or layouts.
- Select the Frame Tool: Find the Frame Tool in the toolbar (it looks like a rectangle with diagonal lines).
- Draw Your Frame: Click and drag on your canvas to draw a rectangular or elliptical frame.
- Place Your Image: Drag an image from your computer (or another Photoshop layer) directly into this frame. Photoshop automatically crops the image to fit within the frame, with the ability to resize and reposition the image inside the frame.
- Adjusting the Frame/Image:
- Clicking the frame itself allows you to move or resize the frame, altering the visible area of the image.
- Clicking the image content inside the frame allows you to move or resize the image within the frame, adjusting which part of the image is visible.
The Frame Tool simplifies the process of creating picture placeholders, excellent for digital art compositions or presenting image collections with a consistent visual structure.
Enhancing Your Workflow with Photoshop’s Cropping Features
Optimizing your workflow is crucial for efficient visual design and digital photography. Photoshop’s additional cropping features and integration with modern AI capabilities can significantly boost productivity, especially when dealing with large volumes of images for Tophinhanhdep.com, from nature wallpapers to thematic collections.
Creating and Managing Crop Presets
For repetitive tasks or maintaining a consistent visual style, custom crop presets are invaluable. Once you’ve set a specific aspect ratio or W x H x Resolution, you can save it for future use.
- Saving: After entering your desired values in the Options Bar, click the aspect ratio dropdown and select “New Crop Preset.” Give it a clear name (e.g., “Wallpaper 16:9 HD,” “Social Post 1:1”).
- Accessing: Your custom presets will appear in the aspect ratio dropdown menu, allowing you to quickly apply standard crops without re-entering values.
- Deleting: To remove old or unused presets, open the aspect ratio dropdown, then click the gear icon and select “Delete Crop Preset.”
These presets ensure consistency across your image collections, a hallmark of professional aesthetic photography and efficient image optimization.
Understanding the Perspective Crop Tool
Sometimes, images suffer from perspective distortion—for example, a photograph of a building or document taken at an angle. The Perspective Crop Tool, a variation of the standard Crop Tool, is specifically designed to correct this.
- Access: Hold down the Crop Tool icon in the toolbar, and select “Perspective Crop Tool,” or press Shift+C repeatedly until it’s active.
- Draw and Adjust: Draw a rough crop box around the distorted object. Then, click and drag each of the four corner handles independently to align them with the true corners of the object (e.g., the corners of a rectangular building, a book cover, or a print).
- Correct and Crop: Commit the crop. Photoshop will automatically transform and straighten the perspective of the area within your adjusted crop box, effectively correcting the distortion while cropping the image.
This tool is a powerful asset for architectural photography, scanning documents, or any scenario where geometric accuracy is paramount to visual design.
The Role of AI in Modern Image Manipulation
Adobe has significantly integrated Artificial Intelligence into Photoshop, with tools that complement and extend traditional cropping capabilities. The Adobe MAX Updates, for example, have introduced features that resonate deeply with the needs of visual creatives on Tophinhanhdep.com.
- Generative Fill & Expand: Powered by Adobe Firefly AI,
Generative FillandGenerative Expandrevolutionize how we deal with composition and canvas size. If you crop an image tightly and then decide you need more background,Generative Expandallows you to expand the canvas beyond the original image boundaries. Photoshop’s AI then intelligently fills in the new transparent areas with photorealistic content that blends seamlessly with your existing image. This is a game-changer for adjusting compositions that might have been too tight, creating dynamic backgrounds, or even transforming a portrait into a landscape. - Removal Tool & Distraction Removal: AI-enhanced tools like the
Removal Toolcan efficiently eliminate distracting elements (e.g., unwanted objects, power lines) from an image before or after cropping. This ensures that the focal point of your cropped image is unhindered, contributing to cleaner, more impactful beautiful photography.
These AI tools offer unprecedented creative freedom, allowing photographers to correct compositions, extend scenes, and refine images with a speed and accuracy previously unimaginable, thus enhancing the raw material for any aesthetic collection.
Why Cropping is Essential for Tophinhanhdep.com Users
For anyone engaging with the vast world of images, from professional photographers to casual hobbyists on Tophinhanhdep.com, understanding and applying effective cropping techniques is not just an optional skill – it’s fundamental. Cropping serves multiple critical functions that directly contribute to the quality, impact, and versatility of your visual content.
Connecting Cropping to Image Quality and Visual Storytelling
Cropping is intrinsically linked to the essence of beautiful photography and powerful visual storytelling. It allows you to:
- Improve Composition: By removing extraneous details and focusing on the core subject, cropping guides the viewer’s eye, strengthening the image’s narrative. This is crucial whether you’re working on nature photography, abstract art, or emotional portraits. A well-cropped image eliminates distractions, ensuring your message is clear and impactful.
- Enhance Focus: Cropping can bring a subject closer, emphasizing details that might otherwise be lost in a wider shot. This is particularly useful for high-resolution images where intricate textures or expressions add depth.
- Correct Flaws: A simple crop can hide imperfect edges, distracting elements, or even improve a slightly off-kilter perspective, refining the overall aesthetic.
Cropping for Web Optimization and Creative Freedom
In today’s digital landscape, images are consumed across countless platforms and devices. Cropping plays a vital role in optimizing images for web use and unleashing creative freedom:
- Aspect Ratio Consistency: For website backgrounds, social media banners, or digital art portfolios, images often need to conform to specific aspect ratios. Cropping ensures your visuals fit perfectly, avoiding awkward stretching or unintended cut-offs.
- File Size Reduction: By removing unnecessary pixels, cropping can reduce an image’s file size. This is a crucial step in image optimization, leading to faster website loading times and improved user experience—a benefit for any platform showcasing image collections.
- Creative Adaptation: Cropping allows for artistic interpretation. You can transform a wide landscape into a dramatic panoramic crop, isolate a striking detail for an aesthetic wallpaper, or create a series of thematic images from a single original photograph. It’s a tool for photo manipulation that extends your creative ideas beyond the initial capture.
- Mood Board Creation: When compiling visual inspiration or mood boards, cropping allows you to extract the most impactful elements from various sources, ensuring each piece contributes effectively to the overall theme, whether it’s sad/emotional imagery or trending styles.
Ultimately, mastering the art of cropping in Photoshop means taking complete control over your visual output. It’s about more than just trimming edges; it’s about making deliberate compositional choices, ensuring technical excellence, and adapting your images for every conceivable purpose. For Tophinhanhdep.com users, this expertise ensures that every image shared, every wallpaper downloaded, and every background utilized reflects the highest standards of visual appeal and professional quality, transforming mere images into unforgettable visual experiences.