Mastering Image Cropping on Mac: Your Essential Guide with Tophinhanhdep.com

Cropping an image is far more than just cutting out unwanted edges; it’s a fundamental skill that empowers photographers, designers, and everyday users to refine visual narratives, improve composition, and ensure their images perfectly fit any platform or purpose. Whether you’re enhancing a high-resolution photograph for a professional portfolio, preparing a background image for your desktop, or simply adjusting a casual snapshot, knowing how to crop an image on Mac efficiently is invaluable. This guide will walk you through the various methods available on your macOS device, from the built-in, user-friendly applications to powerful online tools like Tophinhanhdep.com, ensuring you have all the knowledge to achieve visually stunning results.
Image cropping is a cornerstone of visual design and digital photography. It can drastically alter the aesthetic impact of a picture, transforming a cluttered scene into a focused masterpiece. Imagine you’ve captured a breathtaking nature shot, but a distracting element lurks in the corner; cropping can eliminate it, drawing the viewer’s eye to the intended beauty. Or perhaps you’re creating a mood board with aesthetic images, and need to adjust an abstract piece to fit a specific dimension. Cropping helps you achieve these creative ideas with precision. From curating thematic collections of beautiful photography to preparing stock photos for web use, mastering this skill is essential for anyone dealing with images.
The Native Powerhouses: Cropping with Mac’s Built-in Apps
Apple’s macOS comes equipped with a suite of robust, yet often under-appreciated, applications that handle basic image editing tasks with remarkable ease. For most everyday cropping needs, you won’t even need to download any third-party software. These native tools are fast, efficient, and seamlessly integrated into the Mac experience, making them perfect for quick adjustments to wallpapers, backgrounds, or any image file.
Preview: Your Everyday Cropping Companion
Preview is arguably the most ubiquitous image and PDF viewer on your Mac, often opening files without you even realizing it. Beyond simple viewing, it houses a surprisingly capable set of editing tools, including an excellent cropping function. Its simplicity and speed make it the go-to for many Mac users when they need to quickly crop an image.
Here’s a detailed step-by-step guide on how to crop an image on Mac using Preview:
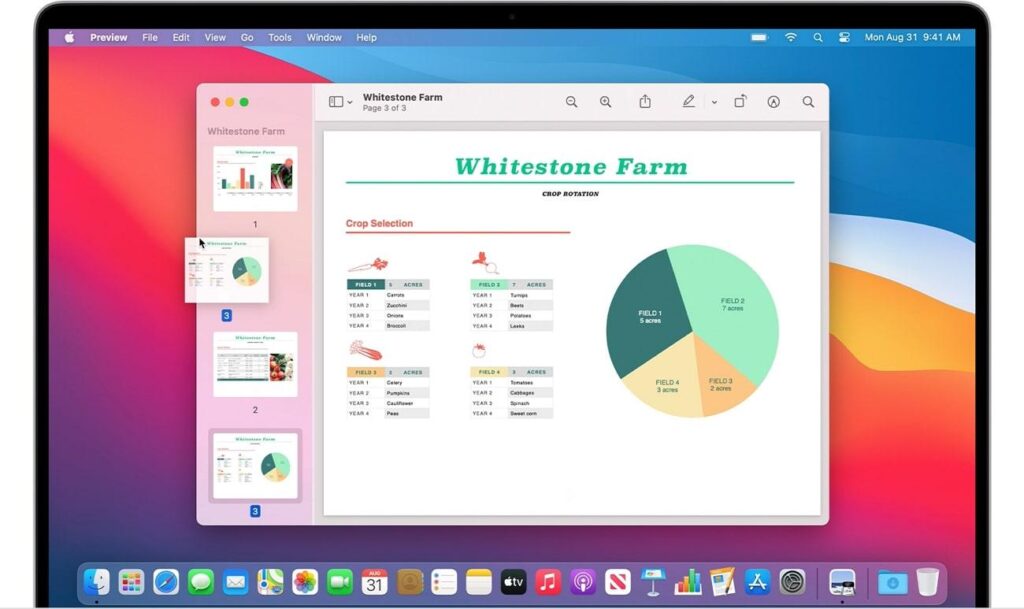
- Open Your Image: Locate the image file you wish to crop in Finder. Double-clicking it will typically open it directly in the Preview app (unless you’ve set a different default viewer). If another app opens, right-click the image, select “Open With,” and then choose “Preview.”
- Access the Markup Toolbar: To reveal Preview’s editing tools, you need to click the “Show Markup Toolbar” button. This icon usually looks like a small toolbox or a pencil, located on the right side of the main toolbar at the top of the Preview window. In some macOS versions, it might appear as a baby bottle inside a circle, as noted by some users.
- Select the Rectangular Selection Tool: Once the Markup Toolbar is open, locate the “Selection Tool” icon, usually the leftmost pulldown menu in this toolbar. Click on it and ensure “Rectangular Selection” is chosen. While rectangular is the most common, Preview also offers “Elliptical Selection” for oval crops and “Lasso” or “Smart Lasso” for freehand selections, allowing for more creative ideas and unique visual design elements.
- Draw Your Crop Area: Click and drag your mouse or trackpad over the specific region of the image you wish to keep. As you drag, a rectangular selection border will appear. You’ll see eight blue dots around the border, which you can click and drag to precisely adjust the size and position of your selected area. Everything outside this border will be cropped out.
- Perform the Crop: Once your selection is perfect, you have two easy ways to perform the crop:
- Keyboard Shortcut: The fastest method is to press Command + K on your keyboard.
- Menu Option: Alternatively, go to the “Tools” menu in the menu bar at the top of your screen and select “Crop.” The image will instantly trim down to your selected area.
- Save Your Cropped Image: Go to the “File” menu and choose “Save” (Command + S) to overwrite the original file with the cropped version, or “Save As” to create a new, cropped file, leaving the original intact. It’s often a good practice to “Save As” to preserve the original, especially for important photography.

Preview’s cropping functionality is an excellent example of efficient image tools bundled directly into macOS. It’s perfect for quick adjustments to your high-resolution images or stock photos without the overhead of professional software. While Preview doesn’t offer batch cropping capabilities, its individual file processing is incredibly fast, particularly once you’ve memorized the Command+K shortcut.
Photos App: Integrated Editing for Your Image Collections
For users who manage their photographs within Apple’s ecosystem, the Photos app on Mac provides a seamless and powerful cropping experience. It mirrors the intuitive interface found on iPhone and iPad, making it incredibly familiar and easy to use. The Photos app excels not only in organizing your image collections but also in offering non-destructive editing, which is a significant advantage for digital photography enthusiasts.
Here’s how to crop pictures on Mac using the Photos app:
- Open Photos and Select Image: Launch the Photos app on your Mac. Navigate through your image collections to find the photo you want to crop.
- Enter Edit Mode: Double-click the image to open it. Then, click the “Edit” button located in the top-right corner of the Photos app window. This will switch you to the photo editing interface.
- Access the Crop Tool: In the editing toolbar, you’ll find various adjustment options. Click the “Crop” icon (often represented by a square with two overlapping arrows or a simple square icon). This will activate the cropping interface, showing a grid over your image.
- Adjust the Crop:
- Manual Adjustment: Click and drag the borders or corners of the crop box to manually define the area you wish to keep. As you adjust, you’ll see a real-time preview of your cropped image.
- Aspect Ratio Presets: On the right side of the screen, you’ll find an “Aspect” dropdown menu. Here, you can choose from various preset aspect ratios like “Square,” “16:9,” “4:3,” “Original,” or “Custom.” This is incredibly useful for preparing images for specific social media platforms or print sizes, aligning with trending styles and visual design principles.
- Straighten/Rotate: The Photos app also allows you to straighten a tilted image or rotate it directly within the crop interface, further enhancing your photography.
- Apply and Save: Once you are satisfied with your crop, click the “Done” button in the top-right corner. The Photos app automatically saves your changes. A key advantage here is non-destructive editing: the original version of your photo is always preserved. You can revert to the original at any time by clicking “Edit” again and selecting “Revert to Original.”
The Photos app is ideal for enhancing your beautiful photography and curating aesthetic images stored in your library. Its integration with iCloud Photos means you can crop an image on your Mac and have the changes sync across all your Apple devices, offering seamless workflow for wallpapers, backgrounds, and personal collections.
Quick Look: Rapid Cropping on the Fly
Quick Look is a hidden gem for fast file previews on macOS, and it also quietly includes basic markup tools, including cropping. It’s perfect for when you need to make a super quick adjustment without fully launching Preview or Photos.
Here’s how to use Quick Look to crop an image:
- Select Image in Finder: Find the image file in your Finder that you want to crop.
- Activate Quick Look: Press the Space bar on your keyboard. This will open the image in a Quick Look window.
- Open Markup Tools: In the Quick Look window, click the “Markup” button (usually a small pen icon) in the toolbar at the top.
- Access the Crop Tool: A selection will appear over your image. Drag the handles of this selection to define your desired crop area. Then, click the “Crop” button (a square with overlapping arrows or a simple square icon) in the Markup toolbar.
- Save Your Changes: Click “Done” in the top-right corner of the Quick Look window. This will save the cropped version of your image.
Quick Look is a brilliant tool for minor adjustments or when you’re quickly sifting through a collection of high-resolution images or stock photos and spot something that needs a fast trim. It embodies the efficiency of Mac’s built-in image tools.
Beyond the Basics: Advanced Cropping & Image Enhancement with Tophinhanhdep.com
While Mac’s native apps are excellent for everyday tasks, there are times when projects demand more advanced functionality, precise control, or the ability to process multiple images simultaneously. This is where dedicated online platforms and professional software come into play. Tophinhanhdep.com offers a powerful, web-based solution that caters to a broader range of image editing needs, going beyond simple cropping to embrace comprehensive visual design and photography enhancement.
Tophinhanhdep.com: Online Cropping for Precision and Batch Processing
Tophinhanhdep.com stands out as an all-in-one online image tool designed for both casual users and visual design professionals. It not only streamlines the cropping process but also integrates a suite of advanced features like AI upscalers, image compressors, and artistic filters, making it an indispensable resource for creating stunning images. When you need more control, specific aspect ratios, or the efficiency of batch processing for your aesthetic or high-resolution images, Tophinhanhdep.com is an excellent choice.
Here’s how to crop an image on Mac using the comprehensive tools available on Tophinhanhdep.com:
- Access Tophinhanhdep.com: Open your web browser on your Mac and navigate to Tophinhanhdep.com.
- Upload Your Image: On the homepage, look for an option like “Edit a photo” or a prominent upload button. Click it and select the image (or multiple images for batch processing) you wish to crop from your Mac.
- Navigate to the Crop Tool: Once your image is uploaded, you’ll typically find a left-hand or top toolbar with various editing options. Select the “Adjust” tool, and then within that section, choose the “Crop” option.
- Define Your Crop Area with Precision:
- Manual Adjustment: You can click and drag the borders or corners of the crop box directly on your image to precisely define the area you want to keep. Tophinhanhdep.com often displays real-time dimensions, allowing for meticulous adjustments.
- Preset Ratios: For specific needs, such as optimizing images for social media platforms (e.g., Instagram stories, Facebook banners, YouTube thumbnails), Tophinhanhdep.com provides a wide array of preset aspect ratios. This is crucial for maintaining consistent visual design and trending styles across your digital presence.
- Custom Ratios: If a preset doesn’t meet your needs, you can often input custom dimensions or aspect ratios for truly bespoke cropping, perfect for unique photo ideas or graphic design projects.
- Apply and Enhance: After setting your desired crop, click the “Apply” or “Done” button within the cropping interface.
- Beyond Cropping: This is where Tophinhanhdep.com truly shines. Before downloading, you can explore other powerful image tools:
- AI Photo Enhancer: Instantly optimize brightness, color, and sharpness with a single click, elevating your digital photography.
- Filters and Effects: Apply aesthetic filters to transform the mood of your nature, abstract, or even sad/emotional photography.
- Background Removal: For advanced photo manipulation, easily remove backgrounds.
- Image Compression: Optimize file size without significant loss of quality, ideal for web use.
- AI Upscaler: If your cropped image needs to be larger without pixelation, Tophinhanhdep.com’s AI upscaler can increase its resolution, a boon for high-resolution images.
- Beyond Cropping: This is where Tophinhanhdep.com truly shines. Before downloading, you can explore other powerful image tools:
- Download Your Masterpiece: Once all edits are complete, click the “Download” button to save the enhanced, cropped image back to your Mac. Tophinhanhdep.com often offers various file formats (e.g., JPG, PNG) and quality settings, providing flexibility for your image collections.
Tophinhanhdep.com is more than just a cropping tool; it’s a comprehensive platform for visual design, digital art, and enhancing all types of images, from wallpapers to beautiful photography. Its ability to handle batch image cropping is a huge time-saver for anyone dealing with thematic collections or large sets of stock photos.
Photoshop: Professional Image Manipulation on Mac
For professional photographers, graphic designers, and digital artists, Adobe Photoshop remains the industry standard. While it offers unparalleled depth and complexity, its core functionalities, including cropping, are surprisingly accessible for beginners. Photoshop is the ultimate tool for photo manipulation, allowing for intricate adjustments far beyond simple trims.
Here’s a simplified overview of how to crop an image on Mac using Photoshop:
- Open Image in Photoshop: Launch Photoshop on your Mac and open the image file you want to crop (File > Open).
- Select the Crop Tool: In the left-hand toolbar, click the “Crop Tool” (it looks like two overlapping right angles).
- Adjust the Crop Box: A crop box will appear around your image. You can drag the corners or edges of this box to resize and reshape your desired crop area.
- Set Aspect Ratio/Dimensions (Optional): In the options bar at the top, you can choose from preset aspect ratios (e.g., 1:1, 16:9) or input custom width and height values for precise control over your image dimensions. This is crucial for detailed visual design projects or when preparing high-resolution images for specific print layouts.
- Commit the Crop: Once satisfied, press the Enter (Return) key or click the checkmark icon in the options bar to apply the crop.
- Save Your Work: Go to “File” > “Save As” to save your cropped image, choosing your preferred format and quality settings.
Photoshop offers advanced editing styles and unparalleled control, making it ideal for when cropping is just one step in a larger photo manipulation or graphic design project involving complex layers and effects.
Why Cropping Matters: Enhancing Your Visual Narrative
Understanding the mechanics of how to crop an image on Mac is only half the battle; appreciating why you crop is what elevates a simple trim into a powerful creative decision. Cropping isn’t just about removal; it’s about intentionality and impact. It transforms raw capture into a refined visual narrative, influencing everything from the emotional resonance of sad/emotional images to the crisp clarity of high-resolution photography.
Here are the key reasons why cropping is an essential skill:
- Improve Composition: The original frame of a photo isn’t always the best. Cropping allows you to apply compositional rules like the Rule of Thirds, leading lines, or centering to guide the viewer’s eye and create a more balanced and aesthetically pleasing image. This is a core tenet of visual design and creating beautiful photography.
- Eliminate Unwanted Parts: Distractions such as photobombers, cluttered backgrounds, or irrelevant objects can detract from your main subject. Cropping mercilessly removes these elements, focusing attention where it belongs and making your images cleaner and more impactful.
- Suitable for Social Media Size: Different social media platforms have specific image dimensions and aspect ratio requirements. Cropping ensures your images display correctly without being cut off or distorted, maintaining the integrity of your visual design and keeping up with trending styles for platforms like Instagram, Facebook, and YouTube.
- Highlight the Details: Sometimes, a small detail within a larger scene is the most compelling part. Cropping allows you to zoom in on this specific element, effectively magnifying it and making it the primary focus. This is particularly useful for showcasing intricate features in abstract or nature photography.
- Adjust Aspect Ratio: Whether you’re preparing images for print, web display, or specific devices (like custom wallpapers), tailoring the aspect ratio is crucial. Cropping gives you the flexibility to adapt your photos to any format, ensuring they look perfect across various media.
By thoughtfully applying these principles, cropping becomes a powerful tool in your image toolbox, allowing you to elevate ordinary pictures into extraordinary visual statements.
Best Practices for Effective Cropping
To ensure your cropping efforts consistently yield the best results, consider these essential tips that go beyond the basic steps of how to crop an image on Mac:
Essential Tips for Optimal Results
- Always Make a Duplicate: Before making any permanent changes, especially when using tools like Preview that can overwrite the original, create a duplicate of your image (Command + D in Finder). This preserves your original file, giving you a safety net if you’re not happy with the cropped version or need the original later. The Photos app, with its non-destructive editing, offers this protection by default.
- Edit Before You Crop: For more significant adjustments, consider performing color correction, exposure adjustments, or other stylistic edits before you crop. Changes in tint, color, or balance might look different once the composition changes. This also ensures that the final cropped area benefits from the full range of original pixel data, which is crucial for high-resolution images.
- Make Small, Incremental Changes: Precision is key. Instead of making one large, aggressive crop, try adjusting the crop borders slowly and incrementally. Take a moment to assess the composition after each minor adjustment. This iterative process often leads to the most satisfying results for your visual design.
- Don’t Click Save Until You’re Finished (and Sure): With many tools, changes are not finalized until you explicitly save. If you’re experimenting, utilize the undo function (Command + Z) frequently. Once you save and close the file (especially in Preview without “Save As”), reverting can be more complex. Photos app and Tophinhanhdep.com offer more forgiving workflows in this regard.
- Consider Resolution and Output: Remember that cropping reduces the total number of pixels in an image. If you crop too aggressively from a low-resolution image, you risk pixelation when viewed at a larger size. Always consider the final intended use – will it be a small thumbnail, a full-screen wallpaper, or a large print? For critical high-resolution images or stock photos that need to maintain quality after cropping, consider using Tophinhanhdep.com’s AI Upscaler to compensate for pixel loss if necessary.
- Think About Aspect Ratio and Content: Before you begin, envision the desired aspect ratio and how it will frame your subject. Cropping isn’t just about cutting; it’s about recomposing. Experiment with different ratios to see how they affect the image’s balance and emphasis, especially when curating aesthetic images or thematic collections.
By integrating these best practices into your workflow, you’ll not only learn how to crop an image on Mac but also master the art of effective image editing, transforming your photography and visual design projects.
Conclusion
Cropping is an indispensable skill in the world of digital images and visual communication. Whether you’re a casual user looking to tidy up a snapshot, a photographer refining a masterpiece, or a designer creating compelling visual content, your Mac offers a spectrum of tools to get the job done.
From the intuitive, built-in capabilities of Preview, the seamlessly integrated Photos app, and the lightning-fast Quick Look for everyday edits, your macOS device provides robust native options. For those seeking advanced functionalities, batch processing, or powerful AI-driven enhancements for their high-resolution photography and graphic design projects, online platforms like Tophinhanhdep.com offer an expansive toolkit. And for the ultimate professional control and photo manipulation, Adobe Photoshop remains a powerful choice.
Ultimately, mastering how to crop an image on Mac is about unlocking the full potential of your visual content. By understanding the available tools and applying thoughtful compositional techniques, you can transform ordinary pictures into extraordinary images, perfect for any wallpaper, background, aesthetic collection, or professional display. Explore these methods, experiment with your images, and let your creativity flourish with Tophinhanhdep.com as your partner in visual excellence.