Mastering Image Cropping in Adobe Illustrator: A Comprehensive Guide

In the dynamic world of visual design and digital content creation, the ability to precisely manipulate images is paramount. Whether you’re crafting stunning wallpapers, refining high-resolution photography, or assembling compelling graphic designs, cropping images is a fundamental skill that significantly impacts the final aesthetic and message. Cropping allows you to eliminate distracting elements, adjust composition, and focus the viewer’s attention on the most crucial parts of your visual story.
Adobe Illustrator, a cornerstone for graphic designers and digital artists, offers a robust suite of tools for both vector and raster image manipulation. While historically known more for its vector capabilities, recent updates have streamlined the process of working with raster images, including a dedicated “Crop Image” function. However, the versatility of Illustrator extends far beyond this single tool, offering multiple techniques to achieve precise and creative crops, depending on your specific needs and the type of image you’re working with. From permanent removal to non-destructive masking, understanding these various methods is key to unlocking Illustrator’s full potential.
This comprehensive guide will walk you through the primary ways to crop an image in Adobe Illustrator, catering to both newer Creative Cloud versions and older editions. We’ll delve into the nuances of each technique, providing step-by-step instructions and practical tips. Additionally, we’ll explore how these powerful software functionalities can be complemented by efficient online image tools like those found at Tophinhanhdep.com, offering quick and accessible solutions for various image processing tasks within the broader context of images, photography, and visual design.
The Essential “Crop Image” Tool (Illustrator CC 2017 and Newer)
For users of Adobe Illustrator Creative Cloud 2017 and later versions, the “Crop Image” function provides a direct and intuitive way to trim raster images. This feature brings Illustrator more in line with dedicated photo editing software, simplifying a process that was once more convoluted for new users.
Understanding Raster vs. Vector Cropping in Illustrator
Before diving into the “Crop Image” tool, it’s crucial to understand the distinction between raster and vector graphics, as Illustrator handles them differently.
- Raster Images: These are pixel-based images, like photographs (.jpg, .png, .gif) or rasterized artwork. The “Crop Image” tool is specifically designed for these formats. When you crop a raster image, you are essentially reducing the number of pixels visible, though the original pixel data might still be preserved in the file’s metadata until explicitly flattened or exported.
- Vector Graphics: These are path-based images created with mathematical equations (Illustrator’s native .ai format, .svg, .eps). They scale infinitely without losing quality. The “Crop Image” tool cannot be directly applied to editable vector graphics. Instead, vector cropping often involves using Pathfinder tools or Clipping Masks.
Linked or Embedded Images: When you place a raster image into Illustrator, it can be either “linked” or “embedded.”
- Linked Images: The Illustrator file maintains a link to the original image file on your computer. This keeps the Illustrator file size smaller. If you crop a linked image using the “Crop Image” function, Illustrator will prompt you that it will embed a copy of the image, essentially making it part of the Illustrator document and breaking the link. The original file on your hard drive remains untouched.
- Embedded Images: The image data is directly incorporated into the Illustrator file, increasing the file size. Cropping an embedded image directly modifies the image within the Illustrator document, without affecting any external file.
Knowing this distinction is vital, especially when working on projects that require precise image management or collaboration.
Step-by-Step Guide to Using the Crop Image Function
The “Crop Image” function is straightforward for rectangular and square crops. Let’s walk through it:
-
Prepare Your Image in Illustrator:
- Open a new or existing document: Launch Adobe Illustrator and either create a new document (
File > New) or open an existing.aifile (File > Open). - Place your image: Go to
File > Place...(Shift + Ctrl/Cmd + P), select your desired raster image (e.g., a .jpg or .png from your “Beautiful Photography” collection), and clickPlace. Then, click on your artboard to place the image. If you need to resize it, click on the image with the Selection Tool, then holdShiftand drag a corner to maintain its aspect ratio.
- Open a new or existing document: Launch Adobe Illustrator and either create a new document (
-
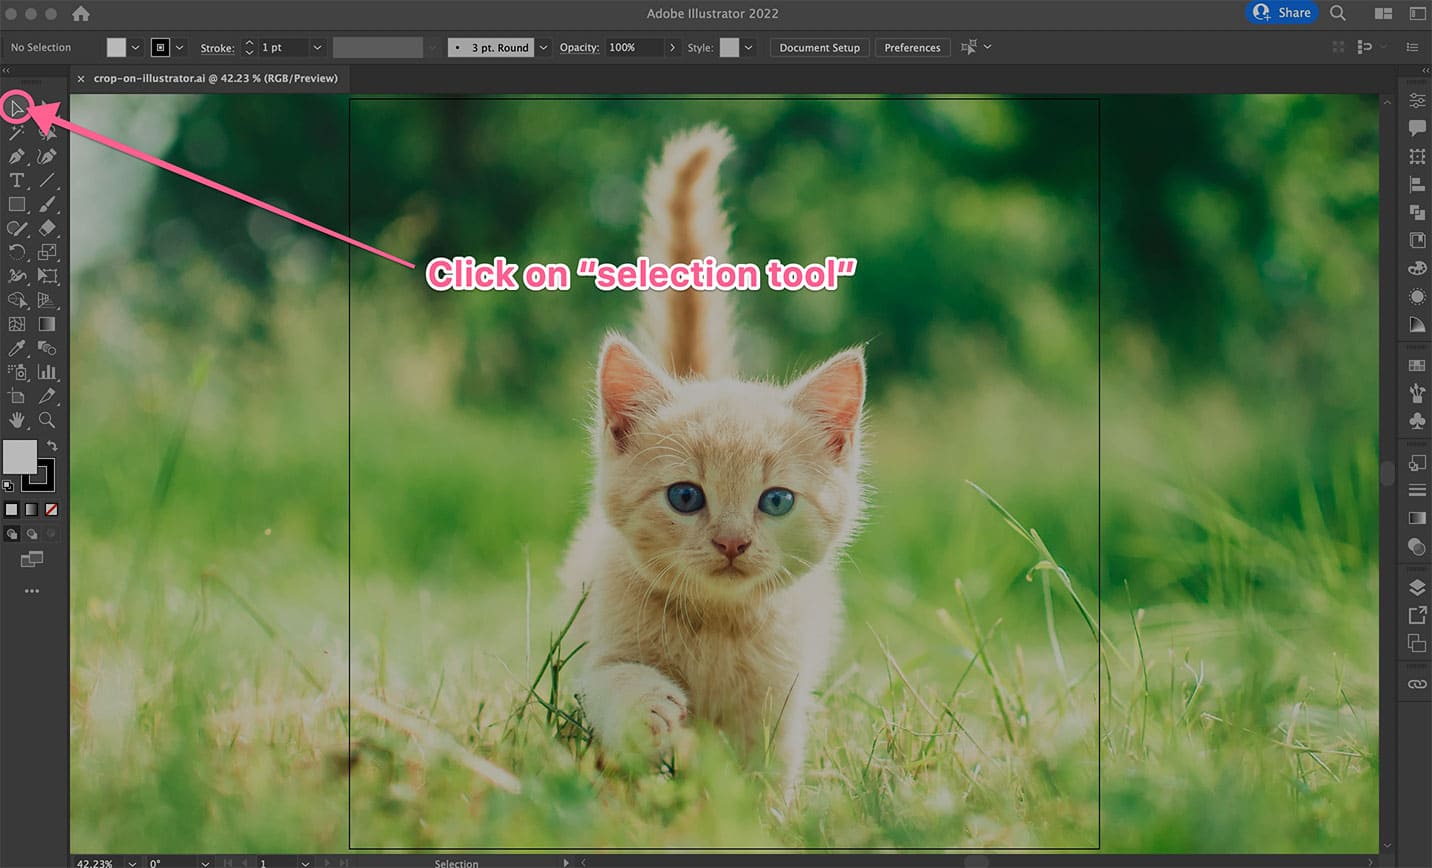
Select the Image You Want to Crop:
- Use the Selection Tool (the solid black arrow in the toolbar, or press
Von your keyboard). Click directly on the image you placed. You’ll see a bounding box appear around it, indicating it’s selected.
- Use the Selection Tool (the solid black arrow in the toolbar, or press
-
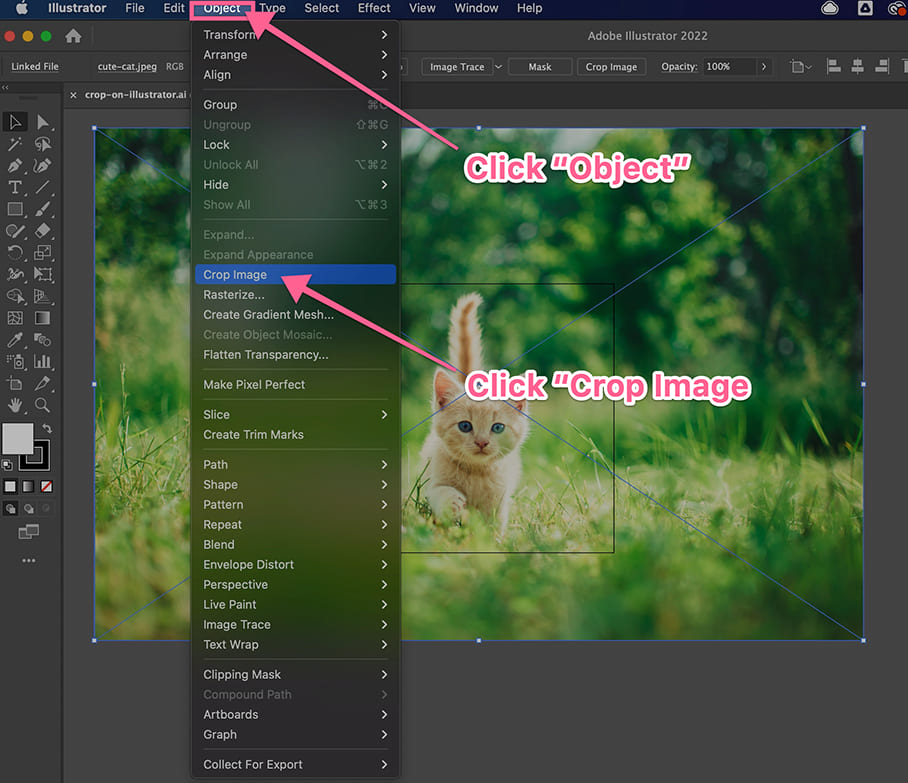
Activate the “Crop Image” Function:
- Once the image is selected, look at the top Control Panel (just below the menu bar) or the Properties panel on the right side of your screen. You should see a button labeled “Crop Image”. Click this button.
- A warning prompt may appear, especially if your image was linked, informing you that the image will be embedded. Click
OKto proceed. This is Illustrator’s way of ensuring the cropped image is self-contained within your document.
-
Adjust the Cropping Area:
- After clicking “Crop Image,” a bounding box with eight handles (four corners and four sides) will appear around your image, often with a semi-transparent overlay indicating the area to be removed.
- Drag the handles: Click and drag any of these handles inwards or outwards to define your desired cropping area. The dark dotted lines show the new boundaries.
- Move the image within the crop: You can also click and drag the image itself within the cropping box to reposition it, allowing you to perfectly frame your subject, perhaps a captivating scene from your “Nature Images” or “Abstract Backgrounds.”
- Maintain aspect ratio: If you want to maintain a specific aspect ratio while adjusting, hold down the
Shiftkey while dragging a corner handle.
-
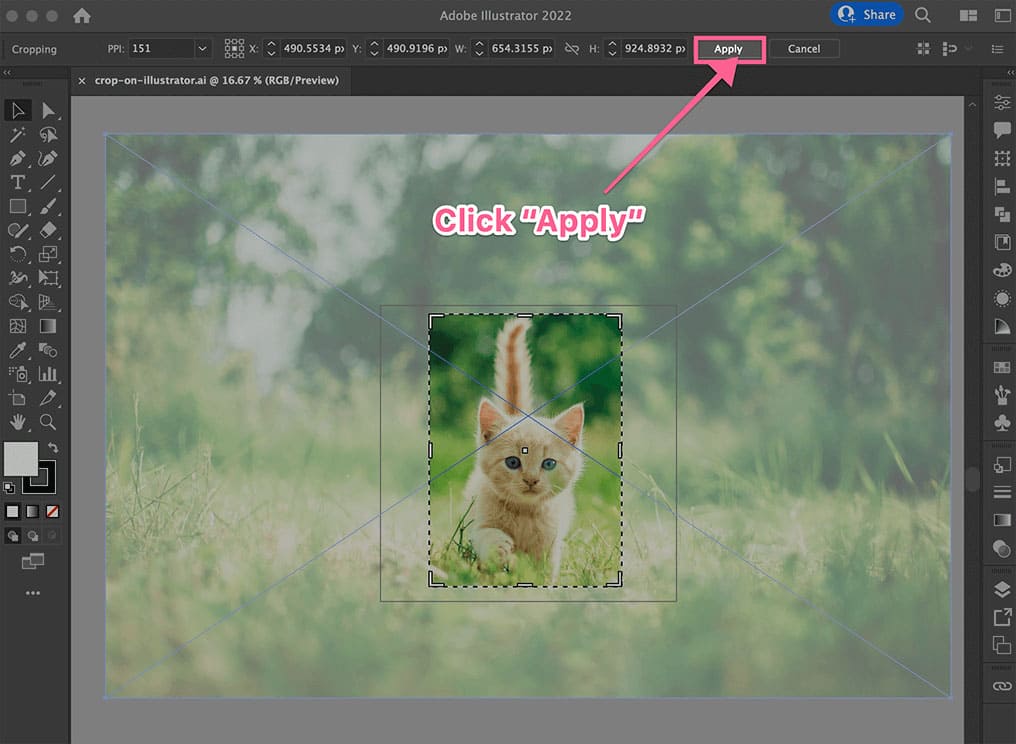
Apply the Crop:
- Once you’re satisfied with the cropping area, click the “Apply” button in the Control Panel at the top, or simply press
Enter(orReturn) on your keyboard. - The areas outside your defined box will be permanently removed from the image within your Illustrator document. The original image file on your computer, however, remains intact.
- Once you’re satisfied with the cropping area, click the “Apply” button in the Control Panel at the top, or simply press
This method is incredibly efficient for quick, precise rectangular crops, making it a go-to for many daily design tasks involving raster images.
Unleashing Creativity with Clipping Masks (All Illustrator Versions)
The Clipping Mask is a timeless and highly versatile feature in Adobe Illustrator, available in virtually all versions, including those predating the dedicated “Crop Image” tool. What makes clipping masks particularly powerful is their non-destructive nature and the ability to crop images and vector graphics into any shape imaginable, far beyond simple rectangles. This makes them indispensable for “Visual Design” and “Photo Manipulation” where creative ideas and unique compositions are key.
A clipping mask works by using one object (the “clipping path”) to define the visible boundaries of another object or group of objects (the “clipped artwork”). Only the parts of the clipped artwork that fall within the boundaries of the clipping path will be visible. Everything outside is merely hidden, not permanently deleted, allowing for easy adjustments.
Basic Clipping Mask for Custom Shapes
This method is your best friend when you need to crop an image, text, or a group of vector objects into an irregular or custom shape, perfect for aesthetic images or complex graphic design elements.
-
Prepare Your Image or Graphic:
- Start with your raster image (like a piece of “Beautiful Photography”) or your vector artwork already placed on your Illustrator artboard.
-
Draw Your Mask Shape (Clipping Path):
- This is the shape that will define your crop. It must be a closed path.
- For regular shapes: Select a shape tool from the toolbar (e.g., Rectangle Tool
M, Ellipse ToolL, or **Polygon Tool`). Draw the desired shape directly over the area of your image that you want to keep. - For irregular or custom shapes: Use the Pen Tool
P, Pencil ToolN, or even a combination of shapes with the Pathfinder panel to create a unique contour. For example, if you wanted to crop an image to fit a custom logo shape, you would draw that logo shape. - Crucial Tip: The clipping path (your mask shape) must be on top of the image or objects you intend to crop. If it’s not, select your mask shape with the Selection Tool, then go to
Object > Arrange > Bring to Front(Shift + Ctrl/Cmd + ]).
-
Select Both the Image and the Mask Shape:
- Use the Selection Tool (
V). Click and drag a marquee selection box around both your image (or group of objects) AND your mask shape. Alternatively, click on the image, then holdShiftand click on the mask shape to select both.
- Use the Selection Tool (
-
Create the Clipping Mask:
- With both elements selected, go to the top menu bar and click
Object > Clipping Mask > Make. - Alternatively, use the convenient keyboard shortcut:
Ctrl + 7(Windows) orCommand + 7(Mac). - Instantly, your image will be “cropped” to the shape of your clipping path. Anything outside that shape will disappear, giving you the custom crop you desired.
- With both elements selected, go to the top menu bar and click
Editing and Refining Clipping Masks
One of the greatest advantages of clipping masks is their flexibility. Since the hidden parts are not deleted, you can easily modify your crop:
-
Editing the Clipped Content (Image/Graphic):
- Double-click the masked object: This enters isolation mode, allowing you to select and move or resize the image within the static clipping mask. This is fantastic for fine-tuning the composition without changing the crop shape.
- Use the Direct Selection Tool (
A): Select specific anchor points or paths within the clipped content to edit them.
-
Editing the Clipping Path (Mask Shape):
- Double-click the masked object: Once in isolation mode, select the clipping path itself (you might need to click the outline). Now you can use the Direct Selection Tool (
A) or Pen Tool (P) to modify its shape, adding or removing anchor points, or adjusting curves. - Use the Direct Selection Tool (
A): Without entering isolation mode, you can often select just the clipping path’s outline by carefully clicking its edge. Then, you can reshape it.
- Double-click the masked object: Once in isolation mode, select the clipping path itself (you might need to click the outline). Now you can use the Direct Selection Tool (
-
Releasing a Clipping Mask:
- If you decide you no longer want the crop, simply select the masked object and go to
Object > Clipping Mask > Release(Alt + Ctrl + 7orOption + Cmd + 7). The original image and mask shape will reappear as separate objects.
- If you decide you no longer want the crop, simply select the masked object and go to
Clipping masks are a powerful tool for sophisticated “Digital Art” and “Photo Manipulation,” giving you unparalleled control over how your visuals are presented.
Advanced Cropping with Opacity Masks
While clipping masks define hard, visible boundaries, opacity masks take this concept a step further by allowing you to create crops with varying degrees of transparency, gradients, and soft edges. This method is particularly useful when you want to blend images seamlessly or create artistic fades, aligning with “Creative Ideas” and “Aesthetic Images.” Opacity masks use grayscale values to determine visibility: white areas of the mask reveal, black areas conceal, and shades of gray create semi-transparent effects.
Creating Gradient or Soft Crops with Opacity Masks
Let’s explore how to use opacity masks to achieve subtle and creative cropping effects, moving beyond solid shapes.
-
Prepare Your Image and Mask Shape:
- Place your raster image or vector graphic onto the artboard.
- Draw a shape (e.g., a rectangle, circle, or custom path) over the area you want to manipulate. This shape will act as your opacity mask. As with clipping masks, this mask shape must be on top of the content you want to mask.
-
Apply Color or Gradient to the Mask Shape:
- Select your mask shape.
- For a soft fade: Apply a gradient to your mask shape. For instance, if you want to fade an image from left to right, apply a linear gradient to your mask that goes from white on the left (fully opaque) to black on the right (fully transparent).
- For varied transparency: Fill your mask shape with different shades of gray. Lighter grays will make the image more visible, while darker grays will make it more transparent.
- For specific transparent areas: Fill parts of your mask with black to make the corresponding parts of the image completely transparent, and white for opaque.
-
Select Both the Image and the Mask Shape:
- Using the Selection Tool (
V), select both your image/graphic and the mask shape with the applied color or gradient.
- Using the Selection Tool (
-
Make the Opacity Mask:
- Open the Transparency Panel by going to
Window > Transparency. - In the Transparency panel, ensure both your image and mask shape are selected. Then, click the “Make Mask” button.
- By default, the “Clip” option will likely be checked, which means the black areas of your mask will fully clip/hide the image. The “Invert Mask” option (if checked) would reverse this effect.
- Immediately, you’ll see your image cropped and/or faded according to the grayscale values of your mask shape. For example, if you used a white-to-black gradient, the image will softly transition from opaque to transparent.
- Open the Transparency Panel by going to
-
Adjust Opacity (Optional):
- Within the Transparency panel, you can further fine-tune the overall opacity of the masked object using the Opacity slider. This allows you to control the global transparency of the entire cropped/faded image.
- You can also click on the mask thumbnail in the Transparency panel to re-select the mask and refine its gradient or color fills using the Gradient tool or Swatches.
Opacity masks offer incredible artistic freedom for blending “Mood Boards” or creating intricate “Thematic Collections.” They provide a dynamic way to integrate images into complex layouts without harsh lines, enhancing the overall visual flow and appealing to various “Editing Styles.”
Workflow Enhancements and Online Alternatives
Beyond the core cropping tools in Illustrator, there are additional techniques for specific workflow needs and complementary online resources that can streamline your image processing, especially for raster graphics.
The Artboard Method for Export-Based Cropping
This “quick and dirty” method is excellent when you need to crop an image for export, without necessarily modifying it permanently within your working Illustrator file. It’s particularly useful when dealing with final outputs for web or print, where precise dimensions are critical.
-
Select the Image and Activate the Artboard Tool:
- First, place and position your image on your artboard.
- Select the Artboard Tool (
Shift + O) from the toolbar. - With the Artboard Tool active, click on your image. Illustrator will automatically create an artboard sized precisely to your image.
-
Adjust the Artboard for Your Desired Crop:
- With the Artboard Tool still selected, drag the corners or sides of the newly created artboard to define the exact rectangular or square area you wish to crop to. You can also manually input precise dimensions in the Control Panel at the top.
- If you have multiple artboards, ensure this is the active artboard you want to export.
-
Export the Cropped Image:
- Go to
File > Export > Export As...orFile > Save for Web (Legacy)...(Alt + Shift + Ctrl/Cmd + S). - In the export dialog box, crucially, ensure the “Use Artboards” checkbox is selected. If you have multiple artboards, you can specify a range (e.g., “Range: 1-1”) or select “All.”
- Choose your desired file format (e.g., JPG for “High Resolution” photos, PNG for transparency) and settings, then click
ExportorSave. - This method creates a separate cropped image file, leaving your original image untouched on your Illustrator canvas, which can be useful for iterative design.
- Go to
Flatten Transparency: Making Clipping Masks Permanent
As we learned, clipping masks are non-destructive, meaning the hidden parts of an image are still present. Sometimes, however, you might want to permanently discard those hidden pixels, especially to reduce file size or simplify a complex file for hand-off. The “Flatten Transparency” trick can achieve this.
-
Apply a Clipping Mask:
- Start by applying a standard clipping mask to your image as described in the previous section.
-
Flatten Transparency and Expand:
- Select the masked object.
- Go to
Object > Flatten Transparency.... A dialog box will appear. You can usually accept the default settings, but ensure the “Convert All Text to Outlines” and “Convert All Strokes to Outlines” are unchecked if you don’t want those elements affected. ClickOK. - Next, with the object still selected, go to
Object > Expand. In the Expand dialog, ensure “Object” and “Fill” (and “Stroke” if applicable) are checked. ClickOK. - This process effectively “bakes” the clipping mask into the image, permanently deleting the hidden pixels and reducing the image to its visible cropped area. Use with caution, as this is a destructive action.
Beyond Illustrator: Cropping with Tophinhanhdep.com’s Image Tools
While Adobe Illustrator is a powerhouse for professional design, there are many instances where you might need a quicker, more accessible solution for cropping raster images without diving into complex software. This is where online “Image Tools” like those offered by Tophinhanhdep.com shine.
Tophinhanhdep.com provides a suite of online tools designed for rapid image processing, complementing your workflow, particularly for tasks related to “Images,” “Photography,” and quickly preparing visuals for web or social media.
- Convenience and Accessibility: Unlike Illustrator, which requires software installation and a powerful device, Tophinhanhdep.com’s cropping tool operates directly in your browser. This means you can crop images on any device – a laptop, desktop, smartphone, or tablet – without any downloads or installations. It’s ideal for on-the-go adjustments to “Backgrounds” or “Aesthetic Images.”
- User-Friendly Interface: Tophinhanhdep.com simplifies the cropping process significantly. You upload your JPG, PNG, or GIF image, and then easily define your cropping area. There are no complex layers, panels, or multiple tools to navigate.
- Basic vs. Advanced Cropping: Tophinhanhdep.com typically offers rectangular and circular cropping options, perfect for standard social media requirements or quick visual adjustments. While it won’t handle Illustrator’s advanced custom shapes or opacity masks, it excels at providing immediate results for common “Image Tools” needs. It also often includes pre-set aspect ratios for popular platforms, saving you time.
- Batch Processing: Many online tools, including Tophinhanhdep.com, support batch processing, allowing you to crop multiple images simultaneously – a massive time-saver for large “Photo Ideas” collections or “Stock Photos.”
- Privacy and Security: Tophinhanhdep.com prioritizes user data. Your images are processed directly in your browser and are not uploaded or stored on their servers, ensuring the security of your “Digital Photography” assets.
- Speed and Quality: Despite being an online service, Tophinhanhdep.com’s tools are optimized for speed and maintain the quality of your high-resolution images after cropping, making them ready for “Trending Styles” or “Image Inspiration & Collections.”
For basic, rectangular, or circular crops of raster images, Tophinhanhdep.com offers a streamlined, hassle-free alternative that integrates perfectly into a modern digital workflow, complementing the advanced capabilities of Adobe Illustrator. It’s the ideal solution when you need a quick crop without the overhead of professional software.
Conclusion
Mastering how to crop an image in Adobe Illustrator is an indispensable skill for anyone involved in “Visual Design,” “Digital Art,” or “Photography.” Whether you’re working with intricate vector graphics or high-resolution raster images, Illustrator provides a diverse array of tools to meet your specific needs. From the straightforward “Crop Image” tool in newer versions to the versatile and non-destructive Clipping Masks and the creatively expressive Opacity Masks, each method offers unique advantages for shaping your visuals.
Understanding the differences between destructive and non-destructive techniques, and knowing when to apply each, empowers you to maintain control over your artwork, optimize file sizes, and achieve your desired aesthetic. For those moments when the full power of Illustrator isn’t required, or when you need a quick fix on the go, online “Image Tools” like those found at Tophinhanhdep.com offer a convenient and efficient alternative for basic raster cropping.
By integrating these powerful software and online resources into your workflow, you can confidently transform your raw “Images” and “Digital Photography” into polished, impactful visual content, ensuring your “Creative Ideas” are always presented with precision and flair. Embrace these techniques, and unlock a new level of control over your visual storytelling.