How to Crop an Image in Canva for Picture-Perfect Visuals and Enhanced Designs

In the realm of digital creation, where visual content reigns supreme, the ability to manipulate and refine images is an invaluable skill. Whether you’re a seasoned graphic designer, a social media enthusiast, a digital artist, or simply someone looking to create stunning visuals for personal projects, understanding how to crop an image effectively is fundamental. Canva, with its intuitive interface and powerful features, has become a go-to platform for millions seeking to bring their creative ideas to life. However, even with such user-friendly tools, many find themselves asking: “How do I crop an image in Canva to achieve precisely the look I envision?”
Cropping is far more than just trimming the edges of a photograph; it’s a critical technique in photo manipulation that allows you to redefine the focus, improve composition, alter aspect ratios, and remove distractions, ultimately transforming a good image into a great one. It’s the essential first step in ensuring your images — whether they are high-resolution stock photos, aesthetic backgrounds, or candid digital photography — perfectly align with your visual design goals. This comprehensive guide will walk you through every method of cropping in Canva, from the basic tools to advanced techniques, ensuring your images are always picture-perfect. We will also explore how the diverse image tools and collections available on Tophinhanhdep.com can further elevate your design process, offering everything from AI upscalers to extensive thematic collections.
Mastering Basic Image Cropping in Canva
Canva offers several straightforward methods for cropping images and elements, each serving a slightly different purpose in your visual design journey. Familiarizing yourself with these foundational tools will empower you to take full control over your creative output.
The Standard Crop Tool: Reshaping Your Photos with Ease
The most common and fundamental way to crop a photo in Canva involves using its standard crop tool. This method is perfect for those instances where you need to adjust the boundaries of an image, focus on a particular subject, or simply remove unwanted elements. Imagine you have a beautiful nature photograph, but a distracting object lurks in the corner; the standard crop tool is your immediate solution.

Here’s a step-by-step breakdown:
- Start Your Design: Begin by opening a new or existing design in Canva.
- Add Your Image: Upload your desired photo from your device, or select one from Canva’s extensive library of stock photos or your previously uploaded assets. You might choose a stunning aesthetic wallpaper, a dynamic abstract background, or a serene landscape from Tophinhanhdep.com’s vast collection.
- Activate the Crop Tool:
- Select the image on your canvas by clicking on it once.
- Locate and click the “Crop” button in the top toolbar that appears.
- Alternatively, and often more quickly, you can simply double-click on the image to activate the crop mode directly.
- Adjust the Crop Box: Once in crop mode, you’ll notice distinctive white L-shaped handles at each corner of your image, along with smaller white dots along the sides. These are your cropping controls.
- Proportional Cropping: To maintain the image’s original aspect ratio while making the crop box smaller or larger, click and drag one of the L-shaped corner handles diagonally inward or outward. This is ideal when you want to keep the overall shape consistent, perhaps for a high-resolution photograph that needs to fit a specific slot without distortion.
- Free-form Cropping: If you need to change the aspect ratio—for example, turning a landscape image into a portrait image or vice versa—you can drag the white dots along the vertical or horizontal sides of the image. This allows you to adjust the width and height independently, giving you complete freedom over the crop’s shape.
- Expert Tip: For even finer control over free-form cropping, especially if you’re struggling with independent height and width adjustments (a common frustration, as one user from the community once shared), you can hold down the Shift key while dragging a corner handle. This allows you to adjust width and height separately without being constrained by the original aspect ratio, mimicking the flexibility found in more advanced digital photography editing software.
- Position the Image Within the Crop: After adjusting the crop box to your desired dimensions, you’ll see a darkened area representing the parts of the original image that will be removed. The visible portion is what remains. You can now click and hold the image itself (within the crop box) and drag it around to perfectly position your subject within the newly defined boundaries. This is crucial for achieving optimal composition and ensuring your main subject, whether it’s a person in a beautiful photograph or a key element in an abstract design, is perfectly centered or aligned according to your creative vision.
- Finalize the Crop: Once you are satisfied with the cropped area and the image’s position, click the “Done” button in the top toolbar, or simply click anywhere outside the image on the canvas. Your changes will be saved, and your image will appear with its new dimensions.

This basic cropping method is essential for cleaning up images, emphasizing key details, and creating visual harmony within your designs.
Precision Cropping: Using Specific Dimensions
Sometimes, you need more than just a visual crop; you require exact measurements for your image to fit a specific layout or design requirement. This is particularly common in graphic design for web elements, print materials, or when you’re aiming for consistent sizing across a series of images in a mood board. Canva provides a way to achieve this through its position menu.
Here’s how to set precise dimensions:
- Select Your Image: Click on the image you wish to crop on your canvas.
- Access the Position Menu: In the top toolbar, click on “Position.” This action will open a side panel, usually on the left or right, which contains “Arrange” and “Layers” tabs. Ensure you are on the “Arrange” tab.
- Enter Specific Dimensions: Within the “Arrange” tab, look for the “Advanced” section. Here, you’ll find input fields labeled “Width” (W) and “Height” (H).
- You can directly type in your desired width and height values in pixels, centimeters, or millimeters. As you enter these values, Canva will automatically crop your image to match.
- Maintain Aspect Ratio: To ensure your image doesn’t appear stretched or squashed, make sure the lock icon next to the width and height fields is toggled on. This will link the two dimensions, so when you change one, the other automatically adjusts to maintain the original aspect ratio. If you want to crop freely without maintaining the ratio, simply click the lock icon to unlock it.
- Adjust Image Content: Once the image box is resized to your precise specifications, you can still refine what portion of the original image is visible. Double-click the image to enter crop mode (as described in the standard crop tool section). Now, you can drag the image around within its new, precisely sized frame to get the exact selection you want.
- Confirm Changes: Click “Done” or click outside the image to apply your precise crop.
This method is invaluable for digital art projects, creating uniform images for a blog, or designing elements where exact sizing is paramount.
Cropping Elements for Dynamic Visual Design
Canva isn’t just for photographs; it’s a versatile visual design tool for graphic design and digital art. You can apply the same cropping principles to many graphic elements, such as illustrations, shapes, and vectors. This allows for greater flexibility and creativity in your designs, enabling you to use only a portion of a complex element to fit your aesthetic or message.
Consider a decorative element with multiple flowers, but your design only calls for one or two:
- Add Your Element: From the “Elements” tab in the left sidebar, add any graphic element to your design.
- Activate the Crop Tool: Select the element, then click the “Crop” button in the top toolbar, or simply double-click the element.
- Crop and Position: Use the L-shaped handles and side dots to define the new boundaries of your element, just as you would with a photo. Drag the element within the crop box to position the desired section.
- Finalize: Click “Done” to apply the crop. The unused portions of the element will disappear, leaving you with a customized graphic that perfectly integrates into your creative ideas.
This capability is fantastic for photo manipulation, creating unique digital art compositions, or simply tailoring existing elements to match your unique branding or thematic collections.
Advanced Cropping Techniques and Creative Applications
Beyond basic rectangular cropping, Canva offers more sophisticated ways to crop images, allowing for highly creative outcomes and seamless integration into various visual design contexts.
Unleashing Creativity with Frames and Grids
For those looking to crop images into custom shapes or organize multiple images into a structured layout, Canva’s frames and grids are indispensable. They offer a powerful approach to photo manipulation and adding a distinctive flair to your aesthetic visuals.
Cropping into Custom Shapes with Frames
Frames are pre-designed placeholders that allow you to “clip” an image into a specific shape, such as a circle, a star, a letter, or even an iPhone screen. This is particularly popular for profile pictures (where a circular crop is often desired) or for creating eye-catching photo ideas for mood boards.
Here’s how to circle crop an image in Canva, or crop into any other shape:
- Open Your Design: Start with a new or existing Canva design.
- Add Your Image: Upload the photo you want to crop (e.g., a beautiful photography shot or a personal portrait) and add it to your canvas.
- Find and Add a Frame:
- Go to the “Elements” tab in the left sidebar.
- In the search bar, type “Frames” or more specifically, “Circle Frame” for a round crop, “Heart Frame,” or any other shape you desire.
- Browse through the selection and click on the frame that suits your creative idea. It will appear on your canvas.
- Resize and Position the Frame: Drag the corner handles of the frame to resize it to your preferred dimensions and move it to the desired position on your canvas.
- Drag and Drop Your Image into the Frame: This is the magic step. Click on your uploaded image (from the “Uploads” tab or the canvas itself), drag it directly over the frame, and release your mouse button. The image will instantly snap into the frame, taking on its shape. The unused portions will effectively be “cropped out.”
- Refine the Image Within the Frame:
- Double-click the image inside the frame. You’ll now see the full original image with semi-transparent areas indicating what’s outside the frame.
- You can drag the image to reposition it within the frame, ensuring your subject is perfectly centered or composed.
- Use the white anchor points (dots) around the image to resize it within the frame. You can make the image larger, filling more of the frame, but you generally cannot make it smaller than the frame itself.
- Canva Pro users can also use the “Smart Crop” feature here, which leverages AI to suggest the best possible crop within the frame.
- Apply Changes: Once satisfied, click “Done” or click anywhere off the image.
Important Note on Transparency: When cropping into a circle or any other shape using frames, the image technically remains rectangular, but the areas outside the frame become transparent. To preserve this transparency, it’s crucial to download your design as a PNG file. If you download as JPG (which doesn’t support transparency), the “cropped out” areas will likely appear as a solid white background. Tophinhanhdep.com offers converters if you need to switch formats later, but starting with PNG is best for shapes.
Using Grids for Multi-Image Layouts
Grids are similar to frames but are designed to hold multiple images or elements in predefined layouts. They are perfect for creating collages, mood boards, or dynamic backgrounds with several integrated photographs.
- Add a Grid: Go to the “Elements” tab and search for “Grids.”
- Select a Layout: Choose a grid layout that matches your aesthetic and the number of images you want to feature.
- Drag Images into Grid Cells: Drag and drop your photos (from “Uploads” or Canva’s “Photos” library, perhaps high-resolution stock photos from Tophinhanhdep.com) into each section of the grid.
- Crop Within Grid Cells: Just like with frames, you can double-click on any image within a grid cell to adjust its position and size, effectively cropping it to fit perfectly within that specific segment of the grid.
Grids and frames revolutionize how you approach photo manipulation and creative ideas in Canva, allowing for sophisticated visual narratives.
Cropping for Social Media and Thematic Collections
Optimizing images for various social media platforms is a common task in graphic design. Each platform has preferred aspect ratios (e.g., 1:1 for Instagram posts, 4:5 for portraits, 9:16 for stories, 16:9 for YouTube thumbnails). Canva’s cropping tools, combined with its template features, make this process incredibly efficient.
- Start with the Right Canvas: When creating a new design, choose a template or custom size that matches the target social media platform’s dimensions (e.g., “Instagram Post” for a 1:1 canvas). This automatically sets up your design space for the correct aspect ratio.
- Upload or Select Your Image: Bring your chosen photograph into the canvas.
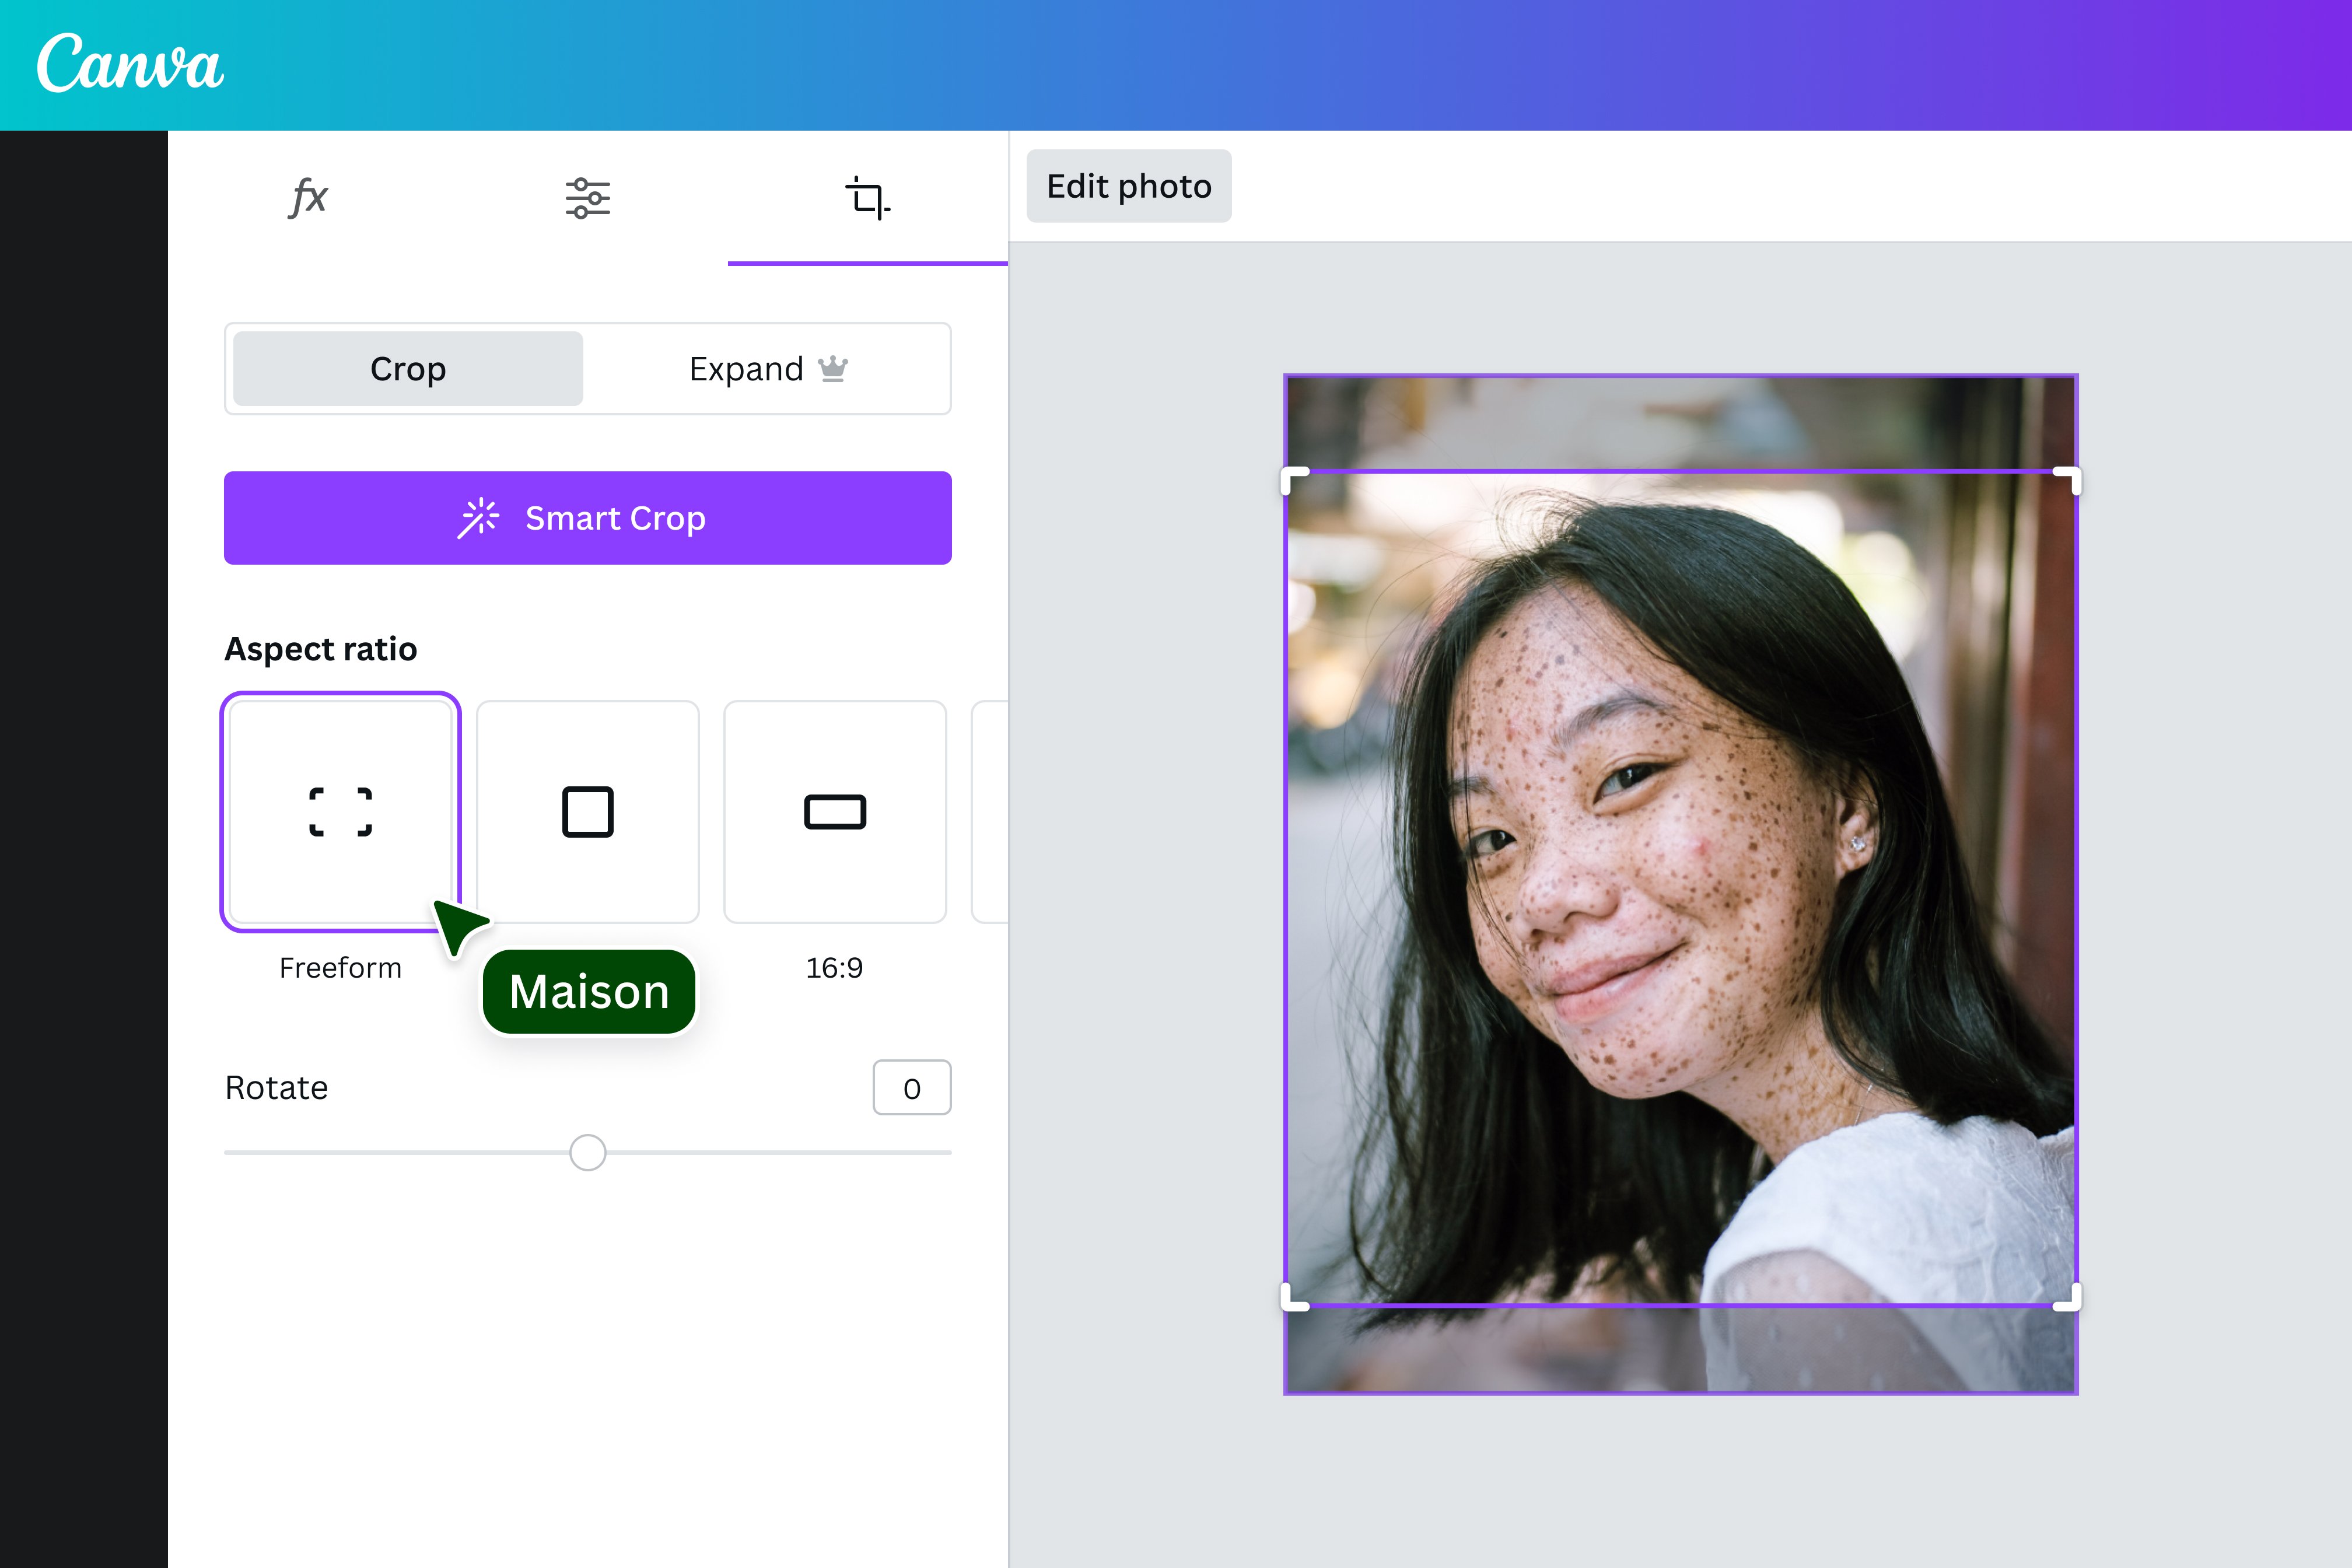
- Smart Crop for Aspect Ratio: With the image selected, click “Edit Photo” in the top toolbar, then navigate to the “Crop” tab in the editing panel. Here, you’ll find “Aspect Ratio” options (1:1, 4:5, 9:16, etc.). Clicking one will automatically apply that crop to your image. While Smart Crop (an AI feature in the same panel) can offer suggestions, manually selecting an aspect ratio gives you more control.
- Fine-tune and Position: After applying an aspect ratio, double-click the image to reposition it within the cropped area.
- Save for Social Media: Once cropped, you can download the image. For managing a collection of images for social media, consider these steps for workflow optimization:
- On the Canva Homepage, go to “Projects” then “Folders.”
- Create a new folder (e.g., “Social Media Imagery”).
- Upload your original high-resolution photography to this folder.
- Open an image, apply your desired social media crop and edits, then “Save to Canva” (it will save an “edited” version in the same folder) or “Download” directly. This streamlines your process for creating consistent content across different platforms, aligning with trending styles and thematic collections.
The Magic of Smart Crop and Background Removal
Canva Pro offers advanced features that significantly enhance your cropping and image editing capabilities, particularly “Smart Crop” and the “Background Remover.” These tools push the boundaries of photo manipulation, allowing for truly creative ideas.
- Smart Crop (Canva Pro): Found within the “Edit Photo” > “Crop” section, Smart Crop uses artificial intelligence to analyze your image and suggest what it believes to be the best compositional crop. While not always perfect, it can provide excellent starting points or offer fresh perspectives on how to frame your subject, especially for beautiful photography where optimal composition is key.
- Background Remover (Canva Pro): After cropping an image, you might want to isolate the subject entirely. The Background Remover, also found under “Edit Photo,” instantly removes the background, leaving your subject on a transparent canvas. This is incredibly powerful for digital art, creating aesthetic overlays, or integrating subjects into new backgrounds seamlessly. For example, you can crop a person from a sad/emotional photography shot and place them onto a more hopeful, abstract background. Tophinhanhdep.com also offers complementary background removal services for images if you’re working outside of Canva or need batch processing.
These Pro features demonstrate how Canva continues to evolve, offering sophisticated image tools that rival more traditional photo editing software, making advanced visual design accessible to everyone.
Enhancing Your Cropped Images with Tophinhanhdep.com’s Tools
While Canva excels at design and basic image manipulation, the journey of an image often extends beyond its initial cropping. Tophinhanhdep.com serves as an invaluable companion resource, providing specialized image tools and extensive collections that can further refine, optimize, and inspire your visual content.
Optimizing Resolution and Quality
After carefully cropping an image in Canva, especially if you’ve zoomed in significantly, you might be concerned about maintaining high resolution or managing file size for web use. This is where Tophinhanhdep.com’s dedicated image tools come into play.
- Compressors and Optimizers: A beautifully cropped image might still be too large for fast website loading or email attachments. Tophinhanhdep.com offers powerful image compressors and optimizers that can reduce file size without compromising visual quality. This ensures your cropped photos, wallpapers, and backgrounds load quickly and efficiently, providing a smooth user experience.
- AI Upscalers: If you’ve cropped a small section of a digital photography piece in Canva and find its resolution is now too low for a larger display or print, Tophinhanhdep.com’s AI Upscalers can be a game-changer. These intelligent tools can enlarge your cropped image while adding detail and improving clarity, restoring or even enhancing its high-resolution quality. This is particularly beneficial for focusing on intricate details in nature or abstract images.
- Converters: Sometimes, a specific project requires an image in a different format (e.g., converting a PNG to JPG for smaller file size, or vice versa for transparency). Tophinhanhdep.com provides image converters that allow you to seamlessly switch between formats, ensuring compatibility across various platforms and applications.
Integrating these image tools from Tophinhanhdep.com into your workflow after cropping in Canva ensures that your visuals are not only perfectly composed but also technically optimized for any application.
Exploring Aesthetic and Thematic Image Collections
The foundation of any great design is compelling imagery. Tophinhanhdep.com boasts a rich repository of diverse image collections that can serve as inspiration or direct assets for your Canva projects.
- Vast Image Categories:
- Wallpapers & Backgrounds: Discover stunning high-resolution wallpapers and backgrounds for any device or design.
- Aesthetic & Nature: Immerse yourself in collections of aesthetically pleasing images, from serene landscapes to intricate natural patterns.
- Abstract & Sad/Emotional: Explore expressive abstract art and powerful sad/emotional photography to convey deeper meanings in your visual narratives.
- Beautiful Photography: Access a curated selection of breathtaking photographs spanning various subjects and styles.
- Curated Inspiration: These collections are not just sources for stock photos; they are goldmines for image inspiration. You can browse them to develop photo ideas, build mood boards, or identify trending styles that resonate with your project. Once you find an image, you can download it and bring it into Canva, where your cropping skills will allow you to tailor it perfectly to your design.
- Digital Photography & Editing Styles: For photography enthusiasts, Tophinhanhdep.com offers insights into different digital photography styles and editing techniques. By understanding these, you can apply more informed cropping decisions in Canva, knowing how a specific crop might enhance a particular artistic style or emotional impact.
By leveraging Tophinhanhdep.com’s extensive image resources, you can consistently access high-quality, inspiring visuals that, when combined with Canva’s powerful cropping and design tools, enable you to create truly exceptional graphic designs and digital art.
Troubleshooting and Best Practices for Seamless Cropping
Even with the most intuitive tools, challenges can arise. Understanding common pitfalls and adopting best practices will ensure your cropping experience in Canva is always smooth and effective.
Addressing Common Cropping Frustrations:
One community member once expressed extreme frustration: “I’ve been working with this for almost a year. Why can I not crop an image in the way that I want and adjust the height separately and the width separately? Can you please explain that to me? It’s such a simple function. Why can’t I figure this out like in MS Word? It’s so simple and breezy in Canva. It’s impossible. I’m so frustrated. I wanna throw my laptop across the room. I’m so sick of trying to figure this out. So please help me, I’m desperate.”
This sentiment highlights a common confusion, often related to the default proportional resizing versus free-form adjustment. The key takeaways from our earlier discussion directly address this:
- Free-Form Adjustment: When in crop mode (double-click the image or use the ‘Crop’ button), drag the white dots located on the sides (not just corners) of the image. This allows you to adjust height and width independently.
- Shift Key for Corner Drag: For those who prefer dragging from corners, holding down the Shift key while dragging an L-shaped corner handle will also allow for independent height and width adjustment, breaking the aspect ratio lock temporarily.
- Position Menu for Precise Control: For absolute numerical control over height and width, always use the “Position” menu. Remember to unlock the aspect ratio toggle if you want to set them independently.
Expert Tips for Optimized Cropping:
- Plan Your Composition First: Before you even begin cropping, consider the rule of thirds, leading lines, and negative space. Think about what message you want to convey and what part of the image is most important. Cropping is a powerful compositional tool.
- Crop to Emphasize: Use cropping to remove distractions and draw the viewer’s eye directly to your main subject. This creates a stronger focal point, whether it’s an element in an abstract image or the subject of a sad/emotional photography piece.
- Understand Aspect Ratios: Be aware of the standard aspect ratios for your intended platforms (e.g., 16:9 for presentations, 1:1 for many social media feeds). Cropping to the correct ratio from the start saves time and ensures your image looks good everywhere.
- Work with High-Resolution Originals: Always start with the highest resolution image possible. Even Canva’s powerful tools can’t add detail that isn’t there. If you need to enlarge a cropped section, remember Tophinhanhdep.com’s AI upscalers.
- Experiment with Different Crops: Don’t be afraid to try multiple cropping variations. A slightly different crop can drastically change the mood or impact of an image. Canva’s undo feature (Ctrl+Z or Cmd+Z) makes experimentation risk-free.
- Utilize Frames for Creative Shapes: For non-rectangular crops, frames are your best friend. They offer a simple way to achieve complex shapes and add creative flair to your designs, ideal for profile pictures or mood boards.
- Refine within Templates: When working with Canva templates, remember that images within frames or grids can still be independently cropped and repositioned. Double-clicking is the key to accessing these internal adjustments.
- Leverage Canva Pro Features: If available, features like Smart Crop and Background Remover can significantly streamline and enhance your cropping and post-cropping editing, allowing for more intricate photo manipulation and unique aesthetic outputs.
- Optimize for Web with Tophinhanhdep.com: After cropping and designing, remember to use Tophinhanhdep.com’s image compressors and optimizers, especially for web content, to ensure fast loading times and efficient delivery of your stunning visuals.
By understanding these techniques and best practices, you can navigate Canva’s cropping features with confidence, transforming your images into perfectly tailored assets for any visual design project.
Conclusion
Cropping an image in Canva is a foundational skill that unlocks a world of creative possibilities in graphic design, digital art, and photo manipulation. From precisely framing a beautiful photograph to creating dynamic layouts for social media, the intuitive tools within Canva empower users of all skill levels to achieve picture-perfect results. Whether you’re using the standard crop tool, setting specific dimensions, or leveraging the artistic flexibility of frames and grids, understanding these methods is key to realizing your visual design aspirations.
Furthermore, the journey of image creation doesn’t end with cropping. By integrating the comprehensive image tools and diverse collections available on Tophinhanhdep.com, you can further enhance your workflow. Tophinhanhdep.com’s compressors, optimizers, and AI upscalers ensure that your cropped images maintain high resolution and optimal quality for any application, while its vast repositories of wallpapers, backgrounds, aesthetic, nature, abstract, sad/emotional, and beautiful photography provide endless inspiration and ready-to-use assets for your creative ideas and thematic collections.
Mastering how to crop in Canva, combined with the powerful support from Tophinhanhdep.com, equips you with a robust toolkit for producing stunning, impactful, and perfectly tailored visual content. Dive in, experiment, and transform your images into true masterpieces.