Unleashing Creativity: How to Crop an Image in Cricut Design Space

Welcome to the exciting world of Cricut crafting, where imagination meets precision! If you’ve just unboxed your Cricut machine or are looking to elevate your design skills, understanding how to crop images in Cricut Design Space is an absolute game-changer. Cropping isn’t merely about removing unwanted edges; it’s a fundamental skill that unlocks endless possibilities for customizing existing designs, extracting specific elements, and creating truly unique projects that reflect your personal style.
At Tophinhanhdep.com, we understand the power of stunning visuals. Whether you’re drawing inspiration from our vast collections of Wallpapers, Backgrounds, Aesthetic, Nature, Abstract, Sad/Emotional, or Beautiful Photography, the ability to seamlessly integrate and manipulate these images within your Cricut projects is paramount. This comprehensive guide will walk you through various cropping techniques in Cricut Design Space, transforming you from a beginner to a confident creator. We’ll explore essential tools like Slice, Subtract, and Contour, and demonstrate how to leverage them to achieve your desired visual outcomes, turning your Creative Ideas and Photo Ideas into tangible masterpieces.

Mastering the Fundamentals of Cropping in Cricut Design Space
Cropping in Cricut Design Space is a foundational skill that every crafter should master. It allows you to refine your images, focus on key elements, and adapt designs to fit specific project dimensions. While the term “crop” might suggest a simple trim, Design Space offers a suite of powerful tools that go far beyond basic resizing, enabling intricate Photo Manipulation and precision editing.
Before diving into the specifics, it’s crucial to ensure your source images are of high quality. Tophinhanhdep.com offers a wealth of High Resolution images and Stock Photos that are perfect starting points for your Cricut projects. If you’re working with personal photos that might be lower resolution, consider using an AI Upscaler tool from Tophinhanhdep.com’s Image Tools section to enhance their clarity before importing them into Design Space, ensuring your final cuts are crisp and professional.
Understanding the “Slice” Tool: Your Primary Cropping Function
The “Slice” tool is arguably the most versatile and frequently used cropping feature in Cricut Design Space. It acts like a digital cookie cutter, allowing you to cut overlapping shapes or images into separate parts. Mastering Slice is a significant step towards unlocking your Cricut’s full potential for Graphic Design and Digital Art projects.
How the Slice Tool Works:
- Preparation: Begin by importing the image you wish to crop into your Cricut Design Space canvas. This could be anything from a complex SVG file to a simple PNG.
- Introducing the Cropping Shape: Select a basic shape (like a square, circle, or triangle) from the “Shapes” panel on the left sidebar. This shape will act as your cropping template. Position this shape over the area of your design that you want to keep or remove. For precise placement, you might temporarily change the shape’s operation to “Guide” to make it transparent, allowing you to see the underlying image clearly.
- The Two-Layer Rule: This is critical: the Slice tool can only be activated when exactly two overlapping layers are selected on your canvas. If you have only one layer selected, or three or more, the “Slice” button (located at the bottom of the layers panel on desktop, or within the “Actions” menu on the app) will be greyed out.
- Executing the Slice: Once your cropping shape is perfectly positioned over your image and both layers are selected, click the “Slice” button.
- Managing “Slice Results”: After clicking Slice, Design Space will generate several new layers, often three or more, referred to as “Slice Results.” These results typically include:
- The portion of your original image that was inside the cropping shape.
- The portion of your original image that was outside the cropping shape.
- A copy of the cropping shape itself. You can then select and delete the unwanted pieces, leaving only the cropped segment you need. This process is ideal for tasks like shortening a design element or isolating a particular motif from a larger graphic.

Practical Applications of the Slice Tool:
- Resizing and Modifying Elements: Easily trim banners, adjust the length of arrows, or cut a design element in half to adapt it for a new layout.
- Cutting Words or Designs Out of Shapes: Create custom stencils by slicing text out of a solid shape, or design unique cut-out effects for iron-on vinyl or paper crafts. For example, you can take a bold font from Tophinhanhdep.com’s Thematic Collections and slice it out of a geometric background for a modern effect.
- Creating New Shapes: By overlapping and slicing two basic shapes (e.g., two circles), you can create entirely new and intricate shapes not readily available in Design Space, such as a crescent moon. This is a fantastic way to develop your own Digital Art assets.
The Efficiency of the “Subtract” Tool for Cleaner Cuts
Since the initial introduction of cropping tools, Cricut Design Space has continuously evolved, introducing more streamlined options for common tasks. The “Subtract” tool, found within the “Combine” menu, offers a more direct approach to certain cropping scenarios, often leading to a cleaner workspace with fewer extraneous layers to delete.
How the Subtract Tool Enhances Cropping:
- Placement: As with Slice, place your desired cropping shape (the “front” layer) directly over the image you want to modify (the “back” layer).
- Combine and Subtract: Select both layers. Navigate to the “Combine” menu and choose “Subtract.”
- Direct Removal: The Subtract tool works by removing the front layer from the back layer. Unlike Slice, which generates multiple separate results, Subtract typically leaves you with just the modified back layer, with the front layer’s shape cut out of it. This can be particularly useful when your goal is purely to remove a section from a larger design without needing the excised pieces.
- Example: If you want to cut a star-shaped hole out of a square, placing a star on top of a square and using Subtract will directly give you a square with a star-shaped hole, eliminating the need to delete extra star and square pieces.
- Key Consideration: Ensure the layer you intend to “cut out” is positioned as the top layer before performing the Subtract operation.
While Slice remains foundational, Subtract provides an elegant and efficient alternative for specific cropping needs, streamlining your design process and contributing to more efficient Visual Design.
Advanced Cropping Techniques for Complex Designs
As you venture into more elaborate projects, you’ll inevitably encounter designs with multiple layers or intricate details. Standard slicing techniques may become cumbersome. This is where advanced cropping strategies come into play, allowing you to maintain precision and artistic vision across complex compositions. When working with detailed Digital Art or layered Graphic Design projects, these techniques are indispensable.
Cropping Multiple Layers: Strategies for Intricate Projects
Cropping an image composed of multiple distinct layers presents a unique challenge, as the fundamental “Slice” rule dictates working with only two layers at a time. However, there are effective strategies to achieve your desired multi-layer crop while preserving the integrity and individual characteristics (like different colors) of each component.
Scenario 1: Preserving Individual Layer Colors (Individual Slicing)
If your multi-layered design relies on different colors for each component and you want to maintain these distinctions after cropping, you’ll need to approach each layer individually.
- Ungroup Layers: If your multi-layered image is grouped (e.g., a watermelon design with separate rind, flesh, and seed layers), first ungroup it to access individual components.
- Duplicate Cropping Shape: Create a cropping shape (e.g., a rectangle to cut the watermelon in half). Critically, you will need to duplicate this cropping shape for each layer you intend to crop. For instance, if your watermelon has three distinct color layers, you’ll need three identical cropping rectangles.
- Precise Alignment: Align all duplicate cropping shapes perfectly over the area you wish to crop. You can select all of them and use the “Align” > “Center” function for flawless alignment.
- Slice Each Layer: Systematically select one cropping shape and one image layer, then click “Slice.” Repeat this process for every layer of your multi-component design.
- Remove Excess: After slicing each layer, you’ll find numerous “Slice Results” in your layers panel. Carefully identify and delete all the unwanted portions, leaving only the cropped segments of each colored layer.
- Regroup: Once all layers are cropped, you can regroup the remaining pieces to maintain their relative positions.
This method, while more involved, guarantees that your Visual Design retains its original color scheme and layered complexity.
Scenario 2: Combining Layers Before Slicing (Using “Weld”)
If the individual colors of the layers are not crucial for the cropped section, or if you intend to create a single, unified cut-out, the “Weld” tool can simplify the process significantly.
- Select and Weld: Select all the relevant layers of your multi-component design that you want to treat as a single entity for cropping. Click the “Weld” tool (found next to Slice at the bottom of the layers panel). This will combine them into a single, unified layer.
- Single Slice Operation: Now that you have a single welded layer, you can use a single cropping shape and the “Slice” tool as you would with a single-layer image.
- Limitations: Remember, once layers are welded, they cannot be un-welded into their original, separate components. This approach is best when the resulting cropped shape will be a single color or when the internal divisions of the original layers are no longer needed.
Leveraging “Contour” to Refine Your Images
The “Contour” tool provides an elegant solution for manipulating individual elements within a single layer, especially when you want to hide or reveal specific parts of a complex SVG or print-then-cut image without altering its fundamental shape. This is particularly useful for extracting motifs from Thematic Collections or refining Digital Art.
How to Use the Contour Tool:
- Select Layer: Choose the single layer containing the elements you want to modify. The “Contour” button will appear at the bottom of the layers panel.
- Open Hide Contour Window: Click “Contour” to open the “Hide Contour” window. This window displays all the individual cut paths and elements within that selected layer.
- Hide/Reveal Elements: In the “Hide Contour” window, simply click on the elements you wish to hide. As you click, they will turn light grey, indicating they will not be cut by your Cricut machine. You can also hide/reveal all contours at once.
- Close Window: Close the window, and you’ll see your image updated on the canvas with the selected elements hidden.
When is Contour the Best Choice?
- Removing Unwanted Text or Graphics: If you download an SVG with multiple words or design elements on a single layer, and you only want to use specific parts (e.g., removing text from an ice cream cone graphic to use only the cone), Contour is perfect.
- Simplifying Complex Designs: For highly detailed images, you might use Contour to temporarily hide small, intricate cuts that might tear your material or are simply not needed for a particular project.
- Isolating Irregular Shapes: When a “cropping shape” (like a square or circle) cannot effectively isolate the specific, irregularly shaped element you want to remove or keep, Contour offers precise control over individual paths.
Contour is a non-destructive editing tool, meaning you can always go back into the “Hide Contour” window and re-enable any hidden elements if your Creative Ideas evolve.
Transforming Images: From Photography to Personalized Crafts
Beyond editing pre-made designs, Cricut Design Space empowers you to infuse personal touches into your projects by transforming photographs and images into unique cut files. This bridges the gap between your cherished memories and Visual Design, allowing you to create truly bespoke items. Drawing from Tophinhanhdep.com’s vast repository of Beautiful Photography and Aesthetic imagery, you can turn any visual inspiration into a tangible craft.
Customizing Photos with Shapes for Unique Stickers and Magnets
One of the most delightful applications of the Slice tool is converting your favorite photos into custom-shaped stickers, magnets, or even decorative elements for cards. This process beautifully combines Digital Photography with practical crafting.
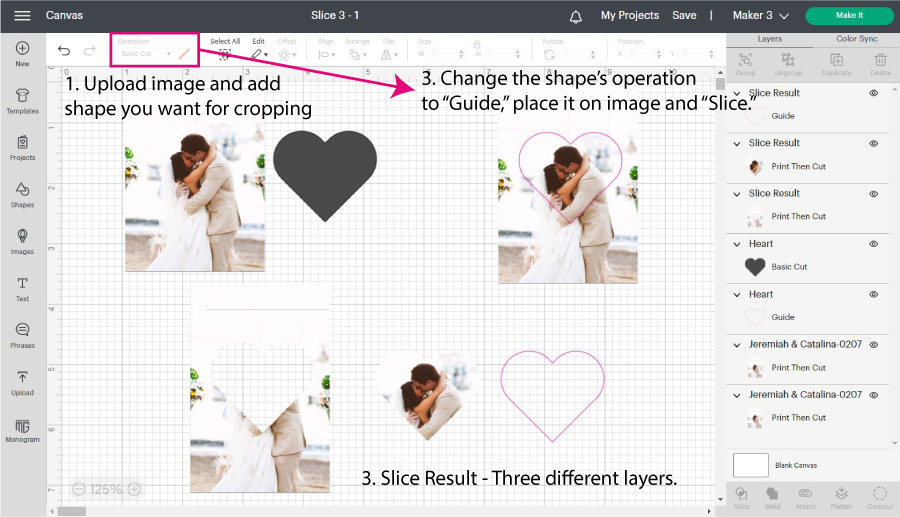
Steps to Crop a Photo into a Shape:
- Upload Your Photo: Begin by uploading your chosen photograph to Cricut Design Space. This could be a picture of a loved one, a scenic landscape from Tophinhanhdep.com’s Nature collection, or a vibrant Abstract image. When uploading a
.jpgor.pngfile, Design Space will guide you through the “Print Then Cut” preparation process, identifying cut lines. - Select a Cropping Shape: From the “Shapes” panel, choose the desired outline for your photo (e.g., a heart, star, circle, or even a more complex shape).
- Position and Align: Place the chosen shape over your photo, precisely positioning it to frame the section you want to keep.
- Tip for Precision: You can temporarily change the photo’s opacity or the shape’s operation to “Guide” to better visualize the cropping area. Unlock the shape’s proportions (by clicking the lock icon on the top menu) if you need to create a custom rectangle or oval.
- Execute Slice: Select both the photo layer and the shape layer. Click the “Slice” button.
- Refine Results: Delete the extraneous pieces generated by the Slice operation, leaving you with your photo beautifully cropped into the desired shape.
- Prepare for Print Then Cut: For a physical output, ensure the cropped image is set as a “Print Then Cut” layer. This tells your Cricut to first print the image onto your chosen material (sticker paper, magnetic sheets, cardstock) and then precisely cut around the cropped shape.
This method allows you to take any image – from Aesthetic Backgrounds found on Tophinhanhdep.com to a cherished snapshot – and transform it into a personalized keepsake or decorative item.
Integrating Tophinhanhdep.com’s Visual Assets for Enhanced Creativity
The synergy between the rich visual resources at Tophinhanhdep.com and the powerful editing capabilities of Cricut Design Space is immense. Our platform provides a constant source of Image Inspiration & Collections, offering high-quality visuals that can be directly applied to your crafting endeavors.
- Curated Mood Boards and Trending Styles: Explore Tophinhanhdep.com for Mood Boards or Trending Styles that spark your interest. Find patterns, textures, or specific photographic styles that you can download. Use the cropping tools in Cricut Design Space to isolate unique elements from these visuals, integrate them into your craft projects, or adapt them to fit a particular theme.
- Enhancing Project Quality: Before importing any image from Tophinhanhdep.com into Design Space, consider utilizing our Image Tools. For example, use an Image Compressor or Optimizer to ensure file sizes are manageable without sacrificing quality, which can improve Design Space performance. If you have a specific color palette in mind for your craft, you might even extract colors using an Image-to-Text (or similar analysis) tool to inform your vinyl or cardstock choices.
- Personalized Decor and Gifts: Imagine taking a breathtaking Nature photograph or an Abstract wallpaper from Tophinhanhdep.com, cropping it into a unique shape, and then printing it onto canvas for custom wall art, or creating personalized magnets as gifts. The ability to crop and manipulate these assets transforms generic visuals into meaningful, personalized items.
By consciously incorporating the diverse array of Images and Photography available on Tophinhanhdep.com, and applying the sophisticated cropping techniques of Cricut Design Space, you’re not just making crafts; you’re creating personalized Visual Designs that tell a story and captivate the eye.
Slice, Weld, Attach, Flatten, Contour: A Comparative Guide to Cricut Design Tools
Cricut Design Space offers a suite of powerful tools, each serving a distinct purpose in the Visual Design and Photo Manipulation process. While “Slice” is central to cropping, understanding its relationship with other tools like Weld, Attach, Flatten, and Contour is crucial for mastering complex projects and achieving specific cutting or printing outcomes.
When to Slice vs. When to Weld or Attach
These three tools are often confused, but their core functions are quite different, impacting how your design is processed by the Cricut machine.
-
Slice (Cutting Overlapping Layers):
- Purpose: To cut one overlapping layer from another, resulting in new, separate pieces. Think of it as using a cookie cutter to create distinct shapes or cut-outs.
- Rule: Works with exactly two selected, overlapping layers.
- Outcome: Creates multiple “Slice Results” (typically 3 or more), which you then manage by deleting unwanted parts.
- Example Use: Cropping a photo into a heart shape, cutting text out of a solid background for a stencil, or dividing a large image.
-
Weld (Combining Layers into One):
- Purpose: To permanently join multiple overlapping shapes or letters into a single, unified layer. This removes any overlapping cut lines, creating a seamless new shape.
- Rule: Works with two or more selected, overlapping layers.
- Outcome: Transforms selected layers into one single, uneditable layer.
- Example Use: Connecting script fonts so they cut as one piece, combining multiple small shapes into a single, larger intricate shape for efficiency, or preparing multiple elements to be “sliced” out of a single background in one go (by welding the elements first).
-
Attach (Linking Layers for Positioning):
- Purpose: To “pin” or link selected layers together on the canvas, ensuring they maintain their relative positions when sent to the cutting mat. It does not alter the actual shape of the layers themselves.
- Rule: Works with two or more selected layers, whether overlapping or not.
- Outcome: Layers remain individual but are grouped for cutting/drawing purposes, maintaining their exact layout. You can “detach” them later.
- Example Use: Attaching draw lines or score lines to a cut shape to ensure they are executed in the correct position, or arranging multiple small shapes precisely on the mat to optimize material usage. Unlike Slice or Weld, Attach can also be used with vector lines (like simple lines you want to cut or draw, but not “slice” out).
Choosing between Slice, Weld, and Attach depends entirely on your desired Visual Design outcome: do you want to cut through a shape (Slice), combine shapes into a new one (Weld), or simply hold shapes in place for cutting/drawing (Attach)?
The Critical “Slice and Set” Method for Specialized Materials
While the Slice tool is a versatile cropping mechanism, its application in the “Slice and Set” method elevates it to a crucial technique for achieving professional results with specific materials, particularly Infusible Ink and layered Heat Transfer Vinyl (HTV). This method goes beyond mere digital manipulation; it directly impacts the physical outcome of your craft.
Why “Slice and Set” is Essential:
- Infusible Ink: When working with Infusible Ink, layering different colors directly on top of each other will result in muddied colors where they overlap. The “Slice and Set” method prevents this by physically removing the overlapping areas. You “slice” the top design out of the bottom design in Design Space, creating a perfect void. Then, when assembling the project (the “set” part), you place the individual Infusible Ink pieces together like a puzzle on your blank, side-by-side, rather than on top of each other. This ensures vibrant, distinct colors with a smooth, seamless finish, truly embodying a high-quality Digital Art transfer.
- Layered Heat Transfer Vinyl (HTV): While HTV can be layered, excessive layering (more than 2-3 layers) can lead to bulky, stiff designs that are prone to peeling over time. The “Slice and Set” method, also known as “knocking out” a design, involves slicing the top layer’s shape out of the bottom layer. This creates a recess in the bottom layer where the top layer can fit into rather than on top of. The result is a flatter, more durable design with a smoother feel, essential for comfortable and long-lasting apparel created from your Creative Ideas.
How the “Slice and Set” Method Works:
- Design Overlap: Place your smaller, top-layer design (e.g., a heart) over your larger, bottom-layer design (e.g., a circle) in Cricut Design Space, exactly where they would overlap.
- Execute Slice: Select both the top and bottom layers and click “Slice.”
- Delete Excess: Remove the original top layer and the excess pieces of the bottom layer that were cut. You’ll be left with the original top layer (e.g., the heart) and the modified bottom layer, which now has a cut-out in the shape of the top layer (the circle with a heart-shaped hole).
- Physical “Set”: When you cut these pieces and apply them to your material, the top layer fits perfectly into the space created in the bottom layer, ensuring no bulky overlap.
This technique is a cornerstone of professional Cricut crafting, ensuring that your projects, whether featuring Aesthetic Backgrounds or intricate Thematic Collections, not only look fantastic digitally but also translate beautifully and durably into physical form.
In conclusion, mastering cropping in Cricut Design Space—through the precise Slice, efficient Subtract, and intricate Contour tools—is fundamental for any crafter. These skills, when combined with the inspiring Images and Photography resources found on Tophinhanhdep.com, allow for unparalleled Visual Design and Photo Manipulation. From transforming High Resolution Stock Photos into personalized stickers to meticulously preparing multi-layered Digital Art for specialized materials using the “Slice and Set” method, the power to precisely modify and refine your visuals ensures that your Creative Ideas and Image Inspiration always translate into stunning, professional-quality projects. Continue exploring the vast possibilities of Cricut Design Space and Tophinhanhdep.com to unleash your full creative potential!