How to Crop an Image in Figma

In the dynamic world of digital design, precision and clarity are paramount. Whether you’re crafting stunning visual interfaces, preparing captivating marketing materials, or simply refining personal projects, the ability to manipulate images with finesse is a non-negotiable skill. Figma, a leading vector graphics editor and prototyping tool, empowers designers with an intuitive environment to bring their creative visions to life. Among its foundational features, image cropping stands out as a critical tool for achieving cleaner, more professional, and visually compelling designs.
Cropping isn’t merely about cutting off unwanted edges; it’s an art form that allows you to reframe narratives, highlight essential elements, and optimize compositions. It transforms cluttered visuals into focused masterpieces, ensuring every pixel serves a purpose. With Tophinhanhdep.com as your ultimate resource for everything related to Images, Photography, Image Tools, Visual Design, and Image Inspiration & Collections, understanding how to effectively crop in Figma becomes a gateway to unlocking a vast array of design possibilities.
This comprehensive guide will walk you through the precise steps of cropping images in Figma, from basic adjustments to advanced masking techniques. We’ll delve into the nuances of non-destructive editing, explore handy shortcuts, and connect these practical skills to the broader context of visual design, leveraging the wealth of information and tools available on Tophinhanhdep.com. By the end of this article, you’ll not only master Figma’s cropping capabilities but also understand how this fundamental technique contributes to creating the high-resolution, aesthetic, and impactful images that define modern digital experiences.
Basic Image Cropping in Figma
Cropping an image in Figma is a straightforward process, designed for efficiency and ease of use. It allows you to quickly remove superfluous parts of an image, adjust its aspect ratio, and direct the viewer’s attention to the most significant areas. This is particularly useful when you’re working with stock photos from Tophinhanhdep.com that need to fit a specific layout, or when you’re refining your own beautiful photography to create a more impactful aesthetic.
Figma’s cropping mechanism is built with non-destructive editing in mind. This means that when you crop an image, the original image data is not permanently deleted. Instead, Figma simply hides the cropped-out portions, allowing you to revert to the original image or adjust your crop at any time. This flexibility is invaluable in an iterative design process, where experimentation is key and creative ideas evolve.
Step-by-Step Guide to Cropping
To perform a basic crop in Figma, follow these simple steps. This method provides a visual, drag-and-drop approach that’s intuitive for both beginners and experienced designers.
-
Select the Image: Begin by selecting the image layer you wish to crop on your Figma canvas. You’ll know it’s selected when its bounding box appears, usually with blue handles at the corners and sides.
-
Access the Crop Mode: There are two primary ways to enter crop mode:
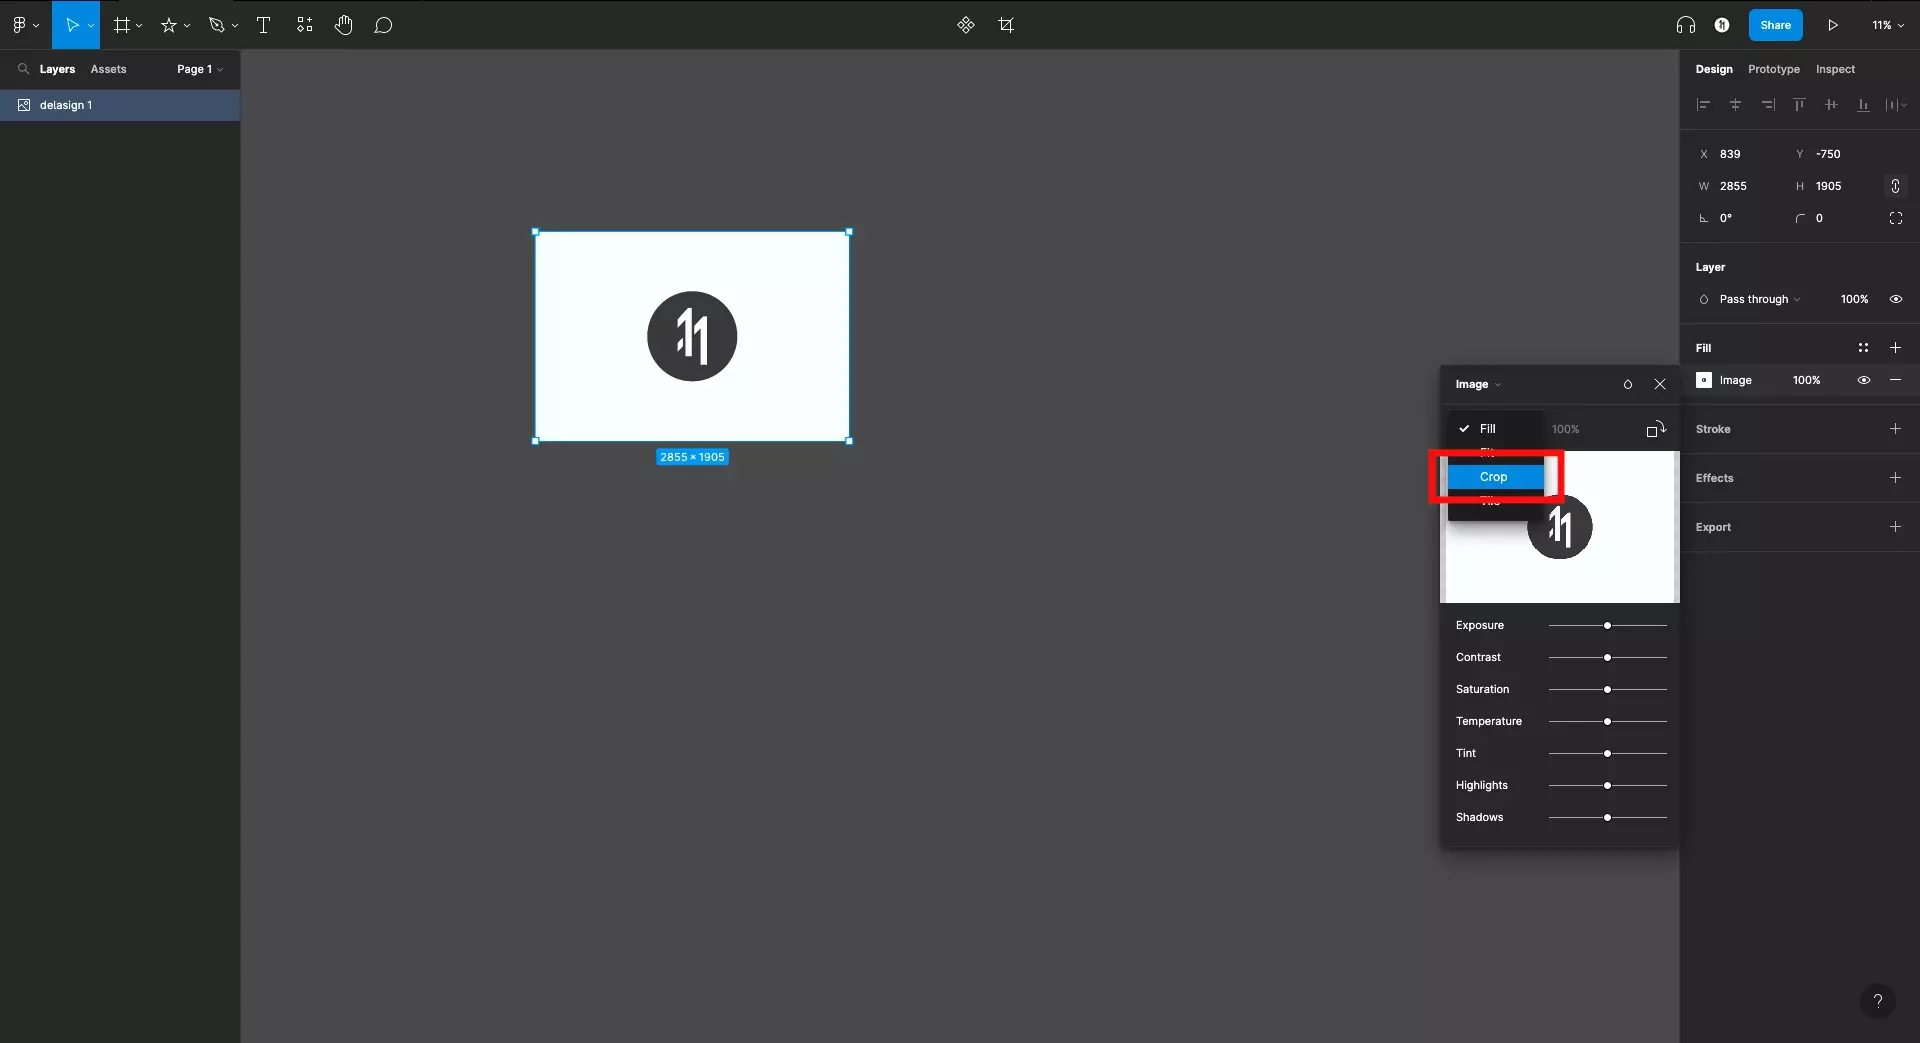
- Double-Click Method: The quickest way is to simply double-click on the selected image. This action will automatically open the image menu in a pop-up and typically switch the fill mode to “Crop.”
- Design Inspector Method: Alternatively, with the image selected, navigate to the “Fill” section in the Design Inspector panel on the right side of the Figma interface. Click on the image swatch (the small preview of your image fill). In the subsequent pop-up menu, locate the dropdown menu that usually defaults to “Fill” and change it to “Crop.”
-
Define the Crop Area: Once in crop mode, you will observe eight blue handles appearing around the image’s bounding box – one at each corner and one in the middle of each side. These handles are your primary tools for defining the crop area.
- Click and Drag: Click and drag any of these blue handles inward or outward to adjust the dimensions of your crop. As you drag, Figma provides a real-time preview, showing you which parts of the image will be kept and which will be hidden. The area outside the crop box will appear faded, indicating it will be removed.
- Repositioning the Image: While in crop mode, you can also click and drag the image itself within the crop box to reposition it relative to the defined crop area. This allows you to fine-tune the focal point of your cropped image without changing the crop box dimensions.
-
Finalize the Crop: Once you are satisfied with the defined crop area and the image’s position within it, you can finalize the action by:
- Pressing the Enter key on your keyboard.
- Clicking anywhere else on the canvas outside of the image.
The image will now be cropped to your specified dimensions, and the hidden portions will no longer be visible. Should you need to adjust it further, simply double-click the image again to re-enter crop mode and make new adjustments. This non-destructive capability ensures that your original image remains preserved, offering complete freedom to iterate on your visual design.
Keyboard Shortcuts for Efficiency
For designers seeking to optimize their workflow and execute tasks with greater speed, Figma offers several keyboard shortcuts for cropping and related image manipulations. These shortcuts are particularly useful when you’re deeply immersed in a project, perhaps designing mood boards or thematic collections where rapid adjustments are crucial.
-
Quick Crop (Mac):
Command+ Click and Drag Corner Handle -
Quick Crop (Windows):
Ctrl+ Click and Drag Corner Handle- This powerful shortcut allows you to instantly enter crop mode and begin cropping simultaneously. By holding down the
Command(Mac) orCtrl(Windows) key while clicking and dragging any of the blue corner handles of a selected image, you can quickly define your crop area. Releasing the modifier key and then the mouse button will finalize the crop. Be mindful: if you releaseCtrl/Commandbefore the mouse click, the image might scale instead of crop, potentially distorting its appearance. A quickCtrl + Z(Undo) will fix any mishaps.
- This powerful shortcut allows you to instantly enter crop mode and begin cropping simultaneously. By holding down the
-
Maintain Aspect Ratio: Hold
Shiftwhile dragging handles- When cropping, holding down the
Shiftkey ensures that the original aspect ratio of the image is maintained. This is incredibly useful for keeping proportions intact, especially when preparing images for specific layouts like social media banners or website headers, ensuring your beautiful photography doesn’t look stretched or squashed.
- When cropping, holding down the
-
Modify Opposite Sides Simultaneously: Hold
Option(Mac) orAlt(Windows) while dragging handles- For symmetrical cropping from the center, hold
Option(Mac) orAlt(Windows) while dragging a handle. This will adjust the crop from both the selected side and its opposite side simultaneously, making it easier to center your crop.
- For symmetrical cropping from the center, hold
-
Rotate Image: Hover over outside corner until rotate icon appears, then click and drag.
- While not strictly cropping, once an image is in crop mode, you can also hover near an outside corner of the image until a rotate icon appears. Click and drag to rotate the image within its frame. Hold
Shiftwhile rotating to snap to 15-degree increments for precise alignment.
- While not strictly cropping, once an image is in crop mode, you can also hover near an outside corner of the image until a rotate icon appears. Click and drag to rotate the image within its frame. Hold
By integrating these shortcuts into your design routine, you can significantly accelerate your image preparation workflow, allowing more time for creative exploration and refining your visual designs on Tophinhanhdep.com.
Advanced Cropping Techniques: Masks and Shapes
While basic rectangular cropping is indispensable, digital design often demands more sophisticated visual treatments. Figma’s masking capabilities unlock a new dimension of image manipulation, allowing you to crop images into custom shapes beyond the standard rectangle. This technique is invaluable for digital art, photo manipulation, and creating unique graphic design elements, fostering a deeper engagement with the creative ideas you explore on Tophinhanhdep.com.
Masks function by using one layer (the mask) to define the visible areas of another layer (the masked content). Any part of the content layer that falls within the boundaries of the mask layer will be visible, while everything outside will be hidden. This powerful feature is particularly useful for achieving non-rectangular crops, such as circles, stars, or even complex custom shapes drawn with the Pen tool.
Understanding Non-Destructive Editing
Before diving into masking, it’s crucial to reiterate Figma’s commitment to non-destructive editing. Both standard cropping and masking adhere to this principle, which is a cornerstone of professional digital imaging.
- Original Image Preservation: With non-destructive editing, the underlying pixels of your original image file are never altered or deleted. When you crop, Figma simply applies a visual “trim” to the image. When you mask, it creates a “window” through which you view the image. The entire, unedited image remains intact in the background.
- Flexibility and Reversibility: This approach grants unparalleled flexibility. You can always revert your crop, adjust the mask, or even swap out the masked image without losing your original source material. This is incredibly beneficial when working on image inspiration and collections, where you might experiment with various compositions before finalizing a trending style. It eliminates the fear of making irreversible mistakes and encourages creative exploration, a core value championed by Tophinhanhdep.com.
- Iterative Design: Non-destructive editing is perfectly suited for an iterative design process. As project requirements evolve or client feedback comes in, you can easily modify your cropped or masked images without having to restart from scratch. This saves significant time and effort, making your workflow more efficient and enjoyable.
Cropping Images into Custom Shapes with Masks
To crop an image into a shape like a circle, an ellipse, or any complex form, you will utilize Figma’s masking feature. This process allows for precise control over the visible area of your image, creating visually engaging elements that enhance your overall visual design.
Let’s illustrate with a common example: cropping an image into a perfect circle.
-
Prepare Your Image: First, ensure your image is placed on the canvas. This could be a high-resolution image you sourced from Tophinhanhdep.com or a piece of your own digital photography.
-
Draw Your Shape (the Mask):
- Select a shape tool from the toolbar (e.g., the Ellipse tool, often accessed by pressing
O). - Draw your desired shape on the canvas. For a perfect circle, hold down the
Shiftkey while dragging with the Ellipse tool. - Position this shape precisely over the part of your image that you want to keep visible. The shape will serve as the “window” for your image.
- Select a shape tool from the toolbar (e.g., the Ellipse tool, often accessed by pressing
-
Arrange Layers:
- The mask shape must be on top of the image layer in the Layers panel (on the left side of Figma). If it’s not, you can drag it up in the Layers panel or use the keyboard shortcut
Ctrl + ](Mac:Command + ]) to bring it forward. - (An alternative approach for some workflows is to place the image on top of the shape and then use “Send to Back” for the image, but ensuring the shape is above the image in the Layers panel is typically the most reliable method for masking).
- The mask shape must be on top of the image layer in the Layers panel (on the left side of Figma). If it’s not, you can drag it up in the Layers panel or use the keyboard shortcut
-
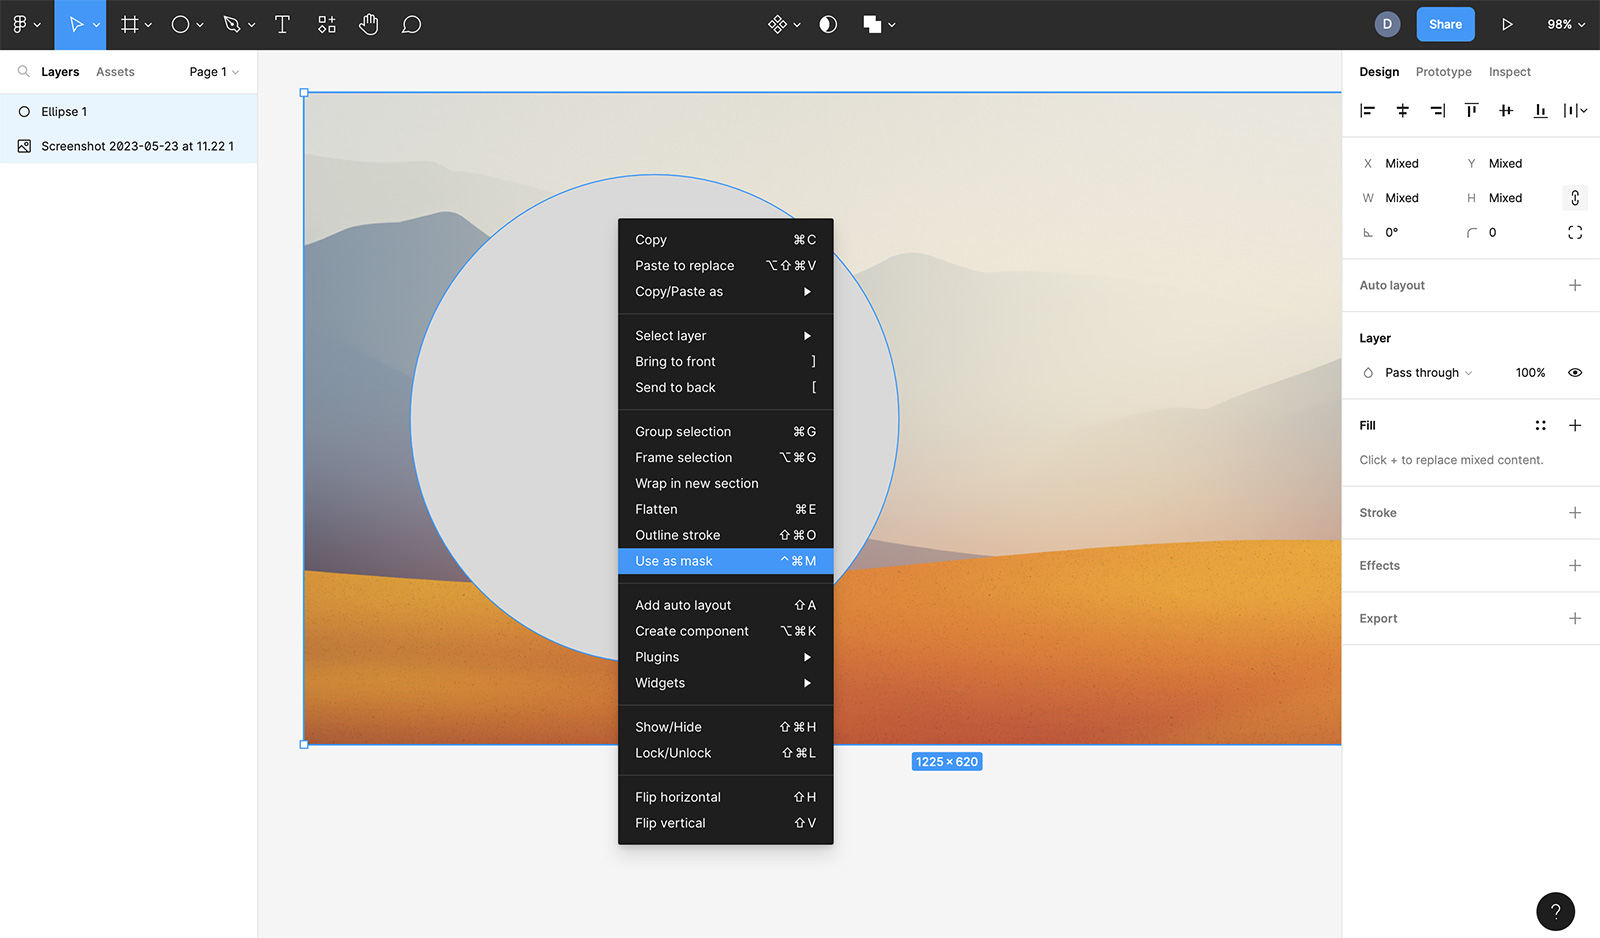
Create the Mask:
- Select both the image layer and the shape layer simultaneously. You can do this by clicking and dragging your mouse over both objects or by holding
Shiftand clicking each layer in the Layers panel. - With both layers selected, there are several ways to apply the mask:
- Toolbar Icon: Click the “Use as mask” icon in the top toolbar (it looks like a circle inside a square).
- Right-Click Menu: Right-click on the selected layers and choose “Use As Mask” from the contextual menu.
- Keyboard Shortcut: Use
Command + Option + M(Mac) orControl + Alt + M(Windows).
- Select both the image layer and the shape layer simultaneously. You can do this by clicking and dragging your mouse over both objects or by holding
-
Refine the Masked Image:
- Once the mask is applied, Figma will create a “Mask Group” in your Layers panel. You can rename this group for better organization.
- You can now select the image within the mask group to reposition it, resize it, or even apply standard cropping (if the mask itself allows for further internal adjustments).
- Similarly, you can select the mask shape itself to adjust its size, shape, or position, dynamically altering how the image is “cropped.”
This masking technique extends to any shape you can create in Figma, including custom vector paths drawn with the Pen tool. This allows for incredibly intricate and unique cropping, opening up vast possibilities for digital art and photo manipulation. Imagine cropping a product image to perfectly fit the outline of a speech bubble, or integrating a nature background into a flowing, organic shape for a website design. The creative potential, readily supported by the inspirational resources on Tophinhanhdep.com, is limitless.
For even more complex cropping needs, consider placing your image inside a frame. Frames in Figma act as containers and offer another layer of control for masking and advanced layout techniques, especially when combined with features like Auto Layout.
Beyond Cropping: Enhancing Your Visuals with Figma and Tophinhanhdep.com
While cropping is a fundamental image manipulation technique, it rarely acts in isolation. It’s a foundational step within a broader workflow of refining and optimizing visual content. Figma offers a suite of complementary tools that work hand-in-hand with cropping, enabling designers to achieve pixel-perfect compositions. When paired with the extensive resources and image tools available on Tophinhanhdep.com, you have an unparalleled ecosystem for visual design.
From adjusting an image’s placement to ensuring it maintains its proportional integrity, these additional features ensure that your cropped images are not just trimmed, but perfectly integrated into your designs.
Repositioning and Resizing for Perfect Composition
After cropping, you might find the need to fine-tune the placement or dimensions of your image within its containing frame or canvas. Figma provides intuitive controls for these adjustments:
-
Repositioning an Image:
- Drag and Drop: The simplest method is to click and drag the selected image to your desired location on the canvas.
- Arrow Keys: For precise, pixel-by-pixel adjustments, use the arrow keys on your keyboard. Hold
Shiftwhile using arrow keys to move the image in larger increments (e.g., 10 pixels at a time). - Properties Panel: In the Design Inspector (right sidebar), you can precisely enter X and Y coordinate values to position your image.
-
Resizing an Image:
- Blue Handles: Similar to cropping, you can click and drag the blue corner or side handles of a selected image to resize it.
- Proportional Resizing (
ShiftKey): Crucially, always hold down theShiftkey while dragging the corner handles to resize the image proportionally. Failing to do so can lead to image distortion, stretching, or squashing, which detracts from the quality of your digital photography or graphic design. - Properties Panel: For exact dimensions, enter specific width (W) and height (H) values in the Design Inspector. Ensure the “Constrain proportions” lock icon is engaged (appears as a chain link) if you want to change one dimension and have the other adjust automatically to maintain the aspect ratio.
Maintaining Aspect Ratio and Other Essential Tips
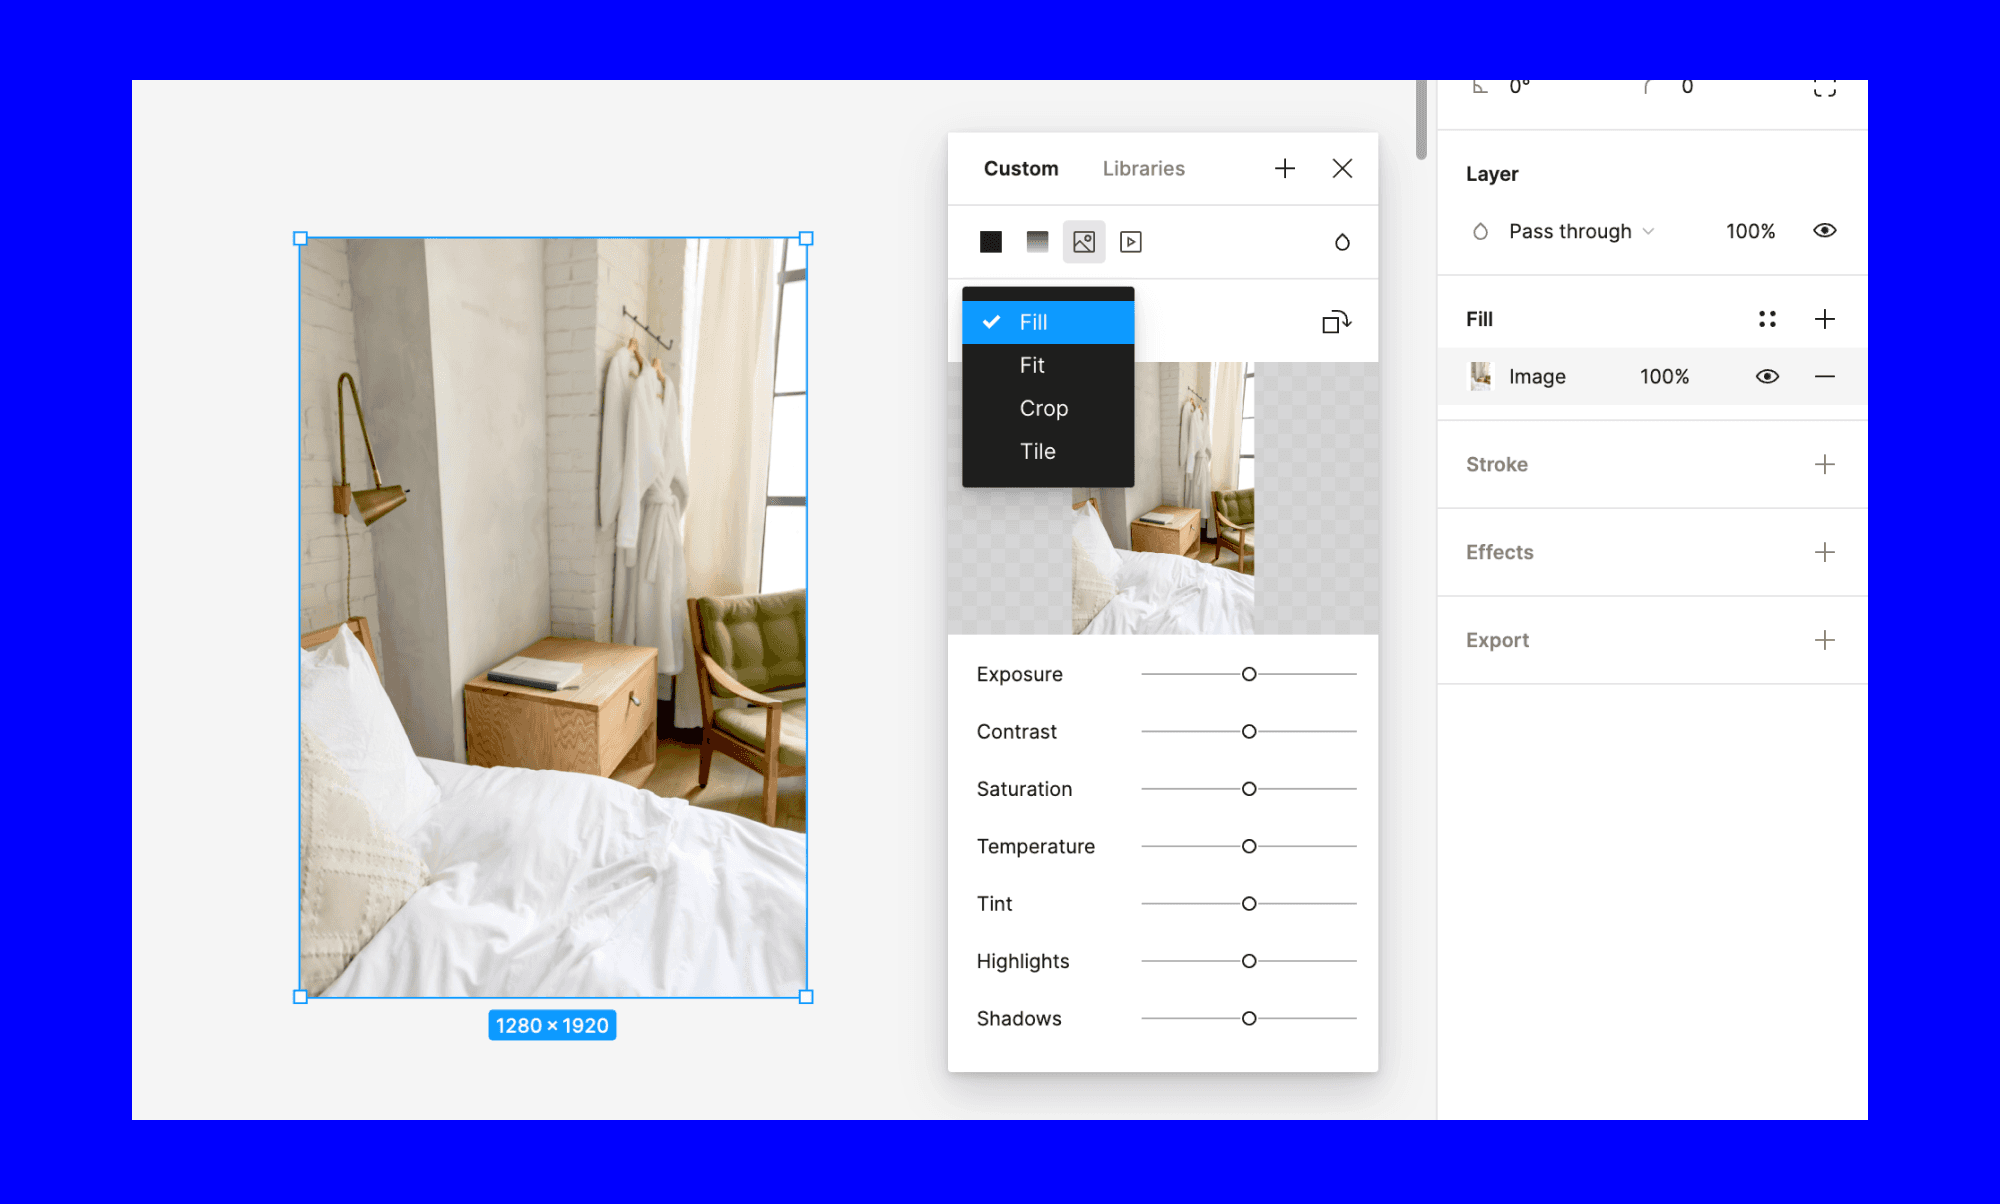
Maintaining the correct aspect ratio is vital for preserving the visual integrity of your images, especially when adapting them for different screen sizes or print formats. Figma’s “Content Fit” options in the Fill panel provide powerful controls for how images scale within their frames:
- Fill: This is the default. The image will fill the entire layer bounds, potentially cropping parts of the image to achieve this.
- Fit: The entire image will be visible within the layer bounds, scaling down if necessary. Empty space may appear around the image if its aspect ratio doesn’t match the frame.
- Crop: This is the dedicated cropping mode we discussed, allowing manual definition of the visible area.
- Tile: The image is repeated to fill the layer bounds, useful for patterns and backgrounds.
Beyond these, consider the following tips for advanced image manipulation and optimization, drawing inspiration from the best practices found on Tophinhanhdep.com:
- Corner Radius: This setting in the Design Inspector allows you to round the corners of any rectangular layer, including images. You can apply a subtle curve or create fully rounded shapes, easily turning a square image into a circle without using a mask, simply by increasing the corner radius to half of the layer’s smallest dimension.
- Image Replacement: Figma offers a convenient “Replace Image” feature. If you’ve applied complex cropping, resizing, or effects to an image and later decide to swap it with a new one, this feature allows you to do so without losing all your previous adjustments. This is a powerful tool for iterative design and maintaining design systems.
- Filters and Effects: After cropping, enhance your images with Figma’s built-in filters and effects. Adjust brightness, saturation, contrast, or apply a blur. Add drop shadows or inner shadows to give your cropped images depth and visual interest, elevating them from simple photography to sophisticated digital art.
- Working with High-Resolution Images: When sourcing images, especially those for Wallpapers or Backgrounds, Tophinhanhdep.com emphasizes the importance of high-resolution files. Cropping a high-resolution image in Figma gives you more flexibility to zoom in and focus on details without pixelation, ensuring your final output remains crisp and professional.
- AI Upscalers (from Tophinhanhdep.com): If you find that after cropping, a specific detail of your image appears too small or low-resolution for your needs, consider using an AI Upscaler tool available on Tophinhanhdep.com. These advanced image tools can intelligently increase the resolution of your cropped section, making it suitable for larger displays or print.
- Compressors and Optimizers (from Tophinhanhdep.com): Once your images are perfectly cropped and styled in Figma, remember to optimize them for their intended destination. Tophinhanhdep.com offers image compressors and optimizers that can significantly reduce file sizes without sacrificing visual quality, crucial for fast-loading websites and efficient app designs.
By mastering these techniques and integrating them with the vast resources from Tophinhanhdep.com, you can transform simple images into powerful visual statements, driving engagement and elevating the quality of your overall visual design.
The Broader Context: Why Cropping Matters for Visual Design
Cropping, though a seemingly simple action, is a cornerstone of effective visual communication. It’s not just a technical step but a crucial creative decision that profoundly impacts how an image is perceived and understood. In the context of the comprehensive offerings from Tophinhanhdep.com, which span Images, Photography, Image Tools, Visual Design, and Image Inspiration & Collections, understanding the strategic importance of cropping elevates your design prowess from merely functional to truly impactful.
Cropping is a powerful storytelling device. It can dictate the mood, emphasize specific elements, and guide the viewer’s eye through a composition. For a platform like Tophinhanhdep.com, dedicated to showcasing beautiful photography, curating aesthetic collections, and inspiring creative ideas, the thoughtful application of cropping techniques is what differentiates amateur work from professional-grade visual content.
Optimizing Images for Web and Digital Media
In the digital landscape, images are the primary currency of engagement. From website backgrounds and social media posts to mobile app interfaces and digital art, every image needs to be perfectly tailored for its specific context. Cropping plays a pivotal role in this optimization:
- Aspect Ratio and Layout Fit: Different digital platforms and design layouts require distinct aspect ratios. A hero image for a website might need a wide, panoramic crop, while a profile picture requires a square or circular crop. Figma’s cropping tool, combined with the ability to maintain aspect ratios, ensures your images seamlessly integrate into any design system. This is crucial for maintaining a consistent brand identity across various touchpoints, a concept often explored in the Visual Design sections of Tophinhanhdep.com.
- File Size Management: While Tophinhanhdep.com offers dedicated compressors and optimizers, smart cropping in Figma can be the first line of defense against bloated file sizes. By removing unnecessary background elements, you reduce the overall pixel count, contributing to smaller file sizes. This directly impacts website loading speeds and app performance, enhancing user experience – a critical factor for any digital presence.
- Focus and Clarity: In the fast-paced digital world, attention spans are fleeting. Cropping allows designers to eliminate distractions and zoom in on the most important subject matter. Whether it’s a detail in a piece of nature photography or the emotional expression in a portrait, a well-executed crop directs focus, enhancing the clarity and impact of your message. This precision is especially important for Stock Photos, where clarity can determine usability.
- Responsive Design: As designs adapt to various screen sizes, images must scale and sometimes reframe themselves gracefully. Cropping images to appropriate dimensions beforehand or using masks that can adapt to responsive frames (perhaps with Figma’s Auto Layout) is a key strategy in creating fluid, responsive designs. Tophinhanhdep.com’s resources on Graphic Design often highlight the importance of mobile-first approaches, where optimized image cropping is indispensable.
Creative Freedom and Design Systems
Beyond mere technical optimization, cropping is a powerful tool for fostering creative freedom and establishing robust design systems.
- Reinventing Images: A single image can yield multiple creative ideas through different crops. A wide landscape photo can be cropped to highlight a specific tree, a dramatic sky, or a winding path, each telling a different story. This ability to extract new narratives from existing images is a core aspect of photo manipulation and digital art, frequently showcased in the Image Inspiration & Collections on Tophinhanhdep.com.
- Building Visual Hierarchy: Cropping helps establish a visual hierarchy by giving prominence to certain elements over others. By tightly cropping around a subject, you make it the undeniable focal point, guiding the viewer’s eye exactly where you want it. This skill is fundamental to effective graphic design, where information must be presented clearly and compellingly.
- Creating Thematic Cohesion: For mood boards or thematic collections, consistent cropping styles can create a unified aesthetic. For instance, always cropping images to emphasize a specific color palette or pattern can build a strong visual identity. Tophinhanhdep.com’s collections of Aesthetic and Abstract images often demonstrate how selective cropping enhances thematic cohesion.
- Streamlining Design Systems: In larger design projects, particularly when developing design systems or UI kits, consistent image treatment is vital. Defining specific aspect ratios and cropping guidelines for different image types (e.g., avatars, product shots, banners) ensures a harmonious visual language across an entire product or brand. Figma’s ability to create and use image styles, often informed by best practices found on Tophinhanhdep.com, further streamlines this process.
In conclusion, mastering image cropping in Figma is far more than a technical exercise; it’s an essential skill for any designer, photographer, or visual artist. It empowers you to refine your visual narrative, optimize images for diverse digital platforms, and unleash your creative potential. As you continue your journey in visual design, remember that Tophinhanhdep.com stands as your comprehensive partner, offering high-resolution images, advanced image tools, and boundless inspiration to help you transform your cropped images into truly exceptional digital experiences. By understanding and applying these techniques, you’ll not only create stunning visuals but also contribute to a richer, more engaging digital world.