How to Crop an Image in GIMP

In the vast and exciting world of digital imagery, where every pixel tells a story and every photograph captures a moment, the ability to refine and perfect your visuals is paramount. Whether you’re a professional photographer, a graphic designer, a digital artist, or simply someone who loves sharing beautiful photography with the world, you’ve likely encountered situations where an otherwise stunning image is marred by unwanted distractions. A picturesque landscape might have a distracting element in the corner, a compelling portrait could benefit from tighter framing, or perhaps you need to adapt an existing high-resolution image for a specific purpose, like a social media banner or a wallpaper.
This is where the art and science of image cropping come into play. Cropping is more than just cutting away parts of an image; it’s a powerful editing style that allows you to redefine composition, emphasize your subject, eliminate distractions, and ultimately, enhance the visual narrative. It’s an indispensable technique in digital photography and visual design, enabling you to transform raw captures into polished, impactful visual statements.

While there are countless tools available for image editing, GIMP (GNU Image Manipulation Program) stands out as a free, open-source, and incredibly versatile option. It offers a robust suite of features that rival many professional-grade software, making it a favorite among creators for everything from basic adjustments to complex photo manipulation. This comprehensive guide will walk you through the various methods of cropping in GIMP, demonstrating how you can leverage its tools to achieve precision, unleash creativity, and optimize your images for any platform or purpose. We’ll explore everything from straightforward rectangular crops and specific aspect ratios to more advanced techniques for cutting out irregular shapes, ensuring your photo ideas and thematic collections always look their best.
Mastering the GIMP Crop Tool: Your Gateway to Refined Imagery
The journey to perfectly composed images begins with understanding the fundamental cropping tools in GIMP. Like any specialized craft, effective image manipulation requires familiarity with your instruments. GIMP provides an intuitive, yet powerful, crop tool that can be accessed and utilized in several ways, catering to different workflows and preferences.
Locating the Crop Tool

Before you can begin trimming your wallpapers or focusing your nature shots, you first need to find the crop tool within GIMP’s interface. GIMP is designed with flexibility in mind, offering multiple avenues to access its functions.
The most common and visually direct method is through the Toolbox. Typically docked on either the left or right side of your GIMP window, the Toolbox houses an array of icons representing different editing functions. Look for the “Paper Knife” icon (it often resembles a small blade cutting a dashed line or a square with a diagonal line through it). Clicking this icon will activate the crop tool, indicated by a change in your cursor.
Alternatively, for those who prefer menu navigation or if your Toolbox is not immediately visible, you can access the crop tool through the image window’s menu bar:
- Click on “Tools” in the main menu.
- Hover over “Transform Tools” in the dropdown list.
- Select “Crop” from the subsequent submenu.
For power users and those seeking maximum efficiency, GIMP also supports keyboard shortcuts. You can activate the crop tool instantly by pressing Shift + C on your keyboard. This method is particularly useful when you’re deeply immersed in a digital photography workflow and want to switch tools quickly without disrupting your creative flow.
Once the crop tool is active, your cursor will transform, signaling that you are ready to define your cropping area. This immediate visual feedback is a hallmark of GIMP’s user-friendly visual design.
Basic Cropping Steps
With the crop tool selected, the process of reshaping your image is remarkably straightforward. This foundational technique is essential for achieving cleaner backgrounds, tighter compositions, and highlighting the critical elements in your stock photos.
Here’s a step-by-step guide to performing a basic crop:
- Launch GIMP and open the image you wish to crop by navigating to
File > Open. - Activate the Crop Tool using one of the methods described above (Toolbox icon, menu, or Shift + C).
- Define the Initial Crop Area: Click and drag your left mouse button across the image to draw a rectangular selection. This initial rectangle represents the area of your image you intend to keep. Don’t worry about being perfectly precise at this stage; GIMP provides ample opportunities for refinement.
- Adjust the Selection: After releasing the mouse button, a rectangle with distinct handles (small squares) at its corners and midpoints will appear on your canvas. As you move your cursor over these handles, it will change, indicating that you can click and drag them to resize the crop area.
- Drag a corner handle to resize the crop area while maintaining its aspect ratio (unless you press
Shiftto constrain). - Drag a side or top/bottom handle to adjust that specific dimension.
- You can also click and drag anywhere inside the crop rectangle to reposition the entire selection without altering its size. This is incredibly useful for fine-tuning the placement of your subject.
- As you adjust, a dialog box or the status bar will often display the current dimensions and aspect ratio of your selection, providing real-time feedback crucial for editing styles that demand precise sizing.
- Drag a corner handle to resize the crop area while maintaining its aspect ratio (unless you press
- Confirm the Crop: Once you are satisfied with the defined area, you have two primary ways to finalize the crop:
- Double-click anywhere inside the crop rectangle.
- Press the Enter key on your keyboard.
GIMP will then trim away all parts of the image outside your selected rectangle, leaving you with your newly cropped image. This basic operation is often the first step in creating compelling aesthetic images or preparing photos for thematic collections.
Remember, GIMP also offers the ability to rotate the crop selection slightly by adjusting the “Position” in the tool options, allowing for minor straightening of horizons or skewed elements, further enhancing the visual design of your photographs.
Tailoring Your Images: Cropping for Purpose and Platforms
In the diverse landscape of digital media, images often need to conform to specific dimensions or aspect ratios to look their best across various platforms. From creating an ideal background for a website to perfectly framing a post for trending styles on social media, GIMP offers robust tools for precision cropping that go beyond simple freehand adjustments.
Cropping to a Specific Aspect Ratio
Aspect ratio refers to the proportional relationship between an image’s width and height. Maintaining or changing this ratio is crucial for ensuring your photography appears correctly on different screens and platforms, preventing distortion or awkward empty spaces. GIMP simplifies this process with its “Fixed” option in the Crop Tool’s options dialog.
To crop an image to a specific aspect ratio:
- Activate the Crop Tool (Shift + C).
- Open the Tool Options dialog. If it’s not visible, you can find it under
Windows > Dockable Dialogs > Tool Options. - In the Tool Options, locate the “Fixed” checkbox and ensure it is marked.
- Next to “Fixed,” there’s a dropdown menu. Select “Aspect Ratio” from this menu.
- A text box will appear below, allowing you to type in your desired aspect ratio. Common examples include:
- 1:1 for a perfect square (ideal for many profile pictures and Instagram posts).
- 16:9 for widescreen formats (common for YouTube thumbnails, some desktop wallpapers, and video content).
- 3:2 or 4:3 for traditional photographic prints.
- 9:16 for vertical formats like Instagram Stories or TikTok (reflecting current trending styles).
- Once you’ve entered the ratio, click and drag on your image to define the crop area. GIMP will automatically constrain your selection to the specified aspect ratio, no matter how you drag the handles. You can still reposition the entire crop box to frame your subject perfectly within these constraints.
- Confirm the crop by double-clicking inside the selection or pressing Enter.
This feature is invaluable for preparing images for social media platforms where specific aspect ratios are critical for optimal presentation. It ensures your creative ideas translate seamlessly across different digital environments.
Resizing and Scaling Images to Exact Dimensions
While cropping removes pixels, resizing (or scaling) changes the overall dimensions of the image by either adding or removing pixels, affecting its resolution and often its file size. This is particularly important for high-resolution stock photos that need to be adapted for web use, email attachments, or specific print sizes without losing quality. GIMP provides a dedicated “Scale Image” function for this purpose.
Here’s how to resize and scale an image to specific dimensions:
- Open your image in GIMP.
- Navigate to the main menu and click on “Image”.
- Select “Scale Image…” from the dropdown menu. A new “Scale Image” dialog window will appear.
- Under “Image Size,” you will see the current Width and Height of your image. You can input your desired “Width” and “Height” values directly into these boxes.
- Maintain Aspect Ratio: By default, a small chain icon located between the Width and Height input boxes will be linked. This ensures that when you change one dimension (e.g., Width), GIMP automatically adjusts the other (Height) to maintain the original aspect ratio, preventing your image from looking stretched or squashed. This is generally recommended to preserve the integrity of your beautiful photography. If you need to change dimensions independently (e.g., to deliberately stretch an image or fit it into a frame with a different ratio), click the chain icon to unlink them.
- Units: You can also change the unit of measurement (from “px” for pixels to “percent,” “inches,” “cm,” etc.) by clicking the spinner next to the dimension values. This is useful if you need to scale an image to, say, 50% of its original size or to a specific print dimension.
- Adjust “Resolution” (optional but recommended for print): Below Image Size, you’ll find “Resolution” (X and Y). For screens, 72-96 PPI (Pixels Per Inch) is common. For high-quality printing, 300 PPI is often required. Adjust these values as needed for your output.
- Choose “Interpolation”: This setting determines the algorithm GIMP uses to calculate new pixel values when scaling. For the best quality, especially when scaling down, consider
LoHaloorCubic.No Interpolationis fastest but can result in blocky images, whileLinearis a good balance. - Once you’ve set your desired dimensions and resolution, click “Scale.” GIMP will process the image, applying your changes.
After scaling, don’t forget to export your image (File > Export As...). When exporting to formats like JPEG, you’ll be presented with options to adjust the quality, which directly impacts the file size. This is where you can further optimize your images using GIMP’s built-in compressors and optimizers, ensuring a balance between visual fidelity and manageable file sizes for online sharing or storage. Previewing the file size during export helps you make informed decisions, especially for stock photos where specific file size limits might apply.
Unleashing Creativity: Advanced Cropping and Image Manipulation
Cropping isn’t solely about removing unwanted edges or fitting standard dimensions; it’s also a powerful tool for artistic expression and intricate photo manipulation. GIMP extends its cropping capabilities far beyond simple rectangles, allowing digital artists and designers to carve out unique shapes, isolate complex subjects, and bring imaginative creative ideas to life.
Cropping Irregular Shapes with the Paths Tool
For truly unique compositions or when you need to extract an object with a non-rectangular outline, GIMP’s Paths Tool (also known as the Pen Tool) is your go-to feature. This technique is fundamental for creating sophisticated digital art and intricate visual design elements.
Here’s how to crop an irregular shape using the Paths Tool:
- Open the image in GIMP.
- Go to the Toolbox and select the “Paths Tool” (it looks like a pen nib).
- Draw freely around the image or object you want to cut out. Click to create individual nodes (points) along the contour of your desired shape.
- For straight lines, simply click to place points.
- For curves, click and drag the mouse after placing a node. Handles will appear that allow you to adjust the curvature of the path.
- Continue placing nodes until you have outlined the entire irregular shape.
- Close the Path: To finalize the path, click on your very first node while holding down the Ctrl key. This connects the end of your path to the beginning, forming a closed shape.
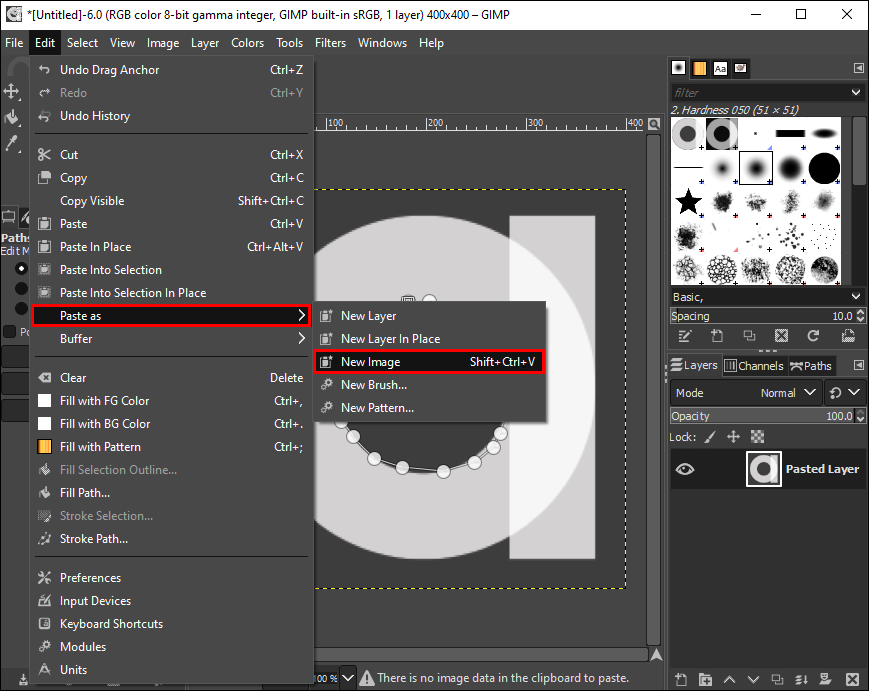
- Convert Path to Selection: Once the path is closed, you need to turn it into an active selection. In the Paths Tool Options, click the “Selection from Path” button, or go to
Select > From Pathin the main menu. You will now see a “marching ants” selection animating around your drawn shape. - Isolate the Selection as a New Image:
- To get your irregularly cropped object on a new canvas (often with a transparent background), first ensure your original layer has an Alpha Channel. Right-click on your image layer in the Layers dialog (
Windows > Dockable Dialogs > Layers) and selectAdd Alpha Channelif it’s not already present. This enables transparency. - With the selection active, go to
Edit > Copy. - Then, go to
Edit > Paste as > New Image. - This will create a brand new image file containing only your irregularly cropped object, with everything outside the selection being transparent.
- To get your irregularly cropped object on a new canvas (often with a transparent background), first ensure your original layer has an Alpha Channel. Right-click on your image layer in the Layers dialog (
This method allows for incredible precision, enabling you to integrate complex shapes into mood boards or thematic collections seamlessly, adding a touch of abstract artistry to your images.
Using Selection Tools for Advanced Cropping
GIMP offers a variety of selection tools, each with its unique strengths, that can be combined with the “Crop to Selection” function for precise and creative cropping. These tools are excellent for specific scenarios, from isolating areas with uniform colors to freehand selections.
-
Rectangle Select Tool / Ellipse Select Tool:
- Found in the Toolbox (rectangle or circle icons).
- Use these to draw precise rectangular or elliptical selections.
- After making your selection, go to
Image > Crop to Selection. This is a quick way to crop to exact geometric shapes without using the dedicated Crop Tool. - To ensure your backgrounds are transparent after cropping a selection, always
Add Alpha Channelto your layer first.
-
Fuzzy Select Tool (Magic Wand):
- Located in the Toolbox (looks like a magic wand).
- Ideal for selecting areas of similar color, such as a solid or relatively consistent background.
- Steps:
- Right-click on your image layer in the Layers dialog and
Add Alpha Channel. - Select the Fuzzy Select Tool.
- Click on the background area you wish to remove. The tool will automatically select all contiguous pixels of similar color. You can adjust the “Threshold” in the tool options for more or less sensitivity.
- Press the Delete key to remove the selected background, making it transparent.
- Repeat as needed for any remaining background areas.
- Right-click on your image layer in the Layers dialog and
- This is a quick method for isolating a subject from a simple background, especially for stock photos or product shots where a clean cutout is desired.
-
Lasso Tool (Free Select Tool):
- Found in the Toolbox (looks like a lasso).
- Offers a freehand selection method, similar to cutting with scissors. It’s excellent for photo manipulation where you need to manually trace complex, organic shapes.
- Steps:
- Select the Lasso Tool.
- Click and drag your mouse to draw a freehand selection around your desired object. For more control, click once to place a node, then click again to draw a straight line to the next point, and continue.
- To complete the selection, return to your starting point and click on it. GIMP will then show the “marching ants.”
- Right-click on your image layer and
Add Alpha Channel. - Press Delete to remove the selected area.
- While it requires a steady hand, the Lasso Tool is perfect for extracting subjects with irregular shapes that would be difficult with other selection methods, contributing to unique creative ideas.
-
By Color Select Tool:
- Similar to the Fuzzy Select Tool but selects all pixels of a similar color across the entire image, not just contiguous ones.
- Steps:
- Right-click on your image layer and
Add Alpha Channel. - Go to
Tools > Selection Tools > By Color Select. - Click on the specific color you want to select (e.g., a solid background color).
- Press Delete to remove all instances of that color.
- Right-click on your image layer and
- This is incredibly efficient for isolating subjects from perfectly uniform, single-color backgrounds.
These advanced cropping and selection techniques empower you to go beyond basic rectangular cuts, offering profound control over image manipulation and allowing you to achieve truly customized and aesthetic results for your digital photography projects.
Auto Cropping for Efficiency
Sometimes, you have an image with an obvious, uniform border that needs to be removed quickly. GIMP anticipates this common need with its “Autocrop Image” feature, an intelligent tool designed to streamline the cropping process for straightforward cases. This feature is a fantastic time-saver, particularly when dealing with image collections that have consistent framing issues.
The “Autocrop Image” tool works by automatically detecting the largest border area of a single, consistent color around the edges of your active layer. Once identified, GIMP then crops this border away, leaving you with a more focused image.
To use the Autocrop Image feature:
- Open your image in GIMP.
- Ensure the layer you want to autocrop is the active layer in the Layers dialog.
- Go to the main menu and click on “Image”.
- Select “Autocrop Image” from the dropdown menu.
GIMP will instantly analyze the image and perform the crop. This method is incredibly useful for:
- Scanning documents or photos where the scanner bed’s uniform color often creates unwanted borders.
- Batch processing images where a consistent background border needs to be removed.
- Quickly tidying up stock photos or wallpapers that have been exported with slight, uniform padding.
While it may not be suitable for complex images with varied borders or when precise manual control is required, “Autocrop Image” is an excellent tool for rapid image optimization and clean-up, aligning perfectly with the goal of producing polished digital photography with minimal effort. It embodies GIMP’s commitment to providing both granular control and efficient automated solutions for various editing styles.
The Impact of Cropping on Visual Storytelling and Design
Cropping is far more than a simple technical operation; it is a fundamental act of visual design that profoundly influences how an image is perceived and understood. By carefully selecting what to include and exclude, you sculpt the viewer’s experience, directing their gaze, evoking specific emotions, and strengthening the narrative of your photography.
Framing Your Subject and Eliminating Distractions
At its core, cropping serves to refine the image’s composition, a principle critical in all forms of art and photography. Whether you’re working with a vibrant nature scene, a striking abstract pattern, or an intimate portrait, the way you frame your subject dictates its prominence and impact.
- Guiding the Eye: An effective crop eliminates superfluous elements that compete for attention, ensuring the viewer’s focus is immediately drawn to the main subject. This can transform an ordinary snapshot into a captivating piece of beautiful photography. For example, a wider shot of a nature landscape might include an unsightly fence or power line; cropping these out redirects the eye to the majestic mountains or serene lake.
- Removing Unwanted Elements: Perhaps the most common reason for cropping is to get rid of distractions – be it an unintentional “photo-bomber,” a messy background, or an object that simply doesn’t contribute to the image’s story. GIMP’s precise cropping tools allow you to surgically remove these intrusions, salvaging what would otherwise be a compromised memory or a flawed stock photo. This aligns with the desire to create aesthetic images that are clean and compelling.
- Enhancing Emotion and Mood: A tight crop on a face can magnify the emotion expressed, turning a casual glance into a powerful statement. Similarly, a wide, intentional crop can convey solitude or vastness. This ability to manipulate visual emphasis makes cropping a key component in conveying sad/emotional themes or creating evocative mood boards. The careful use of negative space, or the deliberate removal of it, fundamentally alters the visual design and emotional resonance of an image.
By taking control of the frame, you assert your artistic intention, ensuring that every element within the final image contributes to its overall purpose and meaning, transforming mere captures into carefully curated visual stories.
Optimizing Images for Various Platforms and Uses
In today’s digital age, images are consumed across a myriad of devices and platforms, each with its own specific requirements and aesthetic preferences. Effective cropping is crucial for optimizing your visuals for diverse applications, from high-definition wallpapers to small profile pictures, without compromising quality or impact.
- Platform-Specific Requirements: Social media platforms, websites, and print media often have precise dimension or aspect ratio guidelines. Cropping an image to fit a 1:1 square for Instagram, a 16:9 widescreen for a YouTube banner, or a vertical 9:16 for a story ensures your content appears polished and professional, leveraging trending styles effectively. GIMP’s ability to crop to fixed aspect ratios and scale to exact pixel dimensions is invaluable here.
- File Size Management and Performance: While cropping primarily deals with dimensions, it also indirectly affects file size by reducing the total number of pixels. This is particularly important for web images where fast loading times are critical for user experience and search engine optimization. When combined with GIMP’s export options for compressors and optimizers, cropping helps create efficient, high-quality images. For stock photos or large image collections, minimizing unnecessary data through intelligent cropping is a core digital photography editing style.
- Versatility in Image Collections and Mood Boards: A single high-resolution photograph can be transformed into multiple derived images through strategic cropping. A wide landscape could yield several vertical crops for phone wallpapers, a horizontal crop for a desktop background, and a square detail for a mood board. This versatility, enabled by GIMP’s flexible cropping tools, enriches your thematic collections and provides abundant photo ideas from a single source.
- Enhancing Visual Design Cohesion: For graphic design projects, consistent cropping and framing across a series of images can create a cohesive and professional look. Whether it’s a portfolio of digital art or a set of product photos, uniform presentation through considered cropping reinforces branding and aesthetic unity.
In essence, cropping in GIMP empowers you to not only improve the immediate visual appeal of an image but also to strategically adapt it for widespread impact. It’s a foundational skill for anyone seeking to master digital photography and visual design, ensuring your creative ideas shine through, regardless of where they are displayed.
Conclusion
The ability to crop an image effectively is a cornerstone of digital photography and visual design, a skill that transcends mere technicality to become an art form in itself. GIMP, with its comprehensive and accessible suite of tools, provides every user—from the novice enthusiast to the seasoned graphic designer—the power to transform their images with precision and creativity.
Throughout this guide, we’ve navigated the various pathways GIMP offers for refining your visuals. We’ve seen how easily you can locate and utilize the fundamental crop tool to trim away unwanted elements, bringing your main subject into sharp focus and crafting compelling compositions. Beyond the basic rectangular cut, GIMP empowers you to define specific aspect ratios, essential for optimizing your photography for diverse platforms and trending styles like those seen in image collections and mood boards. Moreover, its sophisticated selection and path tools unlock a world of photo manipulation, allowing you to crop irregular shapes and extract intricate details, pushing the boundaries of digital art and unleashing truly unique creative ideas.
Whether your goal is to enhance the aesthetic appeal of a nature shot, prepare high-resolution stock photos for commercial use, or simply refine a personal memory, GIMP offers the flexibility and control you need. By mastering these cropping techniques, you not only improve the visual quality of your images but also strengthen their narrative, ensuring that every pixel tells the story you intend. So, dive into GIMP, experiment with its powerful cropping features, and watch your beautiful photography truly pop.