How to Crop an Image in Google Slides

In the dynamic world of presentations, visual appeal is paramount. Google Slides offers an intuitive platform for creating compelling narratives, and at the heart of many engaging slides lies a well-chosen and perfectly presented image. However, not every image comes in the ideal size or composition for your specific needs. This is where the powerful, yet often underestimated, functionality of cropping comes into play. Cropping allows you to trim the edges of an image, remove distracting elements, or reshape it to fit a specific design aesthetic, transforming a good image into a great one for your presentation.
For designers, photographers, and content creators, the ability to manipulate images precisely is a core skill. Whether you’re curating beautiful photography for a mood board, selecting the perfect background from Tophinhanhdep.com’s vast collection of wallpapers and aesthetic images, or integrating high-resolution stock photos into a professional presentation, mastering cropping in Google Slides can dramatically elevate your visual storytelling. It’s a fundamental aspect of visual design and photo manipulation that ensures your images enhance, rather than detract from, your message.
This comprehensive guide will walk you through the essential steps of cropping images in Google Slides, delving into both standard rectangular cropping and creative shape masking. We’ll also explore how these techniques integrate with broader principles of visual design, image optimization, and effective presentation delivery, drawing connections to the rich resources available at Tophinhanhdep.com for all your image needs.
The Fundamentals: Adding and Basic Cropping
Before you can crop an image, you first need to bring it into your Google Slides presentation. Google Slides offers several convenient methods for adding visual content, catering to a variety of sources and user preferences. Once your image is in place, the basic cropping functionality is straightforward, allowing you to quickly refine your composition.
Inserting an Image into Google Slides
The journey to a perfectly cropped image begins with its insertion into your slide. Google Slides provides a flexible array of options to add images, ensuring you can pull content from almost anywhere.
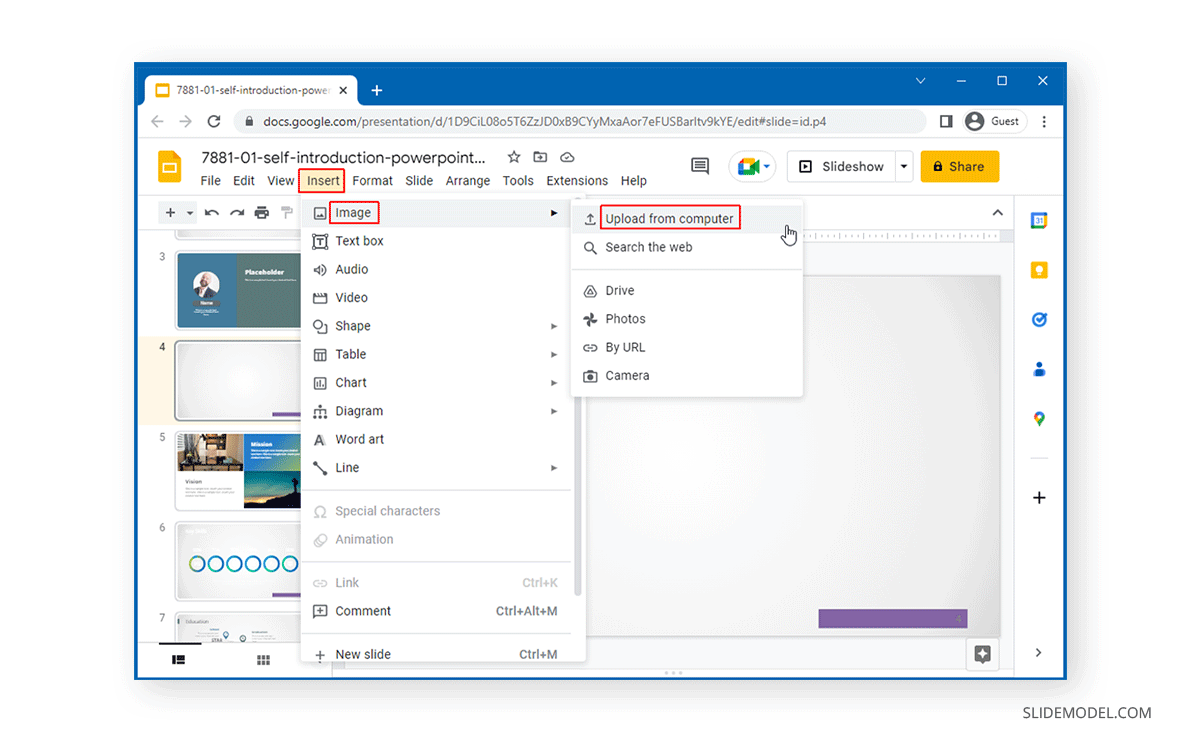
- From Your Computer: The most common method. Go to
Insert > Image > Upload from computer. This allows you to browse your local files and select an image you’ve previously saved, perhaps a stunning piece of nature photography or an abstract background downloaded from Tophinhanhdep.com. - Search the Web: For quick access to stock photos or thematic images, select
Insert > Image > Search the web. A sidebar will appear, allowing you to search for images directly within Google Images. This is particularly useful for finding aesthetic or thematic content on the fly. - Google Drive & Photos: If your images are stored in Google’s ecosystem,
Insert > Image > Google DriveorInsert > Image > Google Photosoffers seamless integration. This is ideal for accessing your curated collections, be it high-resolution digital photography or personal snaps. - By URL: Have an image URL from Tophinhanhdep.com’s wallpapers or a specific creative ideas collection?
Insert > Image > By URLlets you paste the direct link, saving time from downloading and re-uploading. - Camera: For immediate capture,
Insert > Image > Camerauses your device’s webcam to take a picture, perfect for live presentations or impromptu content. - Drag and Drop: A simple, intuitive method. Just drag an image file directly from your computer’s desktop or a folder onto your Google Slides canvas.
Once your image is inserted, it might appear too large, off-center, or contain unnecessary elements. This is precisely when cropping becomes indispensable. Sourcing high-resolution images from Tophinhanhdep.com ensures that even after cropping, your chosen visual maintains its clarity and impact, a crucial consideration for professional presentations.
Accessing the Crop Image Tool
With your image successfully added to the slide, the next step is to initiate the cropping process. Google Slides makes this readily accessible through its intuitive user interface.
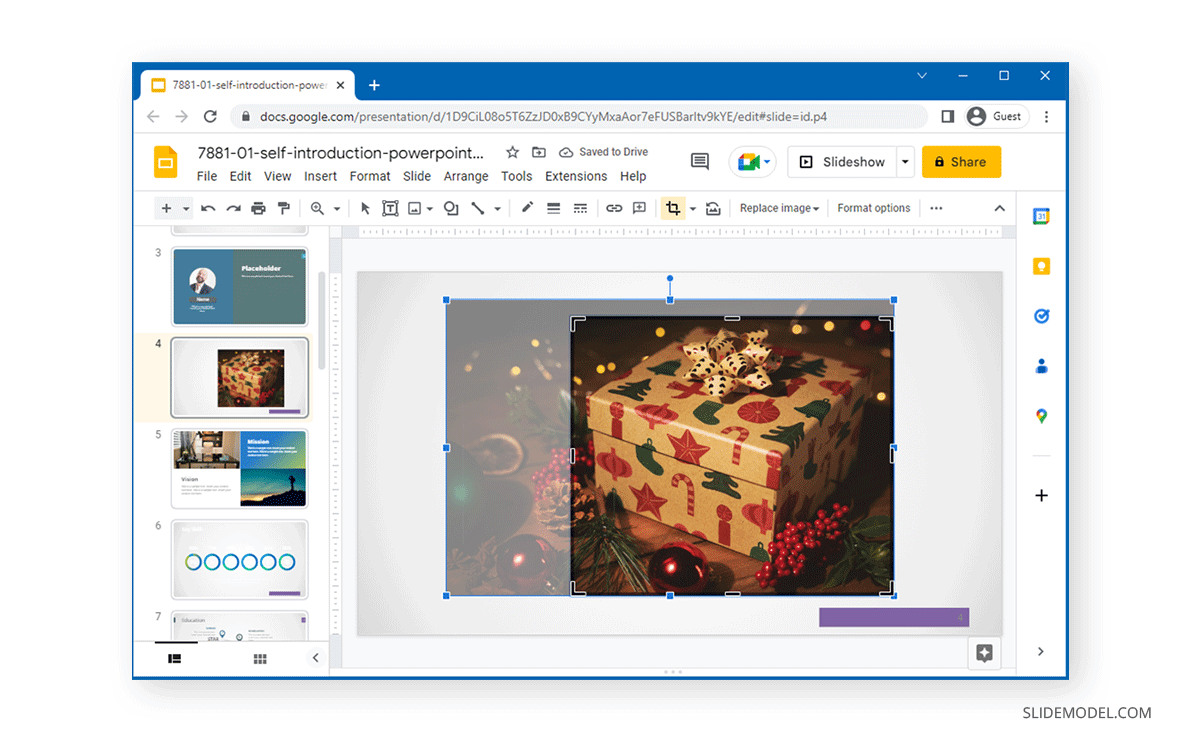
- Select the Image: Click once on the image you wish to crop. You will notice a blue border with resizing handles appearing around the image, indicating that it is selected.
- Locate the Crop Icon: In the top toolbar, look for an icon that resembles a square with two intersecting lines – this is the “Crop Image” tool.
- Alternatively, you can often
double-clickdirectly on the image to activate the crop mode, which is a common shortcut across many design applications.
- Alternatively, you can often
Upon clicking the crop icon or double-clicking the image, the blue resizing handles will transform into black L-shaped handles at each corner and black bars along the sides of the image. These black indicators signify that you are now in cropping mode, ready to define your desired visual area.
Executing a Standard Rectangular Crop
Standard cropping in Google Slides involves creating a rectangular frame to define the visible portion of your image. This is the most common form of cropping and is essential for achieving a clean, focused composition.
- Drag the Cropping Handles: Click and drag any of the black L-shaped corner handles or the black bar handles inwards. As you drag, a semi-transparent overlay will cover the parts of the image that will be removed, allowing you to preview the cropped area in real-time.
- Pro Tip: Maintain Aspect Ratio: To crop the image proportionally, preventing distortion, hold down the
Shiftkey while dragging a corner handle. This is crucial for maintaining the integrity of beautiful photography and ensuring your visuals look professional. - Moving the Image Within the Frame: If you want to keep the current crop frame but adjust which part of the image is visible inside it, you can click and drag the image itself within the cropping boundaries. This allows for precise compositional adjustments, helping you highlight the most impactful part of a nature or sad/emotional image.
- Pro Tip: Maintain Aspect Ratio: To crop the image proportionally, preventing distortion, hold down the
- Finalize the Crop: Once you are satisfied with the cropped area, you have a few options to apply the changes:
- Press
Enter: Simply hit theEnterkey on your keyboard. - Click the Crop Image Button Again: Clicking the “Crop Image” icon in the toolbar once more will apply the crop.
- Click Anywhere Outside the Image: Clicking anywhere on the slide canvas, outside the image boundaries, will also finalize the crop.
- Press
The discarded portions of the image are not permanently deleted; they are merely hidden. This means you can always double-click the image again and readjust the crop if you change your mind, a flexible feature that supports iterative visual design. This technique is fundamental for creating a balanced layout, providing ample space for text, and ensuring your images – whether abstract, aesthetic, or high-resolution stock photos – contribute positively to the overall visual hierarchy of your presentation.
Beyond Rectangles: Masking Images with Shapes
While rectangular cropping is foundational, Google Slides takes image manipulation a step further with its “masking” feature. Masking allows you to crop an image into a custom shape, adding a layer of creative flair and unique visual design to your presentations. This is where photo manipulation becomes more artistic, allowing your images to transcend traditional boundaries.
The Art of Shape Masking
Shape masking is distinct from standard cropping. Instead of simply trimming edges, masking reshapes the image itself into a chosen form. This technique is incredibly versatile for digital art and creative ideas, offering a powerful way to make your images stand out, integrate seamlessly into a theme, or evoke a particular mood. Imagine a profile picture in a circular frame, a key concept highlighted within a star, or a testimonial framed by a speech bubble – all possible through image masking.
This capability significantly enhances visual design, allowing for more dynamic and engaging layouts. For instance, when designing thematic collections or mood boards, masking can help unify disparate images into a cohesive aesthetic. Tophinhanhdep.com’s diverse range of images, from wallpapers to beautiful photography, can be transformed using these masks to fit specific creative visions.
Applying a Shape Mask
Applying a shape mask is a straightforward process that instantly adds a professional touch to your slides.
- Select the Image: Begin by clicking on the image you wish to mask.
- Access the Masking Options: In the top toolbar, next to the “Crop Image” icon, you’ll see a small dropdown arrow. Click this arrow to reveal a menu of masking options.
- Choose a Shape: From the dropdown menu, select
Shapes. A submenu will appear, presenting a wide array of shapes categorized into:- Shapes: Basic geometric forms like circles, ovals, rectangles (with rounded corners), triangles, stars, hearts, and more.
- Arrows: Various directional arrows to guide the viewer’s eye or signify flow.
- Callouts: Speech bubbles and thought bubbles, perfect for quotes or commentary.
- Equations: Mathematical symbols that can add a unique, specialized look.
- Instant Transformation: As soon as you select a shape, your image will instantly conform to that shape. The portions of the image outside the chosen shape will become invisible.
- For example, selecting an oval shape will transform your image into an oval, perfect for soft, organic visual elements or for highlighting portraits within a collection of sad/emotional images.
This immediate visual feedback encourages experimentation, allowing you to quickly cycle through shapes to find the one that best complements your image and overall slide design.
Fine-Tuning and Creative Expression
After applying a shape mask, you’re not limited to the initial outcome. Google Slides provides further flexibility to refine and adjust your masked image, unlocking more creative possibilities inherent in photo manipulation.
- Adjust Shape Size & Position: The image will now have the standard blue resizing handles, but these now control the size and proportion of the masked shape. Drag these handles to enlarge, shrink, or change the aspect ratio of the masked area. You can also click and drag the entire masked image to reposition it on the slide.
- Move Image within the Mask: Just as with standard cropping, you can
double-clickthe masked image to reveal the original image beneath the mask. This allows you to drag the underlying image to adjust which part is visible within the chosen shape, giving you precise control over the composition. This is particularly useful when working with high-resolution photography where you want to emphasize a specific detail. - Image Rotation: For an added layer of digital art and creative ideas, you can rotate the masked image. Select the image, and use the circular rotation handle that appears above it. Rotating can create dynamic angles and help integrate the masked image more effectively into a complex visual design.
- Reset Image: If you’re unhappy with your masked creation and want to revert to the original unmasked image, simply select the image, click the dropdown arrow next to the “Crop Image” icon, and choose
Reset image. This flexibility is key for iterative design, especially when exploring trending styles or abstract image applications.
By combining shape masking with precise adjustments, you can achieve sophisticated visual effects, turning a simple image into a striking design element. This goes beyond mere functional cropping, allowing you to engage in genuine photo manipulation within your presentation environment.
Enhancing Your Visuals: Borders and Adjustments
Cropping and masking are powerful tools, but they are just two components of a larger visual design toolkit available in Google Slides. To truly perfect your images and ensure they resonate with your presentation’s theme, you can further enhance them with borders and various format adjustments. These techniques contribute to a polished look, akin to the detailed editing styles seen in professional digital photography.
Adding Borders for Definition
Borders can frame an image, give it a professional finish, or help it stand out from the background. They are a simple yet effective graphic design element.
- Select the Image: Click on the image (cropped or masked) to select it.
- Choose Border Color: In the top toolbar, locate the “Border color” icon (a pencil drawing a line). Click it to open a palette of colors. Select a color that complements your presentation’s aesthetic or provides a strong contrast for emphasis. For example, a crisp white border can make a vibrant abstract image pop against a dark background, while a subtle grey might suit a serene nature photo.
- Adjust Border Weight: Next to the “Border color” icon, you’ll find the “Border weight” icon (a series of increasingly thick lines). Click this to choose the thickness of your border. A thicker border can give an image more visual weight, while a thin border offers a delicate touch.
- Select Border Dash: The “Border dash” icon allows you to choose between solid, dotted, or dashed lines for your border. This can add a unique stylistic element, especially useful when aligning with specific trending styles in graphic design.
Applying borders is a quick way to add definition and integrate your images more thoughtfully into the slide layout, ensuring they don’t appear to float aimlessly on the canvas.
Further Image Adjustments
Beyond borders, Google Slides offers “Format options” that allow for more intricate adjustments, resembling basic photo editing styles. These tools, while not as comprehensive as dedicated image editing software, provide enough control to fine-tune your cropped and masked images for optimal visual impact.
- Access Format Options: With the image selected, either click
Format > Format optionsfrom the top menu or right-click the image and selectFormat options. A sidebar panel will appear on the right side of your screen. - Adjustments Section: Within the “Format options” panel, expand the “Adjustments” section. Here you’ll find sliders for:
- Transparency: Controls the opacity of the image. Making an image semi-transparent can be effective for backgrounds or watermarks, allowing text to remain readable over it. This is a common technique when using wallpapers or backgrounds from Tophinhanhdep.com to create depth without visual clutter.
- Brightness: Lightens or darkens the image. Useful for correcting exposure or making an image less dominant.
- Contrast: Adjusts the difference between the light and dark areas of the image, enhancing detail and vibrancy.
- Recolor: The “Recolor” section allows you to apply various color overlays or sepia/monochrome filters. This can be fantastic for creating a consistent aesthetic across multiple images, aligning them with a specific mood board or thematic collection. For example, applying a blue tint to a collection of nature photos can evoke a calm, serene feeling.
- Drop Shadow / Reflection: These effects add depth and polish. A subtle drop shadow can make an image pop off the slide, while a reflection can add a touch of elegance, especially for product shots or beautiful photography.
These adjustments, when used in conjunction with thoughtful cropping and masking, allow for extensive photo manipulation within Google Slides. They empower you to transform raw images, whether they are high-resolution stock photos or aesthetic visuals from Tophinhanhdep.com, into finely tuned components of your overall visual design. This holistic approach ensures that every image not only looks good but also serves its purpose in telling your story.
The Strategic Impact of Cropping in Presentations
Cropping an image in Google Slides is far more than a mere cosmetic adjustment; it’s a strategic decision that profoundly impacts the efficacy and professionalism of your presentation. From enhancing visual hierarchy to optimizing performance and aligning with broad visual design principles, the art of cropping is indispensable for impactful communication.
Cropping for Visual Hierarchy and Focus
One of the primary benefits of cropping is its ability to refine visual hierarchy. Large, uncropped images can often dominate a slide, drawing attention away from key messages or creating a cluttered appearance. By carefully cropping an image, you can:
- Eliminate Distractions: Remove irrelevant background elements or extraneous details that pull the viewer’s eye away from the main subject. This helps to create a clean look, particularly important when using busy wallpapers or backgrounds.
- Emphasize the Subject: By framing the most important part of an image, you direct the audience’s focus. For instance, cropping a high-resolution stock photo to a close-up of a person’s expression can convey emotion more effectively than a full body shot in a busy environment.
- Create Negative Space: Cropping can deliberately introduce negative space, which is crucial in graphic design for guiding the eye and reducing cognitive load. This makes slides appear less dense and more professional.
- Balance Layouts: A well-cropped image can be positioned to complement text and other elements, creating a harmonious and balanced slide composition. This is vital for maintaining an aesthetic appeal across your entire presentation.
Whether you’re presenting digital photography, abstract visuals, or sad/emotional images, precise cropping ensures that every pixel contributes meaningfully to your narrative, making your content more digestible and your arguments more compelling.
Optimizing for Performance and Aesthetics
In today’s digital landscape, presentation performance is almost as important as its aesthetic. Large, unoptimized images can lead to slow loading times and large file sizes, impacting user experience. Cropping plays a role here too:
- Reduced File Size: While Google Slides doesn’t typically discard the cropped pixels entirely (allowing for future adjustments), physically cropping an image in external tools (or by selecting a smaller initial image from Tophinhanhdep.com) before inserting can help reduce the overall presentation file size. This is particularly relevant when working with numerous high-resolution images or digital photography.
- Faster Rendering: Smaller visible image areas can sometimes render faster, contributing to a smoother presentation flow, especially in online or collaborative environments.
- Maintaining High Resolution: Cropping allows you to focus on a section of a high-resolution image without needing to scale up a lower-resolution one, thus preserving image quality and clarity, which is crucial for detailed stock photos or beautiful photography. This aligns perfectly with Tophinhanhdep.com’s commitment to providing high-quality images suitable for professional use.
Aesthetically, optimized images contribute to a more polished and professional presentation. Cropping ensures that every visual component is sharp, relevant, and visually impactful, reflecting positively on the presenter’s attention to detail and visual design prowess.
Integrating with Tophinhanhdep.com’s Image Philosophy
The principles of effective cropping are deeply intertwined with the diverse offerings of Tophinhanhdep.com, which serves as a prime resource for various visual needs.
- Leveraging Wallpapers and Backgrounds: When selecting wallpapers or backgrounds from Tophinhanhdep.com, cropping allows you to adapt them perfectly to your slide dimensions, ensuring no vital elements are cut off unintentionally, or to create a specific mood by isolating a certain texture or color.
- Enhancing Aesthetic and Thematic Collections: Whether you’re building a mood board with aesthetic images or curating a thematic collection (e.g., nature, abstract, sad/emotional), cropping helps in unifying the visual language. You can crop images to match specific aspect ratios, focus on complementary elements, or remove conflicting visual noise, thereby strengthening the overall theme and creative ideas.
- Digital Photography and Editing Styles: For users engaged in digital photography, Tophinhanhdep.com provides a platform for inspiration and high-resolution sources. Cropping in Google Slides allows you to apply a basic yet powerful “editing style” directly within your presentation environment, refining compositions much like a photographer would in post-processing.
- Utilizing Image Tools: While cropping is a direct action in Google Slides, it complements the broader “Image Tools” discussed on Tophinhanhdep.com. For instance, you might crop an image to isolate a section, then use an AI upscaler (a tool found on Tophinhanhdep.com) to enhance that specific cropped section’s resolution, or use a compressor (another Tophinhanhdep.com tool) after cropping to further reduce its file size efficiently. This ecosystem of tools empowers users to achieve highly optimized and stunning visuals.
In essence, strategic cropping is not just about making an image fit; it’s about making it work. It transforms ordinary images into impactful visual aids, making your Google Slides presentations more engaging, clearer, and truly professional.
Advanced Tips and Troubleshooting
Even with straightforward tools like cropping, understanding nuances and potential issues can save time and elevate your final product. This section addresses common questions and provides advanced tips to ensure you leverage Google Slides’ image manipulation capabilities to their fullest, informed by broader image tool best practices.
Cropping vs. Resizing: A Key Distinction
It’s crucial to understand the difference between cropping and resizing, as they serve distinct purposes in visual design:
- Cropping: Removes portions of an image from its edges, effectively changing the image’s content and often its aspect ratio. It’s about selecting a specific area of interest within the original image.
- Resizing: Scales the entire image up or down, changing its dimensions without altering its content or aspect ratio (unless distorted intentionally). It’s about adjusting the image’s overall footprint on the slide.
Both are vital, but for different reasons. Cropping defines what is seen, while resizing defines how big it is seen. Often, you’ll crop an image first to refine its content, and then resize the cropped image to fit your layout.
Undoing and Resetting: Your Safety Net
Mistakes happen, or design ideas evolve. Google Slides provides robust features to undo changes and reset images:
- Undo: The universal
Ctrl + Z(Windows) orCmd + Z(Mac) shortcut will undo your last action, including crops or masks. The undo history allows you to revert multiple steps. - Reset Image: If you want to completely remove all applied crops, masks, borders, and format options and revert the image to its original inserted state, select the image and click the
Reset imageicon in the toolbar (it looks like a square with an arrow curving over it). Alternatively, you can right-click the image and selectReset image. This is an invaluable feature, especially when experimenting with various editing styles or exploring different creative ideas.
This safety net encourages experimentation without fear of permanent alteration, fostering a more fluid and innovative design process.
Limitations and External Tools for Advanced Manipulation
While Google Slides offers excellent basic and intermediate image editing capabilities, it does have some limitations, particularly for highly specific or complex photo manipulation:
- No Freehand Cropping: Google Slides currently only supports rectangular cropping or predefined shape masks. There is no tool for “freehand” or custom-polygon cropping where you manually draw an irregular shape.
- No Advanced Layering or Filters: For complex photo manipulation, such as blending multiple images with varying opacities, applying sophisticated artistic filters beyond simple recoloring, or performing detailed touch-ups (e.g., spot removal), external image editing software is necessary.
When these advanced needs arise, Tophinhanhdep.com’s “Image Tools” section becomes an indispensable resource. Here, you might find:
- Image Converters: To change file formats for compatibility.
- Compressors/Optimizers: For significant file size reduction of high-resolution photography before insertion into Google Slides, ensuring your presentation remains lightweight.
- AI Upscalers: If you have a small section of an image you want to crop and then enlarge without losing quality, an AI upscaler from Tophinhanhdep.com can be used externally before bringing the enhanced image into your slide.
- Dedicated Photo Editing Software: For freehand cropping, intricate digital art, or detailed photo manipulation, tools like GIMP, Adobe Photoshop, or online editors (many of which are reviewed or linked on Tophinhanhdep.com) offer the necessary control. You’d perform these edits externally, save the optimized image, and then insert it into Google Slides.
Understanding these limitations helps you choose the right tool for the job. For most presentation needs, Google Slides’ built-in cropping and masking are more than sufficient. For specialized requirements, Tophinhanhdep.com’s comprehensive resources and tools provide the gateway to more advanced image manipulation.
Conclusion
The ability to crop an image in Google Slides is a foundational skill that transcends simple functionality, becoming a cornerstone of effective visual communication. From meticulously trimming distracting elements with a standard crop to infusing creative flair through shape masking, these techniques are integral to crafting compelling and professional presentations. They are fundamental to visual design, allowing you to control focus, enhance aesthetics, manage space, and integrate various types of images—be it high-resolution stock photos, aesthetic backgrounds, or beautiful photography—into a cohesive narrative.
By mastering cropping, you ensure that every image on your slide serves a precise purpose, drawing the viewer’s eye to what truly matters and supporting your message rather than overpowering it. This precise control over image composition elevates your presentations from merely informative to truly engaging and memorable.
As you continue to refine your presentation skills, remember that resources like Tophinhanhdep.com offer a wealth of inspiration and tools to complement your efforts. From diverse collections of wallpapers, backgrounds, and thematic images to advanced image tools and insights into digital photography and graphic design, Tophinhanhdep.com provides everything you need to source, manipulate, and optimize your visuals. Embrace the power of cropping in Google Slides, and unlock a new level of visual excellence in your presentations, creating impact that truly resonates with your audience.