Mastering Image Cropping in Adobe Illustrator: Essential Techniques for Tophinhanhdep.com Users

In the dynamic world of visual content, precise image manipulation is not just a skill—it’s an art form. Whether you’re a seasoned graphic designer, a budding digital artist, or simply someone looking to refine beautiful photography for personal use, the ability to effectively crop an image is foundational. For users creating stunning visuals, wallpapers, or compelling backgrounds for Tophinhanhdep.com, mastering the tools within Adobe Illustrator is paramount. This guide will walk you through the essential methods of cropping images in Illustrator, ensuring your visuals are always perfectly framed, impactful, and aligned with your creative vision.
Adobe Illustrator, traditionally known for its prowess in vector graphics, has evolved significantly, offering robust tools for handling raster images as well. Gone are the days when designers had to constantly switch between Photoshop for cropping and Illustrator for layout. While older versions of Illustrator might have made cropping feel like a convoluted process, modern updates—especially from CC 2017 onwards—have streamlined this crucial task. However, knowing the various techniques remains invaluable, as different projects call for different approaches. From quick rectangular cuts to intricate custom shapes, Illustrator provides the flexibility you need.
This comprehensive tutorial delves into three primary methods for cropping images in Adobe Illustrator: the straightforward “Crop Image” function, the versatile “Clipping Mask,” and the powerful “Opacity Mask” and “Artboard” techniques. We’ll explore each method in detail, outlining step-by-step instructions, practical applications, and how these techniques can elevate your visual design projects on Tophinhanhdep.com, from high-resolution stock photos to thematic collections.
The Fundamentals of Image Cropping in Adobe Illustrator
Before diving into the specific cropping tools, it’s essential to grasp some underlying concepts within Adobe Illustrator. Understanding the distinction between raster and vector graphics, and how images are linked or embedded, forms the bedrock of efficient image handling in your projects. For content creators on Tophinhanhdep.com, this foundational knowledge ensures that your image assets, whether they are aesthetic, nature-inspired, abstract, or emotional, are treated appropriately for optimal quality and flexibility.
Understanding Raster vs. Vector Cropping
Adobe Illustrator is fundamentally a vector-editing program. This means it excels at creating and manipulating graphics defined by mathematical paths, which can be scaled infinitely without loss of quality. Raster images, on the other hand, are composed of pixels and have a fixed resolution. This inherent difference dictates how cropping tools interact with each image type.
When you crop a vector graphic within Illustrator, you are typically modifying its underlying paths or using vector-specific tools like the Pathfinder. This operation is often non-destructive and highly precise, allowing for complex shapes and easy adjustments. For instance, if you’re creating digital art or graphic design elements for Tophinhanhdep.com, you might crop vector shapes to create intricate patterns or logos.
Raster images, such as JPEGs, PNGs, or TIFFs—common formats for beautiful photography, wallpapers, and backgrounds—are treated differently. While Illustrator now offers direct cropping tools for raster images, it’s important to remember that these operations are often more akin to slicing or masking pixel data. The “Crop Image” function, for example, permanently removes pixel data outside the selected area (though your original file on your desktop remains untouched). This is crucial for optimizing images for Tophinhanhdep.com where file size and display performance are key, especially for high-resolution content.
Linked vs. Embedded Images: What You Need to Know
The way an image is brought into Illustrator affects how it’s handled, particularly during cropping. This distinction impacts file size, flexibility, and even the appearance of prompts when you attempt to crop.
-
Linked Images: When you use
File > Place(or Shift+Command/Ctrl+P) or drag an image directly from your desktop into an open Illustrator project, the image is “linked.” This means Illustrator maintains a connection to the original file on your computer. The Illustrator file itself doesn’t contain the full image data, only a preview and a reference to its location. This keeps the Illustrator file size smaller but requires the original linked file to be accessible whenever you open the project. If you crop a linked image using the “Crop Image” function, Illustrator will often embed a copy of the cropped portion into your document, detaching it from the original linked file. -
Embedded Images: An image becomes “embedded” if you copy and paste it into Illustrator, or if you open a raster image directly using
File > Open. In this scenario, the entire image data is stored within the Illustrator document. This makes the Illustrator file larger but also self-contained, meaning you don’t need the original source file to open and work with the image. When you crop an embedded image, the changes are applied directly to the embedded data within your Illustrator file.
Understanding this difference is vital for managing your projects for Tophinhanhdep.com. For instance, when preparing stock photos for distribution, embedding might be convenient, but for large collections of wallpapers, managing linked files can be more efficient, especially when file size needs to be minimized for web optimization.
Method 1: The Direct “Crop Image” Function (Illustrator CC 2017+)
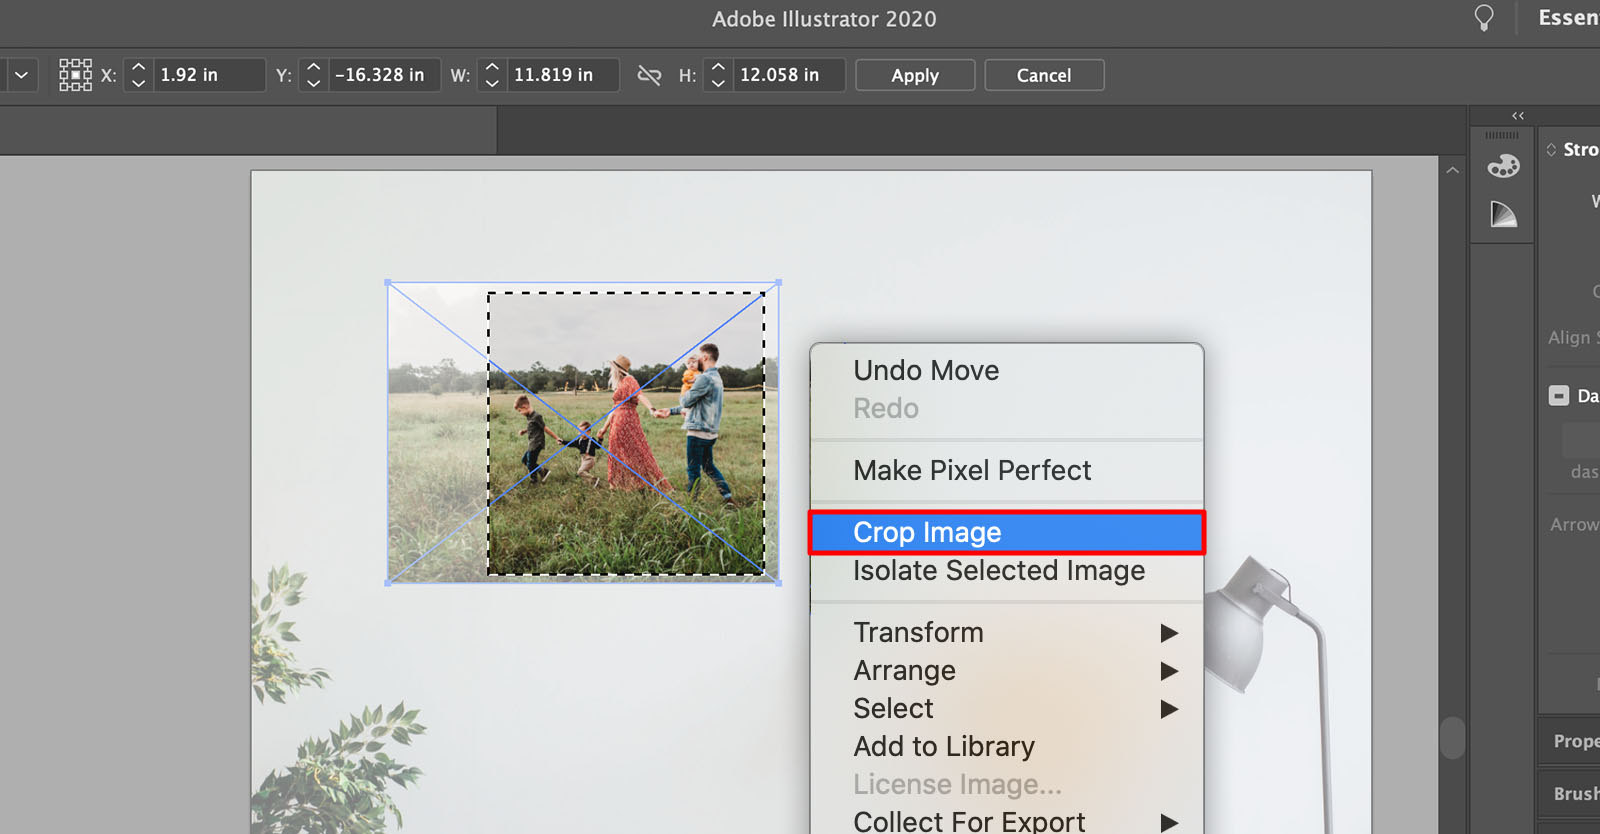
For users of Adobe Illustrator CC 2017 and newer, the “Crop Image” function offers the most straightforward way to trim raster images to a rectangular or square shape. This tool is designed for quick and definitive cuts, making it ideal for refining beautiful photography or adjusting backgrounds for Tophinhanhdep.com with minimal fuss.
Step-by-Step Guide to Using the Crop Image Tool
This method is specifically for raster images (like .jpg, .png, .eps rasterized versions), meaning it won’t apply to editable vector graphics. If your image is part of a group or complex vector artwork, you might need to rasterize it first or use a different method.
-
Prepare Your Image: Begin by opening your Adobe Illustrator file. If you haven’t already, place your desired image onto the artboard. You can do this by navigating to
File > Placeor by dragging and dropping the image from your file explorer onto the canvas. Ensure the image is the size and orientation you generally desire before cropping, as this function will directly modify its dimensions. For example, if you’re preparing a nature wallpaper, ensure the main subject (e.g., a majestic tree) is roughly where you want it. -
Select the Image: Using the Selection Tool (the black arrow icon in your toolbar, or press
V), click on the image you intend to crop. You’ll see a bounding box appear around it, indicating it’s selected. -
Activate the Crop Image Function: With the image selected, look at the Control Panel situated at the top of your screen (just below the menu bar). You should see a button labeled “Crop Image.” Click this button. Alternatively, you can go to
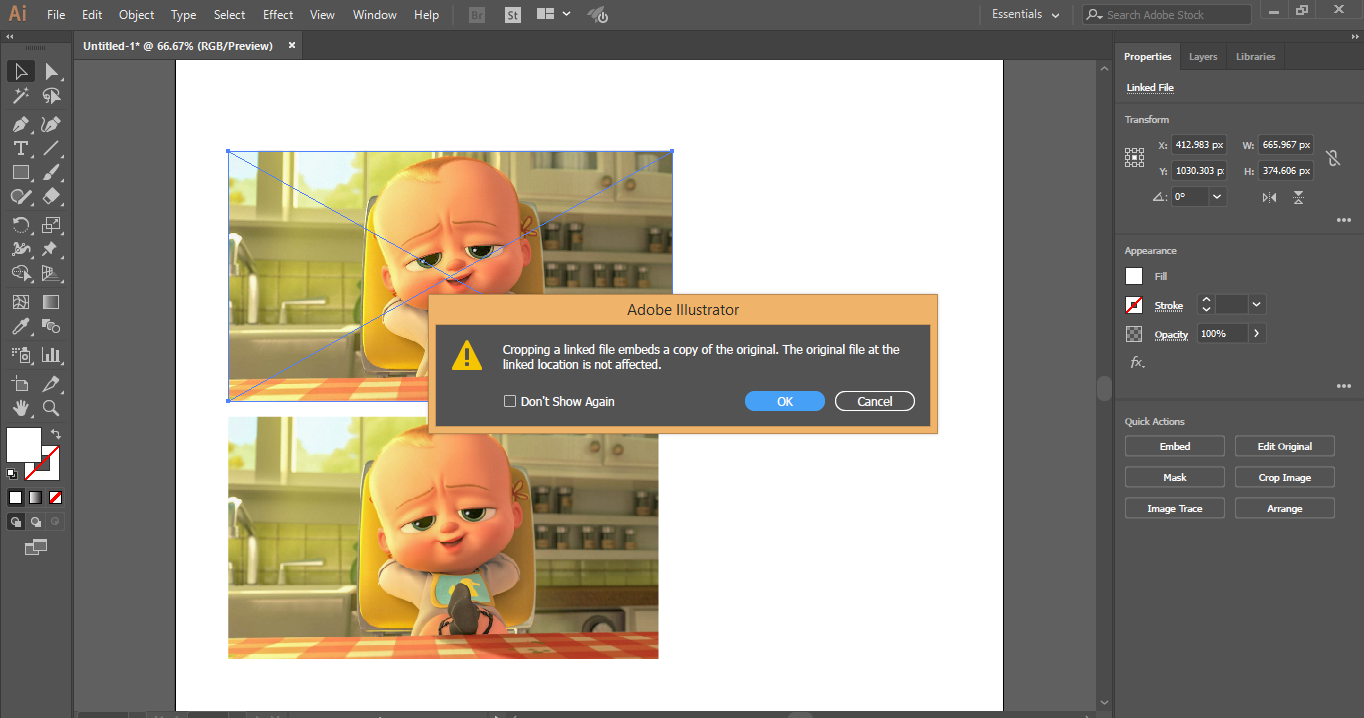
Object > Crop Imagefrom the main menu.- Note: If you’re working with a linked image, a prompt may appear, informing you that cropping will embed a copy of the image. Click “OK” to proceed. This means the cropped version will become part of your Illustrator file, no longer relying on the external linked file for that specific instance. This is a common practice when preparing high-resolution images for final output on Tophinhanhdep.com.
Refining Your Selection and Applying the Crop
Once the “Crop Image” function is activated, you’ll enter a special cropping mode:
-
Adjust the Cropping Area: A bounding box with prominent handles (corners and sides) will appear around your image, often with a semi-transparent overlay indicating the areas that will be removed. Click and drag these handles inwards or outwards to define the precise area you wish to keep.
- Pro Tip for Tophinhanhdep.com: When cropping for specific uses like wallpapers or social media banners, consider the aspect ratio. Hold down
Shiftwhile dragging a corner handle to constrain proportions, preventing distortion. This is crucial for maintaining the integrity of beautiful photography or aesthetic images. - You can also click and drag the entire cropping box to reposition it over your image, allowing you to fine-tune the composition.
- Pro Tip for Tophinhanhdep.com: When cropping for specific uses like wallpapers or social media banners, consider the aspect ratio. Hold down
-
Apply the Crop: Once you’re satisfied with the cropping area, look at the Control Panel at the top. You’ll see an “Apply” button (or a checkmark icon). Click this button to finalize the crop. The areas outside your selection will be permanently removed from the image within your Illustrator document.
This method offers a quick and definitive way to crop rectangular images, perfect for fast adjustments of stock photos or backgrounds on Tophinhanhdep.com. However, for more creative shapes or non-destructive editing, other methods are more suitable.
Method 2: Unleashing Creativity with Clipping Masks
The Clipping Mask is a powerful and highly versatile feature in Adobe Illustrator, offering a non-destructive way to “crop” images into any shape imaginable—not just rectangles. This method is a staple for visual designers on Tophinhanhdep.com who delve into graphic design, digital art, or intricate photo manipulation, where custom shapes and editable results are essential.
Unlike the direct “Crop Image” function, a clipping mask doesn’t permanently delete the masked-out pixels. Instead, it hides them, preserving the original image data. This means you can always readjust your crop or even release the mask to revert to the uncropped image, offering unparalleled flexibility for creative ideas and iterative design.
Crafting Custom Shapes for Your Crops
The beauty of clipping masks lies in their ability to transform your images into unique forms, perfect for aesthetic collections or abstract compositions on Tophinhanhdep.com.
-
Prepare Your Image: Place your raster image (or vector graphic) onto your Illustrator artboard. Let’s say you have a striking nature photograph you want to frame in a circular shape for an aesthetic background.
-
Draw Your Clipping Shape: This is the creative part. Using any of Illustrator’s drawing tools, create the shape that will define your crop.
- For regular shapes: Use the Rectangle Tool (
M), Ellipse Tool (L), or Polygon Tool to draw basic geometric forms. - For irregular or custom shapes: Employ the Pen Tool (
P) to draw freeform paths, or use the Pencil Tool (N) for more organic, hand-drawn shapes. - Key Principle: The shape you draw (the “clipping path”) must be on top of the image you want to crop in the layer stack. If it’s not, select your shape and go to
Object > Arrange > Bring to Front(Shift+Command/Ctrl+]). - It’s often helpful to give your clipping path a visible stroke and no fill (or a semi-transparent fill) so you can clearly see the image beneath it and position it accurately.
- For regular shapes: Use the Rectangle Tool (
-
Position the Shape: Carefully place your custom shape over the area of the image you wish to reveal. Everything inside this shape will be visible, and everything outside will be hidden.
The Power of Non-Destructive Editing
This non-destructive nature is a significant advantage for designers on Tophinhanhdep.com, especially when experimenting with trending styles or creating mood boards.
-
Select Both Objects: Using the Selection Tool (
V), select both your image (the object to be masked) and your custom shape (the clipping path). You can do this by clicking and dragging a marquee selection over both, or by clicking one, holdingShift, and clicking the other. -
Create the Clipping Mask: With both objects selected, navigate to
Object > Clipping Mask > Make. Alternatively, use the convenient keyboard shortcut:Command+7(Mac) orCtrl+7(Windows).- Instantly, your image will be “cropped” to the confines of your custom shape. The areas outside the shape will vanish from view, but they are not deleted.
-
Adjusting Your Mask: To refine your crop after the mask is applied:
- Move the image within the mask: Use the Direct Selection Tool (the white arrow icon, or press
A) to click and drag the image itself. This moves the image inside the fixed mask shape. - Edit the clipping path: Again, with the Direct Selection Tool, click on the edges of your clipping mask. You can then use the Pen Tool or other shape editing tools to modify the mask’s anchor points, reshaping your crop without affecting the underlying image.
- Release the mask: If you want to entirely undo the crop, simply select the masked object and go to
Object > Clipping Mask > Release(Option+Command+7 / Alt+Ctrl+7). Your original image and shape will reappear.
- Move the image within the mask: Use the Direct Selection Tool (the white arrow icon, or press
Advanced Clipping Mask Techniques: Flattening Transparency
While clipping masks are non-destructive, there might be instances where you need a truly cropped, rasterized output, perhaps for specific image optimizers or for a final, uneditable asset. This is where the “Flatten Transparency” trick comes in handy.
- Apply a Clipping Mask: First, create your clipping mask as described above.
- Adjust Transparency (Optional, but Recommended): With the masked object selected, open the
Window > Transparencypanel. You can experiment with blending modes or opacity levels if desired, but for a clean crop, simply ensuring normal mode and 100% opacity is fine. Some sources suggest setting the blend mode to “Darken” before flattening for certain effects, but it’s not strictly necessary for a basic crop. - Flatten Transparency: With the masked object still selected, go to
Object > Flatten Transparency. A dialog box will appear. Ensure “Convert All Text to Outlines” and “Convert All Strokes to Outlines” are unchecked unless you specifically intend to do so. Adjust the “Raster/Vector Balance” slider towards “Raster” if you want to ensure the image is fully rasterized. Click “OK.” - Expand (Final Step): After flattening, immediately go to
Object > Expand. This step often solidifies the rasterization of the clipped area.
Now, you have a truly cropped raster image that only contains the visible pixels, making it ready for export or further processing through Tophinhanhdep.com’s image tools like compressors or optimizers.
Method 3: Leveraging Artboards for Precision Cropping
The Artboard in Adobe Illustrator serves as your canvas, defining the printable and exportable area of your document. Leveraging artboards for cropping is an efficient technique, particularly when preparing multiple image assets or when your final output needs to precisely match specific dimensions, such as custom backgrounds or aesthetic images for Tophinhanhdep.com. This method primarily offers rectangular or square crops but provides excellent control over output.
Cropping for Export: The Artboard Advantage
This technique is especially useful when you have bleed (artwork extending beyond the intended cut line) or simply want to export only a specific portion of your design.
-
Position Your Image: Place your image onto the Illustrator artboard. Adjust its size and position so that the area you wish to keep is fully contained within the artboard. Any part of the image extending beyond the artboard will be automatically “cropped” during export.
-
Adjust the Artboard to Your Desired Crop:
- Manually: Select the Artboard Tool (Shift+O). You can then click and drag the handles of the artboard to resize it precisely around the area of your image you want to keep. This is intuitive for visual cropping.
- By Exact Dimensions: With the Artboard Tool selected, you can also input precise width and height values in the Control Panel at the top of the screen or in the Properties panel. This is perfect for standardizing image sizes for various platforms on Tophinhanhdep.com.
- Fit to Artwork: If you have an image or a specific piece of artwork that you want the artboard to automatically resize to, select that artwork, then go to
Object > Artboards > Fit to Selected Art. This automatically “crops” your artboard to the exact boundaries of your selected content.
-
Export Your Cropped Image: Once your artboard defines the exact cropped area:
- Go to
File > Export > Export As... - In the export dialog box, choose your desired format (e.g., JPEG, PNG).
- Crucially, check the “Use Artboards” checkbox. This tells Illustrator to only export the content visible within your active artboard, effectively cropping everything outside it. If you have multiple artboards and only want to export a specific one, specify the range (e.g., “1-1” for the first artboard).
- Click “Export.”
- Go to
This method is highly recommended for preparing final images for Tophinhanhdep.com, especially for scenarios requiring strict dimension adherence, such as profile pictures, banner ads, or high-resolution stock photos that need to fit specific layouts.
Quick and Efficient Artboard Adjustments
Beyond just exporting, understanding artboard manipulation can enhance your overall workflow for visual design and digital photography on Tophinhanhdep.com.
-
Previewing Your Crop with Trim View: If you have elements extending beyond your artboard but don’t want to immediately resize the artboard or export, you can use
View > Trim View. This temporarily hides everything outside the artboard’s boundaries, giving you a clean preview of your final output without making any permanent changes to your layout. It’s excellent for visual checks when arranging thematic collections or experimenting with creative ideas. -
Creating Multiple Cropped Versions: For a series of images (e.g., a photo collection or mood board), you can create multiple artboards within a single Illustrator document. Each artboard can define a different crop or aspect ratio of the same image (or different images). When you export with “Use Artboards” enabled, Illustrator will generate separate image files for each artboard, significantly streamlining the process of preparing diverse visual assets for Tophinhanhdep.com.
By mastering the Artboard Tool and its export options, you gain precise control over the final dimensions and composition of your images, ensuring they are perfectly tailored for their intended use.
Optimizing Your Cropped Images for Tophinhanhdep.com’s Ecosystem
Cropping in Adobe Illustrator is more than just trimming edges; it’s a critical step in the larger ecosystem of visual content creation and optimization, particularly for a platform like Tophinhanhdep.com. Effective cropping directly influences the aesthetic appeal, functional performance, and overall impact of your images across various categories, from stunning wallpapers to digital photography.
Enhancing Visuals for Wallpapers and Backgrounds
For users creating or sourcing images for Wallpapers and Backgrounds on Tophinhanhdep.com, cropping plays an instrumental role in:
- Composition: Cropping allows you to reframe a scene, eliminating distracting elements and guiding the viewer’s eye to the most impactful part of the image. For a Nature wallpaper, you might crop to highlight a specific flower or a dramatic landscape feature. For Abstract backgrounds, precise cropping can isolate intriguing patterns or textures.
- Aesthetic Appeal: The right crop can transform a good image into an exceptional one, contributing significantly to its Aesthetic quality. It helps achieve balance, rhythm, and visual harmony, making the image more pleasing and engaging as a background.
- Emotional Impact: For Sad/Emotional or Beautiful Photography, cropping can intensify the feeling conveyed. By focusing tightly on a subject’s expression or a symbolic detail, you can amplify the emotional resonance of the image, making it more powerful as a visual statement.
- Device Responsiveness: Often, wallpapers and backgrounds need to adapt to different screen sizes. Cropping can prepare multiple aspect ratios of the same image, ensuring it looks great on desktops, tablets, and mobile devices, a crucial consideration for a site offering diverse image collections.
Integrating Cropping into Your Photography Workflow
For Photography enthusiasts contributing High Resolution or Stock Photos to Tophinhanhdep.com, cropping is an indispensable part of the post-production workflow:
- Refining Digital Photography: Even a perfectly captured photograph can benefit from strategic cropping. It’s an opportunity to correct minor compositional flaws, adhere to the rule of thirds, or zoom in on details that might have been less prominent in the original shot.
- Preparing Stock Photos: When preparing Stock Photos, cropping to standard aspect ratios (e.g., 16:9, 4:3, 1:1) makes them more versatile for buyers. It ensures that images are ready for various layouts, from web banners to print advertisements.
- Defining Editing Styles: Cropping choices can also contribute to a photographer’s unique Editing Styles. A consistent approach to framing and composition through cropping can become a signature element of their work, enhancing their Digital Photography portfolio on Tophinhanhdep.com.
Beyond Cropping: Using Tophinhanhdep.com’s Image Tools
While Illustrator provides the robust means for cropping, remember that this is just one step in the journey of image optimization. Tophinhanhdep.com offers a suite of Image Tools that complement your Illustrator workflow:
- Converters: After cropping, you might need to convert your image to a different format. Tophinhanhdep.com’s converters can handle this efficiently, preparing your image for specific web or print requirements.
- Compressors: Larger cropped images can still impact website loading times. Using a Compressor on Tophinhanhdep.com helps reduce file size without significant loss of quality, crucial for maintaining optimal performance for wallpapers and large image collections.
- Optimizers: Image Optimizers further fine-tune your images for web delivery, balancing quality and file size. They are essential for ensuring that your beautifully cropped photos load quickly and display flawlessly on Tophinhanhdep.com.
- AI Upscalers: If you’ve cropped an image and realize the remaining portion is too small for a high-resolution need, Tophinhanhdep.com’s AI Upscalers can intelligently enlarge it, recovering detail and sharpness that traditional scaling methods would lose. This is a game-changer for repurposing cropped sections of digital art or photography.
- Image-to-Text: For designers creating graphic design elements with integrated text, or for those who need to extract information from images, Tophinhanhdep.com’s Image-to-Text tool can be useful for various applications post-cropping.
By integrating these powerful cropping techniques within Adobe Illustrator with the comprehensive image tools available on Tophinhanhdep.com, you create a seamless workflow for producing, optimizing, and presenting visual content that truly stands out. This holistic approach ensures your Visual Design projects, Image Inspiration & Collections, and Photo Ideas are always of the highest quality and impact.
Conclusion: Mastering the Art of the Cut
The ability to crop an image effectively in Adobe Illustrator is a fundamental skill that underpins successful visual content creation. As we’ve explored, Illustrator offers a versatile toolkit, from the direct “Crop Image” function for quick rectangular adjustments to the highly creative and non-destructive “Clipping Mask” for custom shapes, and the precise “Artboard” method for export-ready dimensions. Each technique serves a specific purpose, providing designers, photographers, and content creators with the flexibility needed to achieve their artistic and practical goals.
For users of Tophinhanhdep.com, mastering these cropping methods means more than just trimming edges; it means enhancing the narrative of your images, refining the composition of your wallpapers and backgrounds, and optimizing every pixel for aesthetic impact and performance. Whether you are curating a collection of high-resolution stock photos, crafting intricate digital art, or designing compelling graphic elements, the power of a well-executed crop cannot be overstated. It transforms raw visuals into polished, purposeful pieces that resonate with viewers and align perfectly with your creative vision.
By integrating these Illustrator techniques with Tophinhanhdep.com’s robust suite of image tools—including converters, compressors, optimizers, and AI upscalers—you are equipped with a comprehensive workflow to manage, enhance, and deploy your visual assets with unparalleled efficiency and quality. So, dive in, experiment with these methods, and unlock the full potential of your images, turning every crop into an opportunity for visual excellence.