Mastering Image Cropping in Adobe InDesign: A Comprehensive Guide for Visual Designers

Adobe InDesign stands as a cornerstone in the world of professional publishing and graphic design. It’s the go-to application for crafting everything from elegant brochures and engaging magazines to dynamic interactive PDFs and stunning digital layouts. Unlike traditional image editors such as Photoshop or Illustrator, InDesign operates on a unique principle when it comes to integrating images into your projects. This distinctive workflow, while incredibly powerful and flexible, can sometimes be a source of confusion for newcomers or those accustomed to more direct image manipulation software.
At Tophinhanhdep.com, we understand the nuances of working with visual content, whether it’s sourcing breathtaking High Resolution Photography for your projects, leveraging powerful Image Tools for optimization, or exploring Visual Design principles to bring your creative visions to life. This comprehensive guide will demystify the process of cropping images in InDesign, revealing how its frame-based system empowers designers with unparalleled control and flexibility. We’ll delve into the core mechanics, walk you through step-by-step methods, and highlight how these techniques contribute to compelling Digital Art and Photo Manipulation. Moreover, we’ll discuss situations where InDesign excels, and when you might consider alternatives like Tophinhanhdep.com’s dedicated online Image Converters, Compressors, and AI Upscalers for swift and specific image preparation tasks.
Understanding the Image and Frame Elements in InDesign
The fundamental difference in how InDesign handles images is crucial to mastering cropping. When you work with an image in InDesign, you’re essentially interacting with two distinct, yet interconnected, elements: the image itself and the frame that contains it. This concept is a cornerstone of InDesign’s non-destructive editing approach, allowing for immense flexibility in layout design.

How Images Differ in InDesign from Other Editors
In most image editing software, like Adobe Photoshop, opening a picture means you’re directly manipulating the pixel data of that image. You apply filters, adjust colors, or erase parts of the image, and these changes are often destructive unless meticulously managed with layers and smart objects.
InDesign, however, treats images differently. When you “place” an image into an InDesign document, you’re not embedding the full, editable pixel data directly. Instead, InDesign creates a link to the original image file on your computer and displays a high-quality preview within a placeholder object known as a “frame.” This frame acts as a window or a container, defining the visible boundaries of your image within the layout. The actual image data remains untouched in its original location, meaning any “cropping” you perform in InDesign is simply adjusting the size or shape of this window, not permanently altering the image file itself. This non-destructive workflow is invaluable for editorial and layout designers who need to make frequent adjustments without fear of damaging original assets.
Placing Your Image and Identifying the Frame
To begin working with images, you first need to bring them into your InDesign document. Let’s consider a practical example using a beautiful Nature or Aesthetic photograph, perhaps a white and black car on brown sand during daytime, sourced from Unsplash (or discovered through Tophinhanhdep.com’s Photo Ideas and Thematic Collections).
- Initiate Placement: Go to
File > Place(or use the shortcutControl + Don Windows,Command + Don Mac). This opens a dialogue box where you can navigate to and select your desired image file. - Position the Image: Once you click “Open,” your mouse cursor will transform into a thumbnail preview of the image. The most efficient way to place it is to click and drag to draw a frame of your desired initial size and position. Alternatively, a single click will place the image at its original size within a default frame.
- Identify the Frame: With the image now on your page, activate the Selection Tool (V from the toolbar). Clicking on the image will reveal a blue bounding box with white square handles around it. This blue box is the frame. It controls the visible area of your image and can be resized, moved, and shaped.
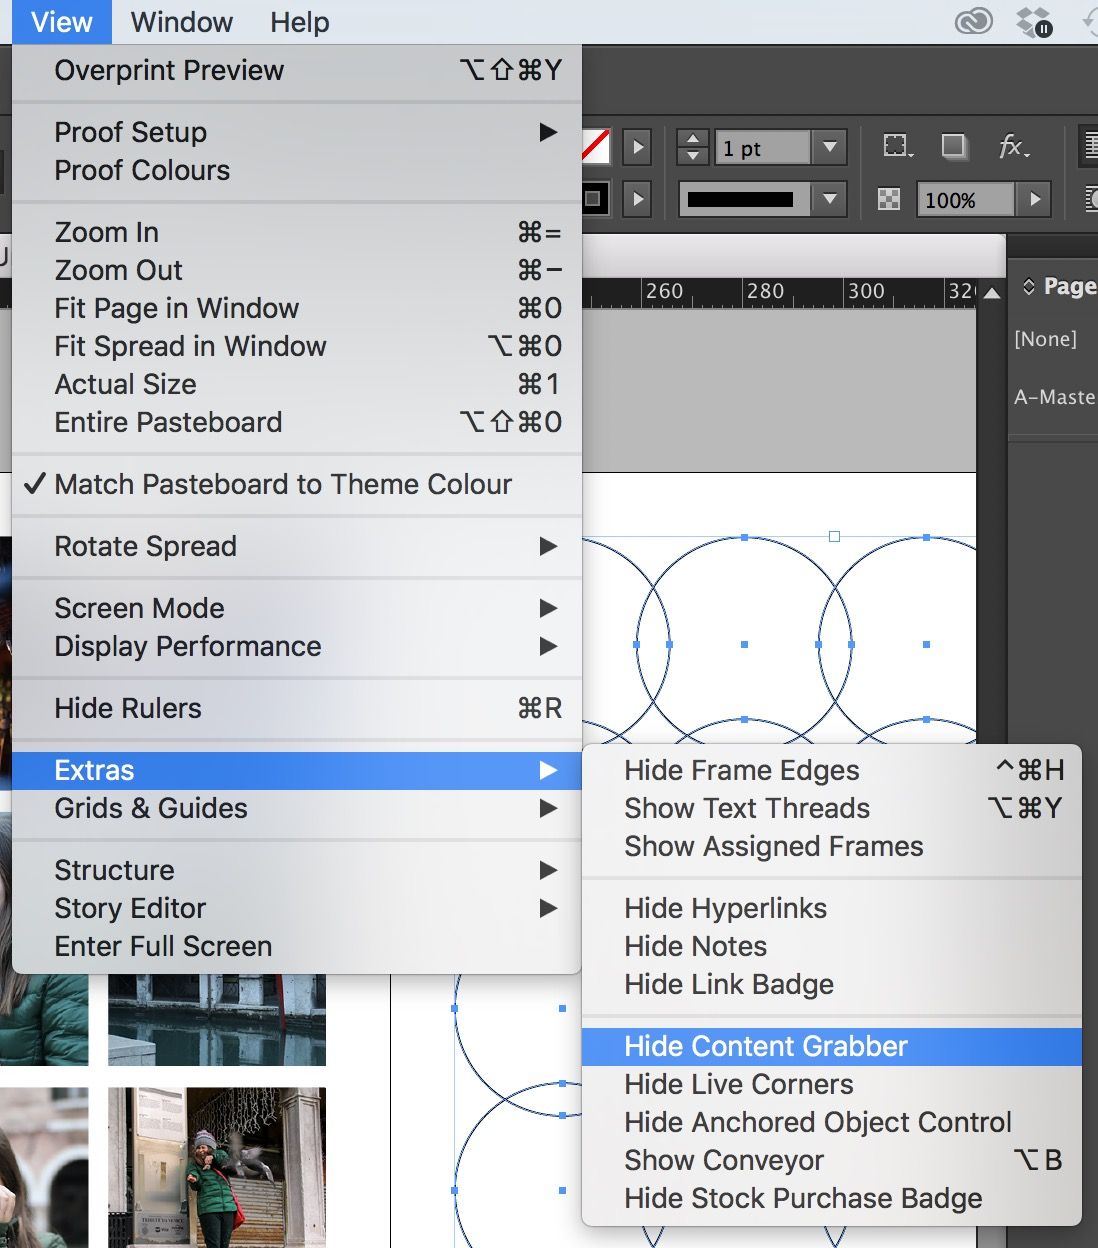
- Identify the Image Content: To interact with the image within the frame, double-click on the image itself, or hover your mouse over the center and click on the small gray circle that appears (often called the content grabber). This action selects the image content, and you’ll see a brown bounding box with brown handles. This brown box represents the actual, full image, often extending beyond the blue frame, but only the portion inside the blue frame is currently visible. The content grabber (gray circle) allows you to move the image around inside its frame without altering the frame’s size or position.
Understanding these two distinct boxes—the blue frame and the brown image content—is the key to effective image manipulation and cropping in InDesign.
How to Crop an Image in InDesign
Once you’ve grasped the concept of the frame and the image content, cropping in InDesign becomes a straightforward and intuitive process. The essence of cropping here is modifying the frame to reveal only the desired portion of the image.
Basic Cropping with the Selection Tool
This is the most common and simplest method for cropping an image to a rectangular or square shape, perfect for adjusting composition or removing unwanted elements.
- Activate Selection Tool: Ensure the Selection Tool (V) is active in your toolbar.
- Select the Frame: Click on the image once. Make sure you see the blue bounding box with control handles. This confirms you have selected the frame, not the image content. If you see the brown box, you’ve selected the content; simply click outside and then click on the image once more to select the blue frame.
- Drag to Crop: Click and drag any of the blue frame’s control handles inward. As you drag, you’ll see the visible portion of your image shrink, effectively cropping out the parts outside the new frame boundaries. For instance, if you want to crop out the trees on the sides of a Nature image to create a portrait orientation, you would drag the side handles inward.
- Result: The image is now cropped. The “hidden” parts of the image are still there, safely stored outside the frame. This non-destructive approach means you can always undo the crop by expanding the frame again, a powerful feature for iterative design processes and Creative Ideas.
Important Note: If your goal is to permanently remove cropped pixels to reduce file size or for a specific output, InDesign’s cropping alone won’t achieve this. You would need to perform a “true” crop in a dedicated image editor like Photoshop or utilize online Image Compressors or Optimizers available on Tophinhanhdep.com before placing the image in InDesign.
Precise Cropping by Adjusting Frame Dimensions
For scenarios where you require exact dimensions for your cropped area, perhaps for a specific Graphic Design element or to fit into a predefined grid, InDesign allows you to input precise values.
- Select the Frame: With the Selection Tool (V), click on the image to select its blue frame.
- Access Properties Panel: Go to the
Propertiespanel (usually on the right side of your workspace). - Modify Transform Values: In the
Transformsection, you’ll find fields forWidth(W) andHeight(H).- To change aspect ratio: Ensure the “Maintain Aspect Ratio” link icon next to the W and H fields is deactivated (it should appear broken or unlinked). Then, enter your desired pixel dimensions for the width and height. For example, to create a perfect square, you might enter
1000 pxfor both W and H. - To maintain current aspect ratio: If you want to scale the frame while keeping its current proportions, activate the “Maintain Aspect Ratio” link icon. Then, changing either the width or height will automatically adjust the other to maintain the ratio.
- To change aspect ratio: Ensure the “Maintain Aspect Ratio” link icon next to the W and H fields is deactivated (it should appear broken or unlinked). Then, enter your desired pixel dimensions for the width and height. For example, to create a perfect square, you might enter
- Reposition Content (if needed): After resizing the frame, you might find the image content isn’t perfectly centered or positioned within the new frame. To adjust this, double-click the image (or click the content grabber) to select the brown image box. Then, drag the image content around inside the blue frame until the desired portion is visible.
This method offers granular control over your crop, vital for professional layouts where consistency and precision are paramount, contributing to polished Digital Art and Photo Manipulation projects.
How to Resize an Image and the Frame in InDesign
After cropping your image, you’ll frequently need to adjust its overall size within your layout. It’s crucial to understand the difference between resizing the frame (which crops) and resizing both the frame and its content (which scales).
When you want to scale the entire image, along with its frame, without further cropping or altering its visible portion, you must resize both elements simultaneously.
- Select the Frame: Use the Selection Tool (V) to select the image frame (the blue bounding box).
- Proportional Scaling: To resize proportionally and prevent distortion (stretching or warping), hold down
Shift + Control(Windows) orShift + Command(Mac) while clicking on any corner anchor point of the blue frame and dragging it inward to make the image smaller, or outward to enlarge it. Holding these modifier keys ensures that both the frame and the image content scale together, maintaining their aspect ratio. - Non-Proportional Scaling (use with caution): If you don’t hold the
Shiftkey, dragging a corner handle will scale non-proportionally, potentially distorting your image. Dragging a side handle will only scale that dimension, also leading to distortion. Generally, proportional scaling is preferred to maintain the integrity of your Beautiful Photography.
By understanding and utilizing these keyboard shortcuts, you can seamlessly integrate your cropped and resized images into your overall Visual Design, ensuring they fit perfectly within your document’s aesthetic. Tophinhanhdep.com emphasizes the importance of maintaining image quality and proportions, especially when working with High Resolution images or creating Aesthetic compositions.
How to Reset the Crop in InDesign
One of the great advantages of InDesign’s non-destructive cropping is the ability to easily revert or “reset” a crop at any time. If you decide a previously cropped image needs to show its full content again, or if you want to quickly undo a cropping mistake, this feature is incredibly handy.
- Select the Frame: With the Selection Tool (V), click on the image frame to select it.
- Access Fitting Options: Go to
Object > Fitting > Fit Frame to Content. - Shortcut for Speed: For quicker execution, use the keyboard shortcut
Control + Alt + C(Windows) orCommand + Option + C(Mac). - Instant Reset: Upon executing this command, the blue frame will immediately expand to encompass and display the entire original image content, effectively undoing any previous cropping. The image will appear as it did when first placed, before any manual frame adjustments.
This flexibility makes InDesign an ideal environment for experimentation in Graphic Design and Visual Design, allowing you to try out different compositions without permanent commitment.
How to Crop the Image to a Shape
Beyond standard rectangular crops, InDesign offers creative ways to crop images into various geometric and custom shapes, adding a unique flair to your Digital Art and Photo Manipulation projects. This feature allows for visually engaging layouts that stand out.
Utilizing Frame Tools for Geometric Shapes
InDesign provides dedicated frame tools for common shapes like ellipses and polygons, enabling you to quickly create non-rectangular image placeholders.
- Select Frame Tool: In the toolbar, right-click on the
Rectangle Frame Tool(the icon usually looks like a rectangle with a cross through it) to reveal hidden options:Ellipse Frame ToolandPolygon Frame Tool. - Draw Your Shape: Choose the desired tool (e.g.,
Ellipse Frame Toolfor a circle). While holding theShiftkey (to maintain perfect proportions), click and drag on your document to draw the frame in your chosen shape (e.g., a perfect circle). - Place the Image: With the newly drawn shape frame still selected, go to
File > Place(orControl/Command + D) and select your image. The image will automatically be placed inside and cropped to the boundaries of your custom shape. - Adjust Fitting Options: The image might not perfectly fill the shape or be ideally centered. Right-click on the framed image, then go to
Fitting. You’ll find several options to fine-tune how the image fits within the frame:Fill Frame Proportionally: Resizes the image to fill the entire frame without distortion, potentially cropping some image content to avoid blank spaces.Fit Content Proportionally: Resizes the image to fit entirely within the frame without distortion, but may leave blank spaces if the image’s aspect ratio doesn’t match the frame’s.Content-Aware Fit: InDesign intelligently analyzes the image content and frame, then repositions and resizes the image to best fit the frame, prioritizing focal points.Center Content: Centers the image within the frame without resizing.
- Fine-Tuning: Use the
Direct Selection Tool(A) or double-click the image to activate the brown image box. You can then reposition and resize the image content within the shape frame until the composition is perfect. - Adding a Stroke: For an enhanced Visual Design, you can add a colored outline (stroke) to your shape frame. With the frame selected, adjust the
Strokeweight and color in thePropertiespanel.
This method opens up numerous Creative Ideas for presenting your Photography and images, moving beyond standard rectangular layouts.
Crafting Custom Shapes with the Pen Tool or Pathfinder
For more complex or unique shapes, InDesign provides advanced tools like the Pen Tool and Pathfinder panel.
- Using the Pen Tool:
- Select the
Pen Tool(P) and draw any freeform path on your document. - Once your path is complete, select it with the
Selection Tool(V). - Go to
Object > Content > Graphic. This converts your custom path into a graphic frame. - With the graphic frame selected, use
File > Placeto insert your image. - Adjust fitting and content as described above.
- Select the
- Using the Pathfinder Panel (for existing frames):
- Select an existing image frame (the blue box).
- If not visible, open the
Pathfinderpanel by going toWindow > Object & Layout > Pathfinder. - In the
Pathfinderpanel, under theConvert Shapesection, you’ll find various predefined shapes (e.g.,Triangle,Ellipse,Rounded Rectangle). Click on one to instantly transform your selected frame into that shape, cropping the image accordingly. This is a quick way to change a rectangular image into a triangle, for instance, adding dynamic elements to your Graphic Design.
Transforming Text into Image Frames for Creative Crops
One of InDesign’s most visually striking features is the ability to crop an image into the shape of text, creating unique Digital Art and Creative Ideas for headings, logos, or artistic elements.
- Type Your Text: Select the
Type Tool(T) and type your desired text directly onto your document. Choose a bold font for better visual impact. - Create Outlines: With the text selected (using the Type Tool or Selection Tool), go to
Type > Create Outlines. This converts your editable text into vector shapes. - Make Compound Path (for multiple letters): If your text consists of multiple letters, they will become individual shapes. To ensure the image treats them as a single frame, select all the outlined letters (with the
Selection Tool) and go toObject > Paths > Make Compound Path. This combines them into one coherent frame. - Place the Image: With the new text-shaped frame selected, go to
File > Placeand choose your image. The image will now appear cropped within the contours of your text. - Adjust Content: Double-click the image within the text frame to activate the brown image box. You can then resize and reposition the image content to achieve the desired effect, using the fitting options as needed.
This method allows for highly customized and integrated Visual Design elements, where the image and text become one unified graphic. For those looking for diverse and visually rich Backgrounds or Abstract imagery to fill these text frames, Tophinhanhdep.com offers extensive collections.
InDesign’s Cropping Limitations: When to Seek Specialized Tools
While InDesign is a powerhouse for layout design and offers remarkable flexibility for non-destructive cropping, it’s essential to acknowledge its inherent limitations as a dedicated image editor. Understanding these boundaries helps designers make informed decisions about when to use InDesign’s native features and when to leverage specialized Image Tools available on platforms like Tophinhanhdep.com.
- Not a True Destructive Crop: As reiterated, InDesign’s “cropping” is essentially masking. The underlying pixels of the image remain untouched. If you need to physically trim pixels to reduce the overall file size of an image, optimize loading times for web Backgrounds, or comply with strict resolution requirements, InDesign won’t do it. You’ll need external software (like Photoshop) or an online image editor that performs destructive cropping.
- No Batch Cropping Functionality: InDesign is designed for individual object manipulation within a layout. It lacks native functionality to crop multiple images simultaneously, which can be a significant time sink for projects involving numerous photographs, such as Thematic Collections or Mood Boards. Imagine needing to crop 50 images to a consistent aspect ratio; manually doing this one by one in InDesign would be incredibly inefficient.
- Steep Learning Curve for Simple Tasks: For a user who simply needs to quickly crop an image to a standard ratio or a specific pixel dimension without the complexities of layout design, InDesign can feel overly cumbersome. Its comprehensive interface and specific workflow for frames and content can be intimidating and time-consuming for basic image tasks.
- Requires Other Software for Detailed Image Editing: InDesign is not built for pixel-level image adjustments, color correction, advanced retouching, or complex Photo Manipulation. If your image requires anything beyond basic cropping, fitting, or geometric shaping, you’ll inevitably need to round-trip to Photoshop or a similar editor. This often means preparing your Beautiful Photography or Sad/Emotional imagery in another tool first.
- Export Considerations: When you export a PDF or other file from InDesign, the full resolution of the original image (including the “cropped” but hidden parts) is often embedded unless specific compression and downsampling settings are applied during export. This can lead to larger file sizes than necessary if not managed carefully.
For situations where these limitations become bottlenecks—especially for quick edits, batch processing, or when precise destructive cropping and optimization are needed before the image even enters a layout—Tophinhanhdep.com’s robust suite of Image Tools offers powerful and user-friendly solutions.
The Best Way to Crop Images: InDesign vs. Tophinhanhdep.com’s Image Tools
Deciding whether to crop an image directly in InDesign or to use an external tool largely depends on your specific needs, workflow, and the nature of your project. Both approaches have their distinct advantages, and often, a combination of both yields the most efficient results, especially when aiming for professional High Resolution outputs or curated Image Inspiration & Collections.
When to Crop in InDesign:
- Layout-Specific Composition: When the crop is an integral part of your overall Visual Design and needs to be adjusted in context with other elements like text and graphics. InDesign’s non-destructive nature is perfect for this, allowing you to fine-tune the composition on the fly within the layout itself.
- Non-Destructive Experimentation: If you need to experiment with different cropping ratios or shapes (like cropping to text or complex paths) without permanently altering the original Photography. This is ideal for Creative Ideas and iterations.
- Vector-Based Cropping: When cropping to specific vector shapes, be it basic geometric forms or intricate paths drawn with the Pen Tool, InDesign provides precise vector-based masking.
- Print and Publishing Workflows: For print-ready documents, where linked files and non-destructive editing simplify revisions and ensure high-quality output.
When to Crop Outside InDesign with Tophinhanhdep.com’s Image Tools:
For many common image preparation tasks, especially those independent of a complex layout, Tophinhanhdep.com’s dedicated Image Tools offer a streamlined and efficient alternative.
- Quick, Standard Crops: If you simply need to crop an image to a standard aspect ratio (e.g., 16:9 for a header, 1:1 for social media Backgrounds, or 4:3 for a general Image) or specific pixel dimensions, Tophinhanhdep.com’s online image cropper provides an intuitive interface that’s faster than navigating InDesign’s multi-step process for a single, straightforward crop.
- Batch Cropping: This is where specialized tools truly shine. Tophinhanhdep.com allows you to upload multiple images and apply the same crop settings (or even different settings per image) to all of them at once. This saves immense time when preparing a gallery of Wallpapers or a large set of Stock Photos.
- Destructive Cropping and Optimization: When you need to physically remove pixels to reduce file size, improve website load times, or meet specific platform requirements for images. Tophinhanhdep.com’s Compressors and Optimizers work hand-in-hand with cropping to deliver web-ready or mobile-friendly assets.
- Pre-Processing for Quality: Before bringing images into InDesign, you might need to enhance them. Tophinhanhdep.com offers AI Upscalers to improve resolution, ensuring your High Resolution images look crisp even after scaling, or tools for adjusting Editing Styles before they reach your layout.
- User-Friendliness for Beginners: For users who aren’t familiar with complex design software, an online image tool offers a much lower barrier to entry for basic tasks like cropping, resizing, and converting.
Example Workflow with Tophinhanhdep.com:
Imagine you have a collection of Beautiful Photography that needs to be cropped to a consistent 3:2 aspect ratio, optimized for web, and then placed into an InDesign brochure.
- Batch Crop and Optimize: Go to Tophinhanhdep.com’s online image cropper. Upload all your images. Select the 3:2 aspect ratio preset. Apply it to all images, making quick adjustments as needed. Then, use the image optimizer tool to reduce file size without compromising quality.
- Place in InDesign: Download your optimized, pre-cropped images. Now, in InDesign, use
File > Placeto import these perfectly prepared images. Since they are already cropped to the correct dimensions and optimized, placing them into your layout will be much faster and more efficient. You can then use InDesign’s powerful layout features to arrange and style them, confident in their underlying quality.
This integrated approach combines the efficiency of Tophinhanhdep.com’s specialized Image Tools for initial preparation with InDesign’s unparalleled layout and Visual Design capabilities, giving you the best of both worlds.
Conclusion: Crafting Perfect Visuals with InDesign and Tophinhanhdep.com
Mastering image cropping in Adobe InDesign is an indispensable skill for any designer working with professional layouts. Its unique frame-based, non-destructive approach offers incredible flexibility for composing visually rich and dynamic documents. From basic rectangular crops using the Selection Tool to intricate shape-based or text-based masks, InDesign empowers you to refine your Graphic Design and Digital Art projects with precision and creative freedom. Remember, the frame is your window, and the image is the view—you have the power to reshape that window and reposition the view anytime without ever harming your original Beautiful Photography.
However, for tasks that fall outside the realm of layout composition—such as quick, consistent batch cropping, destructive image optimization for file size, or advanced image enhancement—specialized Image Tools often provide a more efficient and user-friendly solution. This is where Tophinhanhdep.com becomes your invaluable partner. With its comprehensive suite of resources, including online image croppers, Image Converters, Compressors, Optimizers, and AI Upscalers, Tophinhanhdep.com allows you to pre-process your High Resolution Photography, Wallpapers, Backgrounds, or Stock Photos with ease and speed. Furthermore, our extensive collections of Photo Ideas, Mood Boards, and Thematic Collections serve as a boundless source of Image Inspiration for your next Creative Ideas.
By understanding the strengths of both InDesign’s layout-centric cropping and Tophinhanhdep.com’s dedicated image processing tools, you can establish a highly efficient workflow that ensures your visual content is always perfectly prepared, beautifully presented, and optimized for any platform. Embrace these powerful tools to elevate your Visual Design projects to new heights.