How to Crop an Image in Photoshop: A Comprehensive Guide to Mastering Your Visuals

In the vast realm of digital imagery, where every pixel contributes to the overall narrative, few tools are as fundamental and transformative as the humble crop tool. Whether you’re a seasoned professional photographer or an aspiring graphic designer, understanding how to crop an image effectively in Adobe Photoshop is an indispensable skill. It’s not merely about trimming unwanted edges; it’s about refining composition, emphasizing subjects, conforming to specific dimensions for print or web, and ultimately, telling a more compelling visual story.
On Tophinhanhdep.com, we understand the power of a perfectly framed image. From stunning Wallpapers and captivating Backgrounds to sophisticated Aesthetic compositions, breathtaking Nature scenes, or profound Abstract art, the right crop can elevate any photograph. This guide, drawing on the extensive expertise in Photography and Visual Design shared across Tophinhanhdep.com, will walk you through every facet of cropping in Photoshop. We’ll cover everything from basic canvas-wide cropping to advanced, non-destructive techniques for individual layers, ensuring your High-Resolution images are always presented at their best. We’ll even touch upon how cropping integrates with other Image Tools like optimizers and AI upscalers, forming a complete workflow for your Digital Photography and Photo Manipulation endeavors.
Beyond the technical steps, we’ll explore the ‘why’ behind different cropping choices, offering Image Inspiration & Collections that can help you develop your eye for composition and adapt to Trending Styles. Get ready to transform your images, making them sharper, more impactful, and perfectly suited for any platform.
Mastering the Photoshop Crop Tool: Essential Techniques for Every Image
The Crop Tool in Photoshop is your primary instrument for reshaping and refining the overall canvas of your image. While seemingly straightforward, it harbors a wealth of options and functionalities crucial for precise control over your visual output. This section will delve into its various capabilities, ensuring you can tackle any cropping challenge that comes your way.
Getting Started with the Crop Tool
Your journey begins with selecting the Crop Tool itself. This versatile tool is designed for modifying the boundaries of your entire image, affecting all layers simultaneously.
Selecting the Crop Tool: To activate the Crop Tool, navigate to the toolbar on the left side of your Photoshop interface. It’s typically represented by an icon that resembles two overlapping right angles, forming a square. Alternatively, and more efficiently, you can use the keyboard shortcut by simply pressing the C key. Once selected, Photoshop will automatically place a cropping border around your image, often recalling the settings from your last use. This border, along with the Crop Tool Options Bar at the top of the screen, signals that you’re ready to reshape your image.
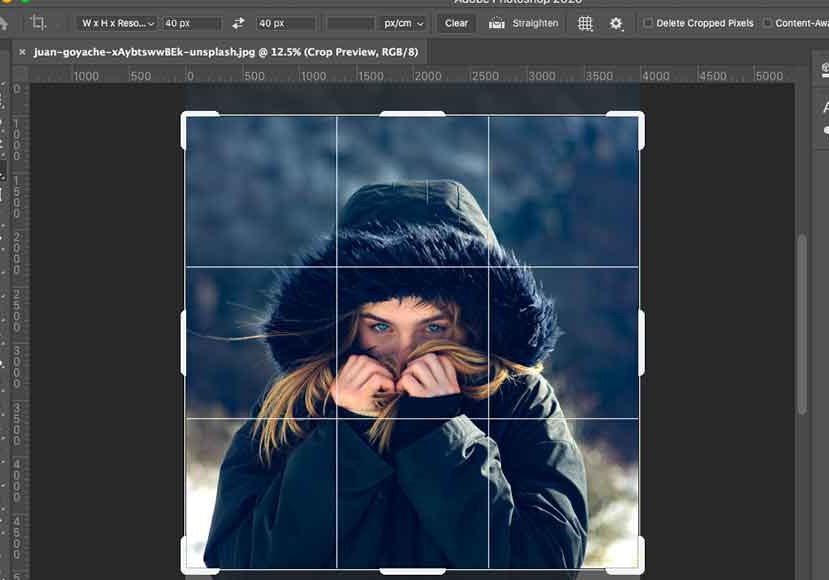
Understanding the Cropping Border and Handles: The cropping border is a dynamic frame that appears around your image. It features “handles” – small squares or lines – located on the top, bottom, left, and right sides, as well as at each of the four corners. These handles are your primary interface for manipulating the crop area.
- Reshaping: Click and drag any of these handles to freely resize the cropping border. The area enclosed within the border is what will be kept, while the faded, semi-transparent area outside will be cropped away.
- Repositioning: To reposition the image within the crop border, simply click and drag anywhere inside the border. The border itself will remain stationary, allowing you to fine-tune the subject’s placement.
Resetting the Crop Tool and Border: Often, when you activate the Crop Tool, Photoshop remembers your previous settings, such as a specific aspect ratio or custom dimensions. This can be inconvenient if you want to start fresh.
- Resetting Tool Settings: To clear the previous settings in the Options Bar, right-click (Windows) or Control-click (Mac) on the Crop Tool icon in the Options Bar itself (not the toolbar). From the dropdown menu, choose “Reset Tool.” This will revert the aspect ratio to “Ratio” and clear any custom width/height values.
- Resetting the Crop Border: Even after resetting the tool settings, the cropping border might retain its previous size. To reset the border to encompass the entire image, select any other tool from the toolbar (like the Move Tool), and then reselect the Crop Tool (by pressing ‘C’). The border will now snap to the full dimensions of your canvas, ready for a new crop.
Drawing Your Own Crop Border: Instead of adjusting an existing border, you can also draw a new one from scratch. Click and drag your cursor anywhere on the image. As you drag, a new cropping border will form, allowing you to define your desired crop area instantly. Once drawn, you can still use the handles to refine its size and position. This is particularly useful for quickly defining a custom crop area, an essential technique for achieving those perfect Aesthetic shots or focusing on key elements in Beautiful Photography.
Modifier Keys for Enhanced Control: To achieve more precise and constrained crops, Photoshop offers several modifier keys:
- Locking Aspect Ratio (Shift Key): To maintain the original aspect ratio of your image (or the currently set ratio in the Options Bar) while resizing, press and hold the Shift key as you drag any of the corner handles. This prevents distortion and is vital for maintaining proportionality for Stock Photos or specific Image Inspiration & Collections.
- Resizing from Center (Alt/Option Key): To resize the crop border symmetrically from its center point, press and hold the Alt (Windows) or Option (Mac) key as you drag any handle. This allows for balanced adjustments from the middle outwards.
- Combining Modifiers (Shift + Alt/Option): For the ultimate control, hold both Shift and Alt (Windows) or Option (Mac) while dragging a corner handle. This will lock the aspect ratio and resize the crop border from its center, perfect for meticulous adjustments in Digital Photography editing.
Cropping to Specific Dimensions and Aspect Ratios
Beyond freeform cropping, Photoshop’s Crop Tool allows you to define exact dimensions and aspect ratios, a critical requirement for various outputs, from Wallpapers to professional prints.
Choosing Preset Aspect Ratios: The Options Bar features an “Aspect Ratio” dropdown menu, offering a selection of common presets:
- 1:1 (Square): Ideal for social media posts or specific Visual Design layouts.
- 4:5 or 8:10: Standard for portrait photography prints.
- 3:2 or 4:6: Common for Digital Photography sensor ratios and landscape prints.
- 16:9: Perfect for widescreen displays or video backgrounds. Selecting a preset instantly snaps the crop border to that ratio, ensuring consistency for your Thematic Collections.
Entering Custom Aspect Ratios: If a preset doesn’t meet your needs, you can enter custom values directly into the “Width” and “Height” fields in the Options Bar. For instance, if you require an 11x14 ratio for a gallery print, simply type “14” into the width field and “11” into the height field. Photoshop will then constrain your crop border to these proportions, making it easy to prepare images for specific Image Inspiration & Collections on Tophinhanhdep.com.
Swapping Crop Orientation: A small “swap” icon (two opposing arrows) between the Width and Height fields allows you to quickly switch between portrait and landscape orientations for your chosen ratio. This is incredibly handy for quickly adapting an image from a vertical Background to a horizontal Wallpaper without re-entering values.
Saving Custom Crop Presets: For frequently used custom ratios (e.g., specific dimensions for blog posts or client deliverables), you can save them as presets. After entering your custom width and height, click the “Aspect Ratio” dropdown and select “New Crop Preset.” Give it a descriptive name (e.g., “11x14 Landscape”), and it will appear in your list for future use, streamlining your Editing Styles and workflow on Tophinhanhdep.com.
Cropping to Specific Print Sizes and Resolution (W x H x Resolution): For professional printing, simply specifying an aspect ratio isn’t enough; you often need exact physical dimensions and a target resolution.
- Select W x H x Resolution: From the “Aspect Ratio” dropdown, choose “W x H x Resolution.”
- Enter Dimensions: Type in your desired width and height, followed by their units (e.g., “14 in” for 14 inches, or “30 cm”).
- Specify Resolution: Crucially, enter your desired resolution, typically “300 px/inch” (pixels per inch) for high-quality prints, or “72 px/inch” for web use. Photoshop will then adjust the crop border and, upon committing the crop, will resample the image to meet these precise specifications. This ensures your High-Resolution images are perfectly prepared for any print requirement, preventing quality loss that could arise from incorrect scaling. When significantly increasing pixel dimensions, it’s generally advised to use Photoshop’s Image Size function with specific interpolation methods for optimal quality, rather than relying solely on the Crop Tool’s resampling. For smaller outputs, the Crop Tool performs excellently. This level of precision is fundamental for anyone involved in Digital Photography or creating professional Stock Photos.
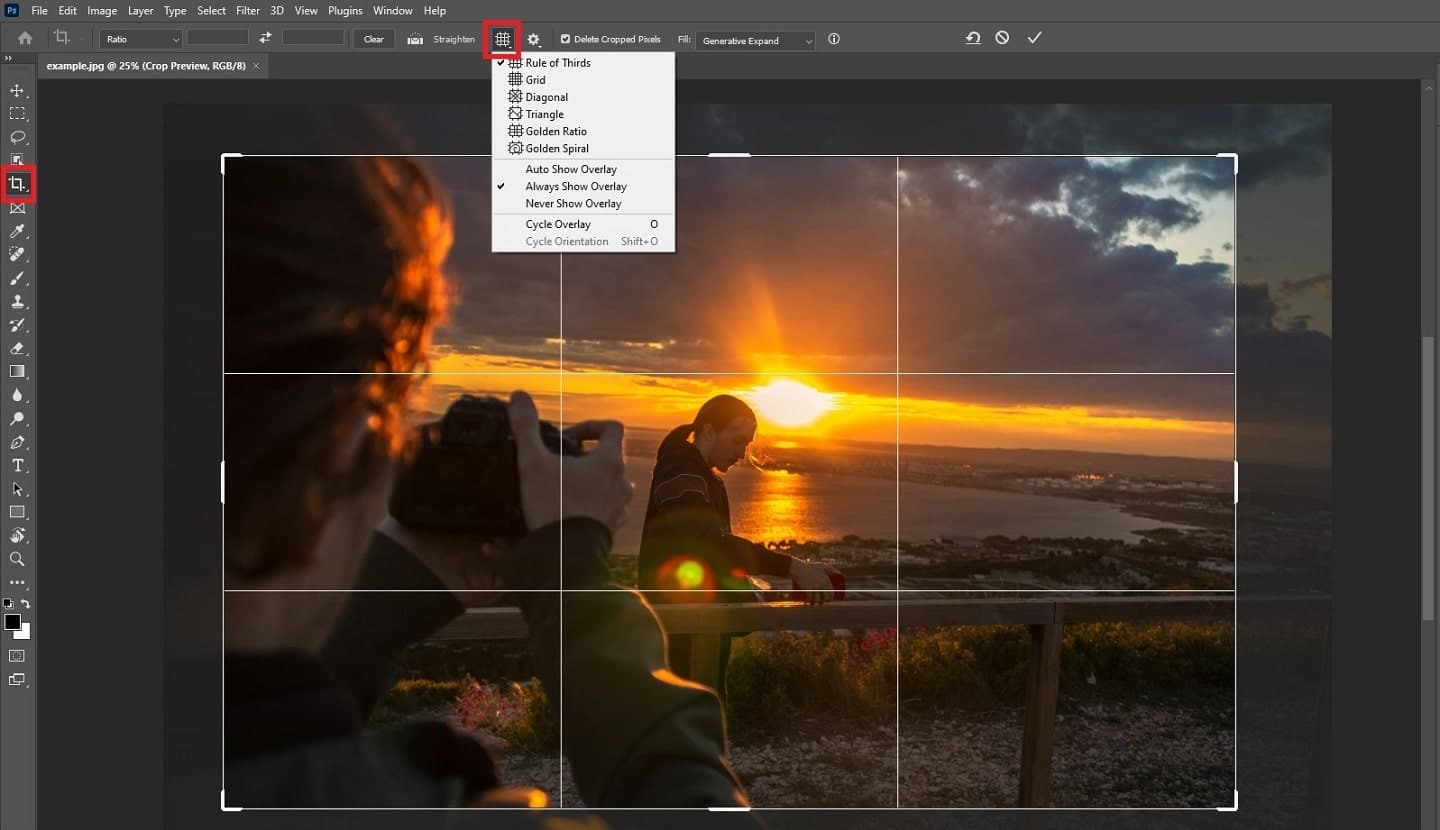
Enhancing Composition with Crop Overlays
The Crop Tool isn’t just for resizing; it’s a powerful compositional aid. Photoshop provides various overlay grids to help you achieve balanced and dynamic layouts.
Choosing a Different Overlay: When the Crop Tool is active, a default 3x3 grid (Rule of Thirds) often appears. To change this, click the “Overlay” icon (a small grid thumbnail) in the Options Bar. A dropdown menu will offer several compositional guides:
- Rule of Thirds: Divides the image into nine equal sections. Placing subjects at the intersections or along the lines often creates a more engaging composition. This is a classic Photography principle, frequently employed in Nature and Beautiful Photography.
- Golden Ratio (Phi Grid): Similar to the Rule of Thirds but based on the ancient Golden Ratio, leading to intersection points slightly closer to the center, often resulting in a more natural and aesthetically pleasing balance.
- Golden Spiral: A dynamic spiral that guides the viewer’s eye through the image, excellent for leading lines or emphasizing a single focal point in Abstract or Aesthetic visuals.
- Triangle & Diagonal: These overlays provide angular guides for strong, dynamic compositions, particularly useful for action shots or modern Visual Design.
Cycling Through and Flipping Overlays: You can quickly cycle through these overlays by pressing the O key on your keyboard. For certain symmetrical overlays like Triangle and Golden Spiral, you can rotate their orientation by pressing Shift+O, allowing you to adapt the guide to your image’s specific compositional needs. These overlays are invaluable for Photo Ideas and creating visually harmonious Mood Boards on Tophinhanhdep.com.
Straightening Crooked Images
A slightly tilted horizon or a misaligned architectural element can detract from an otherwise great photograph. The Crop Tool includes a handy Straighten Tool to correct these imperfections effortlessly.
Selecting the Straighten Tool: With the Crop Tool active, look for the “Straighten” icon (a small level) in the Options Bar. Click it to activate this feature. Alternatively, you can often hold Ctrl (Windows) or Cmd (Mac) while the Crop Tool is active to temporarily switch to the Straighten Tool.
How to Use the Straighten Tool:
- Identify a Straight Line: Find an element in your image that should be perfectly horizontal or vertical (e.g., a horizon, building edge, or flagpole).
- Draw the Line: Click and drag your mouse along this element. As you drag, Photoshop will draw a temporary line, using it to calculate the exact angle needed for correction.
- Automatic Correction: Release the mouse button, and Photoshop will automatically rotate the entire canvas to straighten the image according to your drawn line. It will also adjust the crop border to exclude any transparent areas created by the rotation in the corners.
- Refine Crop: After straightening, you can further adjust the crop border using the handles, just as you would with any normal crop, to fine-tune the composition.
Committing the Crop: Once you’re satisfied with your crop and any straightening adjustments, there are several ways to apply it:
- Click the checkmark icon in the Options Bar.
- Press Enter (Windows) or Return (Mac) on your keyboard.
- Double-click anywhere inside the cropping border.
This feature is a lifesaver for Photography enthusiasts, ensuring your Nature landscapes or Beautiful Photography always have a perfectly level horizon.
Non-Destructive Cropping: Preserving Your Pixels
One of the most powerful features of Photoshop’s Crop Tool is its ability to perform non-destructive cropping. This means you can adjust your crop at any time, even after saving and reopening the file, without losing a single pixel of your original image. This is a cornerstone of professional Digital Photography and Photo Manipulation.
The “Delete Cropped Pixels” Option: By default, the “Delete Cropped Pixels” checkbox in the Options Bar is usually active. When checked, committing a crop permanently removes all pixels outside the defined border. If you later try to expand your crop, Photoshop will fill the new area with your background color (often white) because the original pixels are gone. This is a destructive workflow and can limit future editing flexibility.
Turning Off “Delete Cropped Pixels” for Non-Destructive Editing: To enable non-destructive cropping, simply uncheck the “Delete Cropped Pixels” option in the Options Bar before committing your crop.
Benefits of Non-Destructive Cropping:
- Reversibility: You can re-enter the Crop Tool at any time, expand the crop border, and all your original pixels will reappear, ready for a new composition. This provides immense freedom to experiment with different Editing Styles and ratios for your Mood Boards.
- Repositioning After Crop: Even after committing a non-destructive crop, you can select the Move Tool and drag the image around within the cropped area. Photoshop simply reveals more of the hidden pixels, allowing for subtle compositional tweaks without re-cropping.
- “Reveal All” Command: To instantly restore the entire original image after a non-destructive crop, go to Image > Reveal All. This command expands the canvas to its full original dimensions, revealing all previously hidden pixels.
- Content-Aware Expansion: If you expand the canvas beyond the original image boundaries while “Delete Cropped Pixels” is unchecked, Photoshop will fill the transparent areas. For a more intelligent fill, you can check the “Content-Aware” option in the Options Bar. This uses Adobe’s AI technology to generate content that seamlessly blends with your existing image. While powerful for simple backgrounds, it can sometimes produce “sub-optimal” results in complex areas, so use with caution. This feature, along with AI Upscalers, represents the cutting edge of Image Tools for creatives on Tophinhanhdep.com.
Classic Mode: For users accustomed to older versions of Photoshop, the Crop Tool’s behavior changed significantly around CC 2019. If you prefer the original way where the crop box rotated around the image (instead of the image rotating within a static crop box), you can enable “Classic Mode” from the gear icon within the Crop Tool options in the Options Bar. This reverts to the previous functionality, catering to diverse Editing Styles and preferences.
Precision Cropping: Isolating and Refining Individual Layers
While the primary Crop Tool (the one we’ve just explored) is perfect for canvas-wide adjustments, it crops all layers of your project simultaneously. What if you’re working on a complex Photo Manipulation or Digital Art project with multiple layers, and only want to crop a single element or image on one specific layer without affecting the rest? This is where alternative, layer-specific cropping methods become indispensable. Tophinhanhdep.com advocates for efficiency and precision, and these techniques embody both.
The Rectangular Marquee Tool for Destructive Layer Cropping
This method is quick and straightforward but comes with a significant caveat: it is destructive, meaning the pixels outside your selected area will be permanently deleted. Use it when you are certain about your crop and don’t foresee needing to restore those pixels later.
Step-by-Step Process:
- Select the Target Layer: In the Layers panel, click on the layer thumbnail of the image you wish to crop. Ensure it is highlighted, indicating it’s the active layer.
- Choose the Rectangular Marquee Tool: From the toolbar on the left, select the Rectangular Marquee Tool (shortcut M).
- Define the Area to Keep: Click and drag with the Marquee Tool to draw a selection outline around the specific portion of the image on your active layer that you want to preserve. Everything outside this selection will be cropped away.
- Refine the Selection (Optional - Transform Selection): If your initial selection isn’t perfect, go to Select > Transform Selection. This will place transform handles around your marquee selection, allowing you to resize or reshape it precisely. Remember to unlink the width and height in the Options Bar if you need to adjust proportions freely. Click the checkmark in the Options Bar or press Enter/Return to commit the transformation.
- Invert the Selection: At this point, the area you want to keep is selected. To crop, you need to select everything outside this area. Go to Select > Inverse (or use the shortcut Shift+Ctrl+I on Windows, Shift+Cmd+I on Mac). You’ll see marching ants around the edges of your canvas and your original selection, indicating the inverse area is now active.
- Delete the Unwanted Pixels: With the inverse area selected, press the Delete key on your keyboard. The pixels outside your initial desired area will disappear, replaced by transparency.
- Deselect: Finally, go to Select > Deselect (or Ctrl+D / Cmd+D) to remove the marching ants selection outline.
Working with Smart Objects: If the layer you’re trying to crop is a Smart Object, Photoshop will issue a warning that Smart Objects cannot be directly modified. To proceed with this destructive method, you’ll first need to “rasterize” the layer. Right-click on the Smart Object layer in the Layers panel and choose “Rasterize Layer.” Be aware that rasterizing converts the Smart Object into a standard pixel layer, removing its non-destructive properties. This is a key consideration for Visual Design projects where flexibility is paramount.
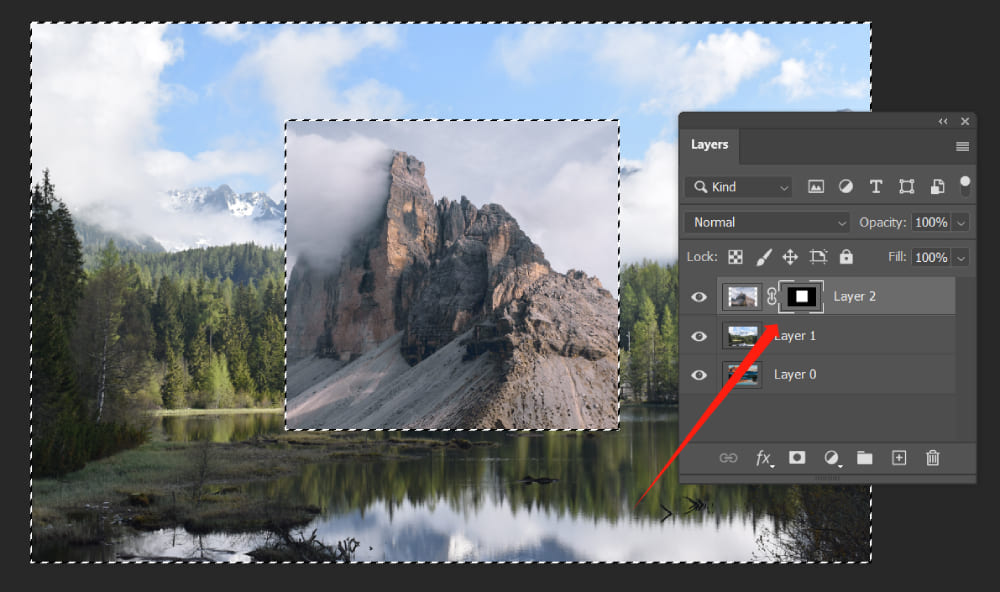
Non-Destructive Layer Cropping with Layer Masks
For unparalleled flexibility and control, using a Layer Mask is the preferred non-destructive method for “cropping” individual layers. Technically, it’s not cropping but hiding parts of a layer, achieving the same visual effect while allowing you to revert or refine your choices at any time. This is a core technique in advanced Photo Manipulation and developing intricate Creative Ideas.
Step-by-Step Process:
- Select the Target Layer: In the Layers panel, ensure the layer you want to “crop” is active.
- Define the Visible Area (Using Selection Tools): Use any selection tool (e.g., Rectangular Marquee Tool, Elliptical Marquee Tool, Lasso Tool, or even the Pen Tool for complex shapes) to draw an outline around the part of the layer you want to remain visible. For example, to crop a person out of a Stock Photo for a Graphic Design project, select just the person.
- Add a Layer Mask: With your selection active, click the “Add Layer Mask” icon at the bottom of the Layers panel. It looks like a rectangle with a circle inside.
- Photoshop will automatically create a layer mask thumbnail next to your layer thumbnail. The area you selected will appear white on the mask (visible), and everything outside your selection will be black (hidden). This effectively “crops” the layer non-destructively.
- This is invaluable for Digital Art compositions where elements need to be perfectly integrated.
Understanding and Manipulating the Layer Mask:
- Mask Thumbnail: The layer mask thumbnail visually represents what’s visible (white) and what’s hidden (black) on your layer. Gray areas indicate partial transparency.
- Toggling the Mask: To temporarily disable/enable the layer mask (and reveal/hide the full layer content), hold down the Shift key and click on the layer mask thumbnail.
- Viewing the Mask on Canvas: To see the layer mask itself displayed on the main canvas (often as a black and white overlay), hold Alt (Windows) or Option (Mac) and click on the layer mask thumbnail. Click again to return to the normal image view.
- Editing the Mask with Brushes: You can refine your “crop” by painting directly on the layer mask using the Brush Tool.
- Select the mask thumbnail (ensure it has a white border around it).
- Set your foreground color to black to hide more of the layer.
- Set your foreground color to white to reveal more of the layer.
- Use varying brush sizes and opacities to fine-tune your edges.
Resizing the “Cropped” Area (Mask Transformation): If you need to resize the masked area (effectively resizing your crop), you can do so independently of the layer content:
- Unlink Mask from Layer: In the Layers panel, click the chain-link icon between the layer thumbnail and the mask thumbnail. This “unlinks” them, allowing independent transformation.
- Select the Mask Thumbnail: Ensure the mask thumbnail is selected (white border).
- Free Transform the Mask: Go to Edit > Free Transform (or Ctrl+T / Cmd+T). Transform handles will appear around the masked area.
- Resize the Mask: Drag the handles to resize the mask. Hold Shift to maintain proportions, or Alt/Option to resize from the center. Click the checkmark or press Enter/Return to apply.
- Relink Mask: For moving the layer and its mask together, remember to click the empty space between the thumbnails in the Layers panel to re-establish the link.
Practical Application: Moving and Adding Effects: Once cropped with a layer mask, the layer behaves as if it’s been cut to size. You can then select the Move Tool (shortcut V) and drag the “cropped” image to any position on your canvas. Furthermore, you can add non-destructive layer effects like strokes, drop shadows, or bevels, enhancing your Visual Design without altering the underlying pixels. This makes layer masks indispensable for Graphic Design and creating professional Image Inspiration & Collections on Tophinhanhdep.com.
Streamlining Layer Cropping with the Frame Tool
Photoshop’s Frame Tool (introduced in CC 2019) offers an even simpler and highly visual way to non-destructively crop layers, especially for rectangular or elliptical shapes. It’s a fantastic addition for quick Photo Manipulation tasks.
Step-by-Step Process:
- Select the Frame Tool: Locate the Frame Tool in the toolbar (it looks like a rectangle with a cross or diagonal lines inside, shortcut K). You can choose between a rectangular or elliptical frame from the Options Bar.
- Draw the Frame: Click and drag on your canvas to draw a frame where you want your image to appear. This frame acts as a placeholder for your image.
- Place the Image:
- If you already have an image on a layer, drag that layer from the Layers panel directly onto the newly created frame on the canvas. The image will automatically clip itself within the frame.
- If you’re starting with a blank frame, you can drag an image file from your desktop or a folder directly onto the frame.
- Adjusting the Image Within the Frame:
- To reposition the image inside the frame, click on the image (not the frame border) and drag it.
- To resize the image inside the frame, click on the image to select it within the frame, and then use Ctrl+T (Windows) or Cmd+T (Mac) for Free Transform. Drag the handles to resize.
- Adjusting the Frame Itself:
- To reposition the frame itself, click on the frame border and drag it.
- To resize the frame itself, click on the frame border to select it, and then drag its corner or side handles. This will redefine the “cropped” area.
- Applying the Crop: The Frame Tool is inherently non-destructive. The image is simply clipped by the frame, and its original pixels remain intact. You can continue to adjust both the frame and the image within it as needed.
The Frame Tool simplifies the process of creating visually engaging layouts, perfect for showcasing Images as Wallpapers or in Mood Boards. It’s an intuitive Image Tool that seamlessly integrates into various Editing Styles and Visual Design workflows.
Elevating Your Visuals: Cropping in the Broader Creative Context
Beyond the technical mechanics, understanding how cropping integrates with the larger ecosystem of digital imagery is paramount for artists and photographers alike. On Tophinhanhdep.com, we recognize that cropping is not an isolated action but a foundational step in creating compelling visuals.
Cropping for Enhanced Visual Design and Image Inspiration
Cropping is a powerful component of Visual Design. It dictates focus, balance, and flow, transforming raw Photography into polished Digital Art.
- Graphic Design & Photo Manipulation: In Graphic Design, cropping precisely shapes elements for logos, advertisements, and web layouts. For Photo Manipulation, it isolates subjects from their backgrounds, preparing them for new composite scenes or integrating them into Thematic Collections.
- Creative Ideas: Experimenting with unconventional crops can spark Creative Ideas. A tight crop on a small detail can evoke mystery, while an extreme wide crop can convey vastness. Consider how cropping affects the narrative for Sad/Emotional or Beautiful Photography.
- Mood Boards & Trending Styles: When compiling Mood Boards, cropping helps distill the essence of reference images, isolating key textures, colors, or compositional elements. Staying abreast of Trending Styles often means adapting your crops—think minimalist compositions or dynamic off-center subjects—to keep your Images fresh and relevant.
Cropping as an Integral Part of Your Photography Workflow
For any Digital Photography enthusiast, cropping is a non-negotiable step in the post-processing workflow, whether for High-Resolution output or quick shares.
- High-Resolution & Stock Photos: For High-Resolution images, cropping maintains pixel integrity, ensuring clarity even after refining composition. For Stock Photos, precise cropping is critical to meet platform-specific aspect ratios and quality guidelines, ensuring your images are optimized for commercial use.
- Editing Styles: Cropping is itself an Editing Style. Some photographers favor tight, intimate crops, while others prefer more expansive, environmental shots. How you crop reflects your artistic vision and helps define your signature look, making your Wallpapers and Backgrounds instantly recognizable.
Cropping’s Synergy with Advanced Image Tools
The cropped image is rarely the final stop; it’s often the starting point for further enhancements using various Image Tools.
- Converters, Compressors, Optimizers: After cropping, images are often fed into Converters (e.g., JPEG to PNG), Compressors (to reduce file size for web without visible quality loss), or Optimizers (for faster loading times on websites). A well-cropped image before these steps will yield better results.
- AI Upscalers: For images intended for very large prints or screens, an AI Upscaler can intelligently increase resolution post-crop, regenerating detail that might otherwise be lost. A clean, well-composed image from cropping provides an ideal foundation for AI algorithms to work their magic.
- Image-to-Text Tools: In scenarios where images are being prepared for documentation or archival, a focused crop can improve the accuracy of Image-to-Text (OCR) tools by eliminating distracting background elements, ensuring only relevant information is processed.
Conclusion: Crafting Perfection, Pixel by Pixel
Mastering the art and science of cropping in Adobe Photoshop is an empowering skill for anyone passionate about visual content. From using the versatile Crop Tool to reshape an entire canvas to employing layer masks or the Frame Tool for precise, non-destructive adjustments on individual layers, Photoshop offers an unparalleled array of options. These techniques are not just about removal but about revelation—bringing focus, balance, and intention to every pixel.
On Tophinhanhdep.com, we celebrate the transformative power of expertly crafted Images. By diligently applying the principles discussed in this guide, you can dramatically enhance your Photography, imbue your Visual Design with greater impact, and confidently prepare your High-Resolution Stock Photos for any application. Remember to embrace non-destructive workflows, allowing for endless experimentation with Editing Styles and compositional choices for your Mood Boards and Thematic Collections.
Whether you’re curating stunning Wallpapers, designing captivating Backgrounds, or creating intricate Digital Art, the precision gained through mastering Photoshop’s cropping capabilities will elevate your work to new heights. We encourage you to continue exploring the wealth of guides and Image Inspiration & Collections available on Tophinhanhdep.com to further hone your skills and unlock your full creative potential. Don’t have Photoshop yet? Download the latest version of Adobe Photoshop and start your free 7-day trial today to embark on your journey of visual mastery!