Mastering Image Cropping in Preview on Mac: Enhance Your Visuals with Tophinhanhdep.com

In the vast and ever-evolving world of digital imagery, the ability to effectively manipulate and refine your photos is paramount. Whether you’re a professional photographer, a graphic designer, or simply someone who loves sharing beautiful images, understanding fundamental editing techniques is crucial. Among these, cropping stands out as one of the most essential and impactful. Cropping isn’t just about cutting away unwanted edges; it’s a powerful compositional tool that allows you to transform an ordinary snapshot into a compelling visual narrative. It helps improve the balance and harmony of a photo, emphasizes the core focus of an image, and allows you to remove distracting elements that detract from the main subject.

While a plethora of sophisticated, third-party image editing software exists for Mac users, many are unaware that a highly capable and entirely free tool is already bundled with every macOS installation: the Preview app. Often underestimated, Preview offers robust functionality for viewing and annotating images and PDFs, including a surprisingly versatile set of editing tools. This comprehensive guide, brought to you by Tophinhanhdep.com, will walk you through the simple yet powerful process of cropping images using Preview on your Mac, ensuring your photos are perfectly framed for any purpose, from high-resolution photography to stunning wallpapers and thematic collections.

The Art and Science of Cropping: Why It Matters for Your Images
Cropping is far more than just trimming an image; it’s a strategic decision that fundamentally alters how a viewer perceives your visual content. On Tophinhanhdep.com, we understand that every pixel counts when it comes to showcasing Beautiful Photography, crafting the perfect Wallpapers or Backgrounds, or conveying specific Aesthetic or Emotional tones. Here’s why mastering this simple technique is vital:
- Improving Composition: The “rule of thirds” is a classic photography principle, suggesting that placing key elements along grid lines or at their intersections creates a more engaging and balanced composition. Cropping allows you to reframe your image to adhere to such principles, even if the original shot wasn’t perfectly composed.
- Emphasizing the Subject: Sometimes, a photograph captures a beautiful subject but is surrounded by distracting elements. Cropping lets you zoom in on what truly matters, eliminating visual clutter and drawing the viewer’s eye directly to your intended focal point. This is particularly useful for Nature or Abstract photography, where intricate details often get lost in a wider frame.
- Changing Aspect Ratios: Different platforms and uses require different image dimensions. A social media post might need a square crop, while a widescreen monitor demands a 16:9 ratio for a Wallpaper. Cropping with Preview enables you to adapt your images precisely to these needs, ensuring they look their best wherever they are displayed.
- Enhancing Visual Impact: By eliminating unnecessary space, cropping can create a more dramatic or intimate feel. It can turn a distant landscape into a close-up of a striking rock formation, or shift the focus of a busy street scene to a solitary figure. This selective emphasis is key in creating compelling Digital Photography and Visual Design.
Understanding the “why” behind cropping empowers you to use it not just as a corrective measure, but as a deliberate creative choice that aligns with your Creative Ideas and Editing Styles.
Navigating Preview: Your Native Mac Cropping Tool
Before diving into the steps, it’s worth noting that Preview is an incredibly efficient application. Its speed and low resource usage make it an ideal choice for quick edits, often outperforming heavier software like Photoshop or Pixelmator for straightforward tasks. This section, presented by Tophinhanhdep.com, will guide you through the process of cropping an image using Preview, ensuring you can quickly prepare your images for anything from Stock Photos to Photo Manipulation.
Step-by-Step Guide to Basic Cropping
Cropping an image in Preview is a remarkably simple process that can be completed in just a few clicks. Follow these steps:
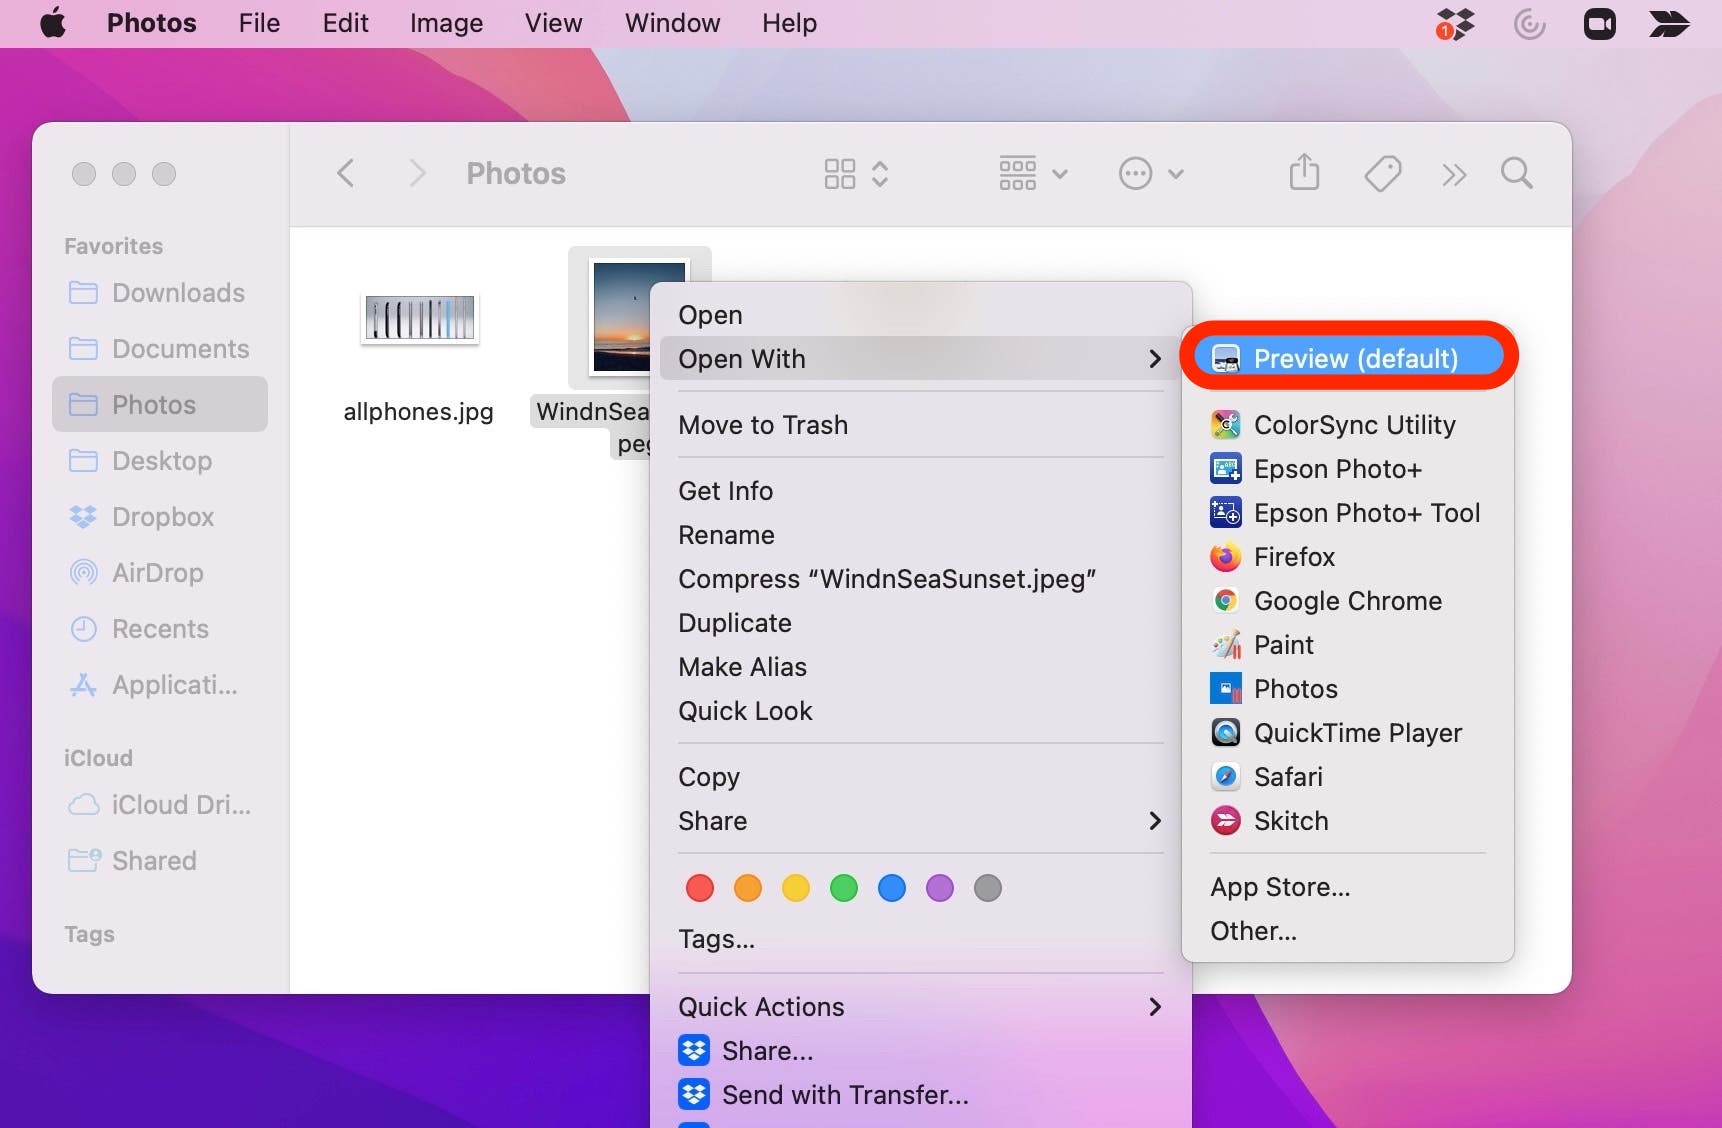
- Open Your Image in Preview: Locate the image file you wish to crop in your Finder. Double-clicking on it will typically open it directly in the Preview app, as it is the default image viewer for macOS. If you have another application set as your default, simply right-click (or Control-click) on the image, select “Open With,” and then choose “Preview.”
- Access the Markup Toolbar: Once your image is open, you’ll need to reveal Preview’s editing tools. Look for the “Show Markup Toolbar” button. This icon usually resembles a small toolbox or a pencil, and is located on the right side of the main toolbar at the top of the Preview window. Click it to expand the editing options.
- Select the Rectangular Selection Tool: Within the now-visible Markup Toolbar, find the “Selection Tool” icon. This is typically the leftmost button in the editing toolbar and often defaults to the “Rectangular Selection” mode. If it’s not already set, click on the small down arrow next to it and choose “Rectangular Selection” from the dropdown menu. This is your primary tool for defining the area you want to keep.
- Draw Your Desired Crop Region: With the Rectangular Selection tool active, click and drag your mouse across the image. A translucent rectangular box will appear, highlighting the portion of the picture you wish to retain. As you drag, you’ll see the selected area. You can adjust the size and position of this box by clicking and dragging its edges or corners until you’ve framed your image exactly as you want it.
- Perform the Crop: Once your selection box is perfectly placed, you have two ways to execute the crop:
- Keyboard Shortcut: The fastest method is to press
Command + Kon your keyboard. - Menu Option: Alternatively, go to the “Tools” menu in the menu bar at the top of your screen and select “Crop.” Upon choosing either option, the image will instantly be trimmed down to the area you defined within your selection box.
- Keyboard Shortcut: The fastest method is to press
- Save Your Cropped Image: After cropping, it’s crucial to save your changes. Go to the “File” menu and choose “Save” or “Save As…”
- “Save” (Command + S): This will overwrite the original image file with the cropped version. Be cautious with this option if you want to keep the original uncropped photo.
- “Save As…” (Option + Shift + Command + S): This allows you to save the cropped image as a new file, under a different name or in a different location, preserving your original. For any image destined for Tophinhanhdep.com, we highly recommend using “Save As” to maintain your source files.
And just like that, you have a perfectly cropped image! This straightforward process makes Preview an indispensable tool for anyone managing their Images on a Mac.
Speeding Up Your Workflow with Keyboard Shortcuts
For those who frequently crop images, memorizing a few keyboard shortcuts can dramatically accelerate your workflow, allowing you to prepare images for Tophinhanhdep.com even faster.
- Open Image: Select the image in Finder and press
Command + Oto open it in Preview (assuming Preview is your default viewer). - Select Area: The rectangular selection tool is often active by default. Simply click and drag to define your crop area.
- Crop: Press
Command + Kto immediately apply the crop. - Save: Press
Command + Sto save your changes (orOption + Shift + Command + Sfor “Save As”).
This sequence allows you to open, crop, and save an image in mere seconds, making it incredibly efficient for bulk adjustments or refining quick Photo Ideas.
Beyond Rectangles: Creative Cropping and Image Optimization
While rectangular crops are the most common, Preview’s capabilities extend further, offering tools to unleash more Creative Ideas in your Visual Design. Furthermore, considering the broader ecosystem of Image Tools is essential for truly optimized visuals on platforms like Tophinhanhdep.com.
Exploring Diverse Cropping Shapes for Creative Visuals
Preview isn’t limited to just straight-edged rectangular crops. The Selection Tool offers additional options that can add a unique flair to your Digital Art and Photo Manipulation:
- Elliptical Selection: This allows you to create circular or oval crops. Imagine framing a portrait within a perfect circle or highlighting a curved element in a Nature photo. After selecting “Elliptical Selection” from the dropdown, draw your oval. Then, like with the rectangle, hit
Command + Kor “Tools > Crop.” - Lasso Selection: For completely freehand, irregular shapes, the Lasso tool is your go-to. Click on it, then draw around the exact contours of the object or area you wish to keep. This is fantastic for isolating subjects for complex Photo Manipulation or creating abstract shapes that challenge traditional framing.
- Smart Lasso: An even more advanced version of the Lasso, Smart Lasso attempts to detect the edges of an object as you trace roughly around it. This can save significant time when dealing with clearly defined subjects and is a powerful feature for quick background removal or isolating elements for Graphic Design.
These varied selection tools provide immense flexibility, allowing you to move beyond conventional framing and infuse your Tophinhanhdep.com submissions with distinctive Editing Styles.
Maintaining Image Quality and Resolution: A Tophinhanhdep.com Perspective
Cropping, by its very nature, reduces the total number of pixels in an image. This has direct implications for its High Resolution and suitability for various uses. When preparing images for Tophinhanhdep.com, keep the following in mind:
- Impact on Resolution: Aggressive cropping can significantly reduce an image’s pixel dimensions, potentially making it unsuitable for printing large formats or for use as high-resolution Wallpapers. Always start with the highest resolution image available.
- Non-Destructive Editing (with caution): Preview, by default, applies changes directly to the file when you “Save.” To preserve the original image and experiment with different crops, always use “File > Save As…” or
Command + Dto duplicate the image before you start editing. macOS’s built-in versioning can also help revert changes, but creating a distinct copy is often safer. - Resizing vs. Cropping: While cropping indirectly changes image dimensions, it’s distinct from resizing. Resizing scales the entire image up or down. Preview also offers a “Tools > Adjust Size” option for this. Remember to keep “Scale proportionally” selected to avoid distortion.
- AI Upscalers as a Companion Tool: If you’ve had to crop an image very tightly and find its resolution has dropped below what’s acceptable for a High Resolution output, consider using AI Upscalers. These advanced Image Tools can intelligently increase the resolution of your cropped image, adding detail where it was lost. Tophinhanhdep.com encourages exploring such tools to maintain quality across your Image Inspiration & Collections.
By being mindful of resolution and utilizing Preview’s options effectively, you can ensure your cropped images remain crisp and vibrant, perfect for any application on Tophinhanhdep.com.
Cropping for Impact: Elevating Your Tophinhanhdep.com Image Collections
The purpose of cropping often goes hand-in-hand with how and where the image will be used. For a platform like Tophinhanhdep.com, which specializes in diverse visual content, intelligent cropping is crucial for making your images shine in various categories.
Crafting Perfect Wallpapers and Backgrounds
Wallpapers and backgrounds demand specific aspect ratios to look good across different devices—be it a desktop monitor, a laptop, or a mobile phone. Cropping in Preview allows you to precisely tailor your images to these needs.
- Desktop Wallpapers: These often require 16:9 or 16:10 aspect ratios. You can select your desired area, then refine the selection box while holding
Shiftto maintain a specific proportion if you’re precise, or use the “Adjust Size” option after cropping to fine-tune dimensions. - Mobile Backgrounds: Vertical orientation (e.g., 9:16) is key here. Crop your Nature, Abstract, or Aesthetic shots to highlight vertical elements and ensure they fit without awkward scaling.
- Thematic Collections: If you’re building Thematic Collections like “Ocean Waves” or “Forest Serenity,” consistent cropping can help unify the visual style of your collection. This attention to detail elevates the user experience on Tophinhanhdep.com, offering cohesive and professional-looking sets of images.
Refining Aesthetic and Thematic Images
For content that aims to evoke a particular Aesthetic or convey a Sad/Emotional message, cropping plays a huge role in setting the mood.
- Minimalist Aesthetic: Cropping can remove busy backgrounds, leaving only the essential elements and creating a clean, focused image that aligns with a minimalist style.
- Emotional Focus: In Sad/Emotional photography, cropping can draw the viewer’s attention to a specific gesture, facial expression, or symbolic object, intensifying the emotional impact.
- Creative Ideas & Mood Boards: When curating Mood Boards or exploring new Photo Ideas, cropping allows you to extract specific details or compositions from existing images to inspire new creations, without being tied to the original frame.
By thoughtfully applying cropping techniques, you transform raw photos into curated pieces that perfectly fit your vision and the diverse categories on Tophinhanhdep.com.
Beyond Cropping: Leveraging Tophinhanhdep.com’s Full Suite of Image Tools
Cropping is often just the first step in a more extensive image refinement process. Once your image is perfectly framed, Tophinhanhdep.com offers a broader perspective on how other Image Tools can further enhance your visuals and streamline your workflow.
- Compressors and Optimizers: After cropping a High Resolution image, you might find the file size is still too large for web use or quick sharing. Tools like Compressors and Optimizers are essential for reducing file size without significant loss of visual quality. This ensures your images load quickly and efficiently on Tophinhanhdep.com, improving user experience.
- Converters: You may need to change an image’s format after cropping, for instance, converting a TIFF to a JPEG or a PNG to a WebP. Converters facilitate these format transformations, ensuring compatibility across different platforms and uses.
- AI Upscalers (Revisited): As previously mentioned, if a necessary crop leaves you with a lower-resolution image, AI Upscalers can become invaluable. They use artificial intelligence to intelligently reconstruct and enhance image detail, bringing back lost clarity and making smaller crops suitable for larger displays or prints, thus ensuring your Digital Photography maintains its pristine quality.
- Image-to-Text Tools: For designers or content creators working with images that contain text, Image-to-Text tools (OCR) can extract editable text, making it easier to integrate visual information into Graphic Design projects or documentation.
By understanding how cropping fits into this larger ecosystem of Image Tools, you gain a holistic approach to image management and enhancement. Tophinhanhdep.com is your resource for exploring how each tool can contribute to creating, optimizing, and utilizing your visual assets to their fullest potential.
Conclusion: Empowering Your Visual Journey with Preview and Tophinhanhdep.com
The Preview app on your Mac is more than just a viewer; it’s a powerful, readily available tool for essential image editing, with cropping at its core. Whether you’re perfecting a Beautiful Photography piece, adjusting an image for a Wallpaper, or creating custom shapes for Digital Art, Preview provides the straightforward functionality you need without the complexity or cost of professional software.
By mastering the simple steps outlined in this guide – from opening your image and activating the Markup Toolbar, to drawing precise selections and executing the crop with a quick Command + K – you unlock a fundamental skill that enhances your entire visual workflow. Remember the importance of saving your work (preferably as a new file to preserve your originals) and consider how different selection tools can add creativity to your designs.
In the broader context of Tophinhanhdep.com’s offerings, effective cropping is the first step towards creating truly impactful Image Collections and Mood Boards. It’s about refining your Photo Ideas and aligning your visuals with Trending Styles. And when combined with other essential Image Tools like compressors, converters, and AI upscalers, your ability to create, manage, and present stunning imagery becomes limitless.
So, next time you need to refine an image on your Mac, remember the understated power of Preview. It’s a testament to how even the most basic, built-in applications can be incredibly versatile, helping you curate and elevate your visual content for Tophinhanhdep.com and beyond. Explore, experiment, and let your creativity flourish with these accessible tools.