Mastering Image Cropping in Microsoft Word: A Comprehensive Guide by Tophinhanhdep.com

In today’s visually-driven world, the ability to effectively integrate and manipulate images within documents is no longer a niche skill but a fundamental requirement for professionals, students, and creatives alike. Microsoft Word, primarily known as a word processing powerhouse, surprisingly offers a robust suite of image editing capabilities, with cropping being one of the most frequently used and impactful. Cropping an image allows you to precisely frame your subject, remove distracting elements, refine composition, and adapt visuals to specific layouts, ultimately enhancing the professionalism and aesthetic appeal of your documents. Whether you’re assembling a critical business report, designing a compelling presentation, or crafting a personal project, understanding how to crop pictures efficiently in Word is invaluable.
At Tophinhanhdep.com, our dedication lies in providing a vast array of resources for all things visual—from stunning Wallpapers and Backgrounds that inspire, to insights into High Resolution Photography and advanced Digital Art techniques. We recognize that superior image quality extends beyond the initial capture or download; it involves careful curation and optimization, which often begins with the simple yet powerful act of cropping. This guide, brought to you by Tophinhanhdep.com, will delve deep into Word’s cropping functionalities, from basic adjustments to advanced techniques, ensuring your document visuals are always impactful and perfectly aligned with your design vision.
The Essentials of Cropping in Word: Basic Techniques for Visual Refinement
Effective image cropping is about more than just cutting off edges; it’s about making strategic decisions that improve your image’s focus and integration into your document. Microsoft Word provides intuitive tools that empower users to achieve precise results without needing external software.
Accessing and Understanding the Crop Tool
Before you can begin transforming your images, you need to know where to find Word’s cropping functionalities and how to interpret the visual cues it provides.
- Open Your Document: Start by opening the Microsoft Word document containing the image you wish to crop.
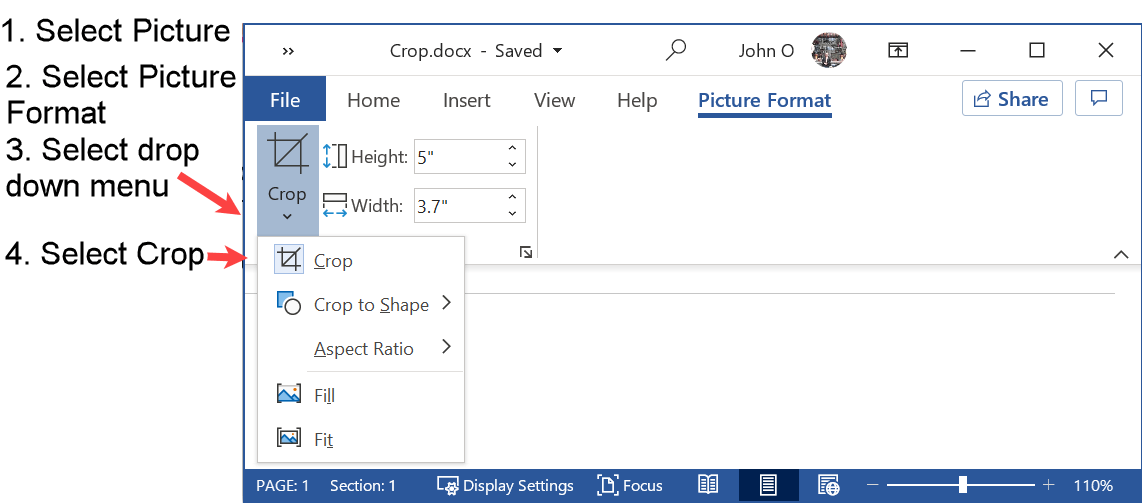
- Select the Picture: Click on the image you want to work with. This action is crucial as it activates a contextual tab in Word’s Ribbon interface, typically labeled “Picture Format” (or “Format” or “Picture Tools” in older versions).
- Navigate to the Crop Tool: With the “Picture Format” tab selected, locate the “Size” group on the far right of the Ribbon. Within this group, you’ll find the “Crop” button. Clicking this button directly activates the standard rectangular cropping mode. Alternatively, clicking the small down-arrow beneath “Crop” reveals a dropdown menu with more advanced cropping options, such as “Crop to Shape” and “Aspect Ratio.”
- Activate Cropping Mode: Once the Crop tool is active, black cropping handles will appear around the selected picture. These handles are your primary interface for adjusting the cropping area.

Understanding the Crop Handles: When you enter cropping mode, different types of handles appear, each serving a specific purpose:
- Horizontal Handles: Located midway on the top and bottom borders of the picture (represented by thick black lines or small squares). Dragging these inward or outward adjusts the width of the cropping area.
- Vertical Handles: Found midway on the left and right borders. Dragging these upward or downward adjusts the height of the cropping area.
- Corner Handles: Situated at each of the four corners (often as thick black L-shapes or small squares). Dragging a corner handle diagonally allows you to crop both the width and height simultaneously, maintaining the overall proportion of the cropped area if you hold down the Shift key (though by default, it crops freely).
- Rotation Handle: While not directly a cropping handle, a small circular arrow may appear above the picture. Dragging this allows you to rotate the picture before or during the cropping process, offering an additional layer of control over the final composition.
Understanding how these handles function is key to achieving precise control over your image dimensions and orientation.
Quick Recap: Key Steps to Activate Crop Mode
- Click the picture.
- Go to the “Picture Format” tab.
- Click “Crop” in the “Size” group.
- Black handles will appear, ready for adjustment.
Fundamental Cropping Actions for Cleaner Documents
Once you’re familiar with accessing the Crop tool and manipulating its handles, you can apply various basic techniques to refine your images.
-
Removing Unwanted Areas: This is the most common use of cropping. Activate the Crop mode, then click and drag any of the black handles inward. As you drag, a semi-transparent gray area will indicate the portions of the image that will be removed. Adjust the handles until only the desired part of the image remains visible. To apply the crop, simply click anywhere outside the picture or press the Enter key. This technique is excellent for eliminating distractions and drawing attention to the main subject.
-
Cropping with Precision: Changing Aspect Ratios: For more uniform and consistent visuals, especially when preparing images for a specific layout or comparing visuals on a Mood Board from Tophinhanhdep.com, adjusting the aspect ratio is crucial.
- Select your picture and activate the Crop mode.
- Click the small down-arrow beneath the “Crop” button in the “Picture Format” tab.
- Select “Aspect Ratio” from the dropdown menu. A submenu will appear with common ratios like 1:1 (square), 3:4, 4:3, 16:9, etc.
- Choose the desired aspect ratio. Word will immediately apply a cropping box conforming to that ratio. You can then drag the image within this fixed cropping box to select the exact area you want to keep.
- Press Enter or click outside the picture to apply. This ensures your images maintain consistent proportions throughout your document.
-
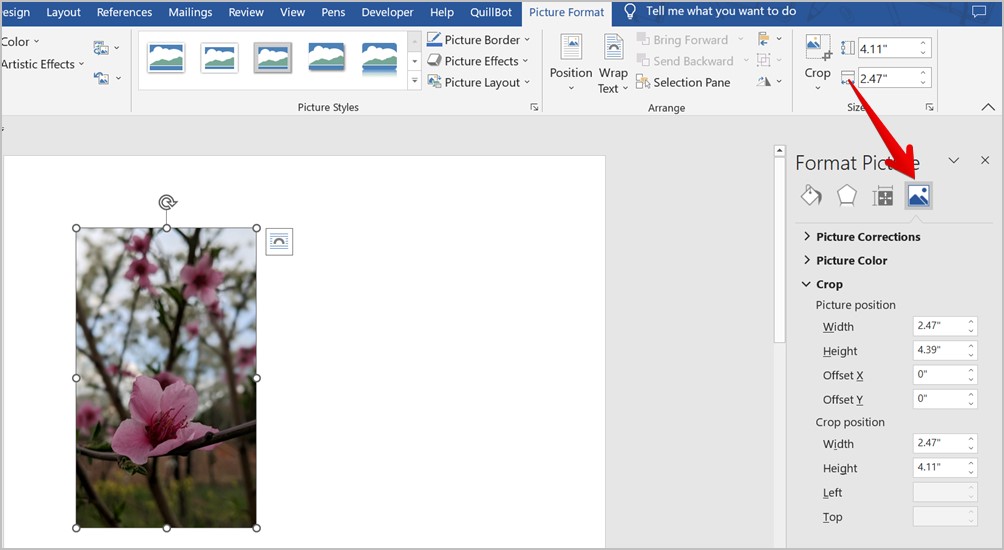
Cropping to Specific Dimensions: While Word doesn’t offer direct pixel-level input for cropping in the main Crop tool, you can achieve specific dimensions through the “Format Picture” sidebar.
- Right-click the image and select “Format Picture.”
- In the “Format Picture” sidebar that appears (usually on the right), click the “Picture” icon (the mountain with a sun).
- Expand the “Crop” section. Here, you can manually enter values for “Picture Position” (Offset X, Offset Y) and “Crop Position” (Width, Height). Experimenting with these values allows for precise numerical control over the cropped area. This can be particularly useful when precise measurements are needed for Visual Design projects.
-
Undoing a Crop: Rectifying Mistakes: Everyone makes mistakes, and Word has you covered.
- Immediately after cropping, you can press Ctrl+Z (Windows) or Cmd+Z (Mac) to undo the last action and revert the picture to its previous state.
- Alternatively, with the cropped picture selected, go to the “Picture Format” tab, click the small down-arrow under the “Crop” button, and select “Reset Picture.” This option fully restores the image to its original, uncropped state, proving useful even after saving the document (unless the cropped areas have been permanently deleted, as discussed later).
Elevating Your Visuals: Advanced Cropping and Image Manipulation in Word
Beyond the basic rectangular cuts, Microsoft Word offers more sophisticated cropping options that allow for creative expression and seamless integration of images into complex layouts. These advanced techniques, combined with Tophinhanhdep.com’s extensive collections of Aesthetic and Nature Images, can transform ordinary documents into visually stunning pieces of Digital Art.
Creative Cropping for Unique Visual Design
Sometimes, a standard rectangular crop isn’t enough to achieve the desired visual impact. Word’s advanced cropping features allow you to break free from traditional boundaries.
-
Cropping to Shapes (Circles, Triangles, Custom Shapes): This feature is incredibly versatile for creating distinctive visual elements.
- Select your picture and go to the “Picture Format” tab.
- Click the down-arrow under the “Crop” button and choose “Crop to Shape.”
- A gallery of predefined shapes will appear (rectangles, ovals, arrows, stars, callouts, etc.). Select the shape that best suits your design. Word will instantly reshape your picture to fit within the chosen contour.
- After applying a shape, you can still drag the picture inside the shape to adjust which part of the image is visible. You can also resize the shape itself using the sizing handles that appear around it.
-
Special Focus: How to Crop a Picture into a Perfect Circle: Creating a perfect circular image is a common design need, often used for profile pictures or iconographic elements.
- Insert your image into the Word document.
- Double-click the image to open the “Picture Format” tab.
- Click the down-arrow under “Crop,” then go to “Aspect Ratio” and select “1:1” (for a perfect square). Adjust the cropping area to frame the desired central part of your image, then press Enter. This ensures your starting point is a perfect square.
- With the now square image still selected, click the down-arrow under “Crop” again.
- Choose “Crop to Shape,” and then select the “Oval” shape. Since your image is already a perfect square, applying the oval shape will result in a perfect circle.
- You can then reposition the image within the circle or resize the circle itself. This step-by-step approach guarantees a symmetrical circular crop.
-
Alternative: Adding a Picture to a Shape Directly: For more control over the shape’s initial dimensions and placement, you can reverse the process.
- Go to the “Insert” tab and click “Shapes.”
- Select your desired shape (e.g., a circle, star, or custom shape).
- Draw the shape directly onto your document.
- With the shape selected, go to the “Shape Format” tab.
- Click “Shape Fill,” then select “Picture” from the dropdown.
- Browse and insert your chosen image. The image will automatically fill the boundaries of your drawn shape. This method is particularly useful when you need precise placement and sizing of the container shape before inserting the image.
-
Freeform Cropping for Dynamic Layouts: While “Crop to Shape” offers many options, the general “Crop” tool also allows for what could be considered freeform cropping by simply dragging the handles to any desired rectangular area. However, for genuinely custom, non-rectangular shapes, “Crop to Shape” with its extensive library is the primary method. These creative cropping techniques open up endless possibilities for Visual Design, enabling you to craft unique elements for your documents that captivate and inform.
Beyond Simple Trimming: Enhancing and Optimizing Images
Microsoft Word’s image tools extend beyond mere cropping, providing features to further refine and optimize your visuals, aligning with Tophinhanhdep.com’s focus on comprehensive Photography and Image Tools.
-
Removing Backgrounds (A Powerful Tool): For isolating subjects or creating clean overlays, Word’s “Remove Background” feature is surprisingly effective.
- Select the picture you want to edit.
- Go to the “Picture Format” tab and click “Remove Background” in the “Adjust” group.
- Word will automatically highlight areas it detects as background in magenta. You’ll then get tools to “Mark Areas to Keep” and “Mark Areas to Remove.” Use these drawing tools to refine the selection, guiding Word to precisely delineate the foreground from the background.
- Once satisfied, click “Keep Changes.” This transforms your image into a transparent background PNG, perfect for layering or integrating into complex Visual Design projects.
-
Adjusting Brightness, Contrast, and Color: To ensure your cropped images truly pop, Word provides basic color correction and enhancement tools:
- Select the image.
- In the “Picture Format” tab, within the “Adjust” group, you’ll find options for “Corrections” (sharpen/soften, brightness/contrast) and “Color” (color saturation, tone, recolor).
- Experiment with these sliders and presets to achieve the perfect visual balance, making your images more vibrant or subtle as needed to fit the overall document aesthetic.
-
Cropping Multiple Pictures at Once: Synchronizing Visual Elements: For documents featuring numerous images that need a consistent look, Word offers a valuable time-saver. While you can’t apply entirely different crops to multiple images simultaneously, you can apply the same aspect ratio or shape crop, and you can synchronize the cropping area adjustment for multiple selected images.
- Select all the pictures you want to crop. Hold down the Ctrl (Windows) or Cmd (Mac) key while clicking each image to select them individually.
- Go to the “Picture Format” tab and click the “Crop” button.
- Now, when you adjust the cropping handles, they will appear around each selected picture. When you adjust the handles of one picture, Word will often attempt to apply similar adjustments to the others, or at least show the cropping boxes on all.
- A more direct way to apply a consistent aspect ratio or shape to multiple images is to select all of them, then choose “Crop to Shape” or “Aspect Ratio.” The chosen property will be applied to all selected images simultaneously. This ensures visual uniformity across your “Image Collections” within the document, a key principle for effective visual communication.
-
Adding Margins: Outcropping for Aesthetic Spacing: Sometimes, you might want to extend the canvas around your image to create a border or provide more negative space, akin to framing a piece of Digital Art.
- Select your picture and activate the Crop mode.
- Instead of dragging the black handles inward, drag them outward past the original image boundaries.
- A white (or transparent, depending on the background) margin will be created around your image. This “outcropping” technique can add visual breathing room and a refined touch to your document layouts.
Optimizing Your Cropped Images: Best Practices and Tophinhanhdep.com Tools
After expertly cropping and enhancing your images within Word, the final steps involve optimizing them for document performance and potential reuse. This aligns perfectly with Tophinhanhdep.com’s mission to provide comprehensive Image Tools for all your visual content needs.
Saving and Managing Cropped Images Effectively
Cropping in Word initially only hides the unwanted parts of an image; it doesn’t delete them from the file. This means the original, larger image data is still embedded in your document, potentially increasing its file size.
-
The Importance of Deleting Cropped Areas: To reduce your Word document’s file size, which is especially important when dealing with many High Resolution Photography assets or sharing documents, you should permanently delete the cropped areas.
- Select the cropped picture.
- Go to the “Picture Format” tab.
- In the “Adjust” group, click “Compress Pictures.”
- In the dialog box, ensure “Delete cropped areas of pictures” is checked. You can choose to apply this to “Selected pictures only” or “All pictures in this document.” You can also adjust the target resolution, which further optimizes file size for various outputs (web, print, email).
- Click “OK.” After this action, the original, uncropped portions of the image are permanently removed. Be aware: once deleted, you cannot undo the crop to retrieve the original image.
-
Saving Cropped Images to Your PC: If you’ve created a perfectly cropped and optimized image in Word that you’d like to use elsewhere (perhaps as part of a Tophinhanhdep.com Mood Board or a custom Wallpaper), you can save it.
- First, perform the “Compress Pictures” step to delete cropped areas.
- Right-click the (now permanently cropped) image in Word.
- Select “Save as Picture.”
- Choose your desired file format (e.g., PNG for transparency, JPG for smaller file size) and save it to your computer. This allows you to export your refined images for use in other applications or on the web.
Tophinhanhdep.com’s Role in Your Image Workflow
While Microsoft Word offers commendable in-document image editing, Tophinhanhdep.com provides a suite of specialized Image Tools that can take your visuals to the next level, complementing Word’s capabilities.
-
Enhancing Beyond Word’s Scope: After achieving the perfect crop in Word, you might find that your image still benefits from additional processing. Tophinhanhdep.com’s Compressors can further reduce file sizes without noticeable quality loss, vital for website optimization or faster sharing. Our Optimizers apply advanced algorithms to improve image quality, while AI Upscalers can intelligently enlarge images that might have become slightly pixelated after cropping or resizing, maintaining clarity for high-resolution displays or print. Our Converters ensure your images are in the right format for any platform or use case, bridging the gap between basic editing and professional-grade output.
-
Connecting to Visual Design and Inspiration: The techniques learned for cropping in Word are foundational for any Visual Design endeavor. By meticulously cropping, you prepare images to become integral components of Graphic Design projects, compelling Digital Art, or curated Thematic Collections. Tophinhanhdep.com offers a wealth of Image Inspiration, from Abstract patterns to Beautiful Photography, providing endless ideas for your next project. Using Word’s cropping tools to extract specific elements from these images or to fit them perfectly into a document layout empowers you to create compelling visual narratives. Whether you’re assembling a professional report, a marketing brochure, or a personal photo album, mastering cropping is a key step in achieving polished, impactful results.
In conclusion, the ability to crop images effectively within Microsoft Word is a powerful and accessible skill that significantly elevates the quality of your documents. From basic rectangular trims to creative shape crops and background removal, Word provides a comprehensive set of tools for visual refinement. By applying these techniques and understanding how to optimize your images by deleting cropped areas, you can create professional, visually appealing documents that capture attention. Furthermore, by leveraging the specialized Image Tools and rich Image Inspiration available at Tophinhanhdep.com, you can seamlessly integrate your Word-edited visuals into a broader digital photography and visual design workflow, ensuring your images are always at their absolute best.