How to Crop an Image in Google Docs: A Comprehensive Guide to Enhancing Your Documents

In today’s digital landscape, visual communication is paramount. Whether you’re drafting a professional report, creating engaging educational materials, or simply compiling personal notes, integrating images can significantly elevate your content. Google Docs, a widely used and highly accessible word processor, provides an impressive array of tools to manage and manipulate images directly within your documents. Among these, the ability to crop images stands out as a fundamental skill, allowing you to refine compositions, remove distractions, and highlight key elements.
While Google Docs offers straightforward cropping for basic needs, it also includes more advanced options, such as shaping images into circles or other geometric forms, akin to more sophisticated photo manipulation software. This guide will delve into the various methods of cropping images in Google Docs, exploring both the standard rectangular crop and the creative possibilities of shape masking. We’ll also touch upon related image editing functionalities that can help you achieve professional-looking results without leaving your document. For those seeking high-quality imagery or advanced editing tools to complement their Google Docs projects, Tophinhanhdep.com offers an extensive collection of resources, from stunning wallpapers and backgrounds to powerful image converters and AI upscalers, ensuring your visual content always meets the highest standards.
Mastering Image Insertion in Google Docs
Before you can begin cropping or editing an image, you first need to get it into your Google Docs document. Google Docs provides several flexible ways to insert images, catering to different sources and user preferences. Understanding these methods is the first step towards seamlessly integrating visual elements into your text.
Diverse Ways to Add Images
Google Docs offers a variety of channels for importing images, ensuring you can quickly access visuals regardless of where they are stored.
- Drag and Drop from Your Computer: For local files, this is often the quickest method. Simply open your Google Docs document and your file explorer (Finder on Mac, File Explorer on Windows). Select the image file you wish to insert, then drag it directly into your Google Docs window. A blue vertical bar will appear, indicating the insertion point. Release your cursor, and the image will upload and appear precisely where you intended. This method is incredibly intuitive for adding images you already have on hand, perhaps a striking piece of Nature Photography or an Aesthetic Background you downloaded from Tophinhanhdep.com.
- Using the “Insert” Menu: This provides the most comprehensive set of options for image insertion:
- Upload from Computer: Navigate to
Insert > Image > Upload from computer. This opens a standard file browser, allowing you to locate and select an image from your device’s storage. This is ideal for incorporating High Resolution images from your personal Digital Photography collection or specific Wallpapers sourced from Tophinhanhdep.com. - Google Drive or Google Photos: For users deeply integrated into the Google ecosystem, these options are invaluable. Go to
Insert > Image > Google DriveorInsert > Image > Photos. You can then browse your cloud storage or photo library to select and insert images. This streamlines the process of adding Stock Photos or Thematic Collections you’ve organized in your Google accounts. - Camera: If your device has a webcam, you can capture a photo directly into your document via
Insert > Image > Camera. This is useful for quick snapshots or capturing physical documents. - By URL: If you have a direct link (URL) to an image hosted online, you can use
Insert > Image > By URL. Paste the image address, and Google Docs will embed the image. This is particularly handy if you’ve found a compelling Abstract or Beautiful Photography image on Tophinhanhdep.com and have its direct link. - Search the Web: Google Docs includes an integrated web search feature (
Insert > Image > Search the web). This opens a sidebar where you can search for images without leaving your document. While convenient, it’s important to be mindful of copyright. For royalty-free images and Image Inspiration, consider exploring the vast resources available on Tophinhanhdep.com, which specializes in providing diverse image collections for various Visual Design needs.
- Upload from Computer: Navigate to
Utilizing the Drawing Tool for Advanced Placement and Manipulation
For more precise control over image placement, the ability to crop into shapes, or to group multiple images, Google Docs’ Drawing tool is an indispensable feature. While the initial insertion might seem like an extra step, it unlocks a greater degree of Photo Manipulation and Creative Ideas.
To insert an image using the Drawing tool:
- Place your cursor where you want the image in your document.
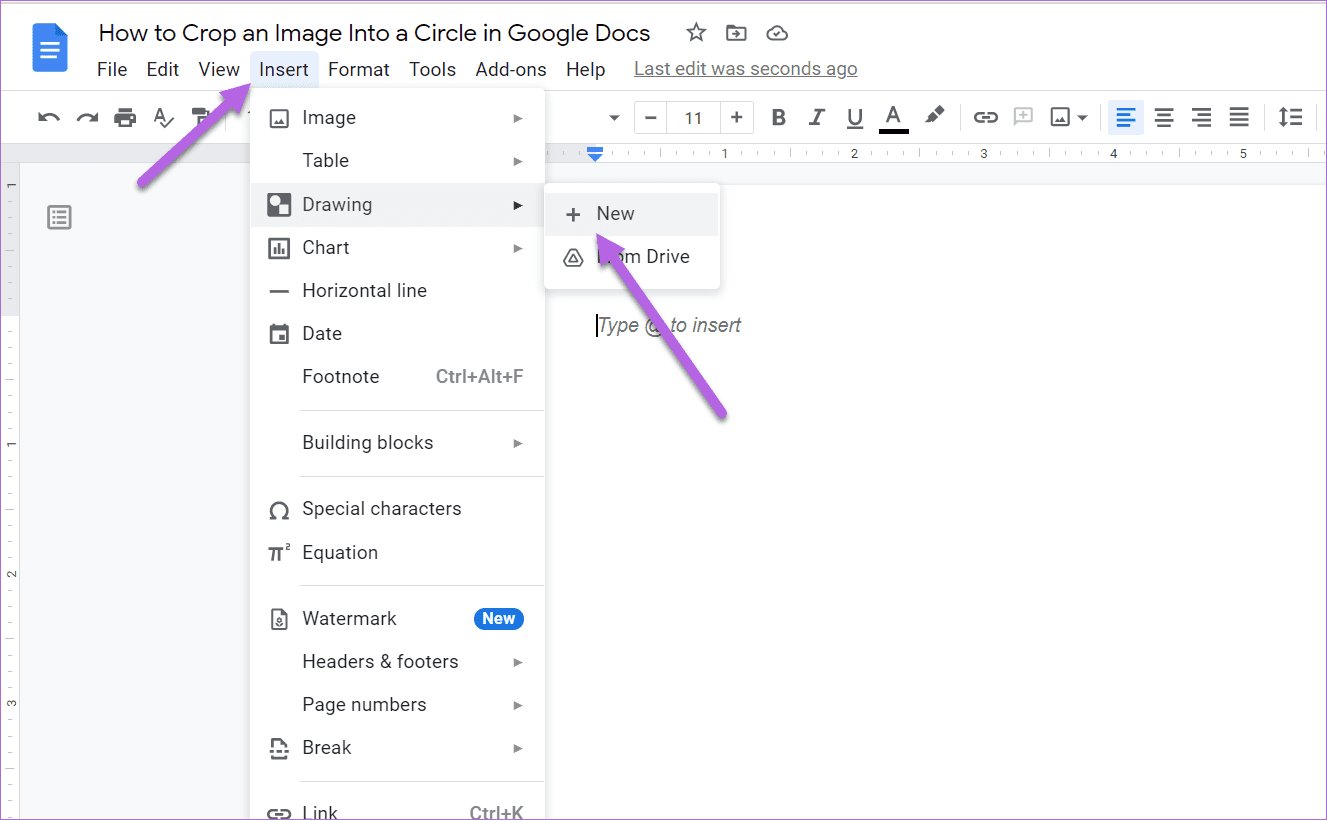
- Go to
Insert > Drawing > New. - In the new Drawing pop-up window, click on the “Image” icon (it looks like a mountain landscape).
- You’ll then have options to upload an image from your computer, Google Drive, or by URL, similar to the direct insert method.
Once your image is on the drawing canvas, it can be manipulated in ways not possible when inserted directly into the document. This is particularly important for advanced cropping and grouping, as we’ll explore next.
Essential Image Manipulation: Beyond Basic Cropping
Cropping an image is more than just trimming edges; it’s an art of framing, focusing, and enhancing the visual narrative. Google Docs offers robust cropping features that go beyond simple rectangular cuts, allowing for creative shaping and precise adjustments, all of which contribute to strong Visual Design.
Standard Rectangular Cropping
The most common form of cropping is the rectangular crop, used to remove unwanted parts of an image, adjust its aspect ratio, or simply improve its composition.
Steps for Standard Cropping:
- Select the Image: Click once on the image you wish to crop within your Google Docs document. Blue handles will appear around its perimeter, indicating it’s selected.
- Activate Crop Mode: In the toolbar that appears above the document, locate and click the “Crop image” icon (it typically looks like a square with two intersecting lines or a small ‘x’ through it). Alternatively, you can double-click the image to enter crop mode directly.
- Adjust Cropping Handles: Black, thick L-shaped handles will appear at the corners and midpoints of the image’s border. Click and drag these handles inwards to define the portion of the image you want to keep. The area outside these handles will be greyed out, indicating what will be removed.
- Apply the Crop: Once you’re satisfied with the cropped area, press the
EnterorReturnkey on your keyboard, or click the “Crop image” icon again in the toolbar. The image will now display only the selected portion.
This method is quick and efficient for streamlining your images, ensuring they fit within your document’s layout and focus on the most important details. For instance, if you have a Beautiful Photography shot with too much empty space, a quick crop can bring the subject to the forefront.
Creative Cropping with Shapes (Masking)
Beyond standard rectangular crops, Google Docs (specifically through its Drawing tool, which is accessible within Docs and is a core part of Google Slides) allows you to crop images into various predefined shapes. This feature, often referred to as “masking,” enables highly customized Visual Design and adds a unique flair to your documents.
Steps for Shape Cropping (Circle and Other Shapes):
- Insert Image via Drawing Tool: As mentioned previously, the most effective way to achieve shape cropping in Google Docs is by inserting your image using the
Insert > Drawing > Newmethod. - Select the Image in the Drawing Canvas: Once your image is on the Drawing canvas, click it to select it.
- Access Shape Crop Options: In the toolbar within the Drawing window, click the small downward-pointing arrow next to the “Crop image” icon. This will reveal a dropdown menu with various shape categories.
- Choose Your Shape:
- Select
Shapes, then pickCircle(orOval). - You can also explore other options like
Arrows,Callouts, orEquationshapes for truly unique designs.
- Select
- Adjust the Mask: After selecting a shape, your image will be immediately masked into that form. You’ll likely see square blue handles around the new shape. If the default crop isn’t an ideal circle (e.g., if you started with a rectangular image), drag these blue handles while holding the
Shiftkey to maintain a perfect aspect ratio and achieve a true circle. You can also reposition the image within the mask to select the best focal point. - Save and Close: Once you are happy with your shaped image, click the
Save and Closebutton. The image, now beautifully cropped into your chosen shape, will appear in your Google Docs document.
This feature is excellent for creating profile pictures, elegant design elements, or Creative Ideas that demand more than just a square frame. While the Google Docs mobile app has limitations for advanced shape cropping, utilizing external tools like those found on Tophinhanhdep.com for advanced masking can provide the flexibility needed, especially for intricate Digital Art or Photo Manipulation tasks before uploading.
Resizing and Aspect Ratios
After cropping, resizing is often the next step to ensure your image fits perfectly within your document’s layout.
Steps for Resizing:
- Select the Image: Click the image in your document. Blue square handles will appear at its corners and sides.
- Drag Handles: Click and drag any of the blue corner handles inwards or outwards to resize the image.
- Maintain Aspect Ratio: To prevent distortion (stretching or squashing), hold down the
Shiftkey while dragging a corner handle. This will maintain the image’s original proportions, ensuring your Beautiful Photography remains visually accurate.
You can also precisely set the size through Image options (right-click the image > Image options > Size & Rotation). This panel allows you to enter exact dimensions or scale percentages. For images that need to be significantly enlarged while retaining High Resolution, Tophinhanhdep.com offers AI Upscalers that can dramatically improve image quality before you even import them into Google Docs.
Enhancing Visuals: Borders, Text Wrapping, and Adjustments
Beyond just cropping and resizing, Google Docs provides several tools to further enhance the visual appeal and integration of your images within your document. These features are key to achieving a polished Visual Design that complements your text.
Adding Borders for Definition
A well-chosen border can make an image pop off the page, giving it a professional finish and helping it stand out from the surrounding text.
Steps to Add a Border:
- Select the Image: Click the image you wish to border.
- Access Border Options: Look for the border icons in the toolbar that appears. These typically include:
- Border Color: An icon resembling a pencil, allowing you to choose the color of your border. A subtle shade can frame a delicate Aesthetic image, while a bold hue might emphasize an Abstract piece.
- Border Weight: An icon showing a stack of horizontal lines, which lets you adjust the thickness (weight) of the border.
- Border Dash: An icon depicting varied horizontal lines, providing options for solid, dotted, or dashed border styles.
- Apply and Observe: Experiment with different combinations to see how they impact your document’s overall Graphic Design. A simple border can significantly enhance the presentation of any image, from a chart to a Sad/Emotional photograph.
Controlling Text Flow (Text Wrapping)
How text interacts with an image is crucial for readability and aesthetic appeal. Google Docs offers various text wrapping options to give you precise control over your layout.
Steps to Adjust Text Wrapping:
- Select the Image: Click the image.
- Choose a Wrapping Style: A floating toolbar will appear below the image with several icons representing text wrapping options:
- In line: The default setting, treating the image like a large character within the text flow. This can sometimes create awkward spacing.
- Wrap text: The text flows around the image, creating a clean, integrated look. This is often the most visually appealing option for general documents.
- Break text: The text flows above and below the image, with no text on its sides.
- Behind text: The image appears behind the text, allowing text to overlay it. This can be used for watermarks or subtle background effects, especially with Backgrounds or Wallpapers from Tophinhanhdep.com.
- In front of text: The image appears on top of the text, potentially obscuring it. Useful for standalone visual elements or overlays.
- Adjust Margins (for Wrap and Break): For
Wrap textandBreak textoptions, you’ll see additional controls to adjust the margin space between the image and the surrounding text. This fine-tuning is essential for maintaining a balanced Visual Design.
Proper text wrapping is key to creating professional-looking documents, ensuring that your images, whether they are Nature Photography or intricate Digital Art, enhance rather than disrupt the reading experience.
Color and Light Adjustments
Google Docs also includes basic image adjustment features, allowing you to fine-tune the appearance of your images for better integration and aesthetic consistency.
Steps for Adjustments:
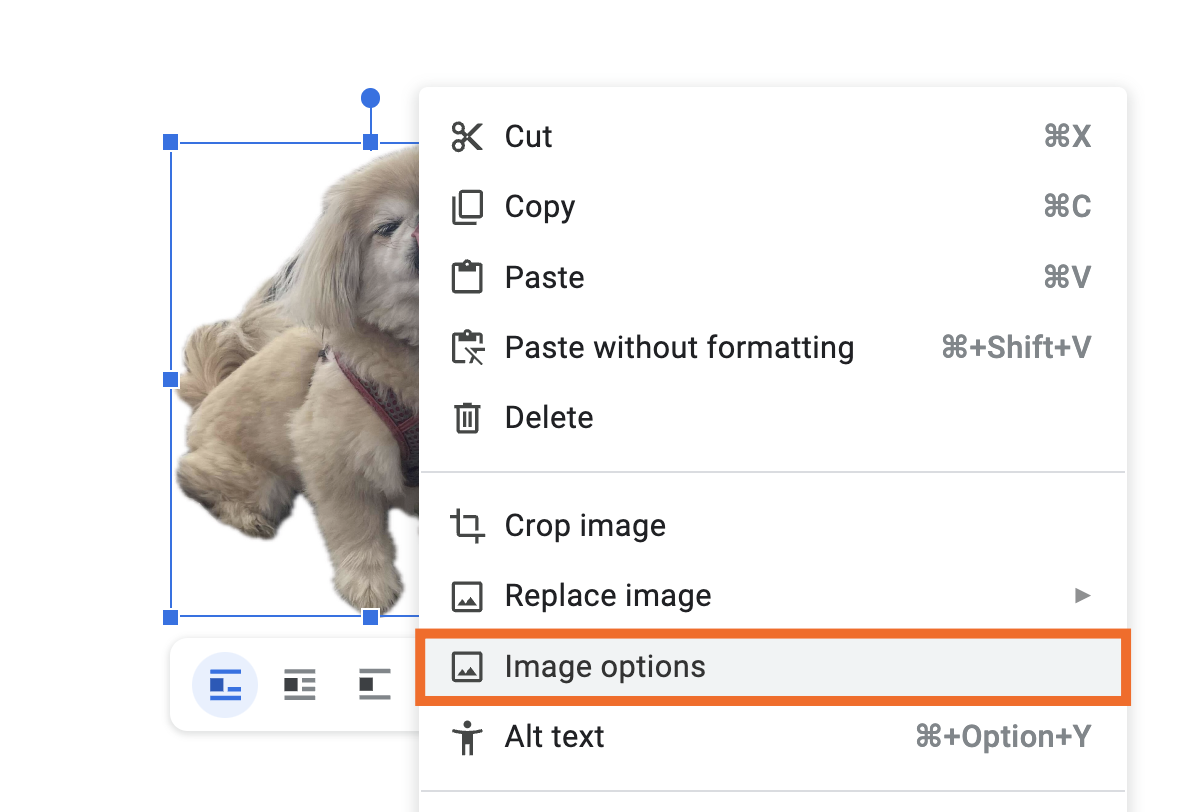
- Select the Image: Click the image.
- Open Image Options Panel: In the floating toolbar, click the three-dot icon, then select
All image options. Alternatively, right-click the image and selectImage options. A sidebar will open on the right. - Explore Adjustment Categories:
- Recolor: This option allows you to apply a color overlay or monochrome filter to your entire image. This can be used to match images to your document’s color scheme or to create a particular mood for Sad/Emotional content.
- Adjustments: Here, you can manually modify:
- Transparency: Makes the image more or less opaque, useful for layering or creating subtle background elements.
- Brightness: Lightens or darkens the image.
- Contrast: Adjusts the difference between the light and dark areas of an image.
- Alt Text: This crucial feature allows you to add descriptive text to your image, improving document accessibility for screen readers. While this alt text might not carry over when exporting to PDF, it’s a good practice for digital documents.
These adjustments are particularly useful for ensuring images, even those from diverse Image Collections like those found on Tophinhanhdep.com, appear cohesive within your document, aligning with your overall Editing Styles and Creative Ideas.
Advanced Image Management and Integration
While Google Docs offers a powerful suite of basic to intermediate image editing functions, sometimes your project demands more. Understanding how to manage images in more complex scenarios, and recognizing when to leverage external tools, is crucial for comprehensive Visual Design.
Grouping Images for Cohesion
For documents that incorporate multiple images that need to function as a single unit—perhaps a series of Photo Ideas arranged as a mini-collage or a Mood Board—the Drawing tool again proves invaluable. Grouping allows you to resize, move, and edit these images together, maintaining their relative positions and proportions.
Steps to Group Images:
- Insert Images via Drawing Tool: Begin by inserting all desired images into the Drawing canvas (
Insert > Drawing > New). - Arrange Images: Position the images on the canvas as you desire them to appear in your grouped formation.
- Select Multiple Images: Hold down the
Shiftkey and click on each image you want to group. A single continuous blue border will outline all selected images. - Group the Images: With all relevant images selected, click
Actionsin the Drawing toolbar, then selectGroup. - Edit as a Unit: Now, when you click any part of the grouped image, the entire group is selected. You can resize, rotate, or move the entire cluster as one object. If you need to edit an individual image within the group, click it again until only its individual border appears, then make your adjustments.
- Save and Close: Click
Save and Closeto insert your grouped image set into your Google Docs document.
This feature is essential for creating complex Graphic Design elements within Google Docs, allowing for dynamic and organized visual layouts.
Exporting and Reusing Cropped Images
The versatility of Google Docs extends to allowing you to download the images you’ve modified within the Drawing tool. This means you can create a perfectly cropped or masked image in Google Docs and then reuse it elsewhere, such as in Google Slides, other documents, or even on your website.
Steps to Download a Cropped Image:
- Open the Drawing Panel: Double-click the image (that was originally inserted via
Insert > Drawing > New) within your Google Docs document. This will reopen the Drawing pop-up window. - Access Download Options: In the Drawing toolbar, click on
Actions(usually on the left side), then hover overDownload. - Choose Your Format: You’ll be presented with several image formats:
PNG,JPG,SVG, andPDF. Select the format that best suits your needs.PNGis excellent for images with transparency, whileJPGis good for photographic content.SVGis ideal for vector-based shapes, maintaining crispness at any scale. - Download: Google Docs will then download the image directly to your computer’s default downloads folder.
This functionality effectively turns Google Docs into a basic Image Tool for quick edits and exports. Should you require further manipulation—like compressing the image for web optimization, converting it to a different format not offered directly by Docs, or even using an AI Upscaler for enhanced resolution—Tophinhanhdep.com provides dedicated tools that seamlessly handle these tasks, complementing your workflow.
Mobile App Considerations
While the desktop version of Google Docs offers a robust set of image editing features, the mobile app experience for Google Docs is more streamlined and, consequently, somewhat limited when it comes to advanced image manipulation.
On Google Docs mobile (Android and iOS):
- Basic Insertion: You can easily insert images from your device’s photos, camera, or the web.
- Basic Editing: You can adjust text wrapping, add borders (color, weight, style), and perform simple resizing by tapping the image and using the available options.
- Cropping Limitations: Crucially, the mobile app generally does not support shape cropping (masking) or the advanced drawing features found on the desktop. Standard rectangular cropping might be available, but the creative shaping capabilities are largely absent.
For users who frequently work on mobile and require advanced image edits, such as cropping images into specific shapes or complex Photo Manipulation, it is recommended to use dedicated third-party mobile applications like Canva, GIMP, or even Google Slides for the initial editing. Many of these tools also have desktop counterparts that integrate well with the resources found on Tophinhanhdep.com, ensuring you can prepare your images (e.g., from Trending Styles or Image Ideas) to perfection before uploading them to Google Docs.
Ultimately, Google Docs is a powerful platform for document creation, and its image editing capabilities are surprisingly extensive for a word processor. By understanding how to effectively insert, crop, resize, and enhance your images, you can create visually compelling documents that capture attention and communicate effectively. And remember, for every image need—from finding the perfect Background or Wallpaper to utilizing advanced Image Tools for optimization and conversion—Tophinhanhdep.com stands as your comprehensive resource for all things visual, empowering your Graphic Design and Photography endeavors.