How to Crop an Image in Adobe Illustrator: A Comprehensive Guide for Visual Storytellers

In the dynamic world of visual design, the ability to manipulate and refine images is paramount. Whether you’re a seasoned graphic designer crafting elaborate digital art, a photographer seeking to highlight the most beautiful aspects of your shots, or an enthusiast creating aesthetic wallpapers and backgrounds, cropping is a foundational skill. It’s not merely about cutting off unwanted edges; it’s a powerful tool for enhancing composition, directing focus, and transforming the narrative of an image. Adobe Illustrator, while renowned for its vector capabilities, offers robust options for working with raster images, making it an indispensable tool for all your image cropping needs.
At Tophinhanhdep.com, we understand the multifaceted nature of images – from high-resolution photography and abstract digital art to thematic collections and mood boards. Cropping is the silent hero that underpins much of this visual diversity, allowing creators to distill complex scenes into compelling visual statements. This comprehensive guide will demystify the art of cropping in Adobe Illustrator, covering multiple techniques suitable for various scenarios and skill levels. We’ll explore how these methods contribute to creating stunning visuals, optimizing images for various platforms, and fostering creative ideas that resonate with trending styles.
Understanding the Essence of Cropping in Visual Design
Before diving into the practical steps, it’s crucial to grasp the theoretical underpinnings of cropping within the broader context of visual design. Cropping is an artistic choice that profoundly impacts how an image is perceived. It can emphasize a subject, remove distracting elements, alter the aspect ratio for specific uses (like social media backgrounds or desktop wallpapers), or even create an abstract composition from a detailed photograph. For high-resolution photography, a well-executed crop can transform a good picture into a masterpiece, focusing on the intricate details of nature or the emotional depth of a subject.
The Fundamental Difference: Raster vs. Vector Cropping
One of the initial points of confusion for new Illustrator users often revolves around the distinction between raster and vector graphics. Illustrator is primarily a vector-based program, meaning it works with mathematical paths rather than pixels. This allows for infinitely scalable digital art without loss of quality. However, when you import a photograph or a scanned image, you are bringing in a raster graphic, which is composed of pixels.
Cropping a raster image (like a JPG, PNG, or TIFF) in Illustrator involves defining a rectangular or custom boundary that determines which pixels are kept and which are discarded or hidden. The methods for raster image cropping are similar to those found in pixel-editing software, though Illustrator offers its unique twists. This is critical for photographers working with digital photography and designers integrating raster elements into their graphic design projects.
Cropping vector graphics, on the other hand, typically involves tools like the Pathfinder, which manipulates overlapping shapes. For instance, to “crop” a vector shape, you might use another vector shape to cut or merge sections, creating new, editable vector elements. While this article focuses predominantly on cropping raster images within Illustrator, understanding this fundamental difference is vital for effective photo manipulation and digital art creation. The techniques we will discuss are tailored for raster image refinement, but their underlying principles often intersect with vector design workflows.
Linked vs. Embedded Images: A Crucial Distinction
When you bring a raster image into an Adobe Illustrator project, it can be either “linked” or “embedded.” This distinction is incredibly important, especially when it comes to cropping, as it affects file size, editing flexibility, and how Illustrator handles the original image data.
-
Linked Images: When an image is linked (often done by using “File > Place” and keeping the “Link” option checked, or by dragging an image from your desktop into an open project), Illustrator maintains a connection to the original image file on your computer. The Illustrator document itself only stores a preview and the path to the original file, keeping the .ai file size relatively small. If the original image file is moved, renamed, or deleted, Illustrator will report a missing link. When you crop a linked image, Illustrator will typically prompt you, stating that it needs to embed a copy of the image after cropping. This means the cropped version becomes part of the Illustrator file, severing its direct link to the (uncropped) original file. The original image on your desktop remains untouched. This is a common practice when dealing with high-resolution images or numerous stock photos, as it helps manage project file sizes until finalization.
-
Embedded Images: An embedded image is fully incorporated into the Illustrator document. There is no longer a link to an external file; all the image data resides within the .ai file. This increases the Illustrator document’s file size but makes it self-contained and portable, as it no longer relies on external resources. Images opened directly with Illustrator (e.g., “Open With > Adobe Illustrator”) or by unchecking the “Link” option during “File > Place” are embedded. When you crop an embedded image, the changes are directly applied to the image data within the Illustrator file, and the removed portions are permanently discarded from that specific document instance.
Understanding whether your image is linked or embedded is crucial for managing your workflow, particularly for projects involving extensive digital photography or detailed photo manipulation. It also informs how you might use image tools like compressors or optimizers after cropping, as the embedded data contributes directly to the final export size. Always consider your needs for file portability, original file preservation, and project size when deciding whether to link or embed.
Method 1: The Intuitive Crop Image Tool (Illustrator CC 2017 and Newer)
For users of Adobe Illustrator CC 2017 and newer versions, the dedicated “Crop Image” tool offers the most straightforward and intuitive way to perform rectangular crops. This function streamlined a process that was previously more cumbersome, making it a go-to for quick adjustments, preparing images for wallpapers, or refining backgrounds. This method is primarily designed for raster images (e.g., .jpg, .png, .eps, or rasterized versions), as it operates on pixels rather than vector paths. It’s perfect for isolating a subject in nature photography or tightening the composition of beautiful photography without dealing with complex masks.
Step-by-Step Guide to Using the Crop Image Function
The Crop Image function provides a visual, interactive way to define your desired cropping area. While it’s a destructive crop within the Illustrator document (meaning the cut-off parts are permanently removed from the embedded image), your original source file remains intact. This balance offers both efficiency and a safety net, which is essential when working with valuable high-resolution photography or stock photos.
Initiating Your Project and Placing the Image
- Open Adobe Illustrator: Launch the application.
- Create a New Document or Open an Existing One:
- To start fresh, go to
File > New(Ctrl+N or Command+N) and select your desired artboard dimensions. - To work within an existing project, go to
File > Open(Ctrl+O or Command+O) and navigate to your .ai file.
- To start fresh, go to
- Place Your Image:
- Go to
File > Place...(Shift+Ctrl+P or Shift+Command+P). - Browse to the raster image file you wish to crop (e.g., a JPG of a scenic landscape for a background, or a PNG graphic).
- Ensure the “Link” checkbox is typically unchecked if you want the image to be embedded directly into your document immediately, or checked if you prefer to maintain a link to the original file for now (remembering it will be embedded upon cropping).
- Click “Place,” then click and drag on your artboard to position and size the image.
- Go to
This step is fundamental for any visual design project, whether you’re starting with a fresh canvas for digital art or integrating existing images into a photo manipulation piece.
Activating the Selection and Crop Tools
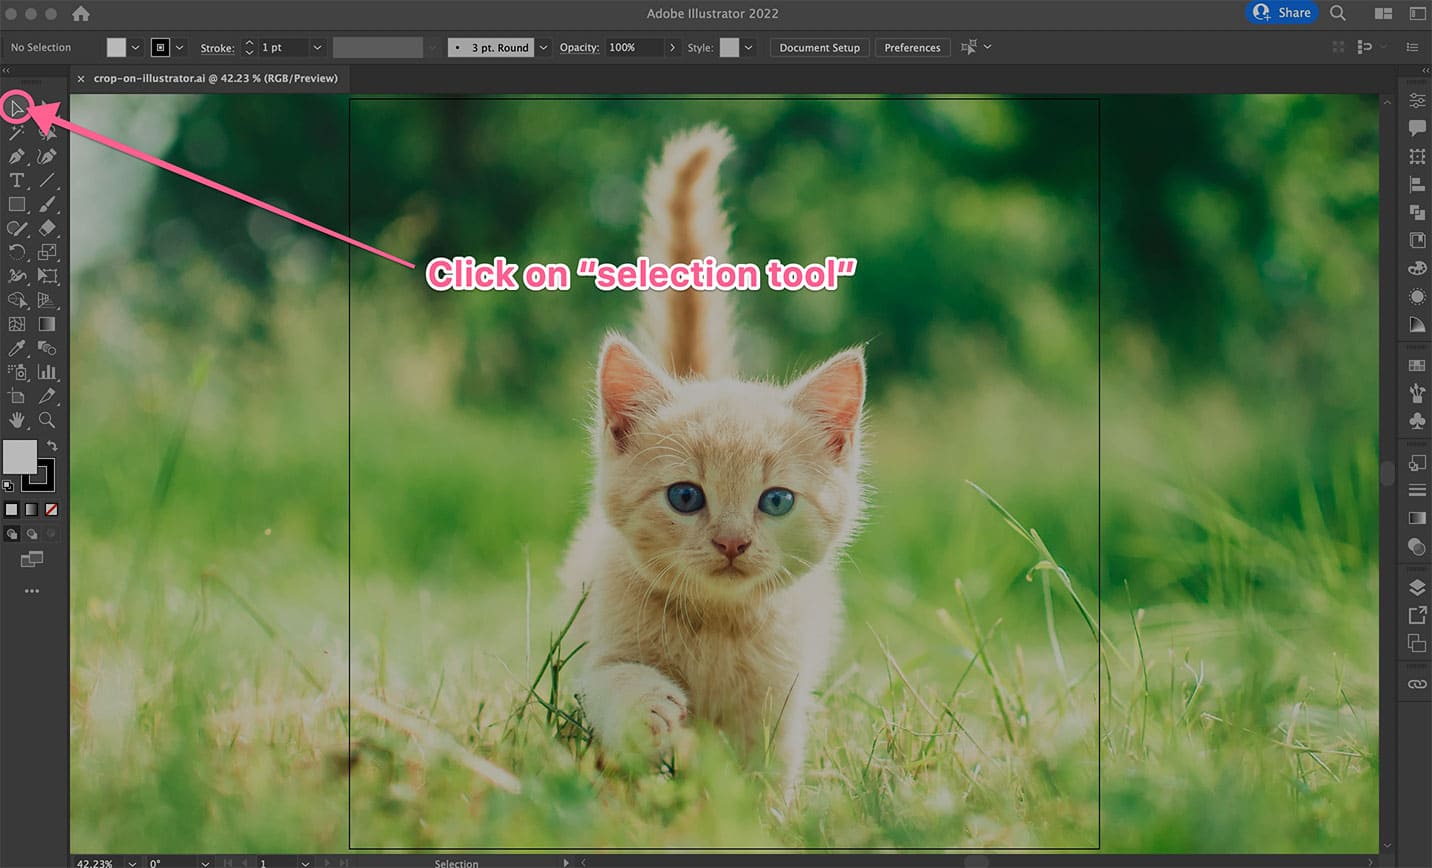
- Select the Image: Using the
Selection Tool(the solid black arrow, shortcutV), click directly on the image you want to crop. A bounding box will appear around it, indicating it’s selected.- Pro Tip: If you can’t find your toolbar, go to
Window > Toolbars > Advanced.
- Pro Tip: If you can’t find your toolbar, go to
- Access the Crop Image Function:
- Once the image is selected, look at the
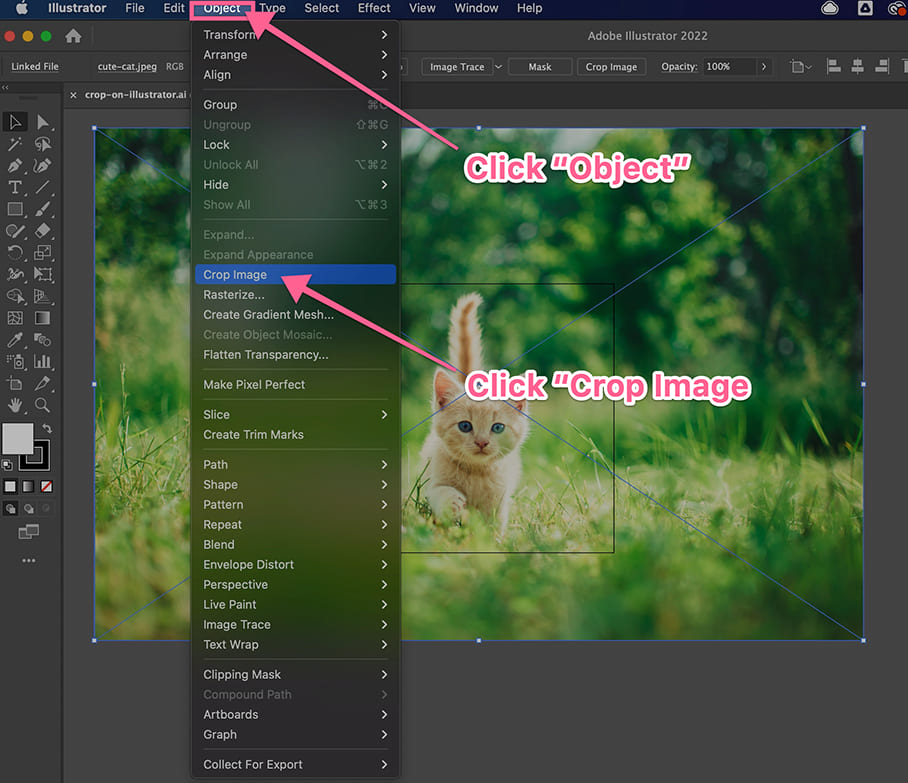
Control Panel(the bar typically at the top of your workspace, below the menu bar). You will see a button labeledCrop Image. Click this button. - Alternatively, you can go to
Object > Crop Imagefrom the top menu bar. - If you receive a prompt about embedding the image, click
OK. This notification confirms that Illustrator will embed a copy of your image for cropping, leaving your original source file untouched.
- Once the image is selected, look at the
This action prepares the image for interactive cropping, providing visual cues that guide your selection, which is vital for artists focusing on aesthetic quality or specific thematic collections.
Defining Your Desired Cropping Area
Upon activating the Crop Image function, a special cropping box with black dotted lines and handles will appear around your image. This is your interactive cropping widget.
- Adjust the Cropping Area:
- Click and drag the
corner handles(small squares at the corners of the box) inwards or outwards to adjust both the width and height of the cropping area simultaneously, maintaining aspect ratio if you holdShift. - Click and drag the
side handles(small squares in the middle of each side) to adjust only the width or height. - Click and drag inside the cropping box to reposition the image within the defined crop area. This allows you to fine-tune the composition, ensuring your subject (e.g., a specific element in nature, or the focal point of a beautiful photograph) is perfectly framed.
- The
Control Panelat the top will also display numeric values for X, Y, W (width), and H (height), allowing for precise, numerical adjustments if needed. This level of control is crucial for graphic designers needing exact dimensions for specific backgrounds or trending styles.
- Click and drag the
Thoughtful adjustment of the cropping area is an art in itself. It’s where you apply principles of composition, such as the rule of thirds, to transform a raw image into a compelling visual for your mood boards or photo ideas.
Finalizing the Crop
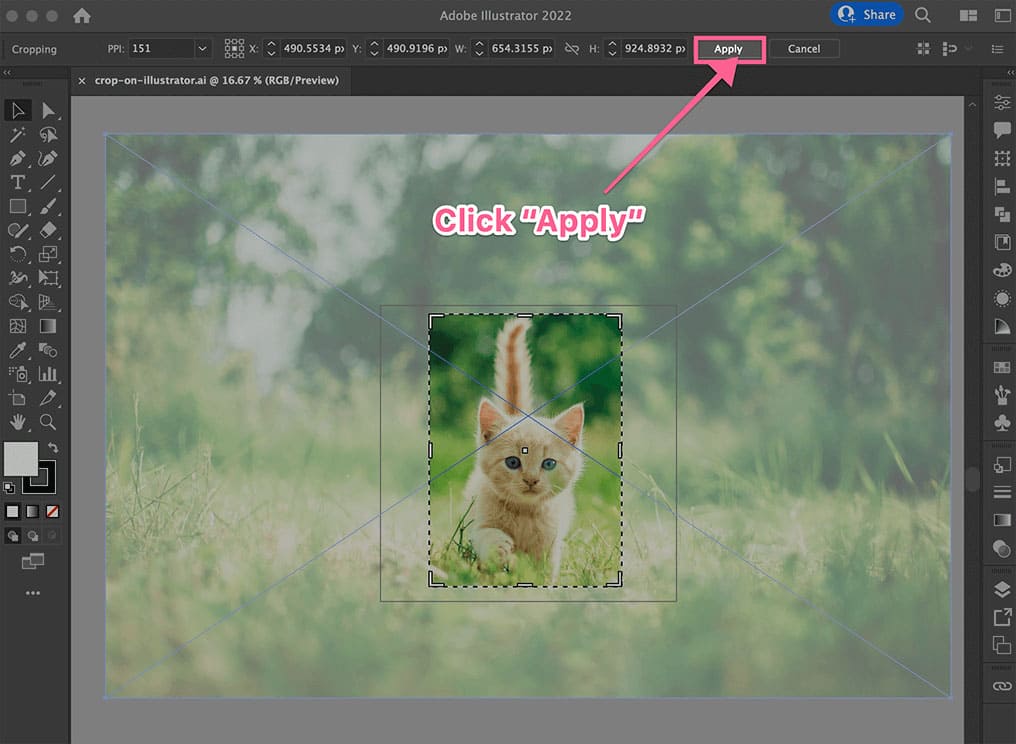
- Apply the Crop: Once you are satisfied with the defined cropping area and the composition, locate the
Applybutton in theControl Panelat the top of your workspace. - Confirm: Click
Apply. The image will instantly be cropped, and only the selected portion will remain visible on your artboard. The parts outside the cropping box are now removed from the embedded image within your Illustrator file.
This direct cropping method is efficient for creating polished images ready for further steps in your visual design workflow, such as converting, compressing, or optimizing them for web use, or even preparing them for AI upscalers by removing unnecessary peripheral details.
Method 2: Precision Cropping with Clipping Masks (All Illustrator Versions)
While the “Crop Image” tool offers quick rectangular cropping, there are many instances in visual design where you need more flexibility. This is where Clipping Masks come into play. A clipping mask in Adobe Illustrator allows you to crop an image (or even vector graphics and text) into any shape, not just rectangles. Furthermore, it’s a non-destructive method, meaning the hidden parts of your image are not permanently deleted; they are merely concealed by the mask, giving you immense control and flexibility for photo manipulation and digital art. This technique is invaluable for creating unique aesthetic compositions or for integrating images seamlessly into complex graphic design layouts.
Mastering Irregular Shapes and Non-Destructive Editing
The power of clipping masks lies in their ability to transform an ordinary image into something extraordinary. Imagine cropping a beautiful photograph of a flower into the shape of a teardrop, or embedding a striking abstract pattern within a custom typographic element. Clipping masks enable these creative ideas, offering a layer of sophistication to your visual design projects. This method works universally across all versions of Illustrator, including those prior to CC 2017, making it a timeless skill.
Preparing Your Artwork with a Custom Shape
- Open or Place Your Image: Ensure you have your raster image (JPG, PNG, etc.) in your Illustrator document. Just like with the Crop Image tool,
File > Place...is the standard method. - Create Your Clipping Mask Shape: This is the creative core of the technique.
- Choose a Tool: Select any shape-drawing tool from the toolbar.
- For regular shapes: Use the
Rectangle Tool(M),Ellipse Tool(L),Polygon Tool, orStar Tool. - For irregular, custom shapes: Use the
Pen Tool(P) to draw precise paths, or thePencil Tool(N) for freehand drawing. You could even use theType Toolto create text outlines (convert text to outlines first:Type > Create Outlines(Shift+Ctrl+O or Shift+Command+O)) as your clipping shape.
- For regular shapes: Use the
- Draw the Shape: Draw your desired shape directly on top of the area of the image you want to keep. This shape defines the “window” through which your image will be visible. Anything outside this shape will be hidden.
- Pro Tip: To easily visualize your crop, set the fill of your clipping shape to “None” and give it a brightly colored stroke (e.g., red or magenta). This allows you to see the underlying image while defining your mask, enhancing your creative control over the final aesthetic.
- Choose a Tool: Select any shape-drawing tool from the toolbar.
- Ensure Proper Stacking Order: This is critical. The shape that will act as your clipping mask must be on top of the image (or group of objects) you want to crop. You can verify and adjust the stacking order in the
Layers Panel(Window > Layers). If your shape isn’t on top, select it and go toObject > Arrange > Bring to Front(Shift+Ctrl+] or Shift+Command+]).
This step directly taps into your visual design prowess, allowing you to sculpt your images into unique forms that align with your photo ideas or current trending styles.
Applying the Clipping Mask
- Select Both Objects: Using the
Selection Tool(V), click on your clipping mask shape, then hold down theShiftkey and click on the image (or group of images/objects) you want to mask. Both should now be selected. - Make the Clipping Mask:
- Go to
Object > Clipping Mask > Makefrom the top menu bar. - Alternatively, use the convenient keyboard shortcut:
Ctrl+7(Windows) orCommand+7(Mac).
- Go to
- Observe the Result: Your image will now be “cropped” to the exact shape of your mask. Only the portion of the image that lies within the boundaries of your mask shape will be visible. The mask itself will lose its fill and stroke by default, though you can reapply them if desired after the mask is made by selecting the mask path within the Layers panel.
The beauty of this method lies in its non-destructive nature. If you need to adjust the crop later, you can select the clipping mask group (in the Layers panel) and then either move the image underneath the mask or edit the mask shape itself using the Direct Selection Tool (A) or Pen Tool (P). This flexibility is invaluable for iterative design processes, complex photo manipulation, and achieving intricate digital art compositions. It empowers you to experiment with different visual designs and adjust for optimal aesthetic impact without fear of permanently losing image data.
Advanced Clipping Mask Technique: Flattening Transparency for Permanent Crops
While the non-destructive nature of clipping masks is a huge advantage, there are times when you might want a truly “hard” crop – where the hidden parts are permanently removed, similar to the Crop Image tool. This is particularly useful for reducing file size after you’re certain about your crop, or for preparing images for external image tools like compressors or optimizers. Illustrator offers a clever trick to achieve this: combining clipping masks with the “Flatten Transparency” function.
This section also introduces the Opacity Mask as a powerful variation of masking. Unlike a standard clipping mask which is either entirely visible or entirely hidden, an opacity mask uses grayscale values to define transparency. White areas of the mask reveal the image completely, black areas conceal it entirely, and shades of gray create varying levels of translucency. This technique is ideal for creating soft-edged crops, artistic fades, or blending images in a subtle way, perfect for evoking a sad/emotional tone in photography, adding a delicate touch to aesthetic backgrounds, or experimenting with abstract digital art.
Making a Permanent Crop with Flatten Transparency
- Apply a Clipping Mask: First, follow the steps above to create your desired clipping mask.
- Access Flatten Transparency: With the clipped image (the clipping mask group) still selected, go to
Object > Flatten Transparency...from the top menu. - Adjust Settings: In the Flatten Transparency dialog box, set the
Raster/Vector Balanceslider to100% Vector(or near it, depending on your image complexity) and ensureClipis checked. ClickOK. - Expand (Optional, but Recommended): After flattening, it’s often beneficial to expand the appearance by going to
Object > Expand(orObject > Expand AppearanceifExpandis grayed out). This converts the flattened transparency effect into editable paths. - Clean Up: You might need to ungroup (
Object > Ungroup) and delete any leftover bounding boxes or invisible elements that result from the flattening process. What you’re left with is a truly cropped raster image, with the hidden parts permanently removed, now ready for final export or integration into your thematic collections.
Utilizing Opacity Masks for Creative Transparency
- Place Your Image and Create a Masking Shape: As with clipping masks, place your raster image. Then, draw a shape on top of the image that will serve as your opacity mask.
- Fill the Masking Shape with Grayscale:
- Fill the masking shape with a gradient from white to black for a fade effect.
- Fill it with solid white for full opacity in that area.
- Fill it with solid black for full transparency.
- Use shades of gray for partial transparency.
- Open the Transparency Panel: Select both the image and the grayscale masking shape. Go to
Window > Transparency(Shift+Ctrl+F10 or Shift+Command+F10). - Make Opacity Mask: In the Transparency panel, click the
Make Maskbutton.- Ensure the
Clipcheckbox is active if you want the mask to also act as a clipping path, effectively cropping it. - Ensure
Invert Maskis unchecked unless you want to reverse the transparency (black becomes opaque, white becomes transparent).
- Ensure the
- Adjust Opacity: Within the Transparency panel, you can further adjust the overall
Opacityslider of the masked group, or click on the mask thumbnail to edit the mask directly (e.g., repaint it with different grayscale values or modify its shape).
Opacity masks are incredibly powerful for digital art, adding depth to photo manipulation, and creating unique visual textures. They allow artists to blend images subtly, achieve soft vignette effects, or even create abstract transitions that can elevate the aesthetic of any image collection.
Method 3: The Strategic Artboard Method for Cropping and Exporting
Sometimes, your cropping needs extend beyond just trimming an image within your working document. You might need to extract a specific portion of a larger design (which could include multiple images and vector elements) as its own standalone image file, optimized for web or print. The Artboard method offers a powerful, precise, and highly efficient way to do this, especially when preparing images for specific output dimensions, such as those required for various backgrounds or image inspiration collections. This technique is less about modifying the image within Illustrator and more about defining an export boundary.
Utilizing Artboards for Defined Image Sections
Illustrator’s artboards act as individual canvases within a single document. They are your printable and exportable regions. By strategically manipulating an artboard, you can effectively “crop” your entire document or a selection of its contents to generate a new image file. This is particularly useful for graphic designers managing complex layouts or creating thematic collections where consistent output dimensions are key. It’s also an excellent way to prepare images for image tools like AI upscalers, ensuring only the desired content is processed, or for optimizing multiple image elements simultaneously.
Selecting Your Image and Adjusting the Artboard
- Open Your Project with Images/Graphics: Ensure your Illustrator document contains the image or design elements you wish to crop and export.
- Activate the Artboard Tool: Select the
Artboard Toolfrom the toolbar (keyboard shortcutShift+O). You’ll see a bounding box around your current artboard. - Adjust the Artboard to Your Crop Area:
- Direct Manipulation: Click and drag the corner or side handles of the artboard to resize it, much like you would a cropping box. Position the artboard precisely around the area of your image or composition that you want to “crop.” This defines the exact dimensions of your output file.
- Fit to Artwork Bounds (for single image): If you’re cropping a single image, select it with the
Selection Tool(V). Then, switch to theArtboard Tool(Shift+O). In theControl Panelat the top, you’ll see options for “Preset.” Choose “Fit to Selected Art” or “Fit to Artwork Bounds” from the dropdown. This automatically resizes the artboard to perfectly encompass your selected image, making it easy to create specific photo ideas or design elements. - New Artboard for Specific Crop: If you have multiple artboards or a complex layout and want to create a new, temporary artboard for cropping:
- With the
Artboard Toolselected, draw a new artboard directly over the area you want to crop. - Alternatively, click the
New Artboardbutton in theControl Paneland then adjust its size and position.
- With the
This precise control over artboard dimensions allows you to define exact crop areas for various uses, from web banners to specific social media backgrounds, ensuring your visual design maintains consistent quality and aspect ratios.
Exporting Your Cropped Selection
Once your artboard is perfectly positioned to define your desired crop, the next step is to export it as a new image file.
- Go to Export Options:
- For general-purpose image files (JPG, PNG, TIFF): Go to
File > Export > Export As... - For web-optimized images (JPG, PNG, GIF): Go to
File > Export > Save for Web (Legacy)...(though “Export As” generally offers sufficient optimization options for modern web use).
- For general-purpose image files (JPG, PNG, TIFF): Go to
- Select “Use Artboards”: In the “Export As” dialog box, ensure the
Use Artboardscheckbox is selected.- If you have multiple artboards, you can choose to export
Allartboards or specify aRange(e.g., “1-2” for the first two artboards) to export specific cropped sections. For a single specific crop, ensure only that artboard is active or selected.
- If you have multiple artboards, you can choose to export
- Choose File Format and Settings:
- Select your desired
Format(e.g., JPEG for high-resolution photography, PNG for transparency in digital art). - Adjust quality, resolution, and other settings as needed for your final output, whether it’s for print, a web background, or a detailed component of a mood board. This is where you might apply settings for image tools like compressors and optimizers, directly during the export process.
- Select your desired
- Export: Click
Export(orSavefor Save for Web).
The Artboard method is incredibly flexible for creating multiple variations of a single design or extracting specific elements from a larger composition. After exporting, you can then import the newly cropped image back into your Illustrator project, or use it independently for any of your visual design needs, confident that it has the exact dimensions and content you defined. This method is particularly efficient for creating thematic collections or preparing diverse visual assets.
Enhancing Your Workflow: Keyboard Shortcuts and Best Practices for Cropping
Mastering the art of cropping in Adobe Illustrator isn’t just about knowing the tools; it’s about integrating these techniques seamlessly into your broader visual design workflow. Efficiency is key for digital artists, graphic designers, and photographers, allowing more time for creative ideas and less for repetitive tasks. Leveraging keyboard shortcuts and adopting best practices can significantly speed up your process, ensuring that your cropped images consistently meet the highest standards for aesthetic quality and functionality.
Essential Shortcuts for Efficient Cropping
Keyboard shortcuts are a designer’s best friend. They reduce reliance on menu navigation, keeping your focus on the artboard. Here are some indispensable shortcuts that will streamline your cropping workflow in Illustrator:
- Selection Tool (V): The most fundamental tool. Use
Vto quickly select objects (images, shapes, artboards) before applying any cropping action. - Artboard Tool (Shift+O): Crucial for the Artboard cropping method.
Shift+Oallows you to quickly select and resize artboards to define your export area. - Place (Shift+Command+P or Shift+Ctrl+P): To quickly bring images into your document.
- Make Clipping Mask (Command+7 or Ctrl+7): The fastest way to apply a clipping mask after selecting your mask shape and target image(s).
- Direct Selection Tool (A): After creating a clipping mask, use
Ato select individual paths within the mask group. This allows you to easily move the image underneath the mask or reshape the mask itself, providing non-destructive editing power. - Rectangle Tool (M), Ellipse Tool (L), Pen Tool (P): Use these shortcuts to quickly draw your masking shapes for clipping masks.
While the “Crop Image” button doesn’t have a default keyboard shortcut, you can create custom shortcuts in Illustrator by going to Edit > Keyboard Shortcuts. This allows you to tailor your workspace to your exact needs, further optimizing your workflow for all image manipulation tasks.
Integrating Cropping into Your Broader Visual Design Workflow
Cropping is rarely the final step in any visual design project. It’s often an intermediate phase that sets the stage for further enhancements and optimizations. Here’s how to integrate cropping effectively:
- Composition and Aesthetic Impact: Before any other editing, use cropping to refine the composition of your images. Whether it’s a beautiful photograph of nature or an abstract piece of digital art, a strong crop can eliminate distractions, highlight the subject, and create a more compelling visual narrative. Experiment with different aspect ratios for various platforms – a square crop for Instagram, a vertical crop for Pinterest, or a horizontal one for website backgrounds.
- Preparing for Photo Manipulation: For complex photo manipulation, precise cropping is essential. It helps isolate elements for seamless integration into new scenes. Clipping masks are invaluable here, allowing you to cut out irregular shapes cleanly.
- Optimizing for Performance: After cropping, especially for web use, your images might need further processing. Tophinhanhdep.com emphasizes the importance of image tools like converters, compressors, and optimizers.
- Compression: Cropping reduces file size by eliminating unwanted pixels, but further compression (e.g., converting to web-optimized JPEG or PNG-8) can dramatically improve load times without significant quality loss.
- Optimization: This can involve resizing to exact display dimensions, applying lazy loading, or using modern image formats like WebP.
- Leveraging AI Upscalers: If you’re working with lower-resolution images that need to be enlarged, precise cropping before using AI upscalers is crucial. Upscaling only the necessary parts avoids processing (and potentially enhancing) unwanted noise or details in the periphery, resulting in a cleaner, higher-quality output.
- Image-to-Text Considerations: For projects requiring image-to-text (OCR) functionality, ensure your images are cropped to tightly focus on the text itself. This improves the accuracy of text recognition by eliminating visual clutter.
- Curating Image Inspiration and Collections: Cropping plays a vital role in curating photo ideas, building mood boards, and assembling thematic collections.
- Mood Boards: Crop images to extract specific textures, color palettes, or thematic elements that inspire your design direction.
- Thematic Collections: Uniformly crop images within a collection to create a cohesive and professional appearance that aligns with trending styles.
- Wallpapers and Backgrounds: Crop images to perfectly fit screen dimensions or design layouts, ensuring a visually pleasing and functional result.
- Non-Destructive Editing Philosophy: Whenever possible, prioritize non-destructive methods like clipping masks. This allows for greater flexibility and iteration in your design process, ensuring you can always revisit and refine your creative ideas without having to start from scratch.
By mastering these cropping techniques and integrating them into a holistic visual design workflow, you elevate your ability to create compelling, high-quality images. Whether you’re enhancing digital photography, designing graphic art, or curating aesthetic inspiration, the power of a well-executed crop is undeniable. Experiment with each method, find what works best for your projects, and unleash your full creative potential on Tophinhanhdep.com.