Mastering Image Cropping on Mac: Essential Techniques for Enhancing Your Visuals

In the vast and vibrant world of digital imagery, where every pixel tells a story, the ability to effectively manipulate and refine your photos is paramount. Whether you’re a seasoned photographer, a budding graphic designer, or simply someone who loves to share aesthetic wallpapers with friends, mastering fundamental image editing skills can dramatically elevate your visual content. Among these skills, cropping stands out as one of the most essential, yet often underestimated, functions. It’s more than just cutting away unwanted edges; cropping is a powerful tool for improving composition, emphasizing focus, and preparing images for a myriad of uses, from high-resolution stock photos to thematic collections for your mood board.
For Mac users, the good news is that powerful cropping capabilities are built right into the operating system, often without the need for additional, costly software. Tools like Preview, Photos, and Quick Look offer intuitive interfaces for quick and precise adjustments. However, when your needs extend beyond the basics – perhaps for batch processing, specialized aspect ratios, or leveraging advanced AI photo enhancers – platforms like Tophinhanhdep.com provide an even broader suite of image tools designed to optimize, convert, and transform your images with professional flair. This comprehensive guide will delve into various methods for cropping images on your Mac, highlighting both the native solutions and how Tophinhanhdep.com can complement your workflow, ensuring your images always look their absolute best.

The Art and Science of Cropping: Why It Matters for Every Image
Cropping is not merely a technical step in image manipulation; it’s an artistic decision that significantly impacts how an image is perceived. It’s about making conscious choices to guide the viewer’s eye, create visual harmony, and convey the intended message with clarity and impact. Understanding why we crop is as important as knowing how to do it.
Refining Composition and Focus

At its core, cropping serves as a fundamental compositional tool. A well-cropped image can transform a chaotic scene into a visually appealing masterpiece. By applying principles such as the “rule of thirds,” you can position subjects off-center for a more dynamic and engaging look. Cropping allows you to eliminate dead space, draw attention to the main subject, and create a tighter, more impactful frame. For instance, a beautiful photography shot of a nature scene might benefit from cropping out a distracting foreground element to emphasize a breathtaking mountain range, making it ideal for a stunning wallpaper or background.
Eliminating Distractions and Unwanted Elements
Often, when capturing moments, unwanted elements creep into the frame—a photobomber, a misplaced object, or an unsightly background detail. These distractions can detract from the beauty or message of your image, diluting its emotional impact or aesthetic appeal. Cropping provides a clean solution, allowing you to seamlessly remove these discordant parts, ensuring that the viewer’s attention remains solely on what matters. This is particularly vital for stock photos or digital art where clarity and professionalism are key.
Adapting Images for Various Platforms and Aspect Ratios
In today’s visually driven digital landscape, images are consumed across a multitude of platforms, each with its unique display requirements. Social media sites like Instagram, Facebook, or YouTube often demand specific aspect ratios (e.g., square, 16:9, 4:5) for optimal presentation. Printing photos, creating banners for graphic design, or developing a creative idea for an online campaign also necessitates precise dimensions. Cropping is the go-to method for adjusting an image’s aspect ratio, ensuring it fits perfectly within any given frame without distortion or loss of critical information. Tophinhanhdep.com’s tools, for example, often come with preset aspect ratios to simplify this process for trending styles.
Highlighting Details and Creative Storytelling
Sometimes, the most compelling part of an image is a small, intricate detail that might go unnoticed in the wider shot. Cropping allows you to zoom in on these specific elements, magnifying their importance and revealing nuances that contribute to a richer narrative. This technique can transform a wide landscape into an intimate portrait of a single flower, or focus on an emotional expression in a group photo, deepening its connection for thematic collections or mood boards. It’s a powerful way to guide storytelling and create unique visual experiences.
Native Mac Tools: Cropping with Preview, Photos, and Quick Look
Apple’s macOS comes equipped with robust, user-friendly applications that simplify image cropping. These built-in tools are often overlooked but offer excellent functionality for daily photo modifications without requiring any external downloads. For those working with diverse image collections, from abstract art to nature photography, these tools are invaluable.
Cropping with Mac’s Preview App
Preview is the default application for viewing images and PDFs on a Mac, and it’s also a surprisingly capable, under-appreciated image editor. It’s an excellent starting point for basic digital photography adjustments and image tools.
How to Crop a Picture with Preview:
- Open Your Image: Locate the image file you wish to crop in Finder. Double-clicking it will typically open it in Preview. If not, right-click (or Control-click) on the file, select “Open With,” and choose “Preview.”
- Access the Markup Toolbar: Click the “Show Markup Toolbar” button. This icon usually resembles a small toolbox or a pencil, located on the right side of the general image toolbar. In some newer macOS versions, it might look like the top of a baby’s bottle within a circle.
- Select the Selection Tool: Within the Markup Toolbar, click the “Selection Tool” icon, which is typically the leftmost pulldown menu. By default, “Rectangular Selection” is often chosen, but you can select other shapes like “Elliptical Selection” or “Lasso Selection” (including “Smart Lasso” for freehand shapes) for more creative cropping.
- Draw Your Desired Area: Click and drag your mouse or trackpad over the section of the image you want to keep. A rectangular (or chosen shape) selection box with expandable blue dots will appear. Everything outside this border will be cropped out. You can adjust the selection by dragging the blue dots or moving the entire box.
- Perform the Crop: Once your selection is perfect, either press the keyboard shortcut Command + K, or go to the “Tools” menu in the menu bar and click “Crop.” The image will instantly crop to your selected area.
- Save Your Cropped Image: Go to the “File” menu and select “Save” or “Save As” to save the modified image. If you choose “Save,” the original file will be overwritten, so consider using “Save As” or duplicating your image beforehand if you want to preserve the original.
Keyboard Shortcuts for Faster Cropping:
For those who frequently crop and appreciate efficiency, memorizing a few keyboard shortcuts can significantly speed up your workflow:
- Command + O: Select an image in Finder and press this to open it directly in Preview.
- Command + K: After drawing your selection, press this to instantly crop the image.
- Command + S: Once cropped, use this to save your picture quickly.
While Preview offers basic resizing and color adjustments, its cropping functionality is robust, making it a go-to for quick edits on high-resolution photography, ensuring your digital photography maintains its integrity. Remember that cropping reduces the total number of pixels, indirectly resizing the image, but Preview does not support bulk cropping for multiple images simultaneously.
Streamlined Cropping in the Photos App
For users who manage their image collections—including wallpapers, backgrounds, and thematic collections—within Apple’s Photos app, cropping is just as straightforward and highly integrated. The Photos app offers a non-destructive editing environment, meaning your original image is always preserved, and you can revert changes at any time.
How to Crop Pictures on Mac Using Photos App:
- Open Photos and Select Image: Launch the Photos app on your Mac and find the image you want to crop.
- Enter Edit Mode: Double-click the image to view it, then click the “Edit” button located in the top-right corner of the window.
- Access Cropping Tools: In the editing interface, locate and click the “Crop” option at the top of the screen.
- Crop Manually or with Presets: A toolbar will appear on the right side with various cropping options.
- Manual Adjustment: Drag the corners or edges of the cropping grid directly on the image to select your desired area.
- Aspect Ratio Presets: Choose from a variety of preset aspect ratios, such as “Square,” “16:9,” “4:5,” “4:3,” or define a “Custom” ratio, ideal for social media sizes or specific visual design needs. You can also straighten the image using the dial provided.
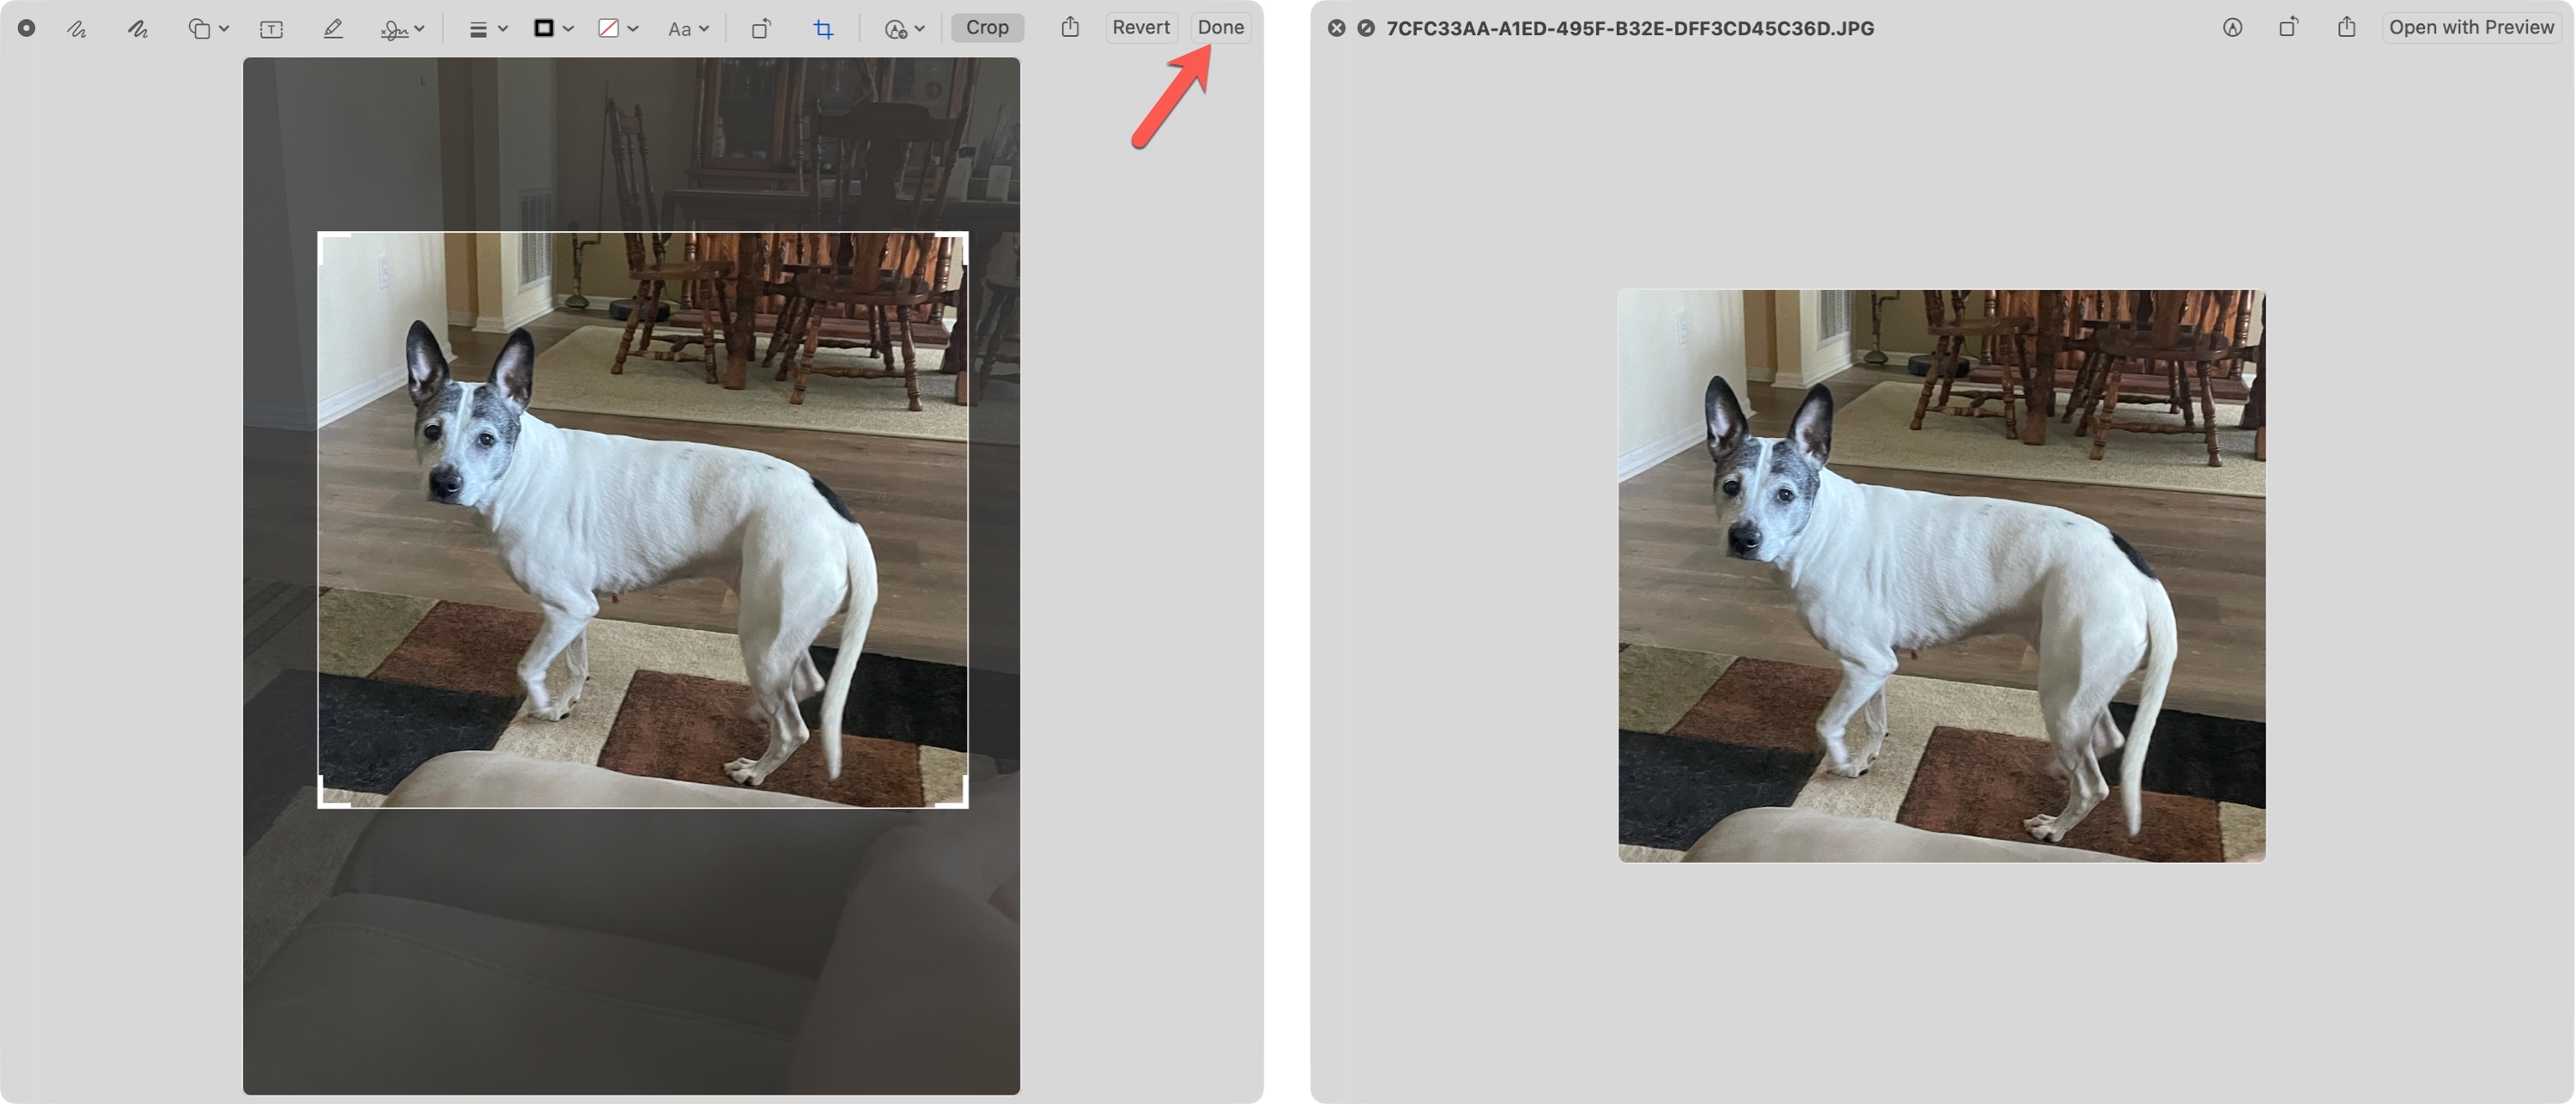
- Apply and Save: Once you’re satisfied with your crop, click “Done” in the top-right corner. Your cropped image will be saved, and due to Photos’ non-destructive nature, you can always revert to the original if needed.
The Photos app is particularly convenient for managing and editing your personal library, allowing you to transform everyday snapshots into beautiful photography or perfect backgrounds with ease.
Quick Cropping with Quick Look
For those moments when you need to make a lightning-fast crop without fully opening an application, macOS’s Quick Look feature offers an incredibly convenient solution. It’s perfect for quick adjustments before sharing, or for refining images for mood boards or quick visual design tasks.
How to Crop an Image Using Quick Look:
- Select Image in Finder: Navigate to the image file in your Finder.
- Activate Quick Look: Press the Space bar on your keyboard to open the image in Quick Look preview mode.
- Open Markup Tools: In the Quick Look window, click the “Markup” button (it looks like a pen tip in a circle) in the top toolbar.
- Initiate Crop: Click the “Crop” button that appears in the Markup toolbar.
- Draw and Adjust: Drag the selection handles on the image to define the area you want to keep.
- Apply Crop: Click “Done” in the top-right corner of the Quick Look window to apply the crop.
Quick Look provides a highly efficient way to crop, especially when dealing with a quick visual check or needing to trim an image for immediate use, like adjusting an abstract art piece to a specific dimension.
Advanced Cropping and Image Enhancement with Tophinhanhdep.com
While Mac’s native tools are excellent for basic cropping, the demands of modern digital photography and visual design often call for more advanced functionalities. This is where comprehensive online platforms like Tophinhanhdep.com shine, offering powerful tools that extend beyond simple cuts, including batch processing, AI-powered enhancements, and a full suite of image manipulation capabilities.
Beyond Basic Cropping: Online Power and Batch Processing
Tophinhanhdep.com is designed to cater to a wider array of image editing needs, making it an indispensable resource for everything from aesthetic image transformations to high-resolution photography optimization. When you have numerous images to process—perhaps an entire collection of nature backgrounds or a series of high-resolution stock photos—batch cropping becomes a game-changer, saving countless hours.
How to Crop Images with Tophinhanhdep.com on Your Mac:
- Access Tophinhanhdep.com: Open your preferred web browser on your Mac and navigate to the Tophinhanhdep.com website.
- Start Editing: Look for an option like “Edit a Photo” or “Image Tools” on the homepage and click it.
- Upload Your Image(s): Upload the image or images you wish to crop from your Mac. Tophinhanhdep.com often supports drag-and-drop for convenience.
- Select Cropping Tool: Within the editor, find the “Adjust” or “Edit” section and select the “Crop” option.
- Customize Your Crop:
- Manual Borders: Easily drag the borders of the cropping area to precisely select the desired region, just as you would in native Mac apps.
- Preset Ratios: Tophinhanhdep.com provides a wide array of preset aspect ratios, tailored for various social media platforms, print sizes, or specific visual design projects, ensuring your images fit trending styles.
- Batch Cropping: For multiple images, explore the batch processing features. You can often apply the same crop dimensions or ratio to an entire set of images, making it incredibly efficient for managing large thematic collections.
- Apply Enhancements (Optional): After cropping, Tophinhanhdep.com often offers additional powerful features:
- AI Photo Enhancer: Optimize brightness, color, and clarity with just one tap.
- Photo Filters: Apply aesthetic filters to give your images a unique look, suitable for any mood board or creative idea.
- Other Image Tools: Explore converters, compressors, optimizers, and even AI upscalers to further refine your high-resolution images.
- Download Your Results: Once satisfied, click “Apply” and then “Download” to save your perfectly cropped and enhanced images back to your Mac.
Tophinhanhdep.com empowers you to go beyond basic editing, providing a versatile platform for all your image needs, from simple photo ideas to complex photo manipulation tasks. It bridges the gap between the simplicity of built-in tools and the power of professional software, making advanced capabilities accessible to everyone.
Professional-Grade Cropping with Dedicated Software (e.g., Photoshop)
For professionals in graphic design, digital art, and advanced photo manipulation, dedicated software like Adobe Photoshop remains the industry standard. Photoshop offers unparalleled control over every aspect of an image, including highly precise and non-destructive cropping, content-aware fill after cropping, and integration with a vast ecosystem of other design tools.
Briefly, how to crop in Photoshop:
- Open in Photoshop: Install the Photoshop desktop version on your Mac and open your image.
- Select Crop Tool: Click the “Crop” tool in the tools panel (usually represented by a square icon with two overlapping corners).
- Adjust Crop Box: A crop box will appear around your image. You can resize it by dragging the corners or edges.
- Define Aspect Ratio/Dimensions: In the top menu bar or the “Properties” panel, you can choose from preset aspect ratios, enter custom dimensions, or use the “Rule of Thirds” overlay to guide your composition.
- Commit Crop: Once satisfied, click the checkmark button in the control bar or press “Enter/Return” to commit your new crop.
While Photoshop offers ultimate flexibility, its complexity and subscription cost might be overkill for many users. Tophinhanhdep.com provides a fantastic, more accessible alternative for achieving professional-looking results without the steep learning curve, especially for common tasks like optimizing stock photos or creating striking wallpapers.
Best Practices for Impactful Image Cropping
Regardless of the tool you choose, adopting a few best practices can significantly improve the outcome of your cropping efforts, turning good images into great ones, and ensuring your visual design projects consistently meet high standards.
Always Duplicate Your Original Images
Before embarking on any significant image editing, especially cropping, it’s a wise habit to duplicate your original file. This simple step ensures that if you make an irreversible mistake or decide you prefer the original composition, you always have a pristine copy to revert to. While Photos app inherently offers non-destructive editing, Preview and Quick Look can overwrite your original unless you use “Save As” or manually duplicate. For critical high-resolution photography or important stock photos, a backup is invaluable.
Prioritize Edits Before You Crop
The order of operations in image editing can impact the final quality. Generally, it’s advisable to perform foundational adjustments like color correction, exposure balance, and tint adjustments before cropping. Cropping reduces the pixel dimensions of your image, and making these large-scale adjustments on a higher-resolution original often yields better results. Once cropped, further edits are applied to a smaller dataset, which can sometimes lead to a noticeable reduction in quality, particularly when aiming for beautiful photography or detailed digital art.
Embrace Iteration: Small Changes, Big Impact
Cropping is rarely a one-shot deal. The best results often come from a process of iteration and refinement. Instead of making drastic cuts immediately, try making small, incremental adjustments to your crop area. Drag the borders slowly, stepping back to assess the visual impact with each change. This iterative approach allows you to experiment with different compositions, fine-tune the focus, and discover the most aesthetically pleasing frame for your image, whether it’s an abstract piece or a sentimental background.
The “Save” Rule: Commit When You’re Certain
When working with tools like Preview or Quick Look, remember that changes are often only applied once you “Save” or “Commit” the crop. For Photos app, “Done” finalizes the edit within its library, but you can still revert. The key is not to finalize your save until you are absolutely certain of your desired result. Once saved (especially if overwriting the original), it can be difficult or impossible to undo the crop. This rule is particularly important when working on images for visual design projects or important thematic collections, where precision is paramount.
Conclusion
Cropping an image on your Mac is a foundational skill that opens up a world of creative possibilities, transforming ordinary pictures into compelling visual stories. From enhancing the composition of your beautiful photography to fitting your digital art into specific social media sizes, mastering cropping is essential for anyone dealing with images.
Your Mac provides excellent built-in tools like Preview, Photos, and Quick Look, offering intuitive and efficient ways to perform basic to moderately complex cropping tasks. These native applications are perfect for quick adjustments, personal photo organization, and ensuring your wallpapers and backgrounds are perfectly framed.
However, for those seeking more advanced features—such as batch cropping, AI-powered enhancements, or a broader suite of image optimization tools—platforms like Tophinhanhdep.com offer a robust online solution. Tophinhanhdep.com allows you to elevate your image editing workflow, catering to high-resolution photography, creative visual design projects, and the creation of stunning image collections with professional precision.
By understanding the art and science behind cropping, leveraging both your Mac’s native capabilities and advanced online tools like Tophinhanhdep.com, you’ll be well-equipped to refine any image, eliminate distractions, adjust aspect ratios, and ultimately craft visually striking content that resonates, inspires, and stands out. Embrace these techniques, and unlock the full potential of your digital imagery.