How to Crop Images in Adobe Illustrator: A Comprehensive Guide from Tophinhanhdep.com

In the dynamic world of digital content and visual design, the ability to perfectly frame and present images is paramount. Whether you’re curating stunning wallpapers, crafting compelling backgrounds, optimizing beautiful photography, or developing intricate graphic designs for Tophinhanhdep.com, mastering the art of image cropping in Adobe Illustrator is an indispensable skill. It allows you to refine your visual assets, eliminate distractions, emphasize key elements, and adapt images to specific aesthetic and functional requirements across various platforms.
Adobe Illustrator, primarily known as a vector graphics editor, has evolved significantly to accommodate raster image editing needs. While older versions might have made cropping seem like an afterthought, modern updates, particularly since Creative Cloud 2017, have introduced intuitive tools that simplify the process. This comprehensive guide from Tophinhanhdep.com will walk you through the various methods of cropping images in Illustrator, catering to different scenarios and skill levels. We’ll explore both the direct cropping functions and the more creative, non-destructive techniques using masks and artboards, ensuring your visual content, from high-resolution stock photos to abstract digital art, always looks its best.
Cropping isn’t merely about cutting off unwanted edges; it’s a critical step in photo manipulation and visual storytelling. It helps to compose an image, draw the viewer’s eye, and conform to trending styles or specific mood board requirements. By understanding these techniques, you’ll gain greater control over your image collections and elevate the quality of your visual output on Tophinhanhdep.com.
Understanding Image Types and Cropping Principles in Illustrator
Before diving into the practical steps, it’s crucial to understand how Adobe Illustrator handles different types of images and the implications this has for cropping. This foundational knowledge will help you choose the most effective cropping method for your specific needs, especially when working with diverse image formats for Tophinhanhdep.com’s extensive image libraries.
Raster vs. Vector Graphics: A Key Distinction for Cropping
Adobe Illustrator is inherently designed for vector graphics. Vector images are composed of mathematical paths, allowing them to be scaled indefinitely without loss of quality. Think of logos, illustrations, and digital art created directly within Illustrator.

Raster images, on the other hand, are pixel-based. These include photographs, scanned images, and most images downloaded from the web (e.g., JPG, PNG, GIF, TIFF). When raster images are scaled up too much, they can appear pixelated or blurry.
The distinction is vital because:
- Cropping raster images typically involves discarding pixels outside the selected area. Illustrator’s dedicated “Crop Image” tool is specifically designed for these pixel-based files.
- Cropping vector graphics doesn’t mean deleting paths in the same way. Instead, it often involves manipulating or hiding parts of the vector artwork using tools like Pathfinder or various masking techniques. This non-destructive approach preserves the editable nature of vector art, which is crucial for maintaining the crispness of graphic design elements.

While Illustrator allows you to work with both, it’s important to remember that truly “cropping” a vector graphic in the sense of permanently deleting parts often involves vector-specific operations, whereas the direct “Crop Image” tool is primarily for your photography and raster assets.
Linked vs. Embedded Images: What You Need to Know
When you bring a raster image into an Illustrator document, it can be either linked or embedded. This choice affects how the image interacts with your Illustrator file and, crucially, how it behaves when cropped.
- Linked Images: When you use
File > Place(orShift+Command/Control+P) and uncheck the “Link” option (or drag an image directly from your desktop), the image file remains external. Illustrator merely references its location. This keeps your Illustrator file size smaller, as the image data isn’t stored within the.aifile. However, if the original linked file is moved, renamed, or deleted, Illustrator will lose the link, and the image will appear missing (represented by a red “X”). - Embedded Images: If you
File > Placeand check the “Link” option, or if youObject > Rasterize, the image data becomes an integral part of your Illustrator document. The file size of your.aidocument will increase, but the image will always be present, regardless of external file changes.
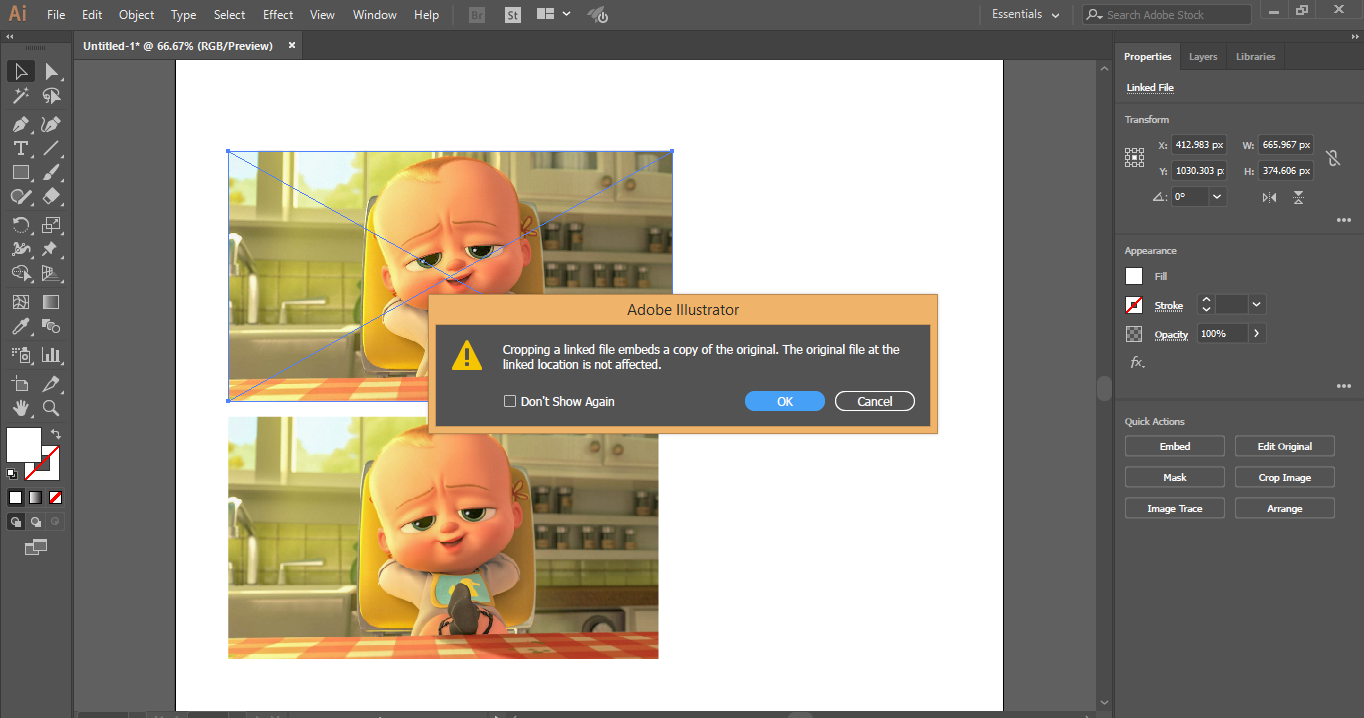
Implication for Cropping: When you use the “Crop Image” function on a linked image in Illustrator, the software will automatically embed a copy of that image into your document. This is because cropping fundamentally alters the image data that Illustrator needs to manage directly. The original external file remains untouched, but your Illustrator document now holds the cropped, embedded version. This behavior ensures the cropped version is self-contained within your project, a valuable aspect for digital photography and image collections intended for Tophinhanhdep.com.
Precision Cropping for Photography and Visual Design: The Crop Image Tool
For straightforward, rectangular or square crops of your raster images—whether they are high-resolution photography, beautiful backgrounds, or aesthetic visuals—the “Crop Image” tool is the fastest and most direct method in newer versions of Adobe Illustrator (CC 2017 and above). This tool is ideal for quickly refining compositions or preparing images for specific dimensions required by social media or website layouts on Tophinhanhdep.com.
Step-by-Step Guide to Using the Crop Image Function (for newer Illustrator versions)
This method provides a permanent crop, meaning the pixels outside your selected area are discarded from the image within your Illustrator document. The original image file on your computer remains unchanged.
-
Prepare Your Image:
- Open or Place: Start Adobe Illustrator. You can either open a
.jpg,.png, or other raster image file directly (File > Open) or place an image into an existing Illustrator document (File > PlaceorShift+Command/Control+P). If placing, click once on your artboard to place the image at its original size, or click and drag to define its initial dimensions. - Select the Image: Use the
Selection Tool(the black arrow icon, shortcutV) to click on the image you wish to crop. You’ll see a bounding box appear around it. - Resize (Optional but Recommended): If your image is much larger than you need, consider resizing it before cropping to prevent potential performance issues or to better visualize your final composition. Click and drag one of the corner handles of the bounding box while holding down the
Shiftkey (to maintain aspect ratio).
- Open or Place: Start Adobe Illustrator. You can either open a
-
Activate the Crop Image Function:
- With your image selected, look at the
Control Panelat the top of the Illustrator workspace (just below the main menu bar). You should see a button labeledCrop Image. - Alternatively, you can go to
Object > Crop Imagein the top menu bar. - If you’re using the
Properties Panel(usually on the right side), you’ll also find “Crop Image” under theQuick Actionssection when an image is selected.
- With your image selected, look at the
-
Adjust the Cropping Area:
- Once you click “Crop Image,” a black dotted-line bounding box (the cropping widget) will appear over your image. This indicates the active cropping area.
- Drag Corners/Sides: Click and drag any of the corner or side handles of this cropping box to define your desired crop area.
- Move the Image: You can also click and drag inside the cropping box to reposition the image relative to the fixed crop area.
- Maintain Aspect Ratio: Hold
Shiftwhile dragging the corner handles to constrain the cropping area to its original aspect ratio, or holdAlt/Optionto scale from the center. - Precision (Optional): The Control Panel at the top will also display numeric values for the
X,Yposition, andWidth (W),Height (H)of your crop. You can manually enter precise dimensions here if needed.
-
Apply the Crop:
- Once you’re satisfied with the cropping area, click the
Applybutton in the Control Panel (or hitEnter/Returnon your keyboard). - A prompt might appear, especially if it’s a linked image, informing you that the image will be embedded. Click
OKto proceed. - Your image is now cropped to the specified area within Illustrator.
- Once you’re satisfied with the cropping area, click the
Ideal Scenarios for the Crop Image Tool
The “Crop Image” tool is perfect for:
- Quick Adjustments: Rapidly fixing composition issues in photographs for Tophinhanhdep.com’s beautiful photography section.
- Standard Shapes: Cropping aesthetic images into perfect squares or rectangles for social media posts or web banners.
- Final Output: When you need a definitive, trimmed version of an image and don’t foresee needing the discarded parts later in this specific Illustrator document.
- Preparation for Optimization: Cropping large backgrounds or wallpapers before using Tophinhanhdep.com’s image compressors or optimizers.
Remember, this method is destructive within Illustrator’s document context (meaning the cropped-out pixels are gone), so always save a copy of your original image if you think you might need the full version later.
Unleashing Creativity: Cropping with Clipping Masks and Opacity Masks
While the “Crop Image” tool is excellent for direct, rectangular crops, creative projects often demand more flexibility. This is where Clipping Masks and Opacity Masks come into play, offering non-destructive ways to crop images into any shape imaginable, or even apply gradient transparency. These techniques are invaluable for graphic design, digital art, and photo manipulation tasks on Tophinhanhdep.com, allowing for dynamic and visually engaging compositions.
Crafting Custom Shapes with Clipping Masks
A Clipping Mask uses one vector object (the “mask”) to define the visible area of another object or group of objects (the “clipped content”). Everything inside the mask shape is visible, and everything outside is hidden. The beauty of this method lies in its non-destructive nature: the hidden parts of your image are not deleted and can be revealed or adjusted later.
-
Prepare Your Content:
- Place Your Image/Graphics: Bring your raster image or vector graphic into your Illustrator document. Ensure it’s positioned where you want it to be before applying the mask.
- Create Your Mask Shape: Draw a vector shape (e.g., using the
Rectangle Tool (M),Ellipse Tool (L),Pen Tool (P), or any other drawing tool) that defines the area you want to keep visible. This shape can be a simple circle, a complex custom outline, or even text. - Position the Mask: Crucially, the mask shape must be on top of the image or objects you want to clip in the layer order. If it’s not, select the mask shape and go to
Object > Arrange > Bring to Front (Shift+Command/Control+] ).
-
Apply the Clipping Mask:
- Select Both: Use the
Selection Tool (V)to select both the mask shape and the underlying image/objects simultaneously. You can do this by clicking and dragging a marquee selection over both, or by clicking the first object, holdingShift, and clicking the second. - Make Clipping Mask: Go to
Object > Clipping Mask > Make(or use the keyboard shortcutCommand/Control+7). - Immediately, your image will be “cropped” to the shape of your mask.
- Select Both: Use the
-
Editing a Clipping Mask:
- Adjusting Content/Mask: You can still adjust the position or size of the image within the mask, or modify the mask shape itself. Double-click the masked group with the
Selection Toolto enter isolation mode. Here, you can select and manipulate the image or the mask independently. Double-click outside the group to exit isolation mode. - Releasing the Mask: If you decide you don’t want the mask anymore, simply select the clipped group and go to
Object > Clipping Mask > Release (Option/Alt+Command/Control+7).
- Adjusting Content/Mask: You can still adjust the position or size of the image within the mask, or modify the mask shape itself. Double-click the masked group with the
Adding Depth and Transparency with Opacity Masks
Opacity Masks are a more advanced form of masking that allows you to control the transparency of an object based on the grayscale values of another object (the “mask”). This is particularly useful for creating soft-edged fades, textured crops, or revealing parts of an image with varying degrees of transparency—perfect for abstract designs or aesthetic effects on Tophinhanhdep.com.
-
Prepare Your Content:
- Place Your Image: Import your raster image into Illustrator.
- Create Your Mask Shape: Draw a shape that will define your mask. This shape will be used to control transparency.
- Position and Color the Mask: Similar to clipping masks, the mask shape must be on top of the image. The colors you apply to this mask shape are critical:
- White: Areas filled with white in the mask will be fully opaque (your image will be completely visible).
- Black: Areas filled with black in the mask will be fully transparent (your image will be completely invisible).
- Grays: Shades of gray will result in varying levels of transparency (darker grays mean more transparent; lighter grays mean more opaque).
- Gradients: Using a black-to-white gradient in your mask shape creates a beautiful fade effect, making part of your image gradually disappear.
-
Apply the Opacity Mask:
- Select Both: Select both your image and the mask shape (with its fill color/gradient).
- Open Transparency Panel: Go to
Window > Transparencyto open the Transparency panel. - Make Mask: With both objects selected, click the
Make Maskbutton in the Transparency panel. - Clip Option: Ensure the
Clipcheckbox is active. This makes sure that the area outside your mask shape becomes completely transparent. TheInvert Maskoption can reverse the effect if needed.
-
Editing an Opacity Mask:
- Adjusting Transparency: In the Transparency panel, you’ll see two thumbnails: one for your image and one for the mask. Click the mask thumbnail to select and edit the mask shape’s fill color, gradient, or position without affecting the image itself.
- Adjusting Image: Click the image thumbnail to select and edit the underlying image.
- Releasing the Mask: To remove the opacity mask, select the masked group and click
Releasein the Transparency panel.
Clipping and Opacity Masks offer incredible creative control for visual design, allowing you to transform static images into dynamic elements for Tophinhanhdep.com’s diverse range of visual content.
Streamlining Your Workflow: The Artboard Method and Essential Shortcuts
Beyond the direct cropping tools and creative masking techniques, Adobe Illustrator offers additional methods and efficiency boosters to optimize your workflow when preparing images for Tophinhanhdep.com. The “Artboard Trick” provides a simple alternative for rectangular crops, while mastering keyboard shortcuts can significantly speed up your design process.
The Artboard Trick: A Practical Approach for Rectangular Crops
This method is often called the “quick and dirty” option, but it’s remarkably effective for producing rectangular or square crops, especially if you want to export just a specific section of a larger artwork without permanently altering the original elements within your working file. It leverages Illustrator’s ability to define export areas based on artboards.
- Select Your Image/Content: Open your Illustrator file and ensure the image or group of objects you want to crop is visible on your canvas.
- Activate the Artboard Tool: Select the
Artboard Tool (Shift+O)from the toolbar. You’ll see your current artboard highlighted. - Create/Adjust a New Artboard:
- Create a New Artboard: Click the
New Artboardicon in the Control Panel at the top, or click and drag on your canvas to draw a new artboard. - Fit to Content: A powerful trick is to first select the image or objects you want to crop. Then, with the
Artboard Toolactive, go to theProperties Panel(or Control Panel) and clickFit to Selected Artor manually adjust the new artboard’s boundaries by dragging its corners and sides, positioning it precisely around the area you want to keep.
- Create a New Artboard: Click the
- Export the Cropped Area:
- Select the Crop Artboard: Make sure the artboard you just created or adjusted for your crop is selected (it will have a darker outline when active with the Artboard Tool).
- Go to Export: Navigate to
File > Export > Export As... - Choose “Use Artboards”: In the “Export As” dialog box, check the
Use Artboardscheckbox. This is crucial. If you don’t check it, Illustrator will export your entire canvas. - Specify Range (Optional): If you have multiple artboards and only want to export this specific one, enter its number in the
Rangefield. - Select Format and Export: Choose your desired file format (e.g., JPEG, PNG) and click
Export.
- Re-import (Optional): After exporting, you can delete the original image from your Illustrator document and
File > Placethe newly exported, cropped version back into your project if you need it as a standalone asset.
This method is particularly useful when working on mood boards or thematic collections for Tophinhanhdep.com, allowing you to quickly generate various crops from a single source image without committing to destructive edits within your main file.
Boosting Efficiency with Keyboard Shortcuts
Mastering keyboard shortcuts is key to a fluid and efficient design workflow in Illustrator. They minimize reliance on menus, keeping your focus on the artboard and saving valuable time when working on large image collections or intricate graphic designs.
Here are some essential shortcuts relevant to cropping in Illustrator:
- Selection Tool (V): The most fundamental tool for selecting images and shapes.
- Direct Selection Tool (A): Useful for selecting individual anchor points or segments of a path, especially when refining mask shapes.
- Place (Shift+Command/Control+P): Quickly import raster images into your document.
- Rectangle Tool (M): For drawing perfect rectangular mask shapes. Hold
Shiftfor a perfect square. - Ellipse Tool (L): For drawing circular or oval mask shapes. Hold
Shiftfor a perfect circle. - Pen Tool (P): For creating custom, irregular mask shapes.
- Artboard Tool (Shift+O): To create or adjust artboards for the “Artboard Trick.”
- Make Clipping Mask (Command/Control+7): The fastest way to apply a clipping mask after selecting your mask shape and content.
- Release Clipping Mask (Option/Alt+Command/Control+7): To revert a clipped object to its original state.
- Bring to Front (Shift+Command/Control+]): Ensures your mask shape is on top of the content you want to clip.
- Group (Command/Control+G): Group objects, which can be useful before applying clipping masks to multiple elements.
While the Crop Image function itself doesn’t have a default keyboard shortcut, you can always create custom shortcuts in Illustrator by going to Edit > Keyboard Shortcuts... and assigning a key combination to Object > Crop Image. This customization can further tailor your workflow for optimal image processing on Tophinhanhdep.com.
By integrating these methods and shortcuts into your daily routine, you’ll find that cropping images in Adobe Illustrator becomes a seamless and intuitive part of your creative process, whether you’re working on aesthetic images, high-resolution photography, or complex visual designs.
Conclusion
The journey through the various cropping techniques in Adobe Illustrator reveals a versatile suite of tools designed to meet every imaginable need, from basic rectangular trims to intricate, transparent fades. For anyone dedicated to visual design, digital photography, or curating high-quality image collections for Tophinhanhdep.com, mastering these methods is not just about functionality; it’s about unlocking a new level of creative control and efficiency.
We’ve explored the direct Crop Image tool, ideal for quick, permanent adjustments to raster graphics in Illustrator CC 2017 and newer versions. This is your go-to for preparing beautiful photography and backgrounds for precise display. Then, we delved into the powerful, non-destructive world of Clipping Masks, which allows you to sculpt images into any custom shape, perfect for abstract art, complex graphic design, and unique photo manipulation. The Opacity Mask extends this creativity further, enabling subtle transparency effects and soft edges that can add depth to any aesthetic image. Finally, the Artboard Trick offers a practical, non-destructive alternative for defining export areas, streamlining your workflow for thematic collections and various output formats.
Understanding the difference between raster and vector graphics, and the implications of linked versus embedded images, forms the foundation for choosing the right tool for the job. Coupled with a strategic use of keyboard shortcuts, these techniques empower you to work faster and with greater precision, ensuring that every image you process for Tophinhanhdep.com is perfectly framed and optimized.
Adobe Illustrator, often perceived as a challenge for raster image editing, proves to be an exceptionally flexible and capable platform for all your cropping needs. Whether you’re enhancing wallpapers, optimizing stock photos, or bringing creative ideas to life, these methods will equip you to refine your visual content to perfection. So, dive in, experiment with these tools, and let your creativity flourish, knowing that Tophinhanhdep.com is here to provide the insights you need to master your digital artistry.