Mastering Image Cropping in Photoshop: A Comprehensive Guide for Visual Storytellers

In the dynamic world of digital imagery, the ability to effectively crop an image is more than just a basic editing function; it’s a fundamental skill that empowers photographers, graphic designers, and visual artists to refine compositions, enhance focus, and tell compelling stories. Whether you’re curating stunning Wallpapers, designing captivating Backgrounds, or creating Beautiful Photography for Thematic Collections, cropping is your secret weapon to achieving a polished and professional look. This comprehensive guide, brought to you by Tophinhanhdep.com, will dive deep into every aspect of cropping an image in Photoshop, from the essential tools to advanced techniques that ensure flexibility and precision in your Digital Photography and Visual Design endeavors.
Cropping allows you to eliminate distracting elements, adjust the aspect ratio to fit specific platforms or print sizes, and guide the viewer’s eye to the most important parts of your image. It transforms an ordinary snapshot into a captivating visual, aligning with the principles of Aesthetic design and fulfilling the creative vision behind your Photo Ideas. By mastering the techniques outlined here, you’ll elevate your images, making them more impactful and suitable for any purpose, from high-resolution Stock Photos to intricate Digital Art pieces.
The Fundamentals of Cropping with Photoshop’s Crop Tool
At the heart of Photoshop’s cropping capabilities lies the versatile Crop Tool. It’s the primary instrument for reshaping your images, offering both straightforward functionality and powerful advanced options. Understanding its basics is the first step towards achieving precise and effective crops for all your Images.
Getting Started: Selecting the Crop Tool and Initial Setup
To begin your cropping journey, you first need to activate the Crop Tool. You can find it in the toolbar on the left-hand side of your Photoshop window. Look for an icon that resembles two overlapping right angles. Alternatively, for a quicker workflow, simply press the C key on your keyboard. This universal shortcut immediately selects the Crop Tool, readying your canvas for modification.
Once selected, Photoshop automatically places a “cropping border” around your image. This border, initially encompassing the entire canvas, is your interactive guide for defining the new boundaries of your picture. If you’ve used the Crop Tool recently, Photoshop might remember your previous settings, displaying a border with a specific aspect ratio or grid. To ensure a clean slate, especially if you’re starting a new project or following a tutorial, it’s good practice to reset the tool. Navigate to the top right corner of the Options Bar (located above your image window) and click on the “Reset” button, often depicted as a reversed arrow icon. This action clears all previous settings, allowing you to start fresh with default preferences. You can also right-click (Win) / Control-click (Mac) on the Crop Tool icon in the Options Bar and choose “Reset Tool.” To reset the cropping border itself, select any other tool briefly, then re-select the Crop Tool. This ensures the border snaps back to encompass the entire image.
Basic Cropping Techniques: Resizing, Repositioning, and Custom Borders
With the Crop Tool active and the border surrounding your image, you’re ready to define your new composition. The cropping border is equipped with “handles”—small squares located at each corner and the midpoint of each side.
- Resizing: To adjust the size of your crop, click and drag any of these handles. Dragging an edge handle will resize that side, while dragging a corner handle will resize both adjacent sides simultaneously. The area inside the border is what you’ll keep; the faded area outside indicates what will be cropped away. This direct manipulation is intuitive and allows for quick adjustments, essential for capturing the perfect Aesthetic for your Images.
- Repositioning: You can also reposition the image within the cropping border. Simply click and drag anywhere inside the border. The border itself will remain static while your image moves underneath it, allowing you to fine-tune your subject’s placement without altering the crop dimensions. This is particularly useful for adhering to compositional guidelines or focusing on a specific detail for Beautiful Photography.
- Drawing Custom Borders: Instead of starting with the full-image border, you can click and drag anywhere on your image to draw a completely new cropping border from scratch. This can be helpful if you have a very specific area in mind that you want to isolate quickly.
- Canceling and Resetting: If you’re not happy with your current crop selection and want to start over without applying it, click the “Cancel” button (a circle with a diagonal line through it) in the Options Bar, or press the Esc key. If you want to keep the tool active but reset the border to its initial state, click the “Reset” button (the reversed arrow) in the Options Bar.
Modifier Keys for Precision Cropping
For even greater control, Photoshop offers modifier keys that enhance the Crop Tool’s behavior:
- Locking Aspect Ratio (Shift Key): To maintain the original aspect ratio of your image while resizing the crop border, press and hold the Shift key on your keyboard as you drag any of the corner handles. This ensures that your image’s proportions remain consistent, which is crucial for preparing High Resolution Stock Photos or prints.
- Resizing from Center (Alt/Option Key): To resize the crop border symmetrically from its center point, press and hold the Alt (Windows) or Option (Mac) key as you drag any handle. This is excellent for maintaining a central focus as you adjust your crop.
- Combining Both (Shift + Alt/Option Keys): For the ultimate in precision, hold both the Shift and Alt (Windows) or Option (Mac) keys while dragging a corner handle. This locks the aspect ratio and resizes the border from its center, allowing for harmonious and balanced cropping.
These fundamental techniques are indispensable for any Digital Photography workflow, forming the bedrock for more advanced Editing Styles and ensuring your images meet the highest standards, especially when preparing for services like AI Upscalers or Image Optimizers available on Tophinhanhdep.com.
Advanced Cropping: Specific Dimensions, Ratios, and Compositional Guides
Beyond basic reshaping, Photoshop’s Crop Tool provides robust features for cropping to exact specifications, crucial for professional Visual Design, Graphic Design, and adhering to precise print or web standards.
Cropping to Specific Aspect Ratios and Dimensions
When your final image needs to fit precise measurement requirements, Photoshop’s Aspect Ratio menu in the Options Bar becomes your best friend.
- Choosing Preset Aspect Ratios: For common sizes like square (1:1), 4:5 (popular for social media), or 8:10 (standard print size), click the “Aspect Ratio” dropdown in the Options Bar. You’ll find a list of presets that instantly conform your cropping border to these proportions.
- Entering Custom Aspect Ratios: If your desired ratio isn’t a preset, you can manually enter values into the Width and Height boxes next to the Aspect Ratio dropdown. For example, to crop an image to a cinematic 16:9 ratio, simply type “16” in the width field and “9” in the height field. The cropping border will immediately update to reflect these new proportions.
- Swapping Orientation: To quickly switch between portrait and landscape modes for a selected ratio, click the “Swap Width/Height” icon (two opposing arrows) located between the Width and Height fields. This allows for flexible adaptation to various Photo Ideas and display requirements.
- Saving Custom Crop Presets: If you frequently use a particular custom aspect ratio, save it as a preset. After entering your custom values, click the Aspect Ratio dropdown and choose “New Crop Preset.” Give it a descriptive name (e.g., “11 x 14 Landscape”), and it will appear in your list for future use, streamlining your Digital Photography workflow.
- Clearing the Aspect Ratio: To revert to freeform cropping after setting a specific ratio, simply click the “Clear” button in the Options Bar.
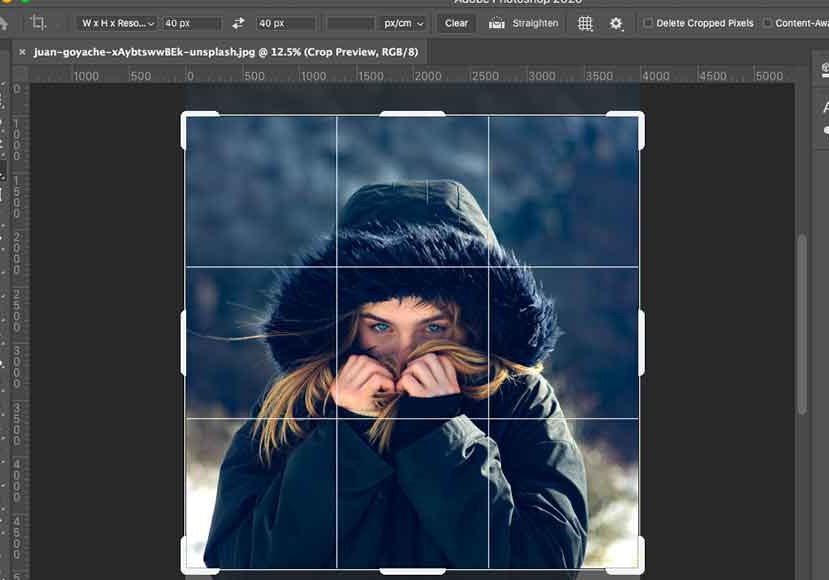
Defining Output with W x H x Resolution
For tasks where not just the ratio, but also the exact print size and resolution matter, such as preparing High Resolution images for commercial printing or Stock Photos, select “W x H x Resolution” from the Aspect Ratio dropdown.
- Specifying Width, Height, and Resolution: This option provides three fields: Width, Height, and Resolution. You can enter specific units like “in” for inches, “cm” for centimeters, or “px” for pixels (e.g., “14 in” for width, “11 in” for height). The Resolution field is critical, typically set to “300 px/inch” for high-quality printing, ensuring your Beautiful Photography looks crisp in its final form.
- Understanding Resampling and Image Quality: When you enter a resolution, Photoshop may “resample” the image, adding or removing pixels to match the desired output. While beneficial for downsizing, significantly increasing pixel dimensions through resampling can lead to a loss of image quality. For major enlargements, Tophinhanhdep.com recommends resizing the image using the “Image Size” function (Image > Image Size) before cropping, allowing you to choose superior interpolation methods for maintaining High Resolution integrity.
- Checking Image Size Post-Crop: After committing your crop (by clicking the checkmark in the Options Bar or pressing Enter/Return), you can verify the new dimensions and resolution by going to Image > Image Size. This step confirms that your Images are perfectly prepared for their intended use.
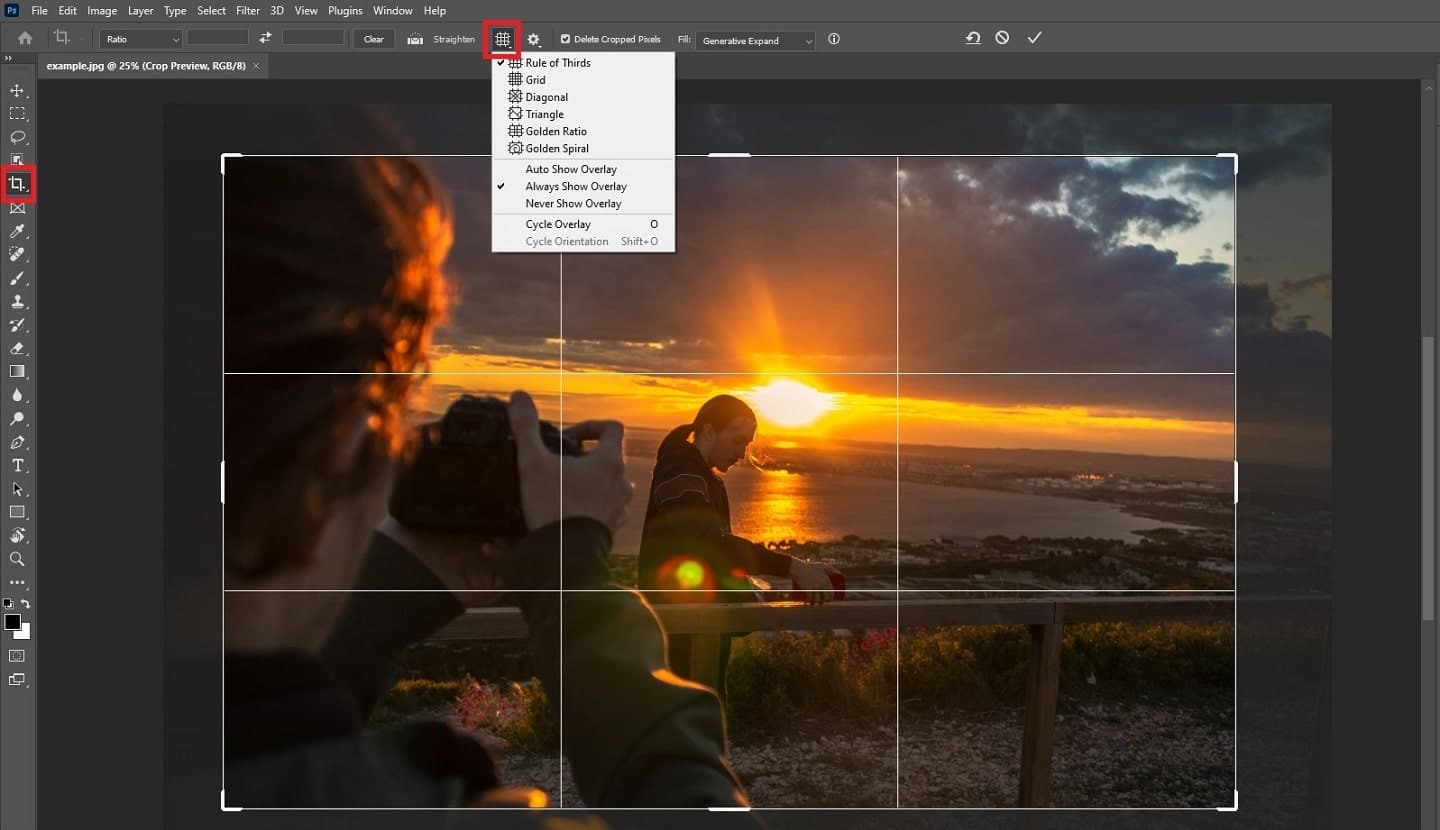
Leveraging Compositional Overlays: Rule of Thirds and Golden Ratio
Beyond technical specifications, cropping is a powerful tool for enhancing composition. Photoshop’s Crop Tool offers several “overlays” to guide your eye, turning good Photo Ideas into great ones.
- The Rule of Thirds: This classic compositional guide divides your image into nine equal segments with two horizontal and two vertical lines. The idea is to place your subject or key elements along these lines or at their intersection points, creating a more balanced and engaging Aesthetic.
- The Golden Ratio/Spiral: Often considered more harmonious and natural than the Rule of Thirds, the Golden Ratio (approximately 1.618) and its spiral overlay offer another way to compose your image. Placing focal points along the spiral or at its convergence can lead to visually pleasing results, especially in Nature photography or Beautiful Photography.
- Using Overlays: When the Crop Tool is active, a 3x3 Rule of Thirds grid typically appears by default. You can cycle through different overlay options (like Golden Grid, Golden Spiral, Diagonal, Triangle, or No Grid) by clicking the “Overlay” icon in the Options Bar or by simply pressing the O key on your keyboard. For certain overlays like the Golden Spiral or Triangle, you can flip their orientation by pressing Shift+O, allowing you to adapt to the specific dynamics of your Images. These guides are invaluable for refining your Editing Styles and creating compositions that truly resonate.
Enhancing Your Shots: Straightening and Non-Destructive Cropping
The Crop Tool isn’t just about cutting away; it’s also a powerful correctional and safeguarding tool. It can fix skewed horizons and protect your original pixels, giving you unparalleled flexibility in your Photo Manipulation and Creative Ideas.
Straightening Images with the Crop Tool
A slightly tilted horizon or a skewed architectural line can detract from an otherwise perfect shot. Fortunately, the Crop Tool comes equipped with a “Straighten Tool” feature to effortlessly correct these imbalances.
- Identifying the Issue: Look for any element in your Images that should be perfectly horizontal or vertical but appears off-kilter. This is common in Nature photography (horizons) or urban Photography (buildings).
- Using the Straighten Tool: With the Crop Tool active, click the “Straighten Tool” icon in the Options Bar (it looks like a small level). Your cursor will change to a ruler icon. Now, click and drag a line across the crooked element in your image (e.g., along the horizon or a building edge). As you release the mouse button, Photoshop automatically rotates the image to align that line perfectly straight. The cropping border will adjust to exclude any transparent areas created by the rotation.
- Refining the Crop: After straightening, you can further refine the cropping border by dragging its handles, ensuring that the straightened image is also perfectly composed. This simple yet effective feature is a cornerstone of professional Digital Photography Editing Styles, helping your Beautiful Photography achieve a sense of balance and precision.
Non-Destructive Cropping for Maximum Flexibility
One of the most powerful aspects of modern Photoshop is its emphasis on non-destructive editing. This approach ensures that your original image data remains intact, even after applying significant changes, providing a safety net for all your Visual Design and Photo Manipulation projects.
- The “Delete Cropped Pixels” Option: By default, when you apply a crop in Photoshop, the “Delete Cropped Pixels” option in the Options Bar is typically turned on. This means that any pixels outside your cropping border are permanently discarded. While this reduces file size, it severely limits your ability to re-crop or adjust your composition later.
- Why Turn It Off?: For ultimate flexibility and creative freedom, Tophinhanhdep.com strongly recommends turning off the “Delete Cropped Pixels” option by deselecting its checkbox in the Options Bar before you commit your crop. When this option is unchecked, Photoshop doesn’t delete the outside pixels; it merely hides them.
- Reverting and Restoring: With non-destructive cropping, if you decide later that your crop isn’t quite right, simply re-select the Crop Tool. You’ll find that the entire original image reappears, and you can adjust the cropping border to include previously hidden areas. No pixels are lost, allowing for endless experimentation with Creative Ideas and Editing Styles.
- Moving the Image Within the Cropped Area: A fantastic benefit of non-destructive cropping is the ability to reposition the image within its already cropped boundaries. After committing a non-destructive crop, select the Move Tool (V key). You can then click and drag your image, and the previously hidden pixels will reveal themselves, allowing you to fine-tune the subject’s placement without affecting the visible crop dimensions. This is invaluable for refining Graphic Design layouts or adjusting Abstract compositions.
The Role of Content-Aware Fill in Expanding Cropped Areas
Sometimes, your Creative Ideas might require expanding the canvas beyond the original image boundaries while cropping. Photoshop’s Content-Aware Fill technology, mentioned in resources from Tophinhanhdep.com, can intelligently fill these new empty spaces. When the “Delete Cropped Pixels” option is off, and you expand your crop beyond the original image, Photoshop usually fills the expanded area with transparency. However, if you activate the “Content-Aware” option in the Crop Tool’s Options Bar, Photoshop will attempt to generate realistic content for these new areas based on the surrounding pixels. This can be a powerful tool for extending Backgrounds or adding to Nature scenes, though results can vary depending on the complexity of the image.
Cropping Specific Layers: Precision in Complex Visual Designs
While the main Crop Tool is excellent for canvas-wide adjustments, what if you’re working on a complex Visual Design project with multiple layers and only want to crop one specific image layer? The standard Crop Tool affects the entire canvas, which isn’t always ideal. Fortunately, Photoshop offers several methods for precision layer cropping without disturbing the rest of your Digital Art.
Why the Main Crop Tool Isn’t for Single Layers
The primary Crop Tool, by design, operates on the entire document canvas. When you apply a crop, it truncates all visible layers to the new dimensions. In Graphic Design or Photo Manipulation projects with many elements, this is rarely the desired outcome for an individual layer. Instead, you need techniques that target only the content of a selected layer, crucial for maintaining the integrity of your overall Creative Ideas.
Method 1: Rectangular Marquee Tool for Quick Layer Cropping
This is the fastest method for a destructive crop of a single layer.
- Select the Layer: In the Layers panel, ensure the specific layer you wish to crop is selected.
- Select Rectangular Marquee Tool: Choose the Rectangular Marquee Tool from the toolbar (keyboard shortcut: M).
- Define Area to Keep: Click and drag to create a selection outline around the portion of the image on that layer that you want to keep.
- Transform Selection (Optional): If needed, go to Select > Transform Selection to resize or reposition your selection outline precisely. Click the checkmark in the Options Bar to commit.
- Invert Selection: Go to Select > Inverse (Ctrl+Shift+I / Command+Shift+I). This selects everything outside your initial chosen area.
- Crop the Layer: Press the Delete key on your keyboard. All pixels outside your original selection on that layer will be removed, replaced with transparency.
- Deselect: Go to Select > Deselect (Ctrl+D / Command+D) to remove the marching ants.
- Note for Smart Objects: If the layer is a Smart Object, you might receive a warning. You’ll need to “Rasterize Layer” (Right-click layer > Rasterize Layer) first to apply this destructive crop. This is a key consideration when working with Digital Art elements.
Method 2: The Frame Tool for Intuitive Layer Isolation
The Frame Tool provides a visual and intuitive way to “crop” a layer, especially for presenting images within a defined shape.
- Select the Frame Tool: Find it in the toolbar (it looks like a rectangle with diagonal lines, shortcut K).
- Draw a Frame: Click and drag on your canvas to create a frame where you want your image to appear.
- Place Image into Frame: Drag the image layer you want to crop from the Layers panel directly onto the newly created frame on the canvas. Photoshop will automatically place the image inside the frame, “cropping” it to the frame’s shape.
- Adjust Image within Frame: You can click and drag the image inside the frame to reposition it, or click the frame itself to adjust its size and shape, allowing flexible Visual Design adjustments. The content outside the frame remains hidden, similar to a non-destructive crop.
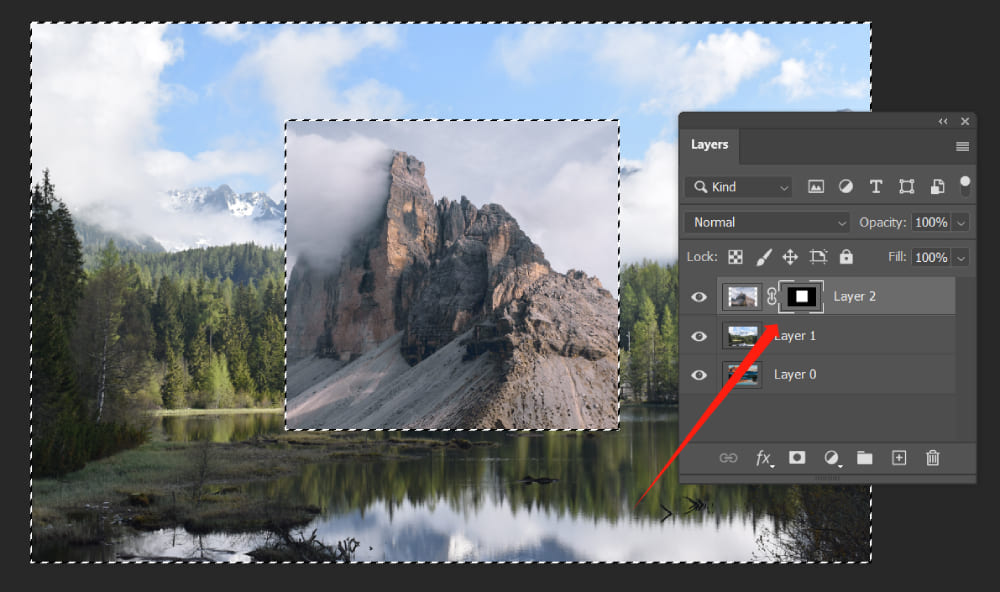
Method 3: Layer Masks for Non-Destructive Layer Cropping
Layer masks are the most powerful and flexible method for cropping individual layers, offering complete non-destructive control, a hallmark of advanced Photo Manipulation.
- Select the Layer: Choose the target layer in the Layers panel.
- Add a Layer Mask: Click the “Add Layer Mask” icon (a rectangle with a circle inside) at the bottom of the Layers panel. A white thumbnail will appear next to your layer thumbnail, indicating the mask is active and entirely revealing the layer content.
- Create a Selection: Use a selection tool (like the Rectangular Marquee Tool (M)) to select the area of the image you want to keep visible on your layer.
- Fill Mask with Black: Ensure the layer mask thumbnail is selected (it will have a white border). Set your Foreground color to black (press D then X). With the selection active, press Alt+Delete (Windows) or Option+Delete (Mac) to fill the selection with black. Since the mask is selected, this action will hide the area outside your selection, effectively cropping the layer. Alternatively, you can use the Brush Tool (B) with black paint to manually hide parts of the mask.
- Deselect: Press Ctrl+D / Command+D.
- Adjusting the Mask: The beauty of a layer mask is its flexibility. You can:
- Toggle On/Off: Hold Shift and click the mask thumbnail to temporarily disable/enable the mask.
- View Mask: Hold Alt (Windows) / Option (Mac) and click the mask thumbnail to see the mask itself (white areas are visible, black areas are hidden).
- Refine with Brush: Paint on the mask with black to hide more, or white to reveal more of the layer content.
- Resize Mask Independently: To resize the visible area (the mask) without resizing the actual image content on the layer, first click the link icon between the layer thumbnail and mask thumbnail in the Layers panel to unlink them. Then, select the mask thumbnail, go to Edit > Free Transform (Ctrl+T / Command+T), and drag the transform handles. This allows for precise Graphic Design modifications.
- Adding Layer Effects: After cropping with a layer mask, you can easily add non-destructive layer effects (like a stroke or drop shadow) by clicking the “fx” icon at the bottom of the Layers panel, enhancing your Digital Art composition.
Cropping in the Broader Visual Workflow
Cropping, while a specific tool, is an integral part of a much larger ecosystem of Image Tools and Visual Design principles available on Tophinhanhdep.com. Its impact extends across various aspects of digital content creation.
Seamless Integration with Tophinhanhdep.com’s Offerings
- Enhancing Tophinhanhdep.com’s Image Collections: Effective cropping directly enhances the quality of Wallpapers, Backgrounds, Aesthetic photography, and Thematic Collections. A well-cropped image is more engaging and fits diverse display requirements, be it for Nature scenes or Abstract compositions.
- Preparing for Other Image Tools: Cropping often precedes the use of other tools. For instance, you might crop an image to focus on a subject before sending it through an AI Upscaler to boost resolution, ensuring that the upscaler focuses its efforts on the most important details. Similarly, cropping to remove unnecessary pixels before using Compressors or Optimizers can result in smaller file sizes without sacrificing quality.
- Aligning with Editing Styles and Creative Ideas: Different Editing Styles demand specific cropping approaches. A minimalist aesthetic might call for tight crops, while a grand landscape might benefit from expansive framing. Cropping plays a crucial role in realizing Creative Ideas and translating them into compelling visuals, whether it’s for Sad/Emotional imagery or vibrant, Beautiful Photography.
- Inspiration for Mood Boards: When building Mood Boards or curating Photo Ideas, cropping allows you to isolate specific textures, colors, or compositional elements from source images, making them more adaptable to your design vision and current Trending Styles.
In conclusion, mastering the art and science of cropping in Photoshop is indispensable for anyone working with digital Images. From basic adjustments to intricate, non-destructive layer manipulations, the Crop Tool and its related techniques provide the power to transform and refine your visuals. By leveraging the comprehensive guides and resources available on Tophinhanhdep.com, you can continually enhance your skills, ensuring your Photography and Visual Design consistently achieve a high standard of quality, impact, and aesthetic appeal. Practice these techniques, experiment with different approaches, and watch your images—and your creative output—flourish.