Mastering Image Cropping in Adobe Illustrator: A Comprehensive Guide for Tophinhanhdep.com Users

In the dynamic world of digital content creation, the ability to precisely manipulate and refine visual assets is paramount. Whether you’re curating stunning wallpapers, crafting unique backgrounds, preparing high-resolution stock photos, or indulging in intricate digital art and photo manipulation, cropping images is a fundamental skill. For users of Tophinhanhdep.com, who frequently engage with a diverse range of visual media—from aesthetic nature shots to abstract designs and beautiful photography—understanding how to effectively crop within Adobe Illustrator can unlock new levels of creative control and efficiency.
Adobe Illustrator, traditionally celebrated as a vector editing powerhouse, has evolved significantly, especially in its handling of raster images. While older versions might have left new users scratching their heads, relying solely on clipping masks, modern updates have introduced more intuitive cropping functionalities. However, even with these advancements, a deep understanding of all available methods is crucial for mastering image preparation for graphic design projects, mood boards, and thematic collections.
This comprehensive guide from Tophinhanhdep.com aims to demystify the process of cropping images in Adobe Illustrator. We’ll explore the various techniques, from the straightforward “Crop Image” function available in newer versions to the versatile “Clipping Mask” and “Opacity Mask” methods, which offer unparalleled flexibility across all Illustrator iterations. We’ll also delve into a “quick and dirty” Artboard method and offer valuable keyboard shortcuts to streamline your workflow. By the end of this article, you’ll be equipped with the knowledge to select the most appropriate cropping method for any visual design challenge, ensuring your images—be they beautiful photography or vibrant digital art—are perfectly tailored for Tophinhanhdep.com’s standards and your creative vision.
The Foundational Difference: Cropping Raster vs. Vector Graphics in Illustrator
Before diving into the “how-to,” it’s essential to grasp a core concept: Adobe Illustrator’s native environment is vectors. This distinction profoundly impacts how raster images (like JPGs, PNGs, TIFFs) and vector graphics (created within Illustrator or imported as SVGs, AI files) are handled, particularly when it comes to cropping.
Traditionally, graphic designers often toggled between Adobe Photoshop for raster image editing, including cropping, and Adobe Illustrator for vector work. This workflow, while effective, can be cumbersome, especially when dealing with numerous images or complex layouts. Fortunately, Illustrator has become more adept at managing raster images, blurring the lines between these traditionally separate design tasks.
Cropping a vector graphic typically involves using tools like the Pathfinder, which modifies the actual paths and shapes that define the vector. This process fundamentally alters the vector artwork. However, applying the same Pathfinder operations directly to a raster image will yield no results unless the raster image has first been vectorized (converted into paths), which isn’t always the desired or practical approach for high-resolution photography.
Linked or Embedded Images: A Crucial Distinction for Cropping
When you bring a raster image into an Adobe Illustrator project, it can exist in one of two states: linked or embedded. Understanding this difference is vital because it affects how Illustrator processes the image during cropping.
- Linked Images: When an image is linked (e.g., using
File > PlaceorShift+Command/Ctrl+P, or by dragging it from your desktop into an open project), Illustrator maintains a connection to the original file on your computer. The image data itself isn’t stored within the Illustrator document; only a reference to its location is. This keeps your Illustrator file size smaller. When you crop a linked image using the “Crop Image” function, Illustrator will often prompt you, informing you that a copy of the image will be embedded into the document. This means the connection to the original file is severed, and the cropped image data becomes part of your Illustrator file. - Embedded Images: If an image is embedded from the outset (e.g., if you opened a JPG directly with Illustrator using
Open With > Adobe Illustratorfor some image formats, or after cropping a linked image), all its data is contained within the Illustrator document. There’s no external link. Cropping an embedded image simply modifies the image data within your Illustrator file.
The primary takeaway here is that if you intend to use the “Crop Image” function (discussed next), Illustrator will typically convert linked images to embedded images during the process. This is important for project management, especially if you have an organized system for linked assets.
Method 1: Utilizing the Crop Image Function in Illustrator CC 2017 and Above
For users leveraging Adobe Illustrator CC 2017 and newer, the “Crop Image” function offers the most direct and intuitive way to trim raster images. This method is akin to what you’d find in photo editing software, making it straightforward for quick adjustments. However, it’s important to remember that this function is primarily designed for raster images (like JPG, PNG, EPS, or rasterized versions of graphics). It performs a destructive crop, meaning the pixels outside your selected area are permanently removed from the image within Illustrator. While your original file on your desktop remains untouched, the image within your Illustrator document is permanently altered.
Here’s a step-by-step guide to using this efficient tool, perfect for refining high-resolution photography or stock photos for your Tophinhanhdep.com projects.
Step 1: Prepare Your Image in Adobe Illustrator
First, ensure your image is correctly placed within your Illustrator document. You can:
- Create a New Project: Open Adobe Illustrator, then go to
File > Newto create a new artboard. - Place Your Image: With your new project open (or an existing one), go to
File > Place...(or use the shortcutShift+Command/Ctrl+P). Navigate to your desired image file (e.g., a.jpg,.png), select it, and clickPlace. Then, click on your artboard to position the image. Alternatively, you can drag an image file directly from your desktop into an open Illustrator project, which will link it.
Once the image is on your artboard, you might want to adjust its size to fit your composition. Select the image with the Selection Tool (black arrow, shortcut V). Hover over a corner handle, press and hold Shift (to maintain aspect ratio), and drag to resize.
Step 2: Select the Image and Access the Crop Image Function
With your image placed and sized, it’s time to crop:
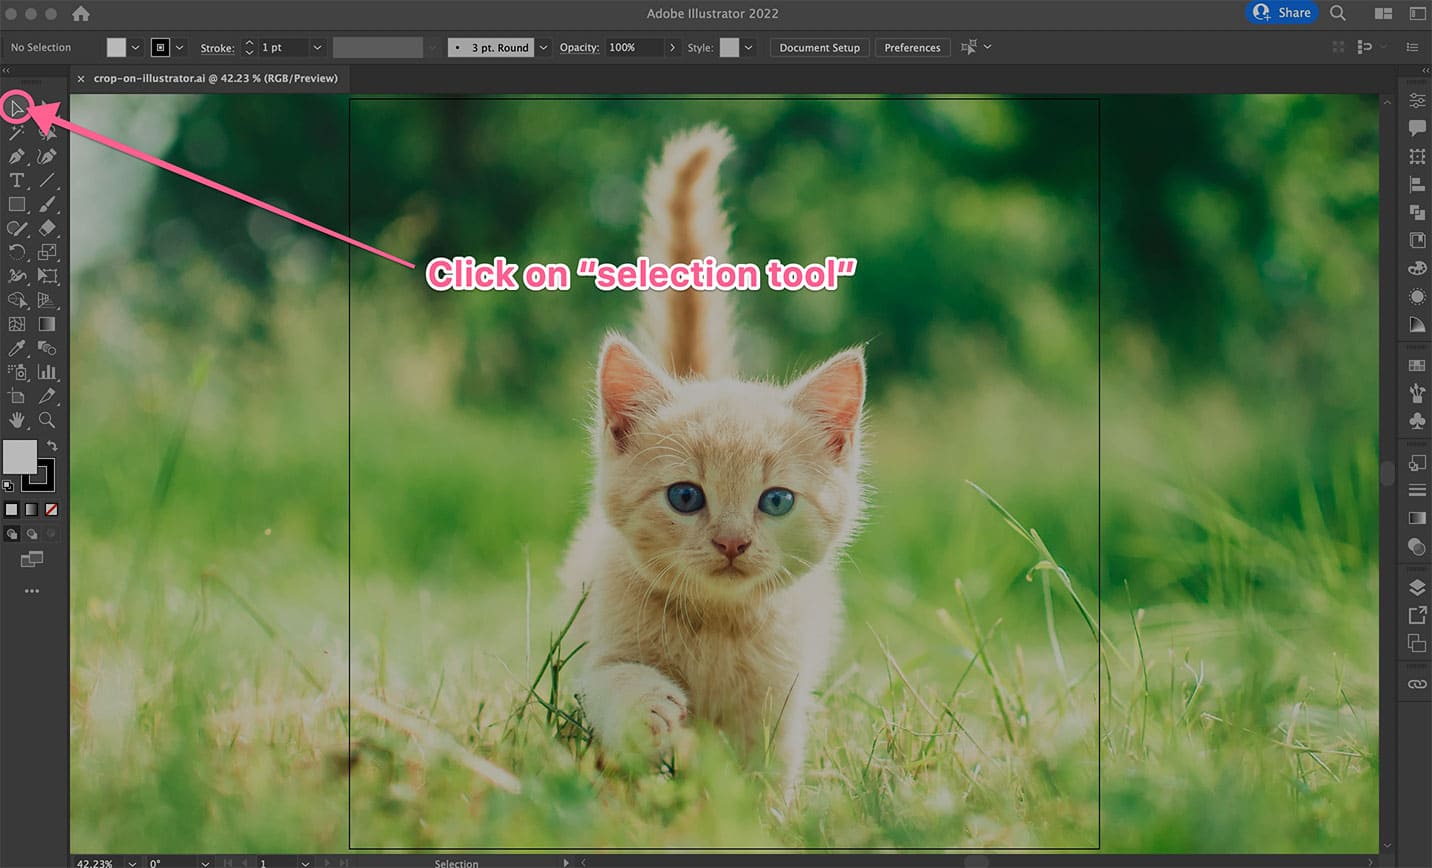
- Select the Image: Use the
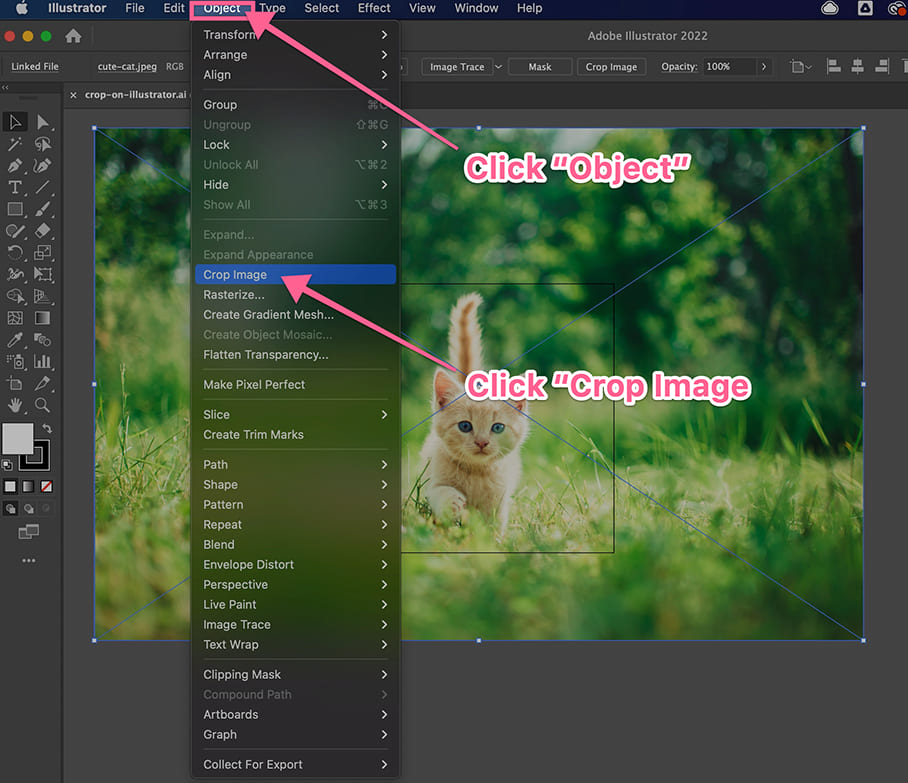
Selection Tool(the black arrow in the toolbar, shortcutV) and click on the image you wish to crop. A bounding box will appear around it, indicating it’s selected. - Locate the “Crop Image” Button: Once selected, the “Crop Image” button will appear in one of two prominent locations:
- Control Panel: Look at the top of your screen, just below the main menu bar. You’ll typically find a
Crop Imagebutton here. - Properties Panel: On the right side of your Illustrator interface, if the
Propertiespanel is open, you’ll find theCrop Imageoption within the “Quick Actions” section. If thePropertiespanel isn’t visible, go toWindow > Propertiesto open it.
- Control Panel: Look at the top of your screen, just below the main menu bar. You’ll typically find a
- Confirm Embedding (if prompted): If your image was linked, Illustrator will display a prompt warning you that cropping will embed a copy of the image. Click
OKto proceed. This ensures the cropped image data is saved directly within your Illustrator file.
Step 3: Define and Apply Your Cropping Area
After clicking “Crop Image,” Illustrator will activate the cropping interface:
- Adjust the Cropping Box: A rectangular box, often with black dotted lines and handles, will appear around your image. You can adjust this box in several ways:
- Drag Corners/Sides: Click and drag any of the corner or side handles to define the area you want to keep. The lighter, semi-transparent area outside the box indicates what will be cropped away.
- Free Transform vs. Aspect Ratio Lock: By default, dragging a corner allows you to freely transform the cropping area. If you need to maintain a specific aspect ratio (e.g., for social media dimensions or specific wallpapers for Tophinhanhdep.com), you might need to hold
Shiftwhile dragging, depending on your Illustrator version and settings. - Numerical Input: For precise dimensions, you can often input specific width and height values in the Control Panel at the top of the screen while the crop tool is active.
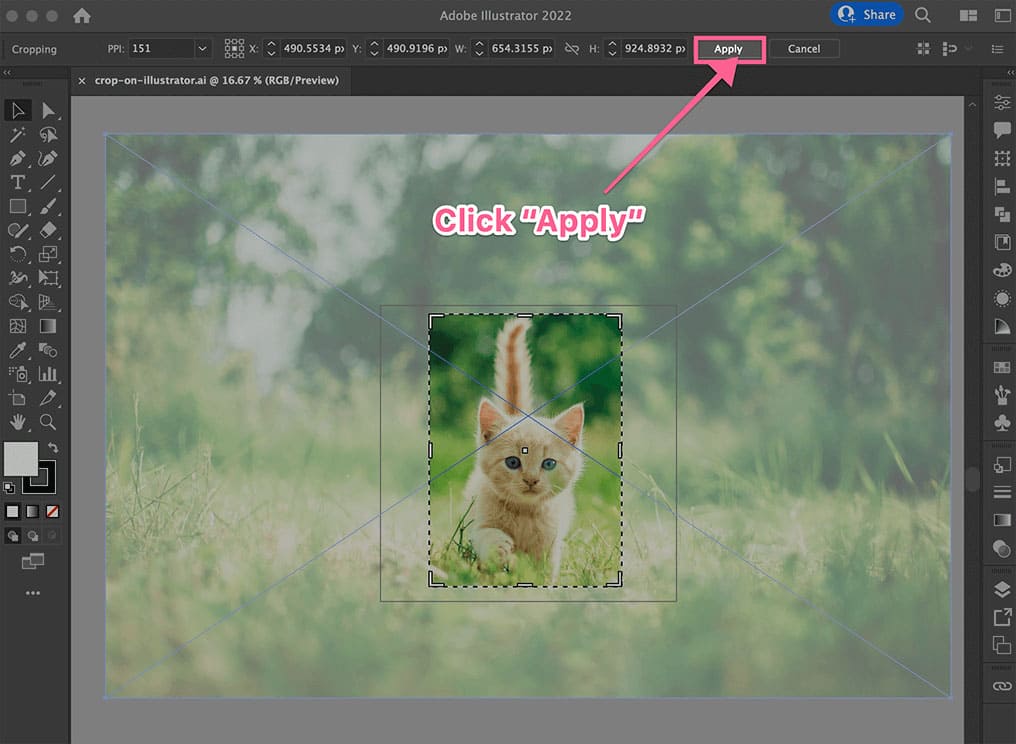
- Apply the Crop: Once you are satisfied with your cropping area, confirm the crop. You can do this by:
- Clicking the
Applybutton (usually a checkmark or similar icon) in the Control Panel at the top. - Pressing
EnterorReturnon your keyboard. - Clicking
OKin the Properties panel.
- Clicking the
Your image will now be cropped to the defined area, with the unwanted portions permanently removed from the Illustrator document. This method is incredibly fast for standard rectangular crops, making it ideal for preparing a batch of images for Tophinhanhdep.com’s aesthetic collections or high-resolution photo galleries.
Method 2: Unleashing Creativity with Clipping Masks in All Illustrator Versions
While the “Crop Image” tool is convenient for straightforward rectangular cuts, it falls short when you need more creative control over the shape of your crop or prefer a non-destructive editing approach. This is where Clipping Masks shine. Clipping masks are a cornerstone of graphic design in Illustrator, allowing you to “crop” an image or group of objects into any shape imaginable – circles, stars, custom hand-drawn paths, or even text outlines. The beauty of a clipping mask is its non-destructive nature: the masked-out portions of your image are merely hidden, not deleted, meaning you can easily readjust your crop at any time. This flexibility is invaluable for digital art, photo manipulation, and creating unique visual designs for Tophinhanhdep.com.
Step 1: Prepare Your Image and Draw Your Desired Mask Shape
To use a clipping mask, you need two primary components: the object(s) you want to mask and the shape that will serve as the mask (the “clipping path”). Crucially, the clipping path must be positioned above the object(s) it will mask in the layer stack.
- Place Your Image or Graphics: Start by placing your raster image (using
File > Place...) or creating your vector graphics on the artboard. This technique works equally well for both. - Draw Your Clipping Path Shape: This is the creative part!
- Basic Shapes: For standard shapes like circles or rectangles, select the
Ellipse Tool(shortcutL) orRectangle Tool(shortcutM) from the toolbar. Draw your desired shape over the area of the image you wish to keep. HoldShiftwhile drawing to create a perfect circle or square. - Custom Shapes: For irregular or artistic crops, use the
Pen Tool(shortcutP) to draw a custom closed path. This could be a complex outline for photo manipulation or a stylized element for digital art. - Text as a Mask: Type out text using the
Type Tool(shortcutT), then select the text and go toType > Create Outlines(Shift+Command/Ctrl+O). This converts the text into editable paths, which can then be used as a clipping mask.
- Basic Shapes: For standard shapes like circles or rectangles, select the
- Position the Clipping Path: Ensure your newly created shape (the clipping path) completely covers the portion of the image or graphics you intend to keep. Anything outside this shape will be hidden. It’s often helpful to turn off the fill and apply a brightly colored stroke to your clipping path temporarily, allowing you to see through it to the image below for precise placement. If your shape is not on top, select it and go to
Object > Arrange > Bring to Front(Shift+Command/Ctrl+]).
Step 2: Select Both Elements and Create the Clipping Mask
Once your image is ready and your clipping path is perfectly positioned, creating the mask is simple:
- Select Both Objects: Use the
Selection Tool(black arrow, shortcutV) to select both the clipping path shape and the image (or group of objects) you want to mask. You can do this by:- Clicking on the clipping path, then holding
Shiftand clicking on the image. - Clicking and dragging your
Selection Toolover both objects.
- Clicking on the clipping path, then holding
- Apply the Clipping Mask: With both objects selected, navigate to the top menu bar and choose:
Object > Clipping Mask > Make- Alternatively, use the powerful keyboard shortcut:
Command+7(Mac) orControl+7(Windows).
Instantly, your image will be “cropped” to the shape of your clipping path. Everything outside that shape will disappear from view, though it remains intact within your Illustrator file. This non-destructive nature means you can easily edit the mask or the masked content.
Step 3: Editing and Refining Your Clipping Mask
The flexibility of clipping masks truly shines in the editing phase:
- Adjusting the Masked Content: If you need to reposition or resize the image within the mask, you can:
- Double-click the masked object. This enters “Isolation Mode,” allowing you to select and manipulate the image independently. Click outside the bounding box or press
Escto exit Isolation Mode. - Select the masked group (the clipping mask object). In the Control Panel at the top, or the Properties panel, look for buttons like “Edit Clipping Path” and “Edit Contents.” “Edit Contents” allows you to select and move the image; “Edit Clipping Path” allows you to modify the shape of the mask itself using anchor points and handles.
- Double-click the masked object. This enters “Isolation Mode,” allowing you to select and manipulate the image independently. Click outside the bounding box or press
- Modifying the Clipping Path: To change the shape of your crop, select the clipping mask group, then click “Edit Clipping Path” or use the
Direct Selection Tool(white arrow, shortcutA) to manipulate the anchor points and segments of the clipping path. - Releasing the Mask: If you decide you no longer want the mask, select the masked object and go to
Object > Clipping Mask > Release(Option+Command+7orAlt+Control+7). Your original image and clipping path will reappear as separate objects.
Clipping masks are indispensable for creating intricate designs, seamlessly integrating images into complex layouts, or preparing stylized profile pictures and aesthetic elements for Tophinhanhdep.com’s visual collections.
Method 3: Advanced Visual Effects with Opacity Masks
Building upon the concept of clipping masks, Opacity Masks introduce an extra layer of control by allowing you to define areas of varying transparency within your image. This method is particularly interesting for digital artists and photo manipulators on Tophinhanhdep.com seeking to create soft transitions, subtle fades, or artistic blends, moving beyond a simple hard crop.
With an opacity mask, the transparency of your image is controlled by the grayscale values of another object (the mask).
- White in the mask means 100% opacity (the image is fully visible).
- Black in the mask means 100% transparency (the image is completely hidden).
- Shades of Grey in between create varying levels of transparency.
This offers a powerful non-destructive way to ‘crop’ an image with feathered edges or intricate transparency effects.
Step 1: Prepare Your Image and Create a Grayscale Mask Shape
Similar to clipping masks, you’ll need your target image and a shape that will act as the opacity mask.
- Place Your Image: Place the image you wish to apply the opacity mask to on your artboard (
File > Place...). - Draw Your Mask Shape: Create a shape (rectangle, ellipse, custom path, or even text outlines converted to paths) that defines the area where your image will be visible or partially visible. This shape should be positioned above your image in the layer stack.
- Fill the Mask Shape with Grayscale: This is the key difference from a standard clipping mask.
- Select your mask shape.
- Go to the
Colorpanel or theFillcolor swatch in your toolbar. - Fill the shape with white if you want the area to be fully opaque (visible).
- Fill it with black if you want the area to be fully transparent (hidden).
- For gradients and feathered edges: Apply a gradient fill to your mask shape, transitioning from white (visible) to black (transparent) or shades of gray. For example, a radial gradient from white in the center to black at the edges will create a soft, circular fade-out effect.
Step 2: Create the Opacity Mask via the Transparency Panel
With both your image and your grayscale mask shape prepared and selected, you can now create the opacity mask.
- Select Both Objects: Use the
Selection Tool(shortcutV) to select both your image and the grayscale mask shape positioned above it. - Open the Transparency Panel: Go to
Window > Transparencyto open the Transparency panel. - Make Opacity Mask: In the Transparency panel, ensure that the image is selected, and then click the
Make Maskbutton.- By default,
ClipandInvert Maskcheckboxes might be available. For typical cropping effects, keepClipchecked (this acts like a standard clipping mask in addition to opacity) andInvert Maskunchecked (unless you want to reverse the black/white effect). - If you apply a grayscale gradient to your mask shape, you’ll immediately see the transparency effect.
- By default,
Step 3: Adjusting and Releasing the Opacity Mask
Opacity masks offer a high degree of adjustability, crucial for fine-tuning your visual designs.
- Editing the Mask: In the Transparency panel, you’ll see two thumbnails: one for your original artwork and one for the mask.
- To edit the mask itself: Click on the mask thumbnail (the right one) in the Transparency panel. This activates the mask for editing. You can then use any drawing tool (Pen Tool, Gradient Tool, brushes) to modify the mask’s shape, fill, or gradient directly on the artboard. Remember, black hides, white reveals, and gray partially reveals.
- To edit the original artwork: Click on the artwork thumbnail (the left one) in the Transparency panel. This allows you to select and modify the underlying image without affecting the mask.
- Adjusting Opacity: The
Opacityslider in the Transparency panel controls the overall opacity of the entire masked object, not just parts of it. For nuanced transparency within the mask, you rely on the grayscale values of the mask shape itself. - Releasing the Mask: To remove the opacity mask, select the masked object, go to the
Transparencypanel, and clickRelease Mask. Both your original image and your mask shape will reappear as separate objects.
Opacity masks are perfect for creating soft vignettes for beautiful photography, blending multiple images seamlessly into a digital art composition, or adding subtle aesthetic touches to backgrounds and wallpapers for Tophinhanhdep.com.
Method 4: The Artboard Method for Precise Rectangular Exports
Sometimes, the goal isn’t just to crop an image within your Illustrator document, but to extract a specific rectangular portion of it as a completely new, standalone image file. This is especially useful when you’ve placed a large image, but only a section needs to be exported for web use, or when you want to isolate a particular element from a complex visual design to contribute to Tophinhanhdep.com’s stock photos or image inspiration collections. The “Artboard Method” provides a quick and effective way to achieve this, specifically for rectangular or square crops.
This method effectively uses Illustrator’s artboards as temporary cropping guides, allowing you to define the export area directly. It’s often referred to as a “quick and dirty” option because it involves a brief export and re-import cycle, but it’s remarkably efficient for its specific purpose.
Step 1: Define Your Cropping Area with an Artboard
Instead of drawing a separate shape for cropping, you’ll use an artboard to define the boundaries of your desired crop.
- Select Your Image (Optional but Recommended): While not strictly necessary, selecting the image you want to crop before activating the Artboard Tool can help snap the new artboard to its boundaries.
- Activate the Artboard Tool: Go to the toolbar on the left and select the
Artboard Tool(it looks like a square with crosshairs, shortcutShift+O). Your existing artboards will become visible with dashed outlines. - Create a New Artboard for Cropping:
- Draw a New Artboard: Click and drag with the
Artboard Toolto draw a new artboard directly over the portion of your image that you want to crop. Adjust its size and position precisely to frame your desired content. - Fit Artboard to Selection: If you have an object (or image) selected, you can click the “Fit to Selected Art” option in the Control Panel (at the top) to quickly create an artboard perfectly around it, then resize it as needed.
- Resize Existing Artboard: Alternatively, if you only have one artboard, you can resize it using the
Artboard Toolto frame the desired crop area.
- Draw a New Artboard: Click and drag with the
- Isolate the Target Area: Ensure that only the content you want to include in your final cropped image falls within the boundaries of this newly created or resized artboard. Any elements outside this artboard will be ignored during export.
Step 2: Export Your Cropped Image
Once your artboard precisely defines the desired crop, you can export it as a new image file.
- Access Export Options: Go to
File > Export > Export As... - Configure Export Settings: In the “Export As” dialog box:
- Choose Format: Select your desired image format (e.g.,
JPEG,PNG,SVG). For high-resolution photography on Tophinhanhdep.com,JPEGis common, whilePNGsupports transparency. - Name and Location: Give your file a meaningful name and choose a location to save it.
- Crucially, Check “Use Artboards”: This is the most important step for this method. Make sure the checkbox labeled
Use Artboardsis activated.- If you have multiple artboards and only want to export your specific cropping artboard, select the
Rangeoption and enter the number of that particular artboard (e.g., if it’s the second artboard you created, enter2). - If you only have one artboard that you’ve resized for cropping, simply checking
Use Artboardswill suffice.
- If you have multiple artboards and only want to export your specific cropping artboard, select the
- Choose Format: Select your desired image format (e.g.,
- Export and Re-import (Optional): Click
Export. Illustrator will then save a new image file based solely on the content within your specified artboard.- Clean Up: You can now delete your temporary cropping artboard (if you created a new one) and even the original, uncropped image from your Illustrator project.
- Bring Back In: If you need the cropped image back in your Illustrator file, use
File > Place...to import the newly exported, perfectly cropped image.
This method is excellent for preparing image assets for the web, creating thumbnails for Tophinhanhdep.com’s trending styles, or isolating elements for mood boards where the original, larger file might be too cumbersome.
Comparing Cropping Techniques and Choosing the Best Fit
Each cropping method in Adobe Illustrator offers distinct advantages, making them suitable for different scenarios. Understanding these differences allows you to choose the most efficient and effective approach for your Tophinhanhdep.com projects, whether you’re working with high-resolution photography, intricate vector art, or crafting aesthetic digital designs.
| Feature | Crop Image Function (CC 2017+) | Clipping Mask (All Versions) | Opacity Mask (All Versions) | Artboard Method (All Versions) |
|---|---|---|---|---|
| Image Type | Raster only | Raster & Vector | Raster & Vector | Raster & Vector (exports raster) |
| Crop Shape | Rectangular/Square only | Any custom shape, including text | Any custom shape, grayscale gradients | Rectangular/Square only |
| Destructive? | Yes (permanently removes pixels from document) | No (hides pixels, preserves original) | No (hides pixels with transparency, preserves original) | Yes (creates new cropped file) |
| Flexibility | Limited post-crop adjustment | High (easily edit mask/content) | Very High (edit mask, content, transparency) | Low (requires re-export for changes) |
| Use Case | Quick, standard image trims, preparing stock photos | Creative, non-standard shapes, photo manipulation, intricate graphic design | Soft fades, vignettes, blending, advanced digital art, aesthetic backgrounds | Exporting specific sections, web assets, quick rectangular isolation for image inspiration |
| Complexity | Easy | Moderate | Advanced | Easy to Moderate |
When to Use Which Method for Your Tophinhanhdep.com Content:
- For Standard Rectangular Crops (Fast & Permanent): If you’re trimming a high-resolution background, a wallpaper, or a general photograph to fit a standard frame, and you’re confident you won’t need the removed pixels again, the Crop Image Function is your fastest friend. It’s ideal for quickly preparing numerous images for Tophinhanhdep.com galleries.
- For Creative & Non-Destructive Crops: When you need to embed an image within a unique shape—like a circular profile picture, a star-shaped graphic for a creative idea, or a hand-drawn silhouette for digital art—the Clipping Mask is indispensable. Its non-destructive nature makes it perfect for photo manipulation and iterative design, ensuring you can always tweak your aesthetic.
- For Blending & Feathering Effects: If your visual design requires more than a sharp edge, such as a gentle fade-out for a beautiful photography piece or a layered effect for an abstract composition, the Opacity Mask offers unparalleled artistic control. This is ideal for subtle background blends or thematic collections that demand nuanced transitions.
- For Exporting Specific Sections: When you have a complex Illustrator project but only need to export a small, rectangular part of it (perhaps for a web banner, a social media post, or to generate a new stock photo thumbnail), the Artboard Method provides a clean, precise way to define your export area without altering your main document.
- For Vector-Specific Trimming: While this guide primarily focuses on raster image cropping, remember that for vector graphics, tools like the Pathfinder (specifically “Crop” or “Minus Front” functions) are the native Illustrator way to modify and trim vector shapes. If you need to cut a vector icon for a graphic design element, the Pathfinder is your go-to.
Keyboard Shortcuts to Enhance Your Cropping Workflow
Mastering these keyboard shortcuts can significantly speed up your design process, allowing you to fluidly move between tools and operations:
- Selection Tool:
V - Direct Selection Tool:
A(useful for editing clipping paths/opacity masks) - Place Image:
Shift+Command/Ctrl+P - Rectangle Tool:
M - Ellipse Tool:
L - Pen Tool:
P - Artboard Tool:
Shift+O - Make Clipping Mask:
Command/Ctrl+7 - Release Clipping Mask:
Option+Command/Ctrl+7
While the “Crop Image” function itself doesn’t have a built-in shortcut, you can always create custom keyboard shortcuts in Illustrator by going to Edit > Keyboard Shortcuts. This allows you to tailor your workflow to your specific needs and frequently used Tophinhanhdep.com image tools.
Wrapping It Up: Empowering Your Visual Designs for Tophinhanhdep.com
Cropping an image in Adobe Illustrator, once a confusing hurdle for many, is now a versatile skill enriched by multiple powerful methods. From the straightforward “Crop Image” button for quick rectangular trims to the limitless creative potential of “Clipping Masks” and the artistic finesse of “Opacity Masks,” Illustrator provides a comprehensive toolkit for every Tophinhanhdep.com user. The “Artboard Method” offers a clever workaround for precise rectangular exports, further expanding your options for image preparation.
By understanding the distinctions between raster and vector, linked and embedded images, and the destructive versus non-destructive nature of each technique, you can confidently choose the best method for your specific design challenge. Whether you’re enhancing the aesthetic appeal of a wallpaper, refining a high-resolution stock photo, manipulating digital art for a creative project, or curating thematic collections, these Illustrator cropping techniques are fundamental to achieving professional and visually stunning results.
The images you share, the backgrounds you design, and the visual stories you tell on Tophinhanhdep.com are only limited by your imagination and your command of these essential tools. Now that you’ve mastered the art of cropping in Adobe Illustrator, dive deeper into your creative projects, experiment with different styles, and continue to explore the vast world of visual design resources available on Tophinhanhdep.com. Unleash your creative ideas and transform your photography into true digital art!