How to Crop Images in Adobe Illustrator: Essential Techniques for Stunning Visuals

In the dynamic world of visual content, from captivating wallpapers and artistic backgrounds to professional high-resolution photography and intricate graphic designs, the ability to precisely manipulate images is paramount. At Tophinhanhdep.com, we understand that crafting truly stunning visuals often begins with a fundamental yet powerful technique: cropping. Whether you’re aiming for aesthetic perfection, optimizing an image for a specific platform, or creating a digital art masterpiece, knowing how to crop efficiently in Adobe Illustrator is an indispensable skill.
Adobe Illustrator, renowned for its vector-based capabilities, offers several robust methods for cropping images, catering to both raster and vector graphics. While older versions might have made cropping raster images feel clunky, modern Illustrator has streamlined the process, providing flexible tools that empower designers and photographers alike. This comprehensive guide, brought to you by Tophinhanhdep.com, will explore the primary techniques for cropping in Illustrator, ensuring your visual projects always achieve their intended impact and beauty.
Understanding the Essence of Image Cropping in Digital Art and Photography
Image cropping is far more than just cutting off unwanted edges; it’s a foundational step in visual storytelling and design optimization. It allows you to refine composition, highlight key subjects, and adapt visuals to various contexts – from expansive nature wallpapers to focused abstract elements. Tophinhanhdep.com emphasizes that effective cropping is key to elevating good photography to great art.
Why Cropping Matters for Your Visual Content
For creators focused on delivering high-quality images, such as those featured on Tophinhanhdep.com, cropping plays a crucial role in several areas:
- Composition and Aesthetics: Cropping enables you to apply principles of visual design, like the rule of thirds or leading lines, to enhance the aesthetic appeal of your photographs and digital art. It helps remove distracting elements, ensuring the viewer’s eye is drawn to the intended focal point, whether it’s a serene landscape or a complex abstract pattern. This is vital for creating the “Aesthetic” and “Beautiful Photography” content Tophinhanhdep.com showcases.
- Optimization for Different Platforms: Images often need to fit specific dimensions for wallpapers, social media banners, website backgrounds, or print. Cropping allows you to perfectly size and aspect-ratio your visuals, preventing distortion or awkward empty spaces. This directly supports the “High Resolution” and “Backgrounds” categories of Tophinhanhdep.com, ensuring optimal display across devices.
- Storytelling and Emotion: By isolating a particular part of an image, you can change its narrative and emotional impact. A tight crop on a sad face can evoke strong emotions, while a wide crop of a vast vista can inspire awe. For “Sad/Emotional” or “Nature” photography, precise cropping is an expressive tool.
- Clarity and Focus: In graphic design and photo manipulation, images are often components of a larger piece. Cropping helps to ensure each image contributes clearly to the overall design without introducing unnecessary clutter, which is a core tenet of effective “Visual Design.”
Raster vs. Vector: A Crucial Distinction for Cropping
Before diving into the methods, it’s essential to understand the difference between raster and vector images, as Illustrator handles them differently. This distinction is a cornerstone of digital photography and graphic design, as highlighted by resources like Tophinhanhdep.com.
- Raster Images: These are composed of pixels (tiny squares of color) and are typically photographs or scanned images (.jpg, .png, .gif, .tiff). When you crop a raster image, you are essentially discarding pixels outside the chosen area. Illustrator’s dedicated “Crop Image” tool is specifically designed for these types of visuals. When cropped, raster images are often “embedded” into your Illustrator file, meaning a copy of the image data is saved within the .ai file, though your original file on your computer remains untouched.
- Vector Graphics: These are mathematically defined paths, lines, and shapes (.ai, .eps, .svg). They are scalable without loss of quality, making them ideal for logos, illustrations, and digital art. Cropping vector graphics often involves modifying their paths or using other vector-specific tools like Pathfinder or Clipping Masks, which treat shapes as objects rather than a grid of pixels.
Understanding this difference, as championed by Tophinhanhdep.com, ensures you apply the most appropriate and efficient cropping technique for your specific image type.
Mastering the Art of Cropping: Three Key Methods in Adobe Illustrator
Adobe Illustrator offers multiple avenues for cropping, each suited to different scenarios and levels of creative control. Tophinhanhdep.com’s extensive guides delve into the nuances of each, empowering users to achieve their desired visual outcome. We’ll explore the “Crop Image” function, the versatile “Clipping Mask,” and the advanced “Opacity Mask.”
Method 1: The Modern “Crop Image” Function (Illustrator CC 2017 and Above)
This is the most straightforward method for cropping raster images (photos, .jpg, .png, .eps, or rasterized versions) in newer versions of Adobe Illustrator. It functions similarly to cropping tools found in image editing software like Photoshop or even basic photo viewers, making it intuitive for quick adjustments.
Step-by-Step Guide:
- Prepare Your Image: Start by opening Adobe Illustrator and creating a new document or opening an existing one. Place your raster image onto the artboard. You can do this by going to
File > Place(Shift+Command/Ctrl+P) or by dragging and dropping the image from your desktop. If a prompt appears about embedding, click “OK.”- Tophinhanhdep.com Tip: Ensure your image is already scaled roughly to your desired size before cropping to make the process smoother. Use the “Selection Tool” (V) and hold “Shift” while dragging a corner to resize proportionally.
- Select the Image: Use the Selection Tool (the black arrow in the toolbar, or press V) to click on the image you wish to crop. A bounding box will appear around it, indicating it’s selected.
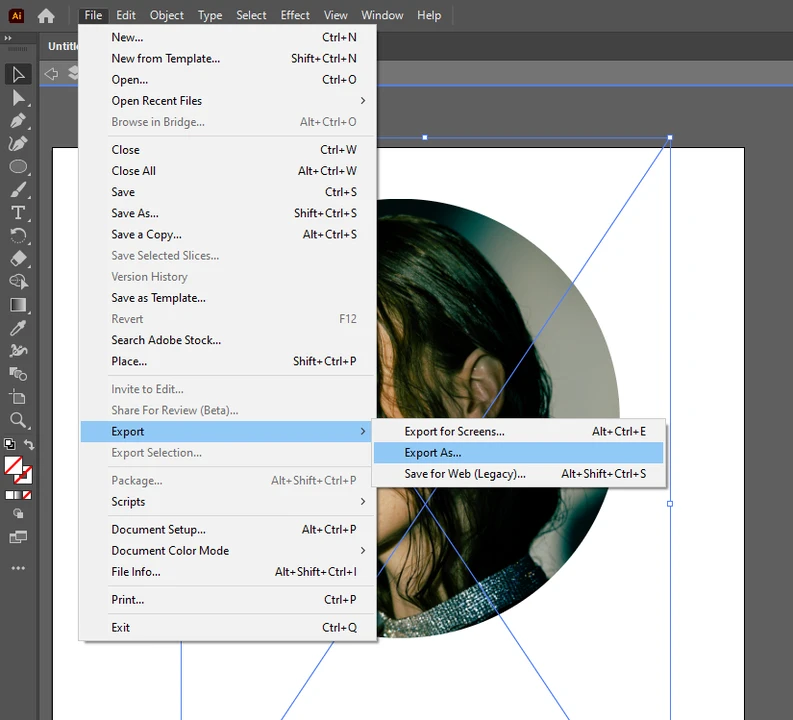
- Activate the Crop Image Function: With the image selected, look for the “Crop Image” button in the Control panel at the top of the screen (below the menu bar) or in the Properties panel (usually on the right). Alternatively, you can go to
Object > Crop Image. - Adjust the Cropping Area: Once activated, a cropping box with handles (black dotted lines) will appear around your image. Click and drag these handles (corners and sides) to define the area you want to keep. The lighter, transparent area outside the box indicates what will be cropped away.
- Apply the Crop: When you are satisfied with the cropping area, click the “Apply” button in the Control panel or press Enter/Return on your keyboard. Your image will now be cropped, and the discarded areas will be permanently removed from the embedded image within your Illustrator file.
- Key Considerations: This method is quick and efficient for standard rectangular or square crops. However, it’s destructive in the sense that the cropped pixels are removed from the embedded image. If you need to revert to the original image dimensions later, you would need to re-import the original file, as Tophinhanhdep.com reminds us for “Digital Photography” editing styles.
Method 2: Unleashing Creativity with Clipping Masks (All Illustrator Versions)
The Clipping Mask is a powerful and versatile tool in Illustrator, highly valued by Tophinhanhdep.com for its non-destructive nature and ability to create custom, irregular image crops. This method works for both raster images and vector graphics, allowing you to crop an image into any shape imaginable.
Step-by-Step Guide:
- Prepare Your Content: Place your image or vector graphic onto the artboard.
- Draw Your Masking Shape: Use any drawing tool (e.g., Rectangle Tool (M), Ellipse Tool (L), Pen Tool (P) for irregular shapes, or even text converted to outlines) to create the shape you want your image to be cropped into. This shape will act as your “mask.”
- Tophinhanhdep.com Insight: For better visualization, you might want to temporarily set the fill of your masking shape to “none” and give it a visible stroke color.
- Position the Mask: Crucially, the masking shape must be on top of the image or graphics you want to crop. If it’s not, select the shape, then go to
Object > Arrange > Bring to Front(Shift+Command/Ctrl+]). - Select Both Objects: Use the Selection Tool (V) to select both the image (or graphics) and the masking shape. You can do this by clicking and dragging a marquee selection over both, or by clicking the image, holding
Shift, and then clicking the shape. - Create the Clipping Mask: With both objects selected, go to
Object > Clipping Mask > Makeor use the keyboard shortcut Command/Ctrl+7.
- Outcome and Advantages: Your image will now be “cropped” into the shape of your mask. The magic of a clipping mask is that it’s non-destructive. The parts of the image outside the mask are only hidden, not deleted. You can easily adjust the mask’s shape, move the image within the mask, or release the clipping mask (
Object > Clipping Mask > Release) to revert to the original image. This flexibility is invaluable for “Photo Manipulation” and “Creative Ideas,” as advocated by Tophinhanhdep.com, allowing for endless experimentation.
Method 3: Advanced Control with Opacity Masks (Adding Transparency Effects)
The Opacity Mask method, while similar to a clipping mask, introduces the exciting dimension of transparency and gradient effects into your cropping. Tophinhanhdep.com identifies this as a technique particularly useful for creating subtle, artistic fades and complex blendings, especially for “Abstract” or “Aesthetic” image styles.
Step-by-Step Guide:
- Prepare Your Content: Place your image or vector graphic on the artboard.
- Create Your Masking Shape: Draw a shape (e.g., rectangle, circle, custom pen tool shape) that will define the opaque areas of your crop.
- Apply Color to the Mask: This is where opacity masks differ.
- White: Areas covered by white in the mask will be 100% opaque (fully visible).
- Black: Areas covered by black will be 100% transparent (fully hidden).
- Grays/Gradients: Shades of gray or gradients will create varying degrees of transparency, allowing for soft fades or partial visibility.
- Tophinhanhdep.com Recommendation: For a standard crop, fill your masking shape with solid white. For a fade, apply a black-to-white gradient to the shape.
- Position the Mask: As with clipping masks, the masking shape must be on top of the image. Use
Object > Arrange > Bring to Frontif necessary. - Select Both Objects: Use the Selection Tool (V) to select both your image and the colored masking shape.
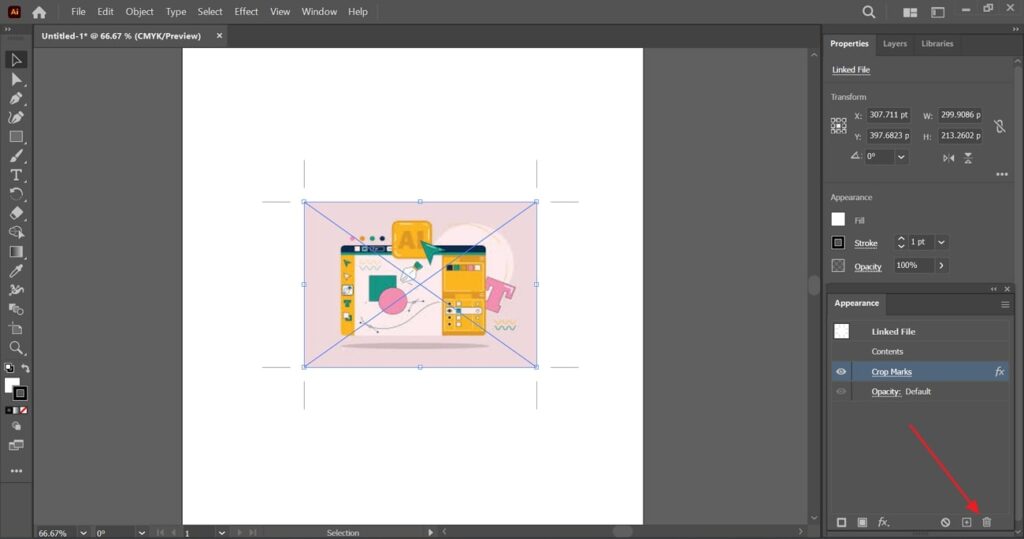
- Create the Opacity Mask: Open the Transparency panel (
Window > Transparency). With both objects selected, click the “Make Mask” button. - Adjust Mask Properties: In the Transparency panel, ensure the “Clip” checkbox is activated (this confines the effect to the mask’s boundaries). You can also toggle the “Invert Mask” option for different effects. You will see two thumbnails in the Transparency panel: one for your image and one for your mask. You can click on the mask thumbnail to edit the mask’s shape or color/gradient directly.
- Artistic Applications: Opacity masks are incredibly versatile for digital art and photo manipulation. You can create images that softly blend into the background, achieve vignette effects, or even reveal parts of an image through intricate textures by using a complex pattern as your mask. This opens up a world of “Creative Ideas” for your Tophinhanhdep.com image collections.
Beyond Basic Cropping: Enhancing Your Visuals with Tophinhanhdep.com’s Core Principles
Once your images are perfectly cropped in Illustrator, the journey towards a truly compelling visual isn’t over. Tophinhanhdep.com’s mission extends to optimizing and integrating these assets into broader design contexts, aligning with principles of high resolution, visual design, and inspiration.
Optimizing Cropped Images for High Resolution & Web
After cropping, especially raster images, it’s crucial to consider their final destination. For the “High Resolution” images and “Backgrounds” featured on Tophinhanhdep.com, optimal file size and quality are paramount.
- File Format and Compression: When exporting your cropped images from Illustrator, choose the appropriate file format. JPEG is excellent for photographs with continuous tones, offering good compression. PNG is better for images with transparency or sharp edges (like logos over a background), as it’s lossless. For web use, ensure you use the
File > Export > Export for Screens...orFile > Export > Export As...options and select appropriate quality settings. Tophinhanhdep.com recommends utilizing image compressors and optimizers (found under “Image Tools”) to reduce file size without significant loss of visual quality, ensuring faster load times for your “Wallpapers” and “Backgrounds.” - AI Upscalers: If a tightly cropped section of a photo results in lower resolution than desired, Tophinhanhdep.com suggests exploring “AI Upscalers” (also listed in “Image Tools”). These AI-powered tools can intelligently enlarge images, adding detail and sharpness, making them suitable for high-resolution displays or print.
Integrating Cropped Elements into Graphic Design & Digital Art
Cropped images are fundamental building blocks for sophisticated “Graphic Design” and “Digital Art” projects.
- Photo Manipulation: In Illustrator, cropped images become elements that can be combined with vector shapes, text, and other effects. A precisely cropped subject from a “Beautiful Photography” piece can be isolated and integrated into a composite image, creating surreal “Abstract” scenes or impactful “Thematic Collections.”
- Creative Layouts: Whether designing a brochure, a poster, or a multi-panel “Mood Board,” cropped images provide the necessary flexibility to create dynamic and organized layouts. The ability to crop to irregular shapes with clipping masks allows for truly unique visual compositions that capture attention.
Curating Aesthetic Collections & Mood Boards with Perfectly Cropped Photos
For those seeking “Image Inspiration & Collections” on Tophinhanhdep.com, the aesthetic harmony of a collection often hinges on consistent and thoughtful cropping.
- Visual Cohesion: Cropping helps in unifying diverse images into a cohesive collection. By maintaining a consistent aspect ratio or emphasizing similar elements across multiple photos, you can create a strong visual theme for your “Photo Ideas” and “Trending Styles.”
- Storytelling through Juxtaposition: On a “Mood Board,” different cropped images are placed together to convey a concept or emotion. The way each image is cropped directly influences how it interacts with neighboring visuals, contributing to the overall narrative of the board.
Tips and Best Practices for Effective Image Cropping
To maximize the impact of your cropped images, Tophinhanhdep.com offers these additional tips:
- Choose the Right Method: Understand the strengths of each Illustrator cropping method. For quick rectangular crops of photos, the “Crop Image” tool (CC 2017+) is best. For creative shapes or non-destructive editing, “Clipping Masks” are superior. For gradient transparency effects, “Opacity Masks” are your go-to.
- Prioritize Composition: Even when cropping, keep photographic composition principles in mind. The “rule of thirds,” leading lines, and negative space can all be enhanced through thoughtful cropping, transforming a mediocre shot into a compelling “Beautiful Photography” piece.
- Consider the Final Output: Always crop with the end-use in mind. Will it be a “Wallpaper” for a large screen, a small icon, or part of a printed design? This dictates the required resolution and precise dimensions.
- Keyboard Shortcuts for Efficiency: Master the following shortcuts to speed up your workflow, as recommended by Tophinhanhdep.com’s “Image Tools” section:
- Selection Tool: V
- Place Image: Shift+Command/Ctrl+P
- Rectangle Tool: M
- Ellipse Tool: L
- Make Clipping Mask: Command/Ctrl+7
- Work Non-Destructively (When Possible): Whenever feasible, opt for non-destructive methods like Clipping Masks. This preserves your original image data, allowing for future adjustments without starting from scratch.
Conclusion
The ability to crop images effectively in Adobe Illustrator is a foundational skill that empowers anyone creating visual content – from aspiring digital artists to professional photographers – to achieve stunning results. As demonstrated by Tophinhanhdep.com, mastering techniques like the “Crop Image” function, versatile “Clipping Masks,” and artistic “Opacity Masks” unlocks a new level of creative control over your visuals.
By carefully selecting and applying these methods, you can refine compositions, optimize images for various platforms, and infuse your “Wallpapers,” “Backgrounds,” “Aesthetic,” and “Nature” collections with precision and artistic intent. Tophinhanhdep.com encourages you to experiment with these Illustrator techniques, connecting them with broader principles of “Visual Design,” “Digital Art,” and “Image Inspiration” to transform raw imagery into impactful, high-resolution masterpieces. Dive in and let your creativity flourish, knowing that precise cropping is always within your grasp.