How to Crop Images in Canva for Picture-Perfect Visuals

In the dynamic world of digital content creation and visual design, the ability to manipulate images effectively is paramount. Whether you’re a seasoned graphic designer, a budding digital artist, or simply looking to enhance your personal photography, tools like Canva have democratized professional-grade editing. Among the most fundamental yet impactful editing techniques is cropping. Cropping isn’t just about cutting off unwanted edges; it’s a powerful compositional tool that can transform an ordinary image into a captivating visual narrative. It allows you to refine focus, adjust aspect ratios, eliminate distractions, and tailor your visuals to specific platforms or design aesthetics.
For creators constantly seeking high-resolution images, stunning wallpapers, aesthetic backgrounds, or diverse thematic collections, platforms like Tophinhanhdep.com serve as invaluable resources. Once you’ve found the perfect image – be it a breathtaking nature shot, an intriguing abstract piece, or a vibrant piece of beautiful photography – knowing how to effectively crop it in Canva becomes the next crucial step in your visual journey. This comprehensive guide will walk you through various methods of cropping in Canva, from basic adjustments to advanced shape manipulations, ensuring your designs achieve that picture-perfect result. We’ll also touch upon how these techniques integrate with broader concepts of photography, visual design, and the utility of image tools, helping you unlock your full creative potential.
The Fundamentals of Cropping in Canva
Cropping in Canva is surprisingly intuitive, offering a range of options to suit different needs, from quick adjustments to precise, detail-oriented work. It’s a foundational skill for anyone delving into graphic design or digital photography, allowing you to take any image – whether uploaded from your own collection or selected from Canva’s vast library of stock photos – and tailor it to your exact specifications.
Standard Free-Form Cropping for Photos and Elements
The most common and straightforward way to crop an image in Canva involves using the built-in crop tool. This method is perfect for isolating a specific subject, adjusting the overall composition, or simply removing unnecessary parts of a photo or graphic element.

Step-by-Step Guide:
- Add Your Image or Element: Begin by creating a new design in Canva or opening an existing one. Upload your desired photo (perhaps a stunning nature landscape or an aesthetic background from Tophinhanhdep.com) via the ‘Uploads’ section, or select a stock photo or graphic element from Canva’s ‘Photos’ or ‘Elements’ tabs. Drag and drop it onto your canvas.
- Activate the Crop Tool: Select the image or element on your canvas. You’ll notice a menu bar appear at the top of the editor. Click the ‘Crop’ tool icon (which typically looks like two overlapping right-angled lines). Alternatively, a quicker method is to simply double-click the image itself. This action automatically activates the cropping handles.
- Adjust the Crop Box: Once the crop tool is active, you’ll see a border with small white L-shaped marks (or solid lines) appear around your image. These are your cropping handles.
- Proportional Cropping: To resize the crop box while maintaining the original aspect ratio (meaning the width and height will scale together), click and drag one of the L-shaped corner handles diagonally inward or outward. This is ideal for maintaining the natural look of your beautiful photography.
- Non-Proportional Cropping (Free-Form): If you need to change the shape or aspect ratio of your crop – perhaps to turn a landscape image into a portrait or vice versa, or to create a unique cut for a digital art piece – you can drag the side, top, or bottom handles independently. For even finer control over non-proportional resizing, some users find holding down the ‘Shift’ key while dragging a corner handle can achieve this effect, though Canva’s default behavior often allows this without the Shift key when dragging side/top/bottom handles.
- Reposition the Image within the Crop Box: After adjusting the crop box to your desired size and shape, the area outside this box will appear dimmed or semi-transparent. This indicates the part of the image that will be cropped out. You can now click and hold the image inside the crop box and drag it around. This allows you to precisely position the most important part of your photo or element within your defined crop area. For instance, if you’re cropping an abstract image, you can shift it to highlight a particular texture or color gradient.
- Confirm Your Crop: Once you are satisfied with the cropped area and the image’s position, click ‘Done’ on the top menu bar, or simply click anywhere outside the image on the canvas. Your image will instantly be cropped to the new dimensions.

This manual cropping technique is a fundamental part of any photo manipulation process and is universally applicable to all types of images, from sad/emotional photography where you might want to focus on an expression, to vibrant wallpapers that need specific dimensions.
Precise Cropping with Specific Dimensions
While free-form cropping offers flexibility, there are times when you need absolute precision. For instance, when working with high-resolution stock photos that need to fit exact specifications for a website banner, a social media post, or a print design. Canva provides tools to achieve this level of control through its ‘Position’ menu.
Step-by-Step Guide:
- Select Your Image: Add your image to the canvas as before and select it.
- Access the ‘Position’ Menu: On the top menu bar, click on ‘Position’. This will open a side panel, usually on the right, which contains ‘Arrange’ and ‘Layers’ tabs. Ensure the ‘Arrange’ tab is selected.
- Set Specific Width and Height: Within the ‘Arrange’ tab, you’ll find input fields for ‘Width’ (W) and ‘Height’ (H). Here, you can type in the exact pixel dimensions you require for your cropped image.
- Maintain Aspect Ratio (Optional): If you want to change one dimension and have Canva automatically adjust the other to preserve the image’s original proportions, click the ’lock’ icon (which looks like a chain link) between the ‘W’ and ‘H’ input fields. This ensures your image doesn’t get distorted and maintains its integrity as a piece of digital photography.
- Fine-Tune the Crop: After entering the dimensions, the image’s frame will resize. Now, double-click on the image. You’ll see the full image with the newly sized frame acting as the crop window. Click and drag the image around within this window to select the exact portion you want to display. This is crucial for precise compositional choices within your new, predefined dimensions.
- Confirm: Click ‘Done’ or click off the image to finalize your precisely cropped visual.
This method is invaluable for graphic design projects that demand strict adherence to sizing guidelines, or when preparing multiple images for a mood board where consistency is key. It acts as an effective image tool, allowing creators to optimize visuals for various platforms and outputs.
Advanced Cropping Techniques and Creative Applications
Beyond the basic rectangular crop, Canva offers innovative ways to crop images into custom shapes and leverage AI for smart adjustments, opening up new avenues for visual design and creative ideas. These methods go beyond mere utilitarian cutting, enabling true photo manipulation and unique aesthetic expressions.
Utilizing Frames for Shape Cropping (e.g., Circle, Custom Shapes)
One of Canva’s most celebrated features for creative cropping is the use of ‘Frames’. Frames allow you to instantly crop your images into a variety of predefined shapes, from circles and stars to more intricate designs, without complex masking techniques. This is particularly useful for profile pictures, unique graphic elements, or adding flair to thematic collections.
How to Crop to a Circle in Canva (and other shapes):
- Start Your Design: Open your Canva project. If you’re using a specific wallpaper or background image from Tophinhanhdep.com, add it to your canvas first.
- Find the ‘Elements’ Tab: On the left-hand sidebar of the Canva editor, click on ‘Elements’.
- Search for Frames: In the Elements search bar, type “Frames” and press Enter. You’ll see a vast selection of frames, categorized by shape and style.
- Select Your Desired Frame:
- For a Circle: Type “Circle Frame” in the search bar, or scroll through the ‘Frames’ options to find a circular one. Click on the circle frame you like. It will appear on your canvas.
- For Other Shapes: If you want a heart-shaped photo, search for “Heart Frame.” If you’re looking for something more playful, search for “Blob Frame” or “Star Frame.” Experiment with different keywords to discover a wide array of options for your digital art.
- Resize and Position the Frame: Once the frame is on your canvas, you can resize it by dragging its corner handles, and move it to your desired position. This defines the final shape and size of your cropped image.
- Drag Your Image into the Frame: Now, go to your ‘Uploads’ or ‘Photos’ section. Select the image you want to crop and drag it directly over the frame. As you hover over the frame, you’ll see your image snap into place, taking on the shape of the frame. This is a magical moment in photo manipulation!
- Adjust Image within the Frame: The image might not be perfectly positioned within the frame initially. To adjust it, double-click on the image inside the frame. You’ll now see the full original image with the frame’s shape overlaid as a transparent window. You can then:
- Move: Click and drag the image to shift its position, centering your subject or focusing on a specific detail.
- Resize: Use the white anchor points around the image (not the frame) to make the image larger or smaller within the frame. Note that you generally cannot make the image smaller than the frame itself, but you can enlarge it to fill or overflow the frame’s boundaries.
- Confirm Changes: Once you’re happy with the placement and size of the image within the frame, click ‘Done’ or click anywhere outside the image area on the canvas.
Important Note on Transparency: When cropping into a shape like a circle, the corners of your original rectangular image are not truly “gone”; they are simply made invisible. To ensure that your shape-cropped image truly has a transparent background (rather than a white square background behind your circle, for example), you must download your design as a PNG file. This is a crucial step for achieving a professional look, especially for images intended for web use or layering in complex graphic designs. While Canva’s free version might add a background color to PNGs, a Canva Pro subscription fully supports transparent backgrounds for such advanced image tools. Tophinhanhdep.com, on the other hand, might offer free alternatives for transparent background generation, or other converters that facilitate this.
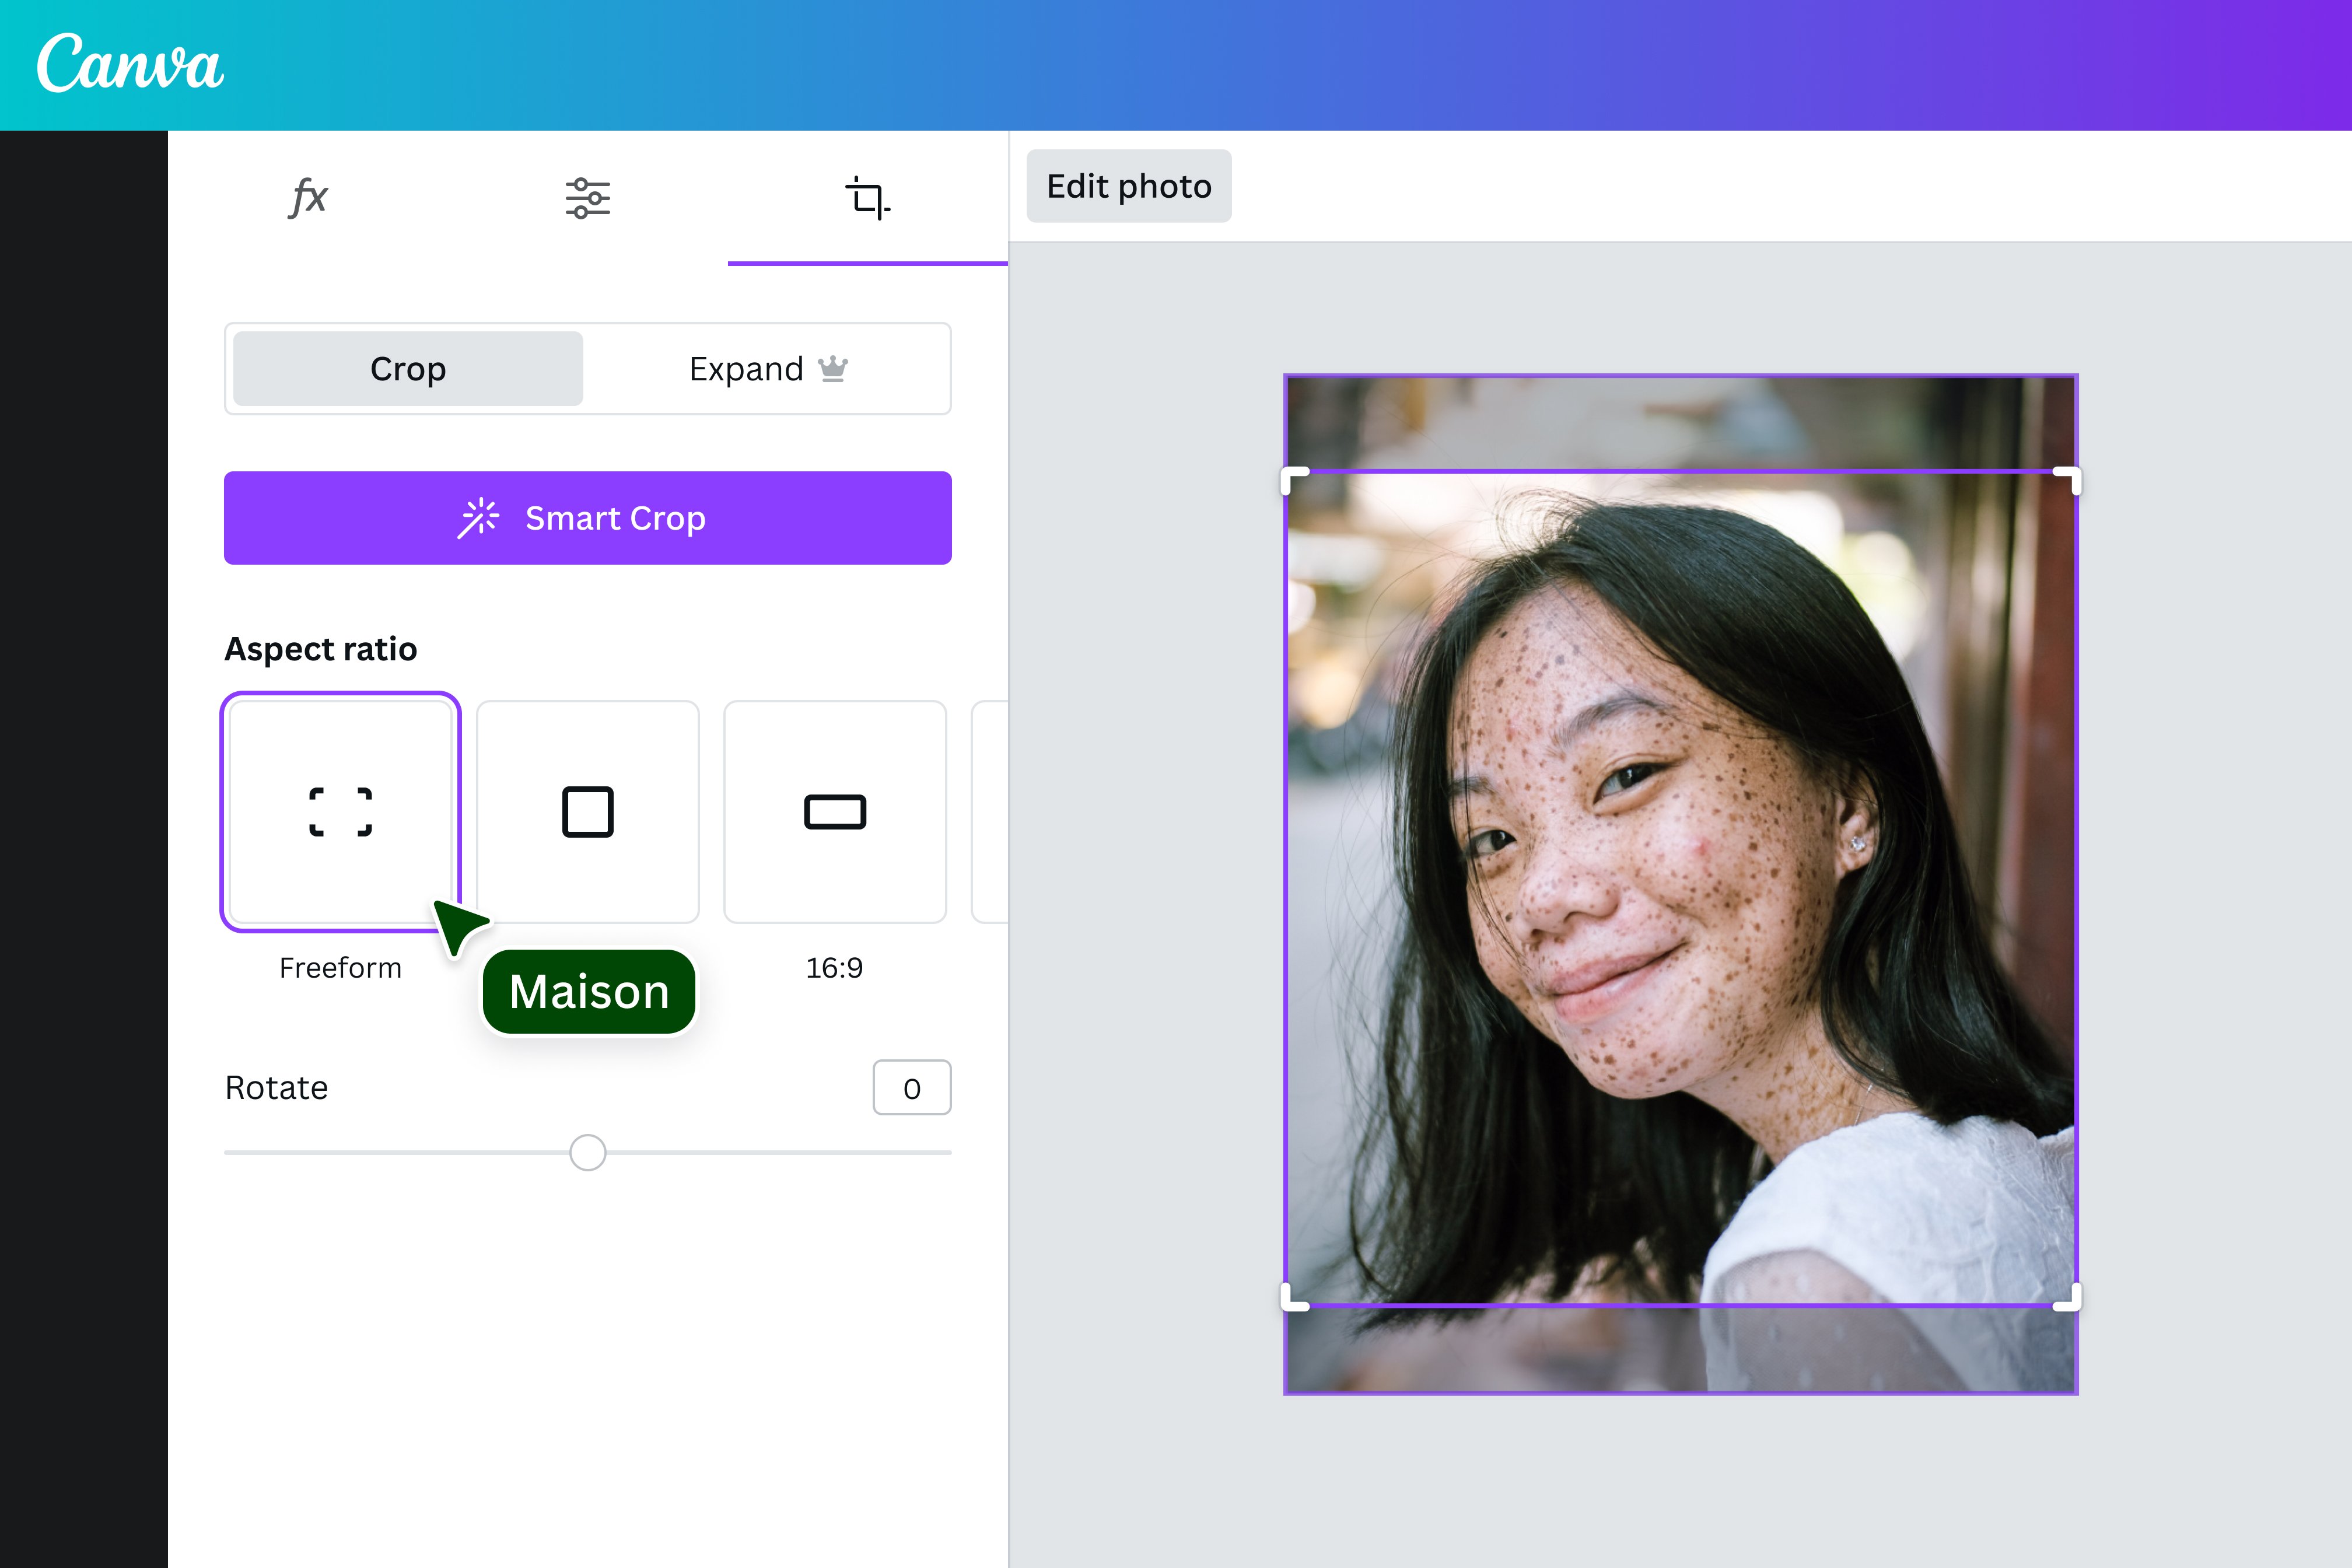
Smart Crop and Aspect Ratio Presets
Canva also integrates smarter cropping features, particularly useful for adapting images to various digital platforms.
Using ‘Edit Photo’ for Advanced Options:
- Select Your Image: Add and select your image on the Canva canvas.
- Click ‘Edit Photo’: On the top menu bar, click ‘Edit Photo’. This opens a new editing panel, often on the left-hand side.
- Explore ‘Crop’ Options: Within this panel, you’ll find a ‘Crop’ tab.
- Smart Crop: Canva’s AI-powered ‘Smart Crop’ feature can analyze your image and suggest what it deems the best crop, focusing on the main subject. While not always perfect, it can offer a quick starting point or fresh perspective, especially for general stock photos.
- Aspect Ratio Presets: Below ‘Smart Crop’, you’ll see a selection of common aspect ratios (e.g., 1:1 for Instagram, 4:5, 9:16 for stories). Clicking on these instantly reshapes your crop box to match the chosen ratio. This is incredibly efficient for social media managers and content creators who need to quickly adapt aesthetic images for various platforms, ensuring trending styles are met without manual calculations.
- Rotate within Crop: This option allows you to rotate the image inside the fixed crop box, rather than rotating the entire image and its frame. This subtle tool can greatly enhance the composition of your digital photography within a constrained space.
Cropping Images for Social Media: A highly efficient workflow for social media content involves batch-processing your images using Canva’s features combined with strategic organization. Tophinhanhdep.com also champions high-resolution photography suitable for social media, which can then be optimized in Canva.
- Organize in Folders: On the Canva homepage, go to ‘Projects’ > ‘Folders’. Create a new folder (e.g., “Social Media Images”).
- Upload and Name: Upload all your images to this folder. Give them descriptive names for easy searching (e.g., “Nature Landscape – Instagram 1:1”).
- Edit and Crop: Click on an image in the folder. It will pop up in an editing window. Use the ‘Edit Photo’ panel to apply aspect ratio presets (e.g., 1:1 for Instagram, 9:16 for stories), manually adjust the crop, or even apply filters.
- Save or Download: You can save the edited version back to Canva (it’s good practice to add “edited” to the filename) or download it directly. This streamlines the process of preparing a thematic collection of images for various social media needs.
These advanced cropping methods, especially when combined with Canva Pro features like the background remover, allow for sophisticated photo manipulation and unlock a wealth of creative ideas for visual design projects.
Enhancing Your Cropped Images with Canva Pro and Beyond
Canva’s versatility extends to working seamlessly within templates and offering powerful Pro features that can further elevate your cropped images. Moreover, understanding how Canva integrates with broader image tools and resources like Tophinhanhdep.com can significantly streamline your creative workflow.
Cropping within Templates and Leveraging Pro Features
Canva is renowned for its extensive library of templates, which serve as excellent starting points for various visual design projects. These templates often include predefined frames and grids for images, allowing you to easily drop in your photos. Even within these structured layouts, the cropping tools remain fully functional, enabling you to perfect the composition.
Adjusting Images in Pre-Designed Templates:
- Select a Template: Choose any template from Canva’s vast collection. Many templates are designed with placeholders for images, often in the form of grids or frames.
- Add Your Image: Drag your photo (perhaps a piece of beautiful photography or an aesthetic background) into an existing image placeholder in the template. The image will automatically conform to the shape and size of that placeholder.
- Refine the Crop: Even though the image is in a template, you can still fine-tune its appearance. Double-click the image within the template. This will activate the familiar cropping interface, allowing you to move and resize the image inside the existing frame or grid. Use the anchor points to enlarge a specific detail, or drag the image to center the focal point. This is crucial for customizing templates to truly reflect your visual design style or to ensure your Image Inspiration is perfectly conveyed.
- Apply Additional Edits: After cropping, you can apply other editing options available in Canva, such as filters, adjustments (brightness, contrast, saturation), or even flip the image. The beauty of Canva is that these edits will only affect the selected image within its frame, leaving the rest of the template unchanged.
Leveraging Canva Pro Features: Canva Pro significantly expands your image manipulation capabilities, directly impacting how you approach cropping and “cutting out” elements.
- Background Remover: This is a game-changer for digital art and photo manipulation. While not a traditional “crop,” the background remover effectively “cuts out” your subject from its background, creating a transparent image. This allows you to place your cropped subject onto any new background, combine elements from different photos, or integrate it seamlessly into complex graphic designs. For example, if you’ve cropped a subject from a high-resolution stock photo, removing its background can make it versatile for use in various collages or advertisements. This feature turns a simple crop into a highly selective cutout, pushing the boundaries of what’s possible with image tools.
- Premium Stock Assets: Canva Pro offers access to millions of premium images, elements, and templates. This expanded library, combined with efficient cropping tools, means you’ll always have high-quality visuals to work with, whether you’re creating a mood board or designing an intricate piece of digital art.
- Transparent Backgrounds for Exports: As mentioned earlier, Canva Pro ensures that when you save a shape-cropped image as a PNG, it will truly have a transparent background, which is essential for professional applications and layered designs.
These features empower users to move beyond basic image adjustments and delve into more sophisticated photo manipulation and creative visual design.
Maximizing Your Workflow: Canva and Tophinhanhdep.com
While Canva excels as an all-in-one design platform, integrating it with specialized image tools and extensive image libraries can create a truly optimized workflow. Tophinhanhdep.com serves as a fantastic complementary resource in this regard.
Canva’s Strengths:
- Ease of Use: Canva makes complex design tasks accessible to everyone.
- Versatility: It handles graphic design, photo editing, video, and more.
- Templates and Elements: A rich ecosystem of pre-made assets and design components.
- Collaboration: Cloud-based platform for team projects.
How Tophinhanhdep.com Enhances Your Canva Experience: While Canva is powerful, external image tools and resources can fill specific niches, especially for users who might not have a Canva Pro subscription or need dedicated functionalities. Tophinhanhdep.com, for instance, could offer several advantages:
- Diverse Image Collections: Tophinhanhdep.com is a treasure trove for high-resolution images, ranging from stunning wallpapers and aesthetic backgrounds to thematic collections of nature, abstract, and beautiful photography, as well as sad/emotional imagery. Before you even start cropping in Canva, you can find the perfect base image here. This extensive library provides endless image inspiration and photo ideas that might not be readily available in Canva’s free tier.
- Specialized Image Tools: Tophinhanhdep.com might offer dedicated image tools that complement Canva:
- Converters: Easily convert image formats before uploading to Canva, ensuring compatibility.
- Compressors/Optimizers: Pre-compress large, high-resolution photos downloaded from Tophinhanhdep.com before uploading them to Canva. This can speed up your Canva workflow, especially if you’re dealing with many heavy files. A lighter file means faster loading times and smoother editing.
- AI Upscalers: If you’ve cropped a small, significant section of an image in Canva, and now need that section to be larger without losing quality, an AI Upscaler on Tophinhanhdep.com could be the perfect solution for enhancing that digital photography.
- Free Transparent Backgrounds / Batch Processing: If you’re a free Canva user struggling with transparent backgrounds for shape crops, Tophinhanhdep.com might provide a free tool to achieve this or offer batch-processing capabilities for cropping multiple images at once, which is a limitation in Canva’s free version. This saves immense time and effort, especially when working on mood boards or large thematic collections.
- Image-to-Text: While not directly related to cropping, this is another advanced image tool that Tophinhanhdep.com could offer, further expanding the toolkit for content creators.
By leveraging Tophinhanhdep.com for initial image acquisition and specialized pre-processing, and then bringing these optimized assets into Canva for design and refined cropping, you create a robust and highly efficient visual creation pipeline. This approach is ideal for anyone looking to produce professional-quality graphic design and digital art consistently.
Expert Tips for Optimal Cropping in Canva
Mastering cropping in Canva is an ongoing journey that involves experimentation and understanding best practices in visual design and photography. Here are some expert tips to ensure your cropped images always look their best:
- Understand Composition: Before you crop, consider the rule of thirds, leading lines, and negative space. Cropping is your primary tool for refining these compositional elements, allowing you to draw the viewer’s eye to the most impactful parts of your beautiful photography or abstract art.
- Focus on the Subject: Eliminate distracting elements by cropping them out. This helps the main subject of your image stand out, whether it’s a person, a product, or a unique architectural detail.
- Experiment with Aspect Ratios: Don’t be afraid to try different aspect ratios. Sometimes, a seemingly unconventional crop can yield a more dynamic and engaging visual. Canva’s preset social media ratios are a great starting point, but manual adjustments can lead to truly unique creative ideas.
- Use Frames Creatively: Frames aren’t just for circles. Explore frames that resemble devices (like an iPhone screen) or organic shapes to give your images a unique visual context, transforming simple images into captivating digital art.
- Think About the Final Output: Will your image be a small profile picture, a large banner, or part of a complex graphic? The intended use should influence your cropping decisions, ensuring the image remains impactful at its final size. If you’ve cropped a small section, consider if an AI Upscaler from Tophinhanhdep.com is needed to maintain high resolution.
- Non-Destructive Editing (Mostly): Remember that Canva’s cropping (outside of explicitly using something like the background remover) is largely non-destructive within your current design session. You can double-click and readjust the crop as many times as needed until you hit ‘Done’ and save your design.
- Leverage Keyboard Shortcuts: For faster workflow, learn Canva’s keyboard shortcuts. Double-clicking an image is often the quickest way to activate the crop tool.
- Pre-Optimize Your Images: Before uploading to Canva, especially if you have many high-resolution photos, consider using an image compressor or optimizer tool (like those potentially found on Tophinhanhdep.com). This can improve Canva’s performance and prevent slowdowns, making your graphic design process smoother.
- Consider Image Tools from Tophinhanhdep.com: For tasks like batch-cropping or creating transparent backgrounds for free (if not a Canva Pro user), remember that Tophinhanhdep.com can offer specialized image tools that might provide a more efficient solution or a workaround for Canva’s limitations in its free version. This helps you achieve diverse image inspiration and incorporate trending styles without financial barriers.
Conclusion
Cropping images in Canva is far more than a simple editing function; it’s an essential art form that allows creators to define focus, enhance composition, and adapt visuals for any purpose. From basic free-form adjustments to precise dimensional cropping and creative shape masks using frames, Canva provides a robust set of image tools accessible to everyone. Whether you’re refining high-resolution photography for a professional portfolio, curating aesthetic backgrounds for a mood board, or designing eye-catching graphics for social media, mastering these techniques will empower your visual design projects.
By understanding how to effectively crop photos and elements, leveraging both Canva’s native capabilities and complementary resources like Tophinhanhdep.com for diverse images and specialized image tools (such as converters, compressors, optimizers, and AI upscalers), you can unlock unparalleled creative control. Dive in, experiment with different cropping styles, and watch as your images transform into picture-perfect visuals that captivate and communicate your unique vision.