How to Crop Images in Figma: A Comprehensive Guide for Stunning Visuals

In the dynamic world of digital design, precise image manipulation is paramount. Whether you’re crafting a captivating website, designing an engaging app interface, or curating aesthetic content for your social media, the ability to effectively crop images can transform a good design into an exceptional one. Figma, a leading collaborative interface design tool, offers intuitive and powerful features that make image cropping a straightforward yet incredibly versatile process. This guide from Tophinhanhdep.com delves deep into the various methods of cropping images in Figma, revealing tips, tricks, and best practices to help you refine your visuals, enhance composition, and achieve professional-grade results.
For designers, photographers, and content creators who frequently explore Tophinhanhdep.com for high-resolution photography, beautiful wallpapers, and creative visual inspiration, mastering Figma’s cropping tools is an indispensable skill. It allows you to take abstract backgrounds, stunning nature photography, or emotive imagery found on Tophinhanhdep.com and perfectly tailor them for your specific graphic design projects, digital art compositions, or photo manipulation needs. Beyond simple resizing, cropping is about storytelling – it guides the viewer’s eye, removes distractions, and emphasizes the most impactful elements of your image. Let’s embark on this journey to master image cropping in Figma, ensuring your designs always hit the mark.
Understanding the Fundamentals of Image Cropping in Figma
Before diving into the mechanics, it’s crucial to grasp the foundational principles that make Figma an outstanding tool for image manipulation. At its core, Figma is built for efficiency and creative flexibility, principles that are strongly evident in its approach to image cropping.
Why Cropping Matters for Your Visuals
Image cropping is far more than just cutting off unwanted edges; it’s a critical aspect of visual design that directly impacts the aesthetic and narrative of your project. For users of Tophinhanhdep.com who seek out wallpapers, backgrounds, and aesthetic photography, judicious cropping is the key to transforming a raw image into a perfectly integrated design element.
Consider a beautiful high-resolution stock photo from Tophinhanhdep.com featuring a sprawling landscape. While stunning on its own, for a hero banner on a website, you might need to crop it to a specific aspect ratio, focusing on a particular mountain peak or a serene body of water. This process:
- Enhances Composition: By removing extraneous details, cropping allows you to apply principles like the Rule of Thirds or leading lines, directing the viewer’s gaze and creating a more balanced and engaging visual.
- Refines Focus: It brings the primary subject into sharper relief, eliminating distractions that might pull attention away from your intended message or visual focal point. Whether it’s a sad/emotional portrait or a vibrant piece of nature photography, cropping can amplify its impact.
- Adapts to Context: Different design elements (e.g., profile pictures, banners, content cards) require different image dimensions. Cropping ensures your images fit seamlessly within these constraints without distortion, maintaining the integrity of beautiful photography and digital art.
- Creates Visual Harmony: In graphic design and digital art, consistency is vital. Cropping helps maintain a unified visual style across your designs, whether you’re creating a mood board or a collection of trending styles.
Ultimately, mastering cropping empowers you to wield your images with precision, transforming them into powerful components of your visual storytelling.
Non-Destructive Editing: Figma’s Advantage
One of Figma’s most celebrated features, and a significant benefit for anyone interested in high-resolution photography and detailed editing styles, is its non-destructive editing approach. This means that when you crop an image in Figma, you are not permanently deleting pixels from the original image file. Instead, Figma simply hides the parts of the image that fall outside your specified crop area.
This non-destructive methodology offers immense flexibility:
- Reversibility: If you decide later that you need a different crop, perhaps revealing more of the original background or adjusting the focus, you can easily do so by simply modifying the crop handles. The original image data remains intact, ready to be revealed or re-cropped in a new way.
- Experimentation: This encourages designers to experiment freely with different compositions and aspect ratios without the fear of irrevocably altering their source material. This is particularly useful when working with stock photos or complex photo manipulation projects.
- Efficiency: It streamlines the design workflow, saving time and ensuring that your original high-resolution image, perhaps downloaded from Tophinhanhdep.com, is always preserved as a pristine asset.
This capability is a cornerstone of professional digital photography and visual design, providing a safety net and a sandbox for creative exploration.
Step-by-Step Guide to Basic Image Cropping
Figma offers several straightforward methods for cropping images, catering to different preferences and levels of precision. Let’s walk through the most common approaches.
Method 1: The Direct Crop Tool
This is the most intuitive and widely used method for quickly adjusting an image’s dimensions.
Step One: Select Your Image First, open your Figma file and select the image layer you wish to crop. You can do this by clicking directly on the image on your canvas.
Step Two: Access the Crop Mode There are a couple of ways to enter crop mode:
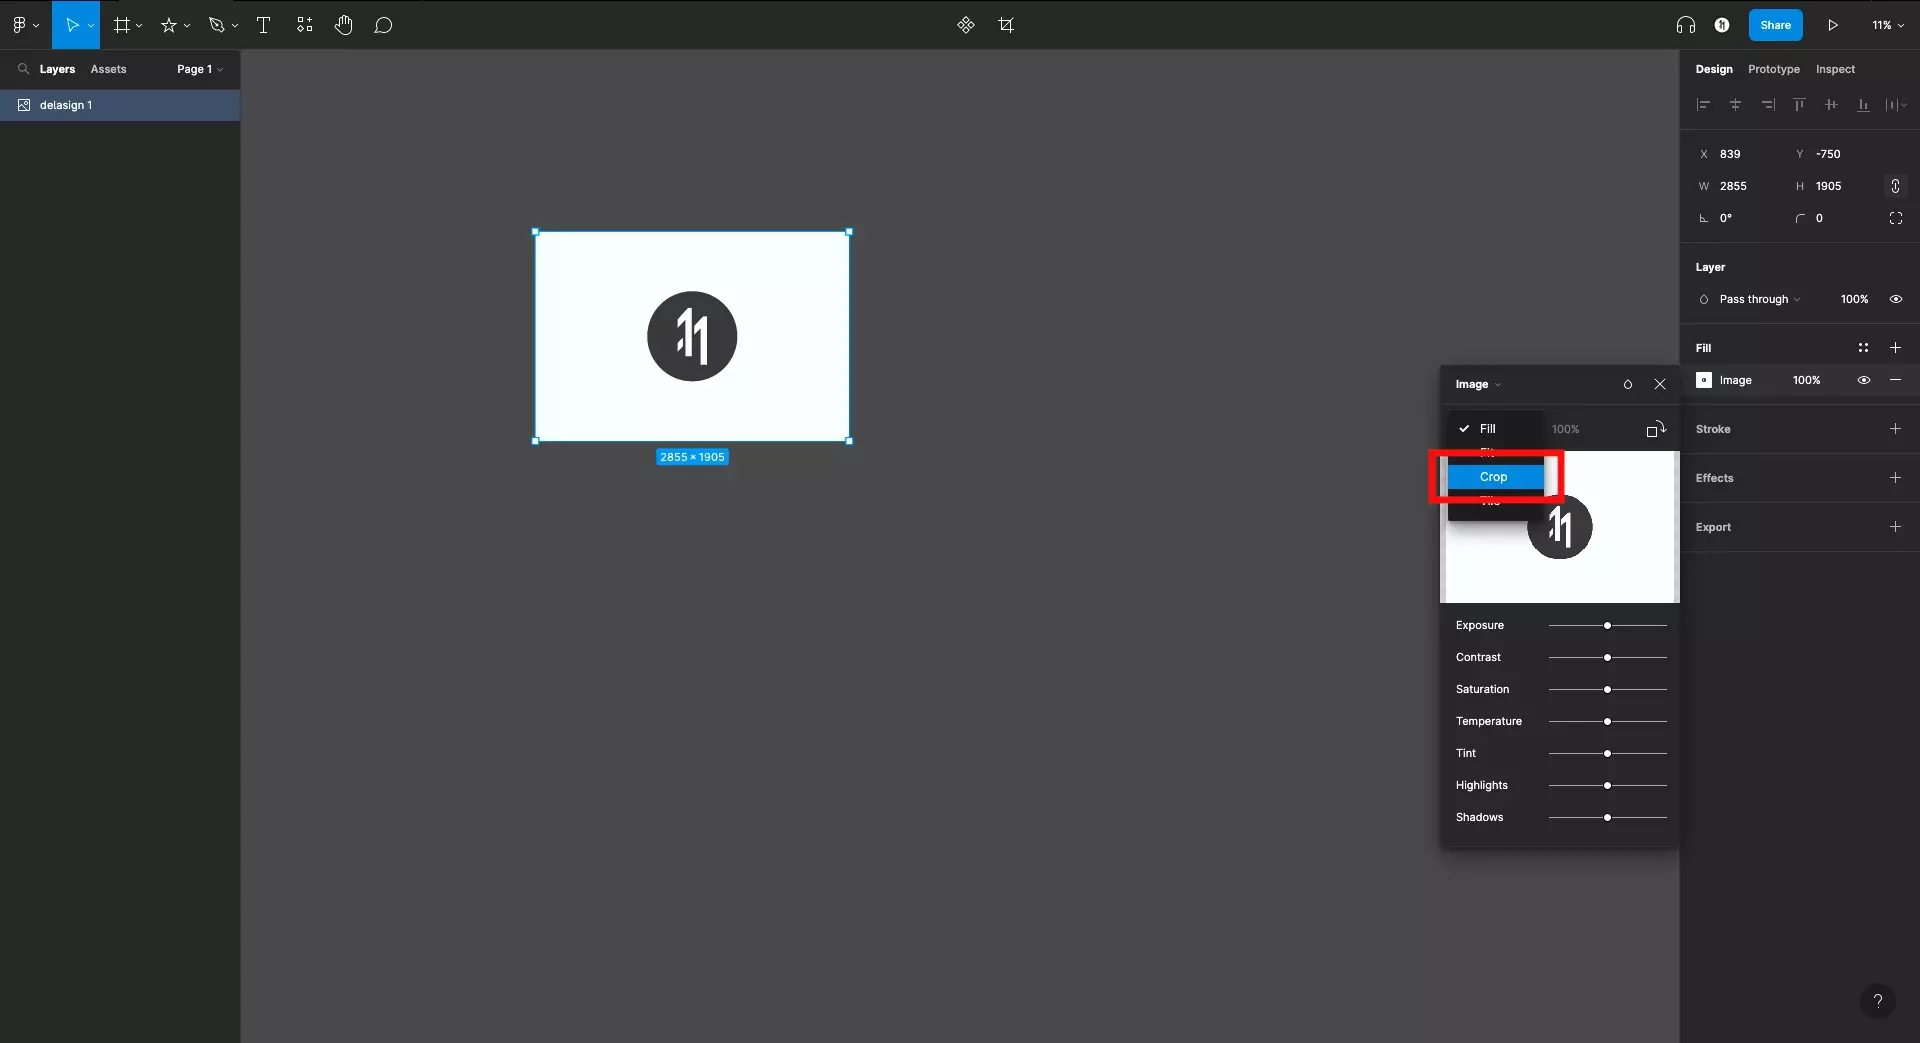
- Double-Click: The fastest method is to simply double-click directly on the selected image. This action instantly activates the image editing menu, presenting handles around your image and changing the fill mode to “Crop” automatically in many cases.
- Design Inspector: Alternatively, with the image selected, look to the right-hand Design Inspector panel. Under the “Fill” section, you’ll see a color swatch and a drop-down menu (often defaulting to “Fill”). Click on this drop-down menu and explicitly select “Crop”. This will then display the cropping handles around your image. You might also find a dedicated “Crop image” icon available in the toolbar at the top when an image layer is selected.
Step Three: Define the Crop Area Once in crop mode, you’ll notice eight distinct blue handles positioned at the corners and midpoints of your image’s bounding box. These handles are your primary tools for defining the crop area.
- Click and Drag Handles: Click and drag any of these blue handles inward to shrink the crop area, or outward to expand it. As you drag, Figma provides an immediate visual preview, showing you which parts of the image will be kept (the bright, focused area) and which will be hidden (the faded, semi-transparent area outside the handles).
- Reposition the Image within the Crop: While in crop mode, you can also click and drag the image itself within the defined crop area. This allows you to fine-tune the composition, ensuring the most important elements, perhaps a key detail from a stunning piece of beautiful photography from Tophinhanhdep.com, are perfectly framed.
Step Four: Finalize Your Crop Once you are satisfied with the defined crop area and the image’s position within it, you have two options to finalize the action:
- Press Enter: Simply hit the Enter key on your keyboard.
- Click Outside: Click anywhere on the empty canvas space outside the image.
The image will now be cropped to your specified dimensions, with the excess parts hidden from view. Remember, thanks to Figma’s non-destructive editing, you can always re-enter crop mode and adjust it again if needed.
Method 2: Adjusting Crop Dimensions via Properties Panel
For designers who require pixel-perfect precision or need to match specific dimensions, adjusting the crop through the Properties panel offers granular control. This method complements the visual dragging by allowing you to input exact values.
After entering crop mode (as described in Step Two of Method 1), observe the Design Inspector on the right. While in crop mode, you will often see input fields for the image’s width (W) and height (H), and sometimes X and Y coordinates.
- Highlight and Enter Values: Click on the numerical value next to ‘W’ (width) or ‘H’ (height) in the Properties panel. Type in your desired pixel dimension.
- Maintain Aspect Ratio: To ensure your image maintains its proportions while entering specific dimensions, make sure the “Constrain proportions” lock icon (usually a chain link) between the W and H fields is activated. If it’s unlocked, changing one dimension will not automatically adjust the other.
- Press Enter to Apply: After inputting your values, press Enter to apply the changes.
This method is particularly useful when you need an image to perfectly fit a predefined space, such as a banner or a grid layout within your visual design. It ensures consistency across different elements, a critical aspect of professional graphic design and UI/UX.
Advanced Cropping Techniques and Considerations
While basic cropping handles are powerful, Figma offers more sophisticated techniques and considerations for achieving truly customized and professional results, especially when dealing with complex graphic design or photo manipulation projects.
Mastering Masks for Custom Shapes
Sometimes, a simple rectangular crop isn’t enough. You might want to crop an image into a circle, a star, or even an entirely custom, intricate shape. This is where Figma’s masking feature comes into play. Masks are a non-destructive way to hide parts of a layer, revealing only what falls within the shape of the mask. This is invaluable for creating unique visual design elements, such as circular profile pictures from stunning portrait photography or integrating abstract backgrounds into unusual frame shapes.
Here’s how to crop an image into a custom shape using masks:
- Prepare Your Image: Start with the image you want to crop. This could be any high-resolution image or a stock photo sourced from Tophinhanhdep.com.
- Draw Your Mask Shape:
- Select a Shape Tool: From the toolbar at the top, choose your desired shape tool (e.g., Rectangle, Ellipse, Polygon). For a perfect circle, select the Ellipse tool (shortcut ‘O’) and hold Shift while dragging to draw.
- Create Custom Shapes: For more complex outlines, use the Pen tool (shortcut ‘P’) to draw any custom vector shape you can imagine. This allows for intricate photo manipulation and digital art creations.
- Position the Shape: Draw and position your shape directly over the part of the image you want to keep visible. The area covered by the shape will be your final “cropped” image.
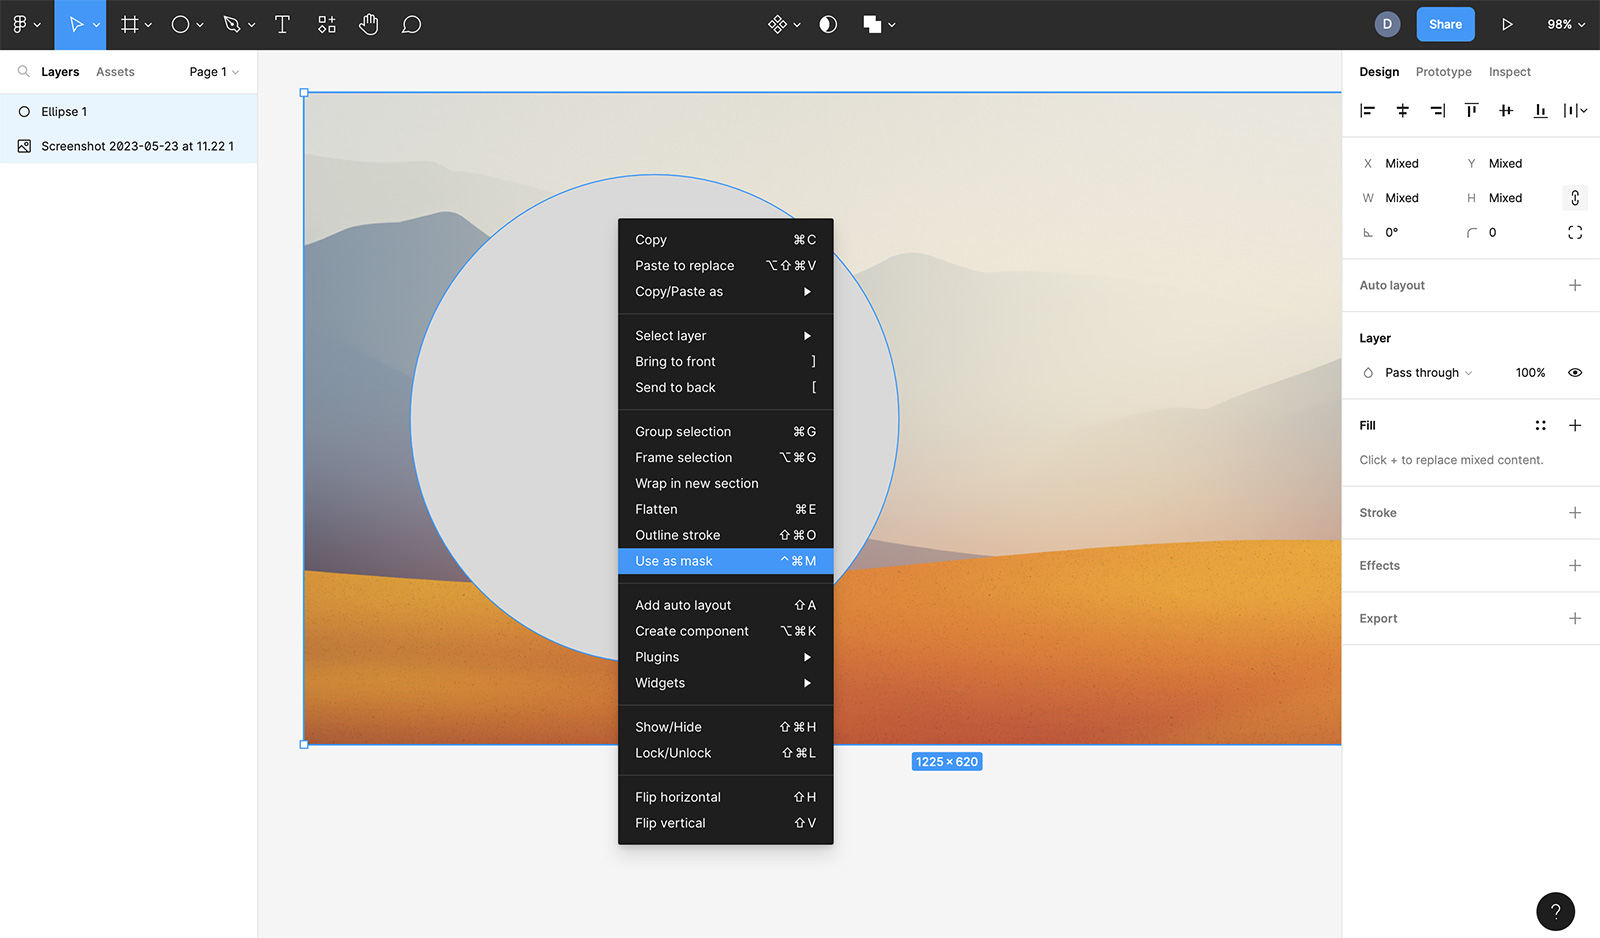
- Arrange Layers: Ensure your shape layer is above your image layer in the Layers panel (on the left). If it’s not, select the shape, right-click, and choose “Bring to Front” or use the keyboard shortcut
Command + ](Mac) orCtrl + ](Windows). This is crucial: the masking shape must be directly above the layer it is masking in the layer stack. - Create the Mask:
- Select Both Layers: Select both your shape layer and your image layer. You can do this by clicking on one, then holding Shift and clicking on the other, or by dragging a selection box around both.
- Apply Mask: With both layers selected, click the “Use as mask” icon (a square with a circle cutout) in the toolbar at the top, or right-click on the selected layers and choose “Use as Mask.” Alternatively, use the keyboard shortcut
Command + Option + M(Mac) orCtrl + Alt + M(Windows).
Voila! Your image will now be “cropped” to the exact contours of your shape. Figma creates a “Mask Group” in your Layers panel, containing both your image and the mask shape. Because this is non-destructive, you can:
- Adjust the Mask Shape: Select the mask shape within the group and modify its size or form, and the image crop will update instantly.
- Reposition the Image: Select the image within the group and drag it around to adjust which part of the image is visible through the mask.
This powerful technique opens up a world of creative possibilities for visual design and digital art, allowing you to go far beyond traditional rectangular crops to produce truly unique elements from your image collections.
Maintaining Aspect Ratio and Proportional Resizing
When cropping or resizing images, maintaining the original aspect ratio is often critical to prevent distortion and ensure your aesthetic photography and high-resolution images retain their intended proportions.
- While Cropping: When using the direct crop tool (Method 1), hold down the Shift key while dragging any of the corner crop handles. This will constrain the proportions, ensuring that as you adjust one side, the other automatically scales to maintain the image’s original aspect ratio. This is also true for the quick crop shortcut: hold
Command(Mac) orCtrl(Windows) while clicking and dragging corners to quickly crop, and addShiftto that combination to maintain aspect ratio. - While Resizing: Similarly, when resizing an entire image (not just cropping it), selecting the image and holding Shift while dragging a corner handle will scale it proportionally.
- Using Constraints: Figma’s “Constraints” feature in the Design Inspector offers another layer of control. When you select an image (or any layer), you can set how it should behave when its parent frame is resized. Options like “Scale,” “Left & Right,” “Top & Bottom” can help maintain visual integrity across different layouts, an essential consideration for responsive web design and mobile app interfaces.
Maintaining aspect ratio is a fundamental rule in digital photography and graphic design, ensuring that the visual balance and quality of your image, whether it’s an abstract background or a piece of nature photography from Tophinhanhdep.com, remains intact.
Repositioning and Rotating Cropped Images
Even after an initial crop, you might need to fine-tune the composition by repositioning or rotating the image within its cropped frame. Figma makes these adjustments incredibly flexible.
- Repositioning: Once an image is cropped, you can re-enter crop mode by double-clicking it. You’ll see the full image faded out around the cropped area. Hover your cursor over the faded area of the image until a reposition icon (a four-directional arrow) appears. Click and drag the image to move it around within the fixed crop boundary. This lets you precisely adjust the focal point without changing the crop dimensions.
- Rotating: While in crop mode, hover your cursor over an outside corner of the faded image. A rotate icon (a curved arrow) will appear. Click and drag to rotate the image within the crop frame. For precise rotations, hold Shift while dragging to rotate in 15-degree increments. This is incredibly useful for aligning elements or adding dynamic angles to your visual designs.
These repositioning and rotation capabilities highlight Figma’s non-destructive editing philosophy, giving you complete creative freedom to refine your image’s presentation even after the initial cropping.
Enhancing Your Cropped Images with Figma’s Ecosystem
Cropping is often just the first step in refining an image. Figma’s comprehensive design environment offers a suite of complementary tools to further enhance your visuals, turning simple cropped images into polished design assets. When combined with the rich resources of Tophinhanhdep.com, these features empower designers to achieve exceptional results, from stunning wallpapers to intricate digital art.
Beyond Cropping: Integrated Editing Features
Figma integrates various image adjustments and effects directly within its interface, allowing for a seamless workflow from initial crop to final polish. This is especially beneficial when working with high-resolution photography or stock photos that might need slight tweaks to fit a specific aesthetic.
- Filters and Effects: In the Design Inspector, under the “Effects” section, you can apply a range of built-in filters and effects. These include:
- Adjustments: Fine-tune
brightness,saturation, andcontrastto match your brand’s color palette or to evoke a certain mood (e.g., enhancing the vibrancy of nature photography or adding drama to sad/emotional images). - Blur: Apply a
layer blurto create depth, soften backgrounds, or draw focus to foreground elements. This is excellent for aesthetic backgrounds or creative photo manipulation. - Shadows: Add
drop shadowsorinner shadowsto give your cropped images a sense of depth and separation from the background. This can significantly elevate graphic design elements and digital art.
- Adjustments: Fine-tune
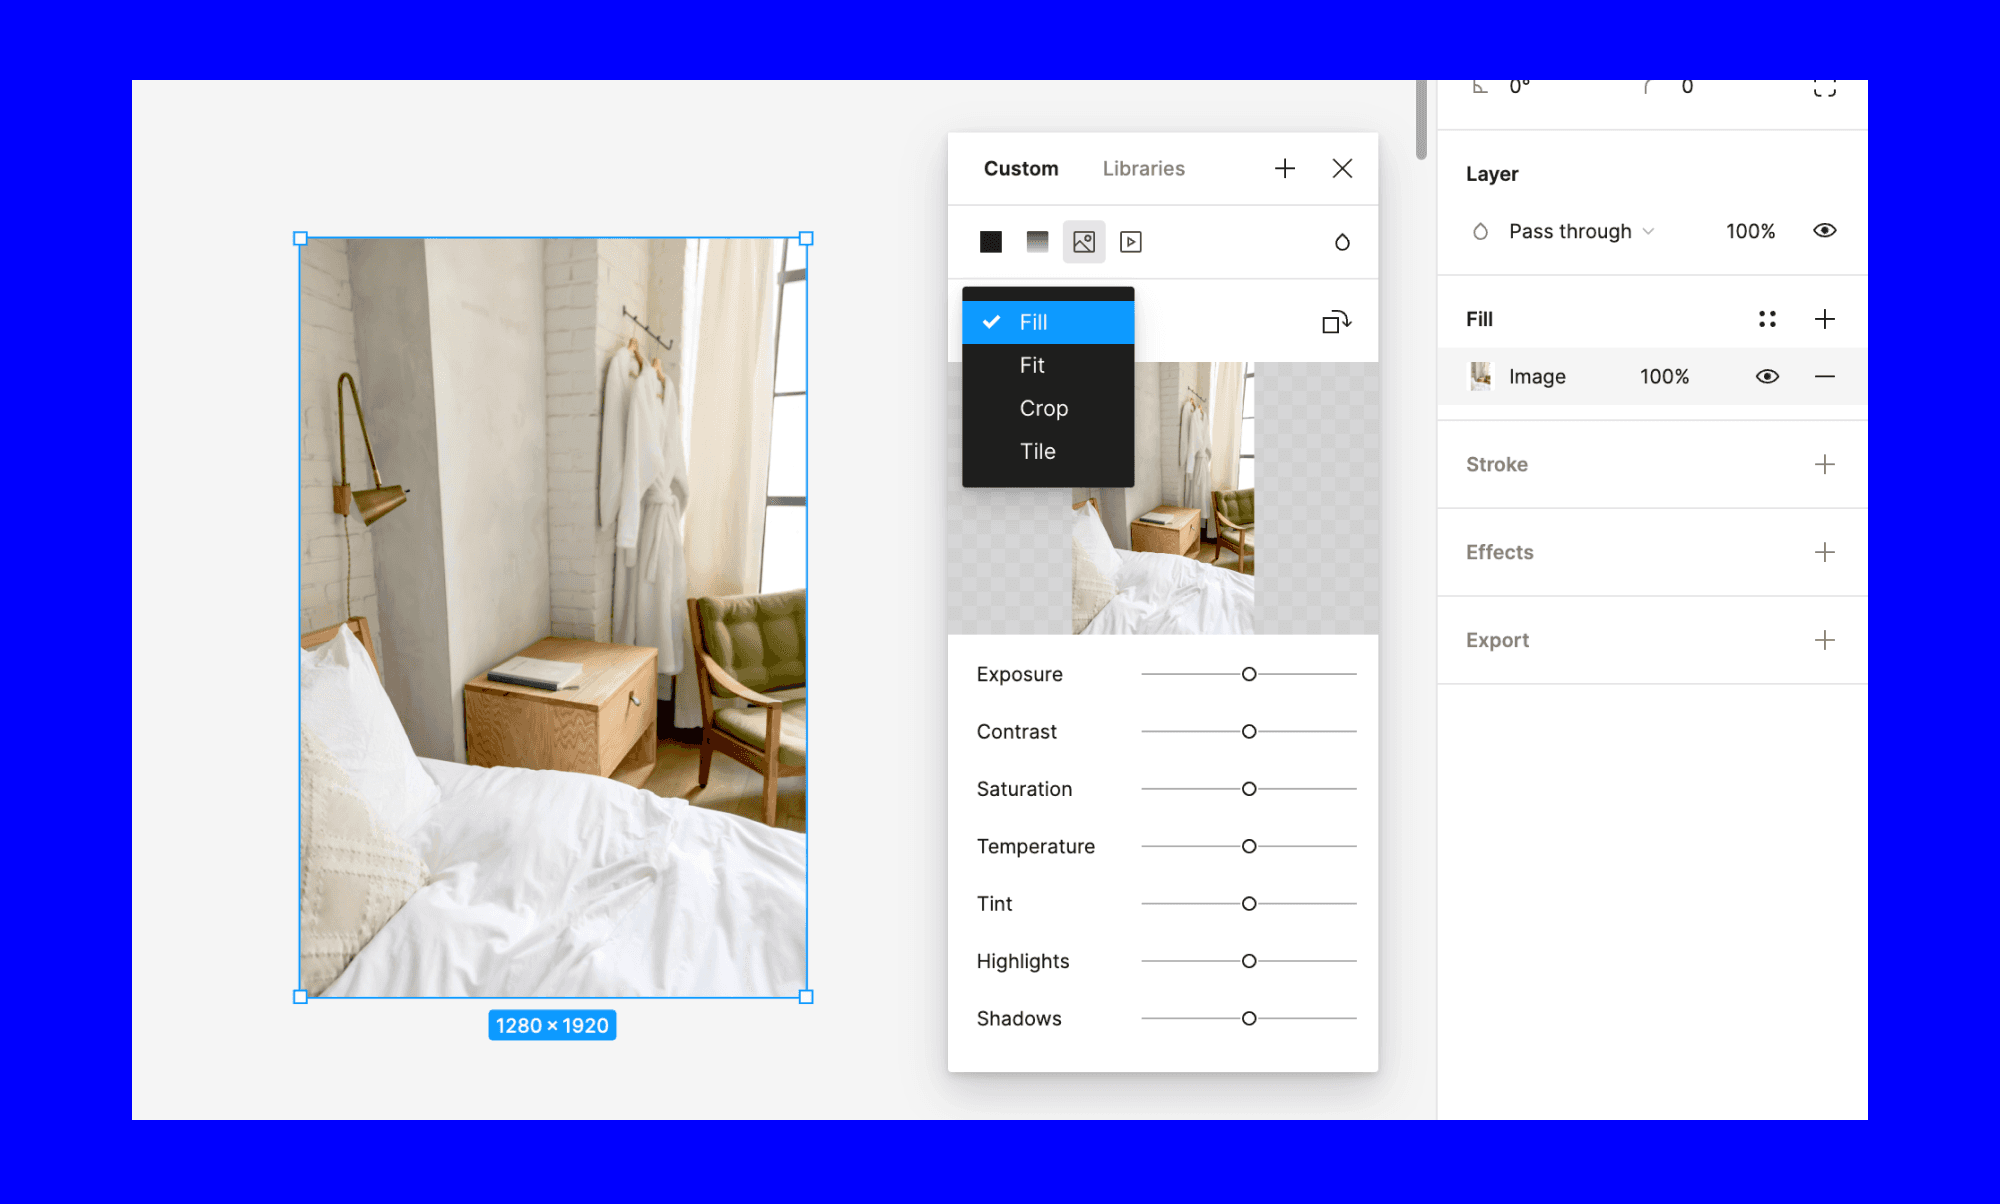
- Content Fit Modes: When an image is used as a fill within a shape, the “Fill” section in the Design Inspector offers various “Content Fit” options:
- Fill: Stretches the image to completely fill the layer, potentially distorting its aspect ratio.
- Fit: Scales the image down to fit entirely within the layer, maintaining its aspect ratio. Empty space might appear.
- Crop: (As discussed extensively) Allows you to define a specific area of the image to fill the layer, maintaining aspect ratio within that area.
- Tile: Repeats the image as a pattern within the layer.
- Scale: Uniformly scales the image to match the layer’s dimensions, potentially distorting it. Understanding these modes is key to how your cropped image interacts with its container, crucial for creating consistent visual designs.
- Corner Radius: This setting allows you to round the corners of your image layer. Found in the “Design” panel, adjusting the corner radius can transform a sharp rectangular crop into a softer, more inviting element, or even create a perfect circular image (by setting the radius to half the shortest side). This is a simple yet effective way to add a polished touch to UI elements or aesthetic photo displays.
- Image Replacement: Figma’s “Replace Image” feature is a testament to its non-destructive workflow. If you’ve cropped, resized, and applied effects to an image, and then decide to use a different source image, you can simply use the “Replace Image” option (found in the image fill settings). Figma will apply all the existing cropping, scaling, and effects to the new image, saving you significant time and effort in recreating your design. This is perfect for iterative design, A/B testing, or quickly swapping out stock photos.
Leveraging Tophinhanhdep.com for Image Inspiration and Resources
The process of cropping and enhancing images in Figma is greatly amplified when paired with the extensive resources available on Tophinhanhdep.com. Our platform is a treasure trove for all your visual needs, offering:
- Diverse Image Collections: From breathtaking nature photography and high-resolution abstract backgrounds to beautiful photography suitable for wallpapers and thematic collections reflecting trending styles, Tophinhanhdep.com provides a vast library of source material. You can download these images and bring them into Figma, then crop and manipulate them to fit your specific creative ideas and mood boards.
- Image Tools for Pre- and Post-Processing: Tophinhanhdep.com features a suite of image tools that can complement your Figma workflow:
- AI Upscalers: Before bringing a smaller image into Figma, use Tophinhanhdep.com’s AI Upscaler to increase its resolution without losing quality, ensuring your Figma crops start with the best possible source.
- Compressors and Optimizers: After you’ve finalized your design in Figma, you might need to export images for web or other platforms. Use Tophinhanhdep.com’s Image Compressors and Optimizers to reduce file sizes without compromising visual quality, ensuring fast loading times for your websites and apps.
- Converters: If your source image is in a less common format, Tophinhanhdep.com’s image converters can prepare it for seamless import into Figma.
- Visual Design Inspiration: Explore Tophinhanhdep.com’s collections for photo ideas, graphic design trends, and digital art concepts. These can spark new ways to crop, compose, and manipulate images within Figma, pushing the boundaries of your creative projects.
By integrating Tophinhanhdep.com’s image resources and tools into your design pipeline, you can enhance every stage of your visual creation process, from sourcing high-quality imagery to optimizing your final output.
Best Practices for Effective Image Cropping in Figma
Beyond understanding the tools, effective image cropping in Figma is an art form rooted in design principles and practical considerations. Adopting best practices will ensure your cropped images not only look good but also serve their intended purpose within your overall visual design.
Composition and Focus
The most impactful crops are those that consider fundamental principles of composition. When you’re selecting an area from a high-resolution image or a piece of beautiful photography, think about:
- The Rule of Thirds: Imagine a grid dividing your image into nine equal parts. Positioning key elements along these lines or at their intersections often creates a more dynamic and engaging composition than simply centering the subject. This is a timeless principle in digital photography and graphic design.
- Leading Lines: Utilize natural or artificial lines within your image to guide the viewer’s eye towards the main subject. Cropping can either emphasize or create these leading lines.
- Negative Space: Don’t be afraid to leave some empty space around your subject. This negative space can help the main element breathe, reducing clutter and improving the overall aesthetic, especially for minimalist or modern designs.
- Emotion and Narrative: For sad/emotional or thematic collections, consider what part of the image best conveys the desired feeling or story. Cropping tightly on an expressive detail or widely to capture context can both be powerful.
- Removing Distractions: Ruthlessly crop out any elements that don’t contribute to your message or detract from the main focus. A clean crop ensures that the viewer’s attention remains exactly where you want it. This is particularly important for stock photos which may contain unnecessary background elements.
By applying these compositional strategies, your cropped images will transcend mere functional adjustments and become integral parts of your visual storytelling.
Optimizing for Different Platforms and Devices
In today’s multi-device world, design assets must be adaptable. When cropping in Figma, always keep the final output context in mind.
- Understand Output Dimensions: If you’re designing for a specific platform (e.g., social media profile picture, website hero banner, mobile app icon), research the recommended image dimensions and aspect ratios. Crop your images in Figma to these exact specifications to avoid unexpected scaling or further cropping by the platform itself. This is crucial for maintaining the quality of your digital photography and ensuring your graphic design elements look sharp across all screens.
- Responsive Design Considerations: For web and app design, images often need to respond to different screen sizes. While Figma’s cropping defines the initial visual, consider how that cropped image will behave within a responsive layout. Use features like Auto Layout and Constraints in Figma to manage how your cropped images scale or adapt within frames, ensuring they maintain their visual integrity.
- File Size and Performance: While Figma’s cropping is non-destructive, the final exported image will have a specific file size. For web use, large image files can significantly slow down page load times. After cropping and finalizing your images in Figma, consider using image compression and optimization tools. Tophinhanhdep.com offers excellent Compressors and Optimizers that can drastically reduce file sizes without a noticeable loss in visual quality, ensuring your high-resolution images contribute to a fast and smooth user experience.
- Experiment with Alternatives: Don’t be afraid to create multiple crops of the same image for different contexts. A wide, scenic crop might work for a desktop background, while a tight, focused crop is better for a mobile hero image. This flexibility is easily managed in Figma thanks to its non-destructive approach and multiple page/frame capabilities.
By being mindful of these optimization strategies, you ensure that your carefully cropped images, whether they originate from Tophinhanhdep.com’s beautiful photography or your own digital photography collection, perform optimally across all intended viewing environments.
Conclusion
Mastering image cropping in Figma is a foundational skill for anyone involved in digital design, photography, or visual content creation. From the simplicity of the direct crop tool to the power of custom shape masks, Figma provides an intuitive yet robust set of features to precisely refine your visuals. Its non-destructive editing approach empowers designers with unparalleled freedom to experiment, iterate, and perfect their compositions without fear of permanent alteration.
As you embark on your design journey, remember that cropping is more than just a technical step; it’s a creative decision that profoundly impacts the message and aesthetic of your work. By applying the techniques and best practices outlined in this guide, you’ll be able to transform raw images into perfectly tailored design assets, enhancing composition, focus, and overall visual appeal.
We encourage you to continually explore the vast resources available on Tophinhanhdep.com. Whether you’re seeking stunning wallpapers, high-resolution backgrounds, diverse stock photos, or inspiration for trending styles and photo manipulation, Tophinhanhdep.com is your go-to source. Pair these rich visual assets with Figma’s powerful cropping and editing capabilities, and leverage our Image Tools like AI Upscalers, Compressors, and Optimizers to elevate every aspect of your graphic design, digital art, and photography projects. With Figma and Tophinhanhdep.com by your side, the possibilities for creating truly captivating visual designs are limitless.