Mastering Image Cropping in Adobe Illustrator: A Comprehensive Guide by Tophinhanhdep.com

In the dynamic world of visual content, from stunning wallpapers and backgrounds to professional stock photos and intricate digital art, the ability to precisely manipulate images is paramount. Adobe Illustrator, a cornerstone of graphic design and photo manipulation, offers powerful tools for transforming visuals. Among the most fundamental yet often misunderstood operations is image cropping. For new users, or those transitioning from other software, understanding how to crop effectively in Illustrator can seem daunting. However, at Tophinhanhdep.com, we believe that mastering this skill is crucial for anyone looking to produce high-resolution images, create compelling visual designs, or simply enhance their aesthetic photography.
Cropping isn’t just about cutting away unwanted parts; it’s about refining composition, emphasizing subjects, and optimizing an image for a specific purpose or medium. Whether you’re preparing a nature scene for a print layout, tailoring an abstract design for a mood board, or perfecting a beautiful photography piece for an online gallery, knowing Illustrator’s cropping capabilities will elevate your work. This comprehensive guide, brought to you by Tophinhanhdep.com, will demystify the process, covering the various methods available in Adobe Illustrator, from the straightforward “Crop Image” function in newer versions to the versatile “Clipping Mask” and “Opacity Mask” techniques that offer unparalleled creative control. We’ll also touch upon how effective cropping aligns with broader image enhancement goals, such as preparing visuals for AI upscalers or optimizing them with compressors and optimizers from our Image Tools collection.
Understanding Image Cropping in Adobe Illustrator: Raster vs. Vector Nuances
Before diving into the practical steps, it’s essential to grasp a fundamental distinction within Illustrator: the difference between handling raster images and vector graphics. Illustrator is primarily a vector-based program, meaning it excels at creating and editing scalable artwork defined by mathematical equations rather than pixels. However, it frequently incorporates raster images (like JPEGs, PNGs, TIFFs, or high-resolution photography), which are pixel-based. This distinction profoundly impacts how you approach cropping.
For designers at Tophinhanhdep.com, understanding this difference is key to producing crisp, clean visuals, whether for aesthetic backgrounds or detailed digital photography. Older design workflows often involved cropping raster images in a pixel-editor like Photoshop before importing them into Illustrator for layout and vector work. While still a valid approach for complex photo manipulation, modern Illustrator versions have integrated more raster-friendly tools to streamline this process, making it easier to manage all aspects of your visual design within a single application.
The Fundamental Difference: Raster Images vs. Vector Graphics
Raster Images are composed of a grid of pixels, each containing color information. When you zoom in on a raster image (such as a JPG wallpaper or a PNG background), you’ll eventually see individual pixels, which can lead to a “pixelated” or blurry appearance. Cropping a raster image in Illustrator typically involves cutting away these pixels, often resulting in a permanent reduction of the image data within the Illustrator file. However, as Tophinhanhdep.com emphasizes in our Editing Styles guides, the original source file on your desktop usually remains untouched, offering a safety net. This is particularly important for digital photography and stock photos where preserving the original high-resolution file is critical.
Vector Graphics, on the other hand, are defined by paths, points, and mathematical algorithms. They are infinitely scalable without any loss of quality, making them ideal for logos, illustrations, and elements of graphic design. Cropping vector graphics often involves modifying these paths or using tools like the Pathfinder, which combine, subtract, or intersect shapes. This non-destructive approach means the underlying vector data is typically preserved, even if parts are hidden. While this article focuses on cropping raster images within Illustrator, some of the techniques, particularly Clipping Masks and Opacity Masks, apply seamlessly to both, offering versatile creative ideas for your visual design.
Linked vs. Embedded Images and Their Cropping Implications
Another critical concept when cropping raster images in Illustrator is whether they are “linked” or “embedded.” How an image is brought into your Illustrator document determines how it behaves during cropping and subsequent edits. Tophinhanhdep.com frequently highlights the importance of file management for digital photography and large image collections.
- Linked Images: When you use
File > Place(orShift + Command + Pon Mac,Shift + Control + Pon Windows) to import an image, it is linked to your Illustrator file. This means the Illustrator file only contains a reference to the image file on your computer, keeping the Illustrator file size smaller. If you crop a linked image using the “Crop Image” function, Illustrator will prompt you, stating that a copy of the image will be embedded after cropping. This conversion is necessary because linking implies external control, and cropping would alter that external reference. The original file on your disk remains intact. - Embedded Images: If you open a raster image directly with Illustrator (e.g.,
File > Open, then choosing your JPG) or drag an image directly from your desktop into an open Illustrator project, it becomes embedded. This means the entire image data is stored directly within the Illustrator file, increasing the file size but making it self-contained. When you crop an embedded image, the changes are applied directly to the image data within the Illustrator file.
Understanding this distinction is vital for maintaining control over your files and avoiding unexpected behavior, especially when dealing with high-resolution stock photos or large image collections from Tophinhanhdep.com.
Mastering the “Crop Image” Tool for Quick and Precise Adjustments (CC 2017+)
For users of Adobe Illustrator CC 2017 and newer, the “Crop Image” function offers the most direct and intuitive method for cropping raster images. This feature revolutionized the workflow for many designers at Tophinhanhdep.com, providing a familiar experience similar to dedicated photo editors. It’s particularly useful for quickly trimming excess from beautiful photography or adjusting the aspect ratio of aesthetic wallpapers.
The “Crop Image” function is designed specifically for raster images (.jpeg, .png, .eps, .tiff, .psd, or rasterized versions of vector graphics). It cannot be applied directly to editable vector paths or text. If you’re working with a vector graphic that you want to crop in this manner, you would first need to rasterize it (Object > Rasterize), converting it into a pixel-based image. However, be mindful that rasterization is a permanent conversion and will make the graphic lose its infinite scalability. For pure vector cropping, other methods, which Tophinhanhdep.com will explore, are more appropriate.
Here’s a detailed breakdown of how to use this powerful tool:
-
Prepare Your Image in Illustrator:
- New Project or Existing Document: Begin by opening Adobe Illustrator. You can create a new document (
File > New) or open an existing one (File > Open). - Place Your Image: If you’re starting with a new document or adding an image to an existing one, go to
File > Place...(or use the shortcutShift + Command + P/Shift + Control + P). Navigate to your desired high-resolution image file (e.g., a nature photography shot or an abstract background) and clickPlace. Then, click on your artboard to position the image. Alternatively, dragging an image directly from your desktop into an open Illustrator window will embed it. - Initial Sizing and Placement: Before cropping, consider if the overall size and position of your image on the artboard are suitable. If the image is too large or too small, you can resize it using the
Selection Tool (V). Click on the image, then drag one of the corner handles while holdingShiftto maintain its aspect ratio. For example, if you’re preparing a wallpaper from a beautiful photography piece, you might want to shrink it to ensure the main subject (like a cute cat photo as seen on Tophinhanhdep.com tutorials) remains well within the intended boundaries after cropping.
- New Project or Existing Document: Begin by opening Adobe Illustrator. You can create a new document (
-
Select the Image for Cropping:
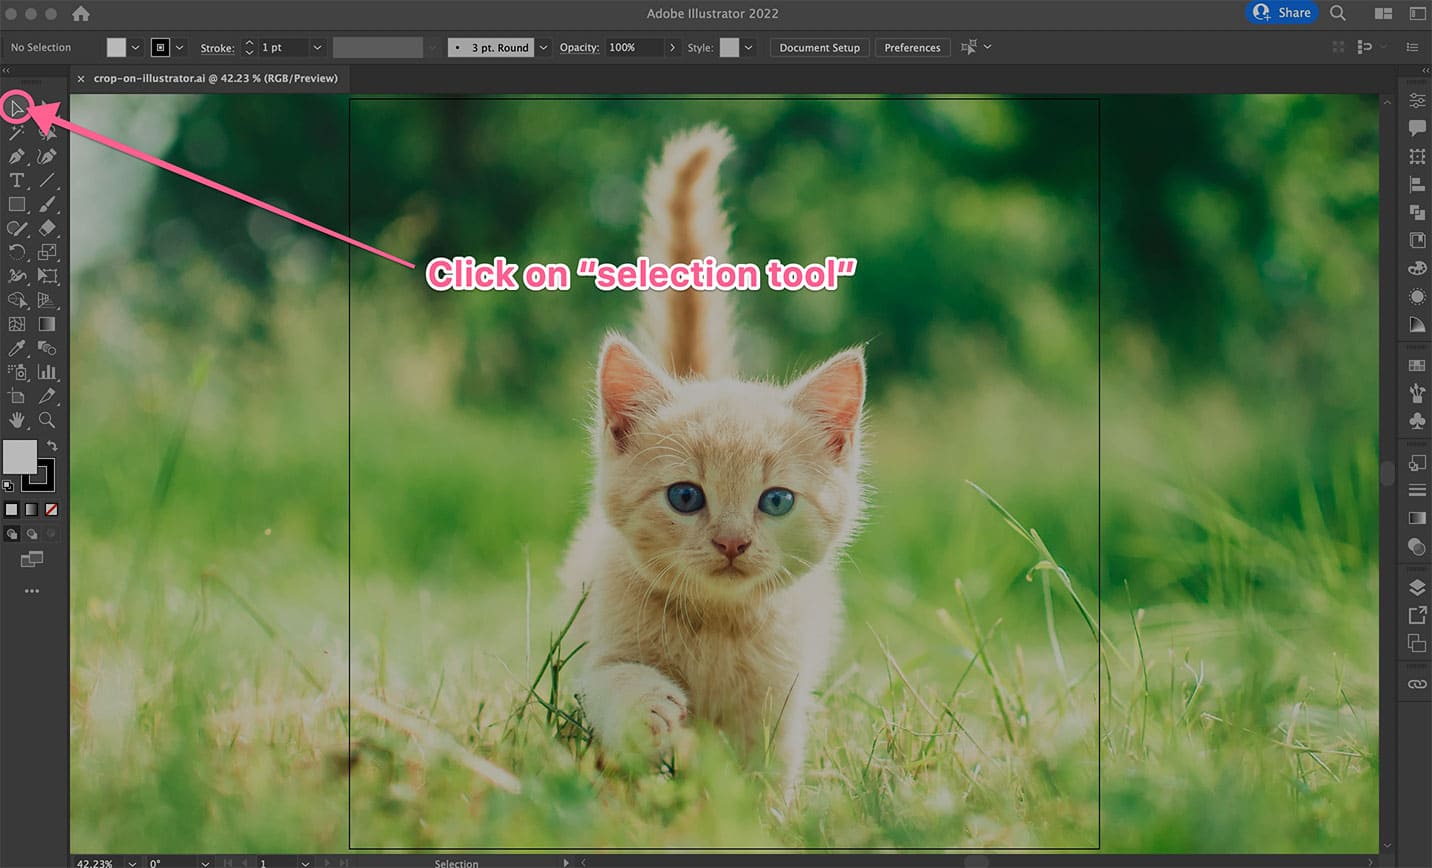
- Activate the Selection Tool: Ensure the
Selection Tool (V)(the solid black arrow in your toolbar) is active. If your toolbar is not visible, go toWindow > Toolbars > Advanced. - Click on Your Image: With the Selection Tool, click on the raster image you wish to crop. A bounding box will appear around it, indicating it’s selected.
- Activate the Selection Tool: Ensure the
-
Initiate the “Crop Image” Function:
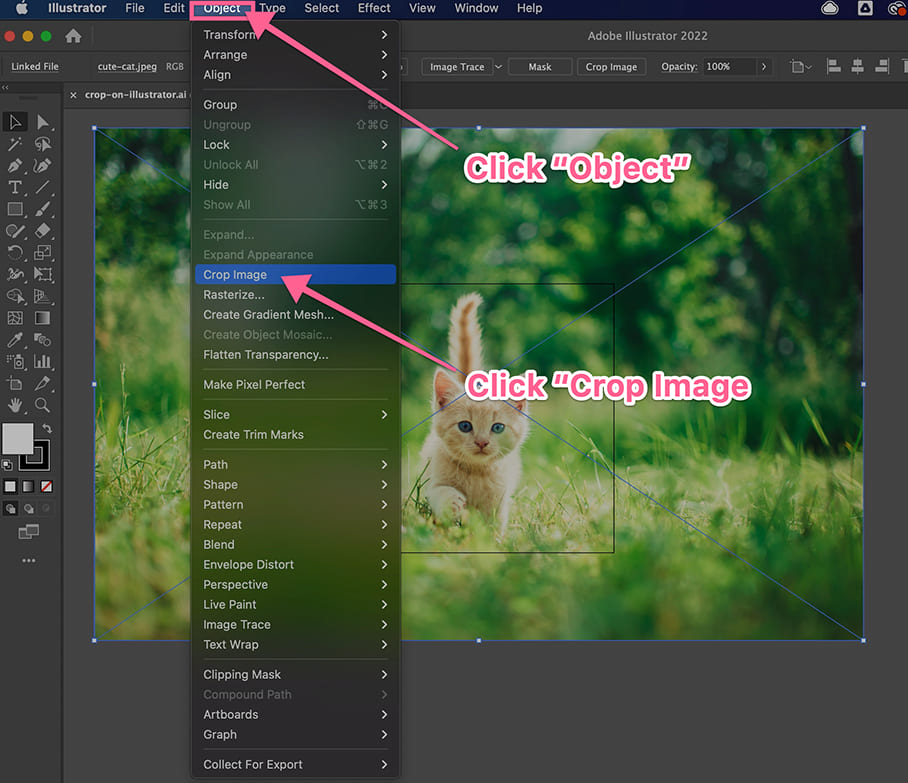
- Access the Function: Once the image is selected, the “Crop Image” button will appear in the Control Panel at the top of your screen (below the main menu bar). Click this button. Alternatively, you can go to
Object > Crop Imagefrom the top menu. - Address the Embedding Prompt: If your image was linked, Illustrator will display a prompt (e.g., “Cropping will embed the image. Original image file will not be changed.”). Click
OKto proceed. This ensures that the cropped version is saved within your Illustrator file, while the original high-resolution image on your computer remains untouched, a crucial detail for digital photography enthusiasts frequenting Tophinhanhdep.com.
- Access the Function: Once the image is selected, the “Crop Image” button will appear in the Control Panel at the top of your screen (below the main menu bar). Click this button. Alternatively, you can go to
-
Adjust the Cropping Area:
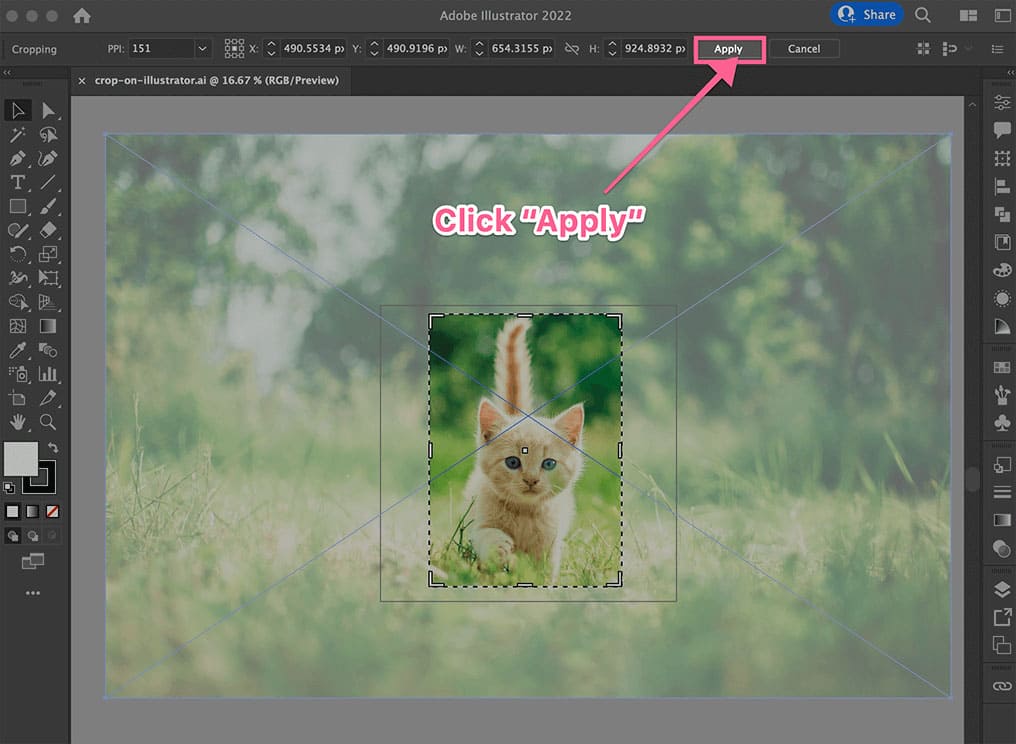
- Interactive Cropping Box: A distinct black-dotted bounding box with handles will appear around your image. This is your interactive cropping widget.
- Drag Handles to Define Crop: Click and drag any of the corner or side handles of this box inwards to define the desired cropping area. The lighter, transparent area outside the dotted lines represents the portion that will be removed. You can also click and drag inside the cropping box to reposition the image relative to the crop area. This granular control is excellent for fine-tuning aesthetic compositions, ensuring the focal point of your beautiful photography is perfectly framed. For instance, you might want to crop a nature photo to emphasize a particular flower or a specific detail in an abstract composition.
-
Apply the Crop:
- Finalize Your Selection: Once you are satisfied with the cropping area, click the
Applybutton, which typically appears above your image or in the Properties panel. - Observe the Result: Illustrator will immediately apply the crop, removing the unwanted areas. Your image is now precisely trimmed to your specifications. This optimized image can then be used directly in your visual design projects, or exported and processed through image compressors or optimizers available on Tophinhanhdep.com.
- Finalize Your Selection: Once you are satisfied with the cropping area, click the
This method is straightforward and highly efficient for rectangular or square crops, making it a go-to for most standard image manipulation tasks, from preparing backgrounds for websites to creating thumbnails for thematic collections.
Advanced Cropping with Clipping Masks: Unleashing Creative Shapes
While the “Crop Image” tool is excellent for rectangular crops, what if your visual design demands a more organic, irregular, or custom shape? This is where the Clipping Mask shines. The Clipping Mask is a powerful and flexible feature in Adobe Illustrator (and other vector applications featured on Tophinhanhdep.com) that works by using one object to “mask” or “crop” another, revealing only the parts of the underlying object that fall within the boundaries of the masking shape.
The beauty of the Clipping Mask lies in its non-destructive nature. Unlike the “Crop Image” function, a clipping mask doesn’t permanently delete the masked-out portions of your image. Instead, it merely hides them. This means you can always adjust both the masking shape and the underlying image even after the mask is applied, offering incredible flexibility for creative ideas and iterative graphic design. It’s a favorite technique for digital artists creating unique photo manipulation effects or aesthetic layouts with custom backgrounds.
Crafting Irregular Shapes with Precision
The primary advantage of Clipping Masks is the freedom to crop an image into virtually any shape you can draw in Illustrator. This extends far beyond simple circles or rectangles, enabling truly bespoke visual design.
-
Prepare Your Image and the Masking Shape:
- Place Your Image: Start with your raster image placed on your Illustrator artboard, just as you would for the “Crop Image” function. This could be a high-resolution nature photograph you want to frame uniquely, or an abstract pattern destined for a complex mood board.
- Create the Masking Shape: This is the creative part. Using any of Illustrator’s drawing tools, create the shape that you want your image to be cropped into.
- Standard Shapes: Use the
Rectangle Tool (M),Ellipse Tool (L),Polygon Tool, orStar Toolfor geometric crops. - Custom Shapes: For truly irregular or organic shapes (perfect for aesthetic digital art), use the
Pen Tool (P),Pencil Tool (N), orBlob Brush Tool (Shift + B). You can draw anything from a cloud shape to a complex, hand-drawn outline.
- Standard Shapes: Use the
- Position the Masking Shape: Crucially, the masking shape must be on top of the image (or group of images) you wish to crop. Use the
Selection Tool (V)to position your newly drawn shape over the area of the image you want to keep visible. To make this process easier, Tophinhanhdep.com recommends turning off theFilland giving the masking shape a contrastingStrokecolor so you can clearly see the underlying image. If your shape is behind the image, select it and go toObject > Arrange > Bring to Front (Shift + Command + ]/Shift + Control + ]).
-
Select Both Image and Shape:
- Select Both Objects: With the
Selection Tool (V), click on an empty area of your artboard and drag a marquee selection box that encompasses both your image and the masking shape. Alternatively, hold downShiftand click on both objects individually. Both objects should now have a blue outline.
- Select Both Objects: With the
-
Create the Clipping Mask:
- Apply the Mask: Go to
Object > Clipping Mask > Make. Alternatively, use the convenient keyboard shortcut:Command + 7(Mac) orControl + 7(Windows). - Observe the Result: Instantly, your image will be “cropped” to the shape of the masking object. Only the parts of the image that fall within the boundaries of your masking shape will be visible. The masked-out areas are now hidden.
- Apply the Mask: Go to
Preserving Original Image Data for Flexible Editing
The non-destructive nature of clipping masks is a huge advantage for visual designers and digital artists. If you decide later that your crop needs adjustment, you don’t have to start over from the original image file.
- Editing the Masking Shape: To change the crop’s outline, simply select the masked group (
Selection Tool (V)), then double-click the group to enter isolation mode, allowing you to select and modify the masking path with theDirect Selection Tool (A). You can reshape it, resize it, or move it. Exit isolation mode by pressingEscapeor double-clicking an empty area. - Editing the Masked Image: To reposition the image within the mask (e.g., to shift the focal point of a sad/emotional photograph or a vibrant nature scene), select the masked group, then double-click to enter isolation mode. Now, you can select the image itself and move or resize it independently of the mask. This is invaluable for refining composition and ensuring your beautiful photography stands out.
- Releasing the Mask: If you want to undo the clipping mask completely and revert to your original image and shape, select the masked group and go to
Object > Clipping Mask > Release.
Clipping masks are fundamental for creating complex visual designs, photo manipulations, and unique image collections. They allow for endless creative ideas, ensuring your aesthetic truly comes to life.
Dynamic Cropping with Opacity Masks: Blending Transparency and Form
Beyond sharp, defined crops, there are times in visual design when you need a softer edge, a subtle fade, or a blend that reveals the underlying background or artwork with varying degrees of transparency. This is precisely what an Opacity Mask (also known as a Transparency Mask) in Adobe Illustrator is designed for. At Tophinhanhdep.com, we recognize this as an advanced editing style that adds significant depth and artistry to digital art and photo manipulation.
The Opacity Mask uses grayscale values in a masking shape to control the transparency of the masked object. White areas in the masking shape make the underlying object completely opaque (visible), black areas make it completely transparent (invisible), and shades of gray create varying levels of translucency. This technique is non-destructive, much like the Clipping Mask, allowing for flexible adjustments.
-
Prepare Your Image and the Masking Shape:
- Place Your Image: Start with your raster image on the artboard. This could be a beautiful photography piece you want to subtly blend into a background, or an abstract element for a complex graphic design.
- Create the Masking Shape: Draw the shape you want to use as your opacity mask. This shape will define the area where transparency variations occur. It can be a simple rectangle, an irregular custom path created with the
Pen Tool, or even a gradient for a smooth fade effect. - Position the Masking Shape: Ensure this masking shape is placed directly on top of the image (or group of images) you intend to mask. Use
Object > Arrange > Bring to Frontif necessary.
-
Define Transparency with Grayscale Colors:
- Fill the Masking Shape: Select your masking shape. Now, assign a grayscale fill color to it.
- White (R=255, G=255, B=255): Any area of the mask filled with pure white will make the corresponding area of the underlying image fully opaque (100% visible).
- Black (R=0, G=0, B=0): Any area of the mask filled with pure black will make the corresponding area of the underlying image fully transparent (0% visible).
- Grays: Shades of gray will create intermediate levels of transparency. Lighter grays result in more opaque areas, darker grays in more transparent areas.
- Gradients: This is where the true power of Opacity Masks shines. Apply a black-to-white gradient to your masking shape (e.g., a Radial Gradient or Linear Gradient). This will create a smooth fade effect, blending your image into the background seamlessly, perfect for aesthetic wallpapers or artistic photo manipulation.
- Fill the Masking Shape: Select your masking shape. Now, assign a grayscale fill color to it.
-
Select Both Image and Masking Shape:
- Select Both Objects: Using the
Selection Tool (V), select both your raster image and the grayscale-filled masking shape.
- Select Both Objects: Using the
-
Create the Opacity Mask:
- Open the Transparency Panel: Go to
Window > Transparencyto open the Transparency panel. - Make Opacity Mask: In the Transparency panel, ensure both the image and the mask are selected. Then, click the
Make Maskbutton. - Clip Option: Within the Transparency panel, you’ll see a
Clipcheckbox. If checked, the opacity mask acts like a clipping mask, cropping the image to the boundaries of the mask shape before applying the transparency. This is often desirable for a cleaner edge. If unchecked, the entire image remains visible, with only transparency applied according to the mask’s grayscale values, which can be useful for blending effects.
- Open the Transparency Panel: Go to
-
Adjusting and Refining the Opacity Mask:
- Edit Mask or Image: In the Transparency panel, you’ll see two thumbnails: one for the masked object and one for the mask itself.
- Clicking the left thumbnail allows you to edit the masked object (e.g., move or resize the image).
- Clicking the right thumbnail allows you to edit the mask (e.g., change its shape, color, or gradient). This non-destructive editing is invaluable for experimenting with different editing styles and achieving the perfect visual design for your digital art.
- Release Mask: To remove the opacity mask, select the masked group and click
Release Maskin the Transparency panel.
- Edit Mask or Image: In the Transparency panel, you’ll see two thumbnails: one for the masked object and one for the mask itself.
Opacity masks offer a sophisticated way to “crop” and blend images, moving beyond simple cuts to create nuanced, layered visual designs. They are perfect for achieving soft transitions, vignette effects, or integrating sad/emotional themes with a ethereal blend, contributing significantly to the aesthetic quality of your work, a principle highly valued at Tophinhanhdep.com.
The Artboard Approach: Cropping for Export and Presentation
Sometimes, the “crop” you need isn’t about modifying the image itself within your Illustrator file, but rather about defining what gets included when you save or export your final artwork. This is where the Artboard method comes into play. The Artboard acts as your digital canvas, and what falls within its boundaries is typically what gets outputted. This technique is particularly useful for preparing wallpapers, backgrounds, or elements of graphic design for specific dimensions, ensuring that only the intended visual design is presented.
The Artboard method is a “quick and dirty” way of essentially cropping your final output, especially when you have a lot of “bleed” or extraneous elements outside your main design area (a common practice in print-ready visual design). It’s a non-destructive way to preview and export your work, preserving all your creative ideas and messy drafts within the Illustrator file. Tophinhanhdep.com emphasizes clean exports for high-resolution images and stock photos, and the Artboard method is a cornerstone of this practice.
Previewing Your Final Output with Trim View
Before exporting, you might want to see exactly how your artwork will look when trimmed to the artboard. Illustrator provides a convenient feature for this:
- Access Trim View: Go to
View > Trim Viewfrom the top menu bar. - Instant Preview: Instantly, all artwork and elements that extend beyond your current artboard boundaries will be temporarily hidden. You will only see what falls within the artboard.
- Non-Destructive: Remember, this is purely a visual preview. None of your artwork is actually deleted or cropped. You can still select and edit objects that are “hidden” by the Trim View. Toggling
View > Trim Viewon and off allows you to switch between your full workspace and the final output preview. This is invaluable for refining composition and ensuring your beautiful photography or graphic design perfectly fits the intended frame.
This feature is excellent for checking the final look of wallpapers and backgrounds before you commit to an export, helping you achieve a polished aesthetic that aligns with Tophinhanhdep.com’s standards.
Exporting with Artboard Boundaries for Optimized Results
The true power of the Artboard method for cropping lies in its export capabilities. You can ensure that your final output precisely matches your artboard’s dimensions, effectively “cropping” the exported file without altering your original Illustrator document. This is ideal for generating high-resolution images for websites, social media, or specific print sizes.
-
Adjust Your Artboard (if necessary):
- Select the Artboard Tool: Activate the
Artboard Tool (Shift + O)from your toolbar. - Resize Manually: Click and drag the handles of your artboard to manually resize it to encompass the exact area of your artwork you wish to “crop” for export.
- Precise Dimensions: With the Artboard Tool selected, you can also input precise
WidthandHeightvalues in the Control Panel at the top, or choose from preset sizes, which is perfect for creating custom backgrounds or wallpapers for specific devices. - Fit to Artwork/Selection: For maximum precision, you can also tell Illustrator to automatically adjust the artboard size to your artwork. Select the
Artboard Tool (Shift + O). Then, go toObject > Artboards. Here, you have options likeFit to Artwork Bounds(which resizes the active artboard to fit all visible artwork) orFit to Selected Art(which resizes the active artboard to fit only the currently selected objects). This is particularly useful for quickly defining a photo idea or a specific element of a visual design.
- Select the Artboard Tool: Activate the
-
Export Your Cropped Image:
- Go to Export Dialog: With your artboard set to the desired “cropped” area, go to
File > Export > Export As...orFile > Save for Web (Legacy)...(for web-optimized images, often preferred for wallpapers and backgrounds on Tophinhanhdep.com). - Crucial “Use Artboards” Option: In the
Export Asdialog box, make sure to check theUse Artboardscheckbox. This is the critical step that tells Illustrator to only export the content within the active artboard’s boundaries, effectively cropping your output. If you have multiple artboards, you can specify aRangeto export only certain ones. - Choose Format and Settings: Select your desired file format (e.g., JPEG for beautiful photography, PNG for transparent backgrounds, or SVG for vector graphics) and adjust any other export settings (quality, resolution, editing styles).
- Final Output: Click
Export. The resulting image file will be perfectly “cropped” to your artboard’s dimensions, ready for upload to Tophinhanhdep.com as a high-resolution image, or further processing with image compressors and optimizers from our Image Tools collection.
- Go to Export Dialog: With your artboard set to the desired “cropped” area, go to
This method is invaluable for final production, ensuring your visual designs, image collections, and trending styles are presented cleanly and professionally, perfectly matching the specified dimensions without permanently altering your working file. It’s a key technique for preparing visuals that are ready for any platform, from digital screens to print, always maintaining the aesthetic quality expected from Tophinhanhdep.com content.
Keyboard Shortcuts: Streamlining Your Cropping Workflow
Efficiency is key in graphic design and digital art. Learning keyboard shortcuts can significantly speed up your workflow when cropping and manipulating images in Adobe Illustrator. Tophinhanhdep.com always encourages users to master these shortcuts to enhance their productivity and creativity, especially when working on high-resolution images or complex photo manipulation projects.
Here’s a selection of useful shortcuts related to image cropping and manipulation in Illustrator:
- Selection Tool (V): Essential for selecting images, shapes, and other objects. This is your primary tool for initiating any cropping method.
- Direct Selection Tool (A): Crucial for editing individual anchor points and paths, especially when refining clipping masks or opacity masks.
- Place (Shift + Command + P / Shift + Control + P): The fastest way to import your stock photos, beautiful photography, or nature images onto your artboard.
- Rectangle Tool (M): Quickly draw rectangular shapes for basic clipping masks or the initial crop area.
- Ellipse Tool (L): For circular or oval-shaped clipping masks.
- Pen Tool (P): The ultimate tool for drawing custom, irregular shapes for advanced clipping masks and opacity masks, offering endless creative ideas.
- Make Clipping Mask (Command + 7 / Control + 7): The indispensable shortcut for applying a clipping mask.
- Artboard Tool (Shift + O): To select and manipulate your artboards, whether for manual resizing or fitting to artwork for export.
- Bring to Front (Shift + Command + ] / Shift + Control + ]): Ensures your masking shape is on top of your image before creating a clipping mask.
While the “Crop Image” function itself doesn’t have a default keyboard shortcut, you can often create custom shortcuts in Illustrator by going to Edit > Keyboard Shortcuts. This allows you to personalize your workspace and further streamline your visual design process.
Conclusion: Elevating Your Visuals with Expert Cropping Techniques
Cropping an image in Adobe Illustrator is far more than a simple trim; it’s a fundamental visual design skill that empowers you to control composition, focus attention, and adapt your visuals for diverse applications. Whether you’re a seasoned graphic designer or an aspiring digital artist, mastering Illustrator’s cropping tools is essential for producing professional-grade images.
As we’ve explored in this comprehensive guide from Tophinhanhdep.com, you have several powerful methods at your disposal:
- The “Crop Image” Function (CC 2017+): For quick, straightforward rectangular or square crops on raster images, ideal for refining wallpapers or backgrounds from beautiful photography.
- Clipping Masks: The versatile, non-destructive method for cropping images into any custom shape, unleashing your creative ideas for photo manipulation and unique aesthetic designs.
- Opacity Masks: An advanced technique for dynamic cropping with variable transparency, perfect for blending elements, creating soft fades, and adding artistic depth to digital art.
- The Artboard Method: A pragmatic approach for defining the final output area, ensuring clean exports of your high-resolution images for specific dimensions, from stock photos to thematic collections.
Each method offers unique advantages, catering to different editing styles and creative requirements. Tophinhanhdep.com encourages you to experiment with all of them, understanding when and why to choose one over another. By integrating these techniques into your workflow, you’ll not only enhance the visual appeal of your nature, abstract, or sad/emotional images but also streamline your production process.
Remember, a perfectly cropped image is often the foundation for further enhancement. Once your image is precisely framed, you can leverage other Image Tools highlighted on Tophinhanhdep.com, such as image compressors for web optimization, AI upscalers for enhancing resolution, or even prepare them for image-to-text analysis. The journey of transforming raw visuals into compelling visual design starts with a keen eye and the right cropping technique. Continue to explore, create, and inspire with Tophinhanhdep.com – your ultimate resource for image inspiration & collections and cutting-edge photography insights.