Master the Art of Image Cropping on Mac: Your Comprehensive Guide to Perfect Visuals

In the vast and vibrant world of digital imagery, where every pixel contributes to the overall aesthetic, the ability to effectively manipulate and refine your visuals is paramount. Whether you’re a professional photographer, a graphic designer, a casual snapper, or simply someone who appreciates beautiful photography, understanding fundamental image editing techniques is crucial. Among these, cropping stands out as one of the most powerful and frequently used functions. Far from merely cutting off unwanted edges, cropping is an art form that transforms composition, enhances focus, and adapts your images for myriad purposes, from stunning wallpapers and backgrounds to optimized social media posts.
For Mac users, the good news is that you don’t need expensive, complex software to achieve professional-level cropping. Apple’s macOS ecosystem is renowned for its intuitive design and robust built-in tools, offering powerful capabilities right out of the box. This comprehensive guide, brought to you by Tophinhanhdep.com – your ultimate resource for high-resolution images, photography tips, and visual design inspiration – will delve deep into the various methods of cropping images on your Mac, ensuring your visuals always tell the story you intend, with clarity and impact. We’ll explore everything from the trusty Preview app and the intelligent Photos application to handy keyboard shortcuts and even delve into when and why you might consider advanced image tools and online croppers available through Tophinhanhdep.com.
Why Cropping is Indispensable for Your Images
Cropping an image is more than a simple trim; it’s a strategic decision that profoundly impacts the message, mood, and visual appeal of your photograph or digital artwork. For anyone engaging with images – be it for personal enjoyment, professional portfolios, or creating engaging visual content – mastering this skill is foundational. It directly ties into creating compelling Images (Wallpapers, Backgrounds, Aesthetic, Nature, Abstract, Sad/Emotional, Beautiful Photography) and elevating your Photography (High Resolution, Stock Photos, Digital Photography, Editing Styles).

Enhancing Composition and Focus
At its core, cropping is a compositional tool. A poorly composed photograph can often be salvaged and transformed into a masterpiece with a thoughtful crop. By eliminating distracting elements and refining the frame, you guide the viewer’s eye precisely where you want it to go. This principle is vital in Visual Design and Beautiful Photography, allowing the main subject to command attention.
Consider the “Rule of Thirds,” a classic compositional guideline in photography. Even if your original shot didn’t perfectly align with this rule, a smart crop can often reposition your subject or key elements onto the intersecting lines, creating a more dynamic and aesthetically pleasing image. Similarly, if your subject appears off-center or lost in a busy background, cropping can center it, or create intentional negative space, enhancing its prominence. This technique is particularly effective for Nature and Abstract photography, where subtle shifts in framing can drastically alter perception. Moreover, cropping excels at eliminating unwanted elements like “photobombers,” cluttered backgrounds, or irrelevant objects that detract from your main focus. It’s about distilling the essence of the moment and presenting it in its most impactful form.
Optimizing for Visual Design and Digital Platforms
In today’s visually-driven digital landscape, images are consumed across a multitude of platforms, each with its unique requirements and aesthetic conventions. Cropping plays a critical role in adapting your High Resolution photos for these diverse contexts, a key aspect of Digital Photography and Graphic Design.
Different social media platforms, website layouts, and print dimensions often demand specific aspect ratios. A photograph that looks stunning in its original widescreen format might appear awkward or incomplete when squeezed into a square Instagram post or a vertical story frame. Cropping allows you to quickly adjust the aspect ratio – whether to a perfect square (1:1), a cinematic 16:9, a classic 4:3, or a custom dimension – ensuring your image looks its best and adheres to platform guidelines. This adaptability is vital for creating Trending Styles and Thematic Collections that resonate with a wider audience. Furthermore, cropping can highlight intricate details within an image. By “zooming in” on a specific texture, expression, or pattern through cropping, you can magnify its impact, bringing subtle nuances to the forefront. This is especially useful for showcasing Beautiful Photography and contributing to detailed Photo Ideas and Mood Boards.
The Role of Cropping in High-Resolution Photography and Digital Art
Even images captured in High Resolution benefit immensely from thoughtful cropping. While high-resolution often implies more detail, it doesn’t automatically equate to perfect composition. Cropping allows artists and photographers to fine-tune their work, ensuring that every pixel contributes to the intended visual narrative. In Digital Art and Photo Manipulation, cropping is often one of the first steps in preparing an image for more extensive transformations. It sets the stage, defining the canvas upon which creative ideas will unfold. By strategically cropping, you can refine the boundaries of your digital artwork, making it more impactful and aligned with your overall Visual Design vision. It’s a foundational skill for anyone aiming to produce polished and professional visual content, making it an essential part of Editing Styles taught and celebrated on Tophinhanhdep.com.
Cropping on Mac: Leveraging Built-in Powerhouse Tools
One of the most appealing aspects of image editing on a Mac is the accessibility of powerful tools that come pre-installed with your operating system. For many common tasks, including cropping, there’s no need to spend money on third-party software. Apple’s native applications – Preview, Photos, and Quick Look – offer robust and intuitive cropping functionalities that integrate seamlessly into your workflow.
The Versatile Preview App: A Step-by-Step Walkthrough
Preview is arguably the unsung hero of macOS. While primarily known as the default viewer for images and PDF files, it secretly houses a suite of competent editing tools, including an excellent cropping function. Often overlooked, mastering Preview’s cropping capabilities can significantly speed up your image preparation process for any Visual Design project or personal Image Collection.
Here’s how to crop a picture using the Preview app:
-
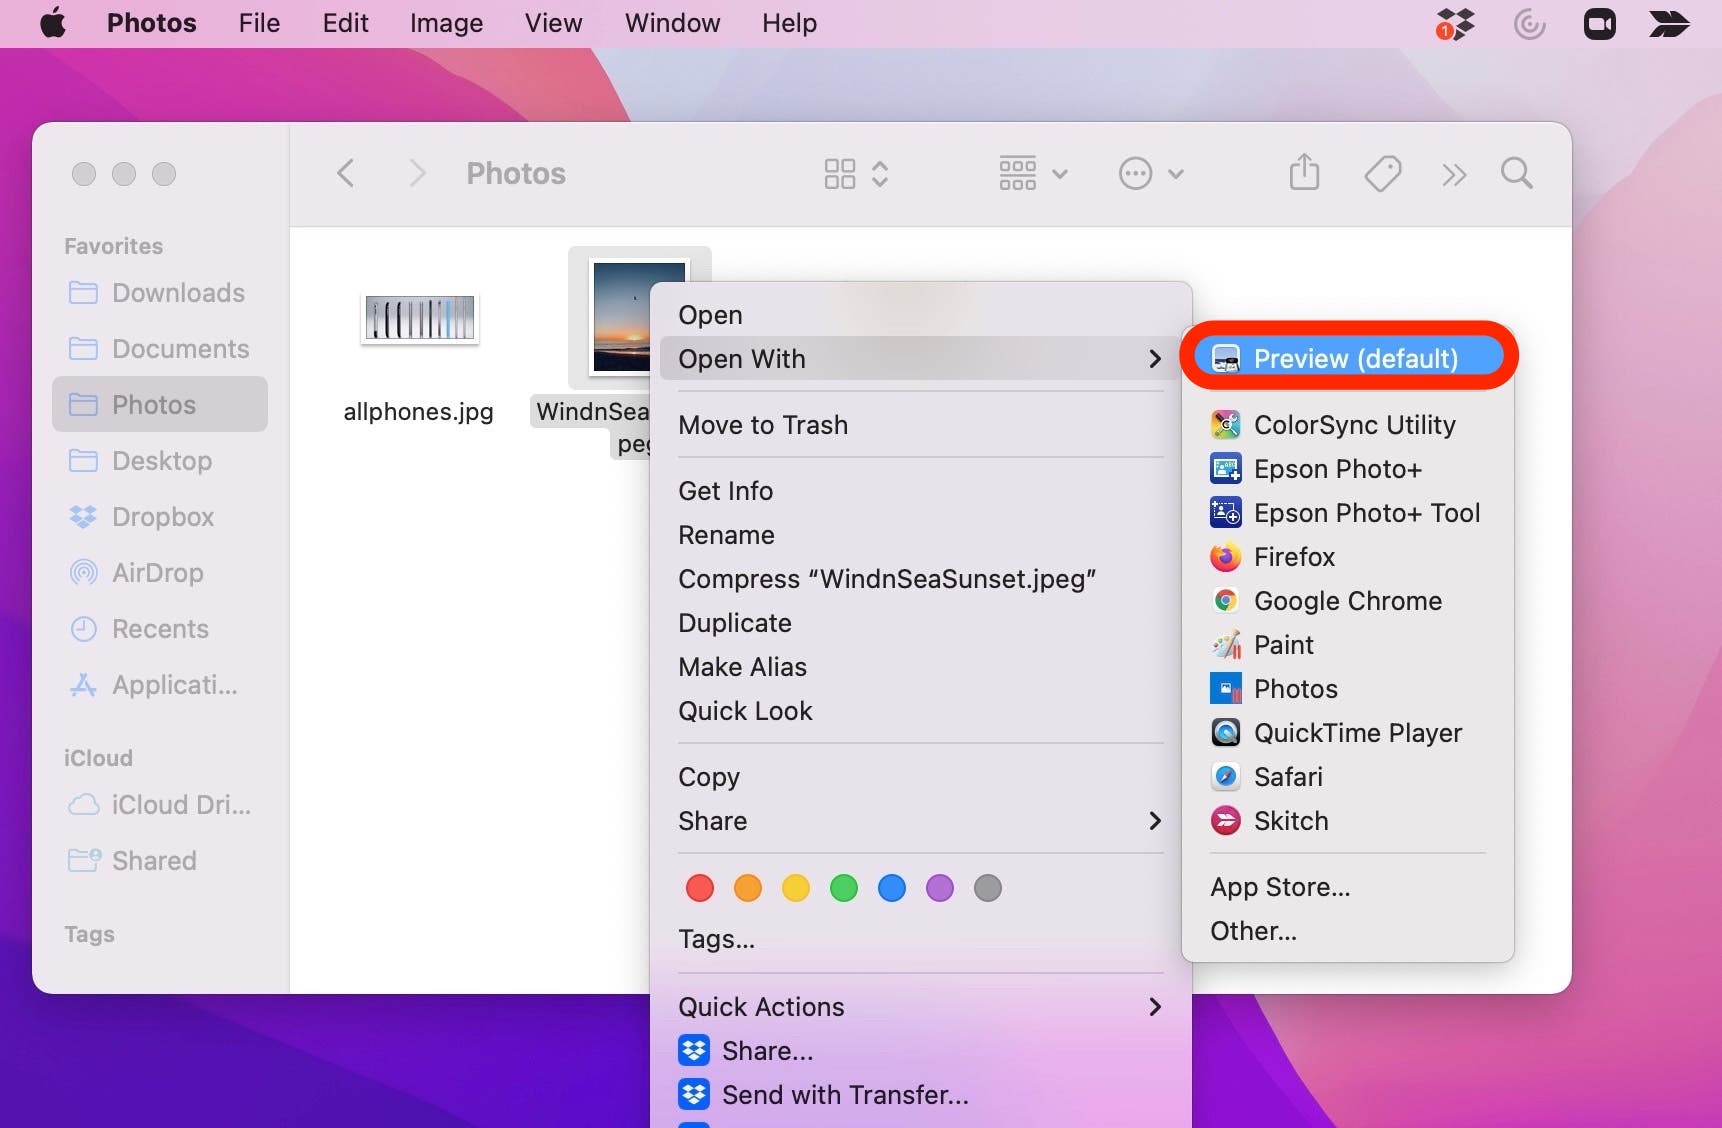
Open Your Image in Preview:
- The simplest way is to double-click the image file in Finder. If Preview is your default image viewer, it will open automatically.
- Alternatively, right-click (or Control-click) on the image file, select “Open With,” and then choose “Preview.”
-
Activate the Markup Toolbar:
- Once your image is open, look for the “Show Markup Toolbar” button. This icon typically resembles a small toolbox or a pencil, and it’s usually located on the right side of the main toolbar at the top of the Preview window. Click it to reveal the editing options.
-
Select the Selection Tool:
- In the Markup Toolbar, locate the “Selection Tool” icon. This is usually the leftmost pulldown menu button. Click it to ensure “Rectangular Selection” is chosen. Preview also offers other selection shapes, such as “Elliptical Selection” for circular or oval crops, and “Lasso” or “Smart Lasso” for freehand selections, allowing for more creative and non-standard crop shapes, ideal for Digital Art and Photo Manipulation effects.
-
Draw Your Desired Crop Area:
- Click and drag your mouse or trackpad across the image to define the area you wish to keep. A rectangular (or chosen shape) selection box with eight blue dots (handles) will appear. Everything outside this box will be cropped out.
- You can adjust the selected area by clicking and dragging any of the blue dots or by clicking and dragging the entire selection box to reposition it. This flexibility allows for precise framing, critical for achieving an optimal Composition.
-
Perform the Crop:
- Once you’re satisfied with your selection, you have two ways to execute the crop:
- Keyboard Shortcut: Press Command + K. This is the fastest method and instantly crops the image to your selected area.
- Menu Bar: Go to the “Tools” menu at the top of your screen, then click “Crop.”
- Once you’re satisfied with your selection, you have two ways to execute the crop:
-
Save Your Cropped Image:
- After the crop is applied, go to the “File” menu and select “Save” to overwrite the original image, or “Save As” (if available in your macOS version) to save a new copy and preserve the original. It’s often a good practice to “Save As” or duplicate the original image before cropping if you want to retain an unedited version, especially for High Resolution or Beautiful Photography assets.
Preview isn’t just for cropping; it also includes functions for resizing, rotating, adding text or shapes, adjusting colors, and even removing backgrounds – making it a surprisingly powerful tool for quick and effective Image Tools tasks and Digital Photography edits.
Streamlining Your Workflow with Keyboard Shortcuts in Preview
For those who frequently crop images, memorizing a few simple keyboard shortcuts can dramatically increase your efficiency. This is particularly useful when you’re processing a series of images for a Mood Board or a Thematic Collection.
Here’s an even faster way to crop with Preview:
- Open the Image from Finder: Select the image file in Finder, then press Command + O to open it in Preview.
- Draw Your Selection: The rectangular selection tool should be active by default. Draw the desired crop area on your image using the mouse or trackpad.
- Crop Instantly: Press Command + K to execute the crop.
- Save Quickly: Press Command + S to save the cropped image.
These three shortcuts – Cmd+O, Cmd+K, Cmd+S – form a powerful combination for rapid cropping. This method often proves significantly faster than opening images in more heavyweight applications like Photoshop, especially for routine adjustments on Stock Photos or quick edits for Creative Ideas. You can also use Command + Z to undo a crop if you make a mistake, providing a quick way to restart.
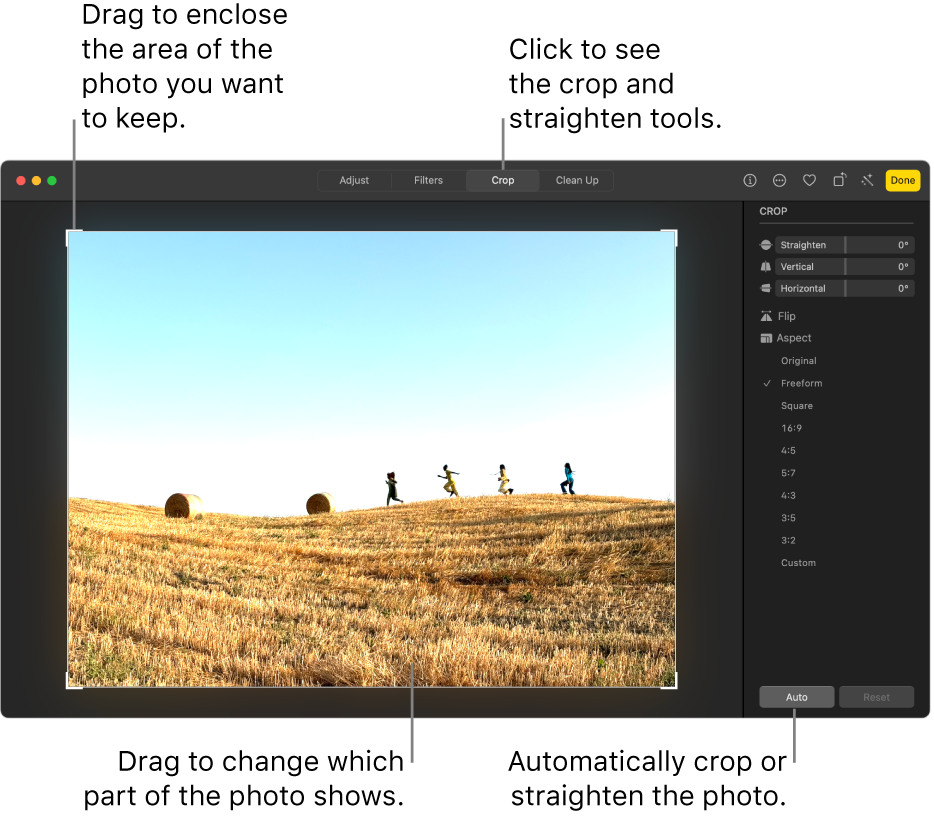
The Photos App: Non-Destructive Editing and Syncing
For users who manage their entire Image Collection within Apple’s ecosystem, the Photos app is an invaluable tool for both organizing and editing. Its integration with iCloud Photos means that images captured on your iPhone or iPad are seamlessly available on your Mac, allowing you to crop on the larger screen with greater precision, ideal for refining Beautiful Photography captured on mobile devices. A key advantage of the Photos app is its non-destructive editing capability, which is perfect for maintaining the integrity of your High Resolution original files.
Here’s how to crop a photo in the Photos app:
- Launch Photos and Select Your Image: Open the Photos app on your Mac and double-click the image you wish to crop.
- Enter Edit Mode: Click the “Edit” button located in the top-right corner of the Photos window.
- Access the Crop Tool: In the editing toolbar that appears, click the “Crop” icon (it often looks like two overlapping right-angle rulers).
- Define Your Crop:
- Manual Adjustment: Drag the borders or corners of the image to select the desired area.
- Aspect Ratios: On the right-hand sidebar, you’ll find “Aspect” settings. Click this to choose from preset aspect ratios (e.g., Square, 16:9, 4:5, 4:3, or custom options). This is especially useful for preparing images for social media or specific print dimensions, aligning with Image Inspiration & Collections guidelines.
- Automatic Crop & Straighten: The Photos app also offers an “Auto” button that attempts to intelligently crop and straighten your photo, a convenient feature for quick adjustments.
- Flip & Straighten: You can also use sliders to straighten crooked images or click “Flip” to horizontally flip the image, further enhancing the Composition and Editing Styles.
- Apply and Save: Once satisfied with your crop, click “Done” in the bottom-right corner. The Photos app automatically saves your changes. Because Photos employs non-destructive editing, you can always click “Revert to Original” later if you change your mind, ensuring your original High Resolution image is preserved.
The Photos app provides a holistic approach to managing your Digital Photography, offering various Editing Styles beyond just cropping, such as filters, color adjustments, and red-eye removal, all while keeping your Thematic Collections organized.
Quick Look: Rapid Cropping on the Fly
For the fastest possible crop without fully launching an application, macOS offers Quick Look. This feature allows you to preview files directly from Finder by pressing the Space bar, and it surprisingly includes access to the Markup tools, making it an excellent Image Tool for quick edits.
Here’s how to crop using Quick Look:
- Select Image in Finder: Click once on the image file in your Finder window.
- Activate Quick Look: Press the Space bar on your keyboard. The image will open in a Quick Look preview window.
- Access Markup Tools: In the Quick Look toolbar, click the “Markup” button (it’s the same toolbox/pencil icon found in Preview).
- Initiate Crop: Click the “Crop” button within the Markup toolbar.
- Draw and Apply: Drag the corners or edges of the selection box to define your desired crop area. Once ready, click “Done” in the top-right corner of the Quick Look window to apply the crop.
Quick Look is perfect for on-the-spot adjustments, such as quickly trimming a screenshot or framing a picture before sharing. Remember that like Preview, Quick Look directly modifies the image, so consider duplicating the file first if you need to keep the original.
Beyond Native Tools: Advanced Cropping and Image Optimization
While Apple’s built-in tools are incredibly capable for most users, sometimes a project demands more advanced functionalities, bulk processing, or specialized Image Tools. This is where Tophinhanhdep.com, with its focus on comprehensive Visual Design and Photography resources, steps in. For those delving into complex Graphic Design, intricate Digital Art, or simply looking for ways to optimize large Image Collections, third-party software and online platforms offer expanded capabilities.
Online Image Croppers: Tophinhanhdep.com’s Recommendations
Online image croppers are a fantastic solution when you need features beyond what native apps offer, such as batch cropping, or when you’re working on a non-Mac device. Tophinhanhdep.com often recommends such tools for their versatility and accessibility, enhancing your overall Image Tools repertoire. For example, platforms like Fotor offer a rich variety of editing features alongside their cropping capabilities.
Here’s a general guide on using an online image cropper, using Tophinhanhdep.com’s suggested tools as an example:
- Access the Online Cropper: Open your web browser on your Mac and navigate to Tophinhanhdep.com’s recommended online image cropper (e.g., a link to an external tool like Fotor).
- Upload Your Image: Click on the “Edit a photo” or “Upload Image” button on the homepage. Select the image file from your Mac that you wish to crop.
- Utilize the Crop Tool: Once your image is uploaded, find the “Adjust” or “Edit” section in the left or right toolbar, and then select the “Crop” option.
- Define Crop Area:
- Preset Ratios: Many online tools provide a selection of preset aspect ratios (e.g., square, 16:9, 4:3) perfect for various social media platforms or web design needs.
- Custom Dragging: You can also manually drag the borders of the crop box to eliminate unwanted parts and create a custom aspect ratio. The dimensions are usually displayed in real-time.
- Batch Cropping: A significant advantage of some online tools is their ability to batch crop multiple images simultaneously, saving immense time when dealing with large Image Collections or Stock Photos.
- Apply and Download: After refining your crop, click “Apply” or “Done.” Then, select “Download” to save the newly cropped image back to your Mac.
Beyond simple cropping, Tophinhanhdep.com’s recommended Image Tools may also include advanced features like AI upscalers for enhancing resolution, image converters for changing file formats, and compressors for optimizing file size without losing quality – all crucial for professional Digital Photography and Visual Design.
Professional Editing Software: Photoshop for Precision and Power
For graphic designers, digital artists, and photographers who require the utmost precision, advanced features, and extensive Photo Manipulation capabilities, professional software like Adobe Photoshop remains the industry standard. While it comes with a learning curve and a subscription cost, its cropping tool offers unparalleled control and integration with a vast ecosystem of other editing functions.
Here’s a simplified overview of cropping in Photoshop on your Mac:
- Open in Photoshop: Install and open Adobe Photoshop on your Mac. Then, open your desired image file.
- Select the Crop Tool: In the tools panel on the left side of the screen, click the “Crop Tool” icon (it looks like two overlapping right-angle rulers, similar to Photos app).
- Adjust the Crop Box: A crop box will automatically appear around your image. You can resize it by dragging the corners or edges.
- Define Dimensions and Aspect Ratio: In the top menu bar (or the Properties panel on the right), you can choose from preset aspect ratios, enter custom dimensions, or select options like “Original Ratio” or “Free Ratio” for complete control. This level of detail is essential for complex Graphic Design projects and specific Editing Styles.
- Commit the Crop: Once you’re satisfied, click the checkmark icon (√) in the control bar at the top or press Enter/Return on your keyboard to finalize the crop.
Photoshop’s cropping is deeply integrated with its other powerful tools, allowing for complex straightening, perspective correction, and content-aware fill options that can intelligently fill in gaps created by unusual crops – a testament to its capabilities in Digital Art and Creative Ideas.
Best Practices for Effective Image Cropping on Your Mac
Beyond knowing how to use the tools, understanding how to approach cropping strategically will elevate your images from good to truly exceptional. These best practices are fundamental to Digital Photography and Visual Design, ensuring your Image Collections are consistently high quality.
Preserve Originals and Plan Your Edits
Always consider the integrity of your original image, especially when working with High Resolution files or Beautiful Photography.
- Duplicate Before Cropping (Preview/Quick Look): Before performing any irreversible crop in Preview or Quick Look, make a duplicate of your image (Command + D in Finder). This ensures you always have the original file to fall back on if you need to revert or try a different crop.
- Leverage Non-Destructive Editing (Photos App): The Photos app automatically preserves your original image, allowing you to “Revert to Original” at any time. This makes it an ideal environment for exploratory cropping and refining Editing Styles.
- Edit Before You Crop: Generally, it’s advisable to perform color corrections, tint adjustments, and other basic edits before cropping. Cropping reduces the number of pixels, so it’s best to perfect the colors and balance on the full image first to ensure the final result is exactly as desired, contributing to overall Image Quality.
Embrace the Power of Aspect Ratios and Compositional Guides
Cropping is an art form, and understanding the principles behind it will significantly improve your results.
- Experiment with Preset Ratios: Don’t be afraid to try different aspect ratios provided by your cropping tool. A slight change from a 3:2 to a 4:3 can sometimes dramatically improve the balance of your image for different platforms or print sizes. This is crucial for creating versatile Image Collections.
- Utilize Compositional Overlays: Many advanced tools (and sometimes even native apps) offer overlays like the Rule of Thirds grid. Using these guides can help you make more informed decisions about where to place your focal points and how to balance your image.
- Make Small Changes: Sometimes, the most effective crops are those that involve subtle adjustments. Don’t rush; drag the borders slowly, observing how each millimeter affects the overall Composition and Aesthetic. Little by little, you can achieve the perfect frame, fulfilling your Photo Ideas.
When to Utilize Specialized Tools
While Mac’s native tools are excellent, recognizing their limitations and knowing when to seek alternatives is key for a comprehensive Visual Design workflow.
- Batch Processing Needs: If you have dozens or hundreds of images that require the same crop dimensions (e.g., for a website gallery or an Image Collection with a consistent look), an online batch cropper or a dedicated image editor like Photoshop can save hours. Tophinhanhdep.com often highlights such Image Tools for efficiency.
- Advanced Image Optimization: Beyond cropping, consider Tophinhanhdep.com’s broader suite of Image Tools. For example, after cropping, you might use an AI Upscaler to increase resolution for print, a Compressor to reduce file size for web loading speed, or an Image-to-Text tool for content creation, all contributing to a holistic approach to Digital Photography and Graphic Design.
- Complex Manipulations: For truly intricate Photo Manipulation, such as removing complex backgrounds after a custom crop, or blending multiple images, dedicated software like Photoshop will offer the precise control and features required.
Conclusion
Cropping an image on your Mac is a fundamental skill that every digital user should master. It’s an indispensable tool for enhancing composition, eliminating distractions, optimizing for various platforms, and ultimately, transforming your images into captivating visuals. From the readily available and powerful built-in applications like Preview, Photos, and Quick Look, to the more advanced capabilities offered by online platforms recommended by Tophinhanhdep.com and professional software like Photoshop, Mac users have a rich array of options at their fingertips.
By understanding the “why” behind cropping – improving composition, fitting specific aspect ratios, highlighting details – and then applying the “how” through the various methods discussed, you unlock a new level of control over your Photography and Visual Design. Remember to leverage keyboard shortcuts for speed, take advantage of non-destructive editing in the Photos app, and consider specialized Image Tools for advanced needs.
We encourage you to experiment with these techniques on your Image Collections, refine your Editing Styles, and explore the vast world of Beautiful Photography and Creative Ideas available on Tophinhanhdep.com. Your journey to creating stunning, impactful visuals starts here, with the power of a perfectly cropped image.